Coffee Station - Comprehensive Assembly Plan And Visual Guide
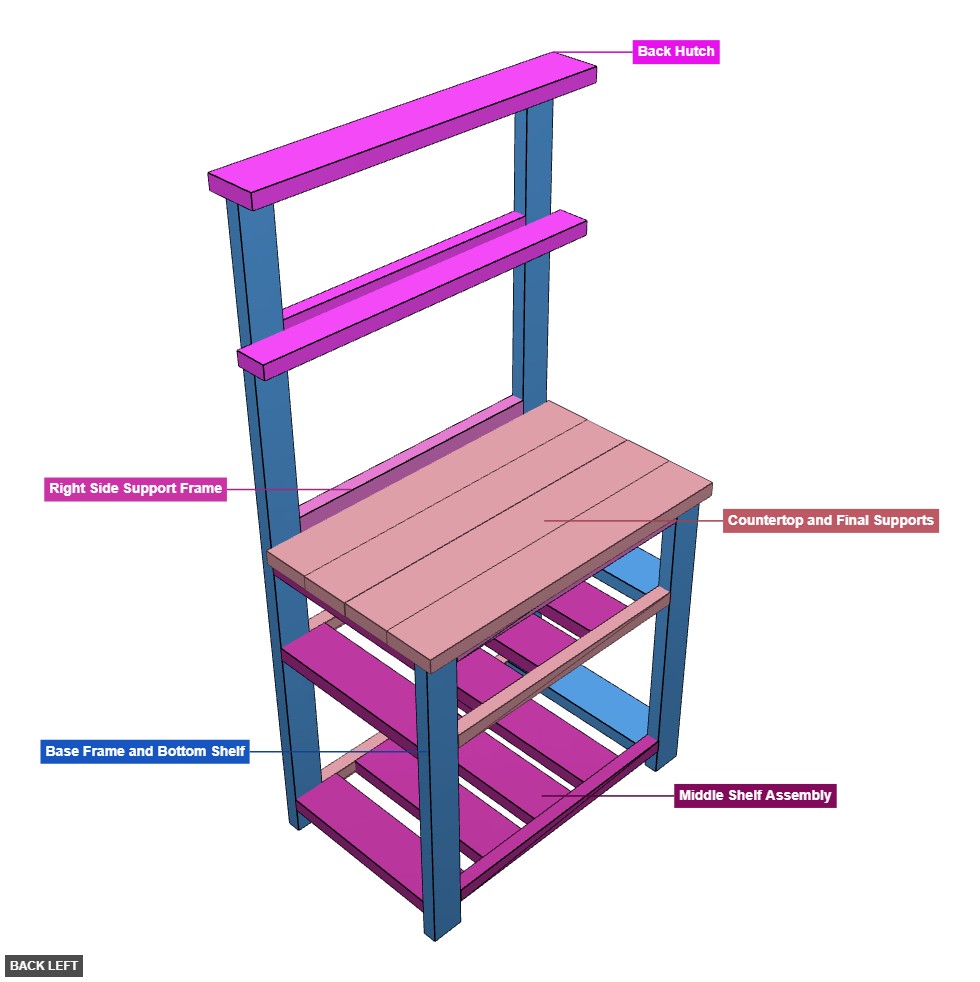
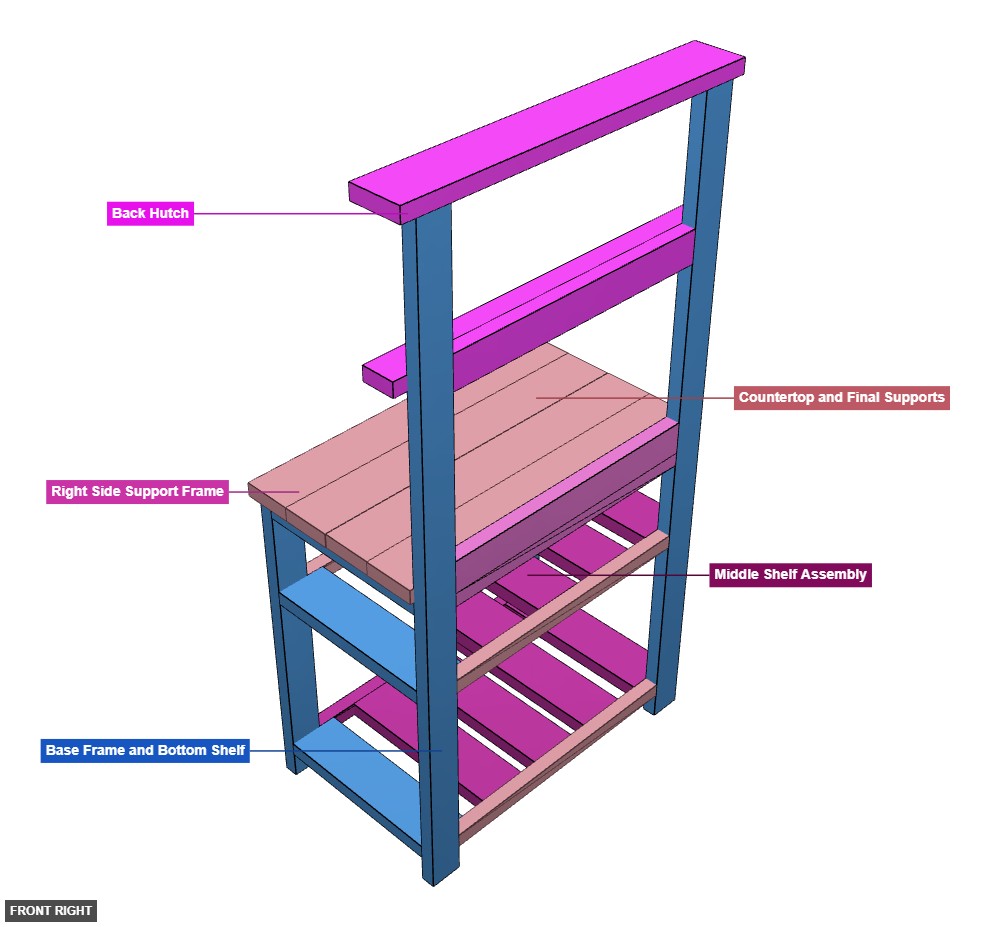
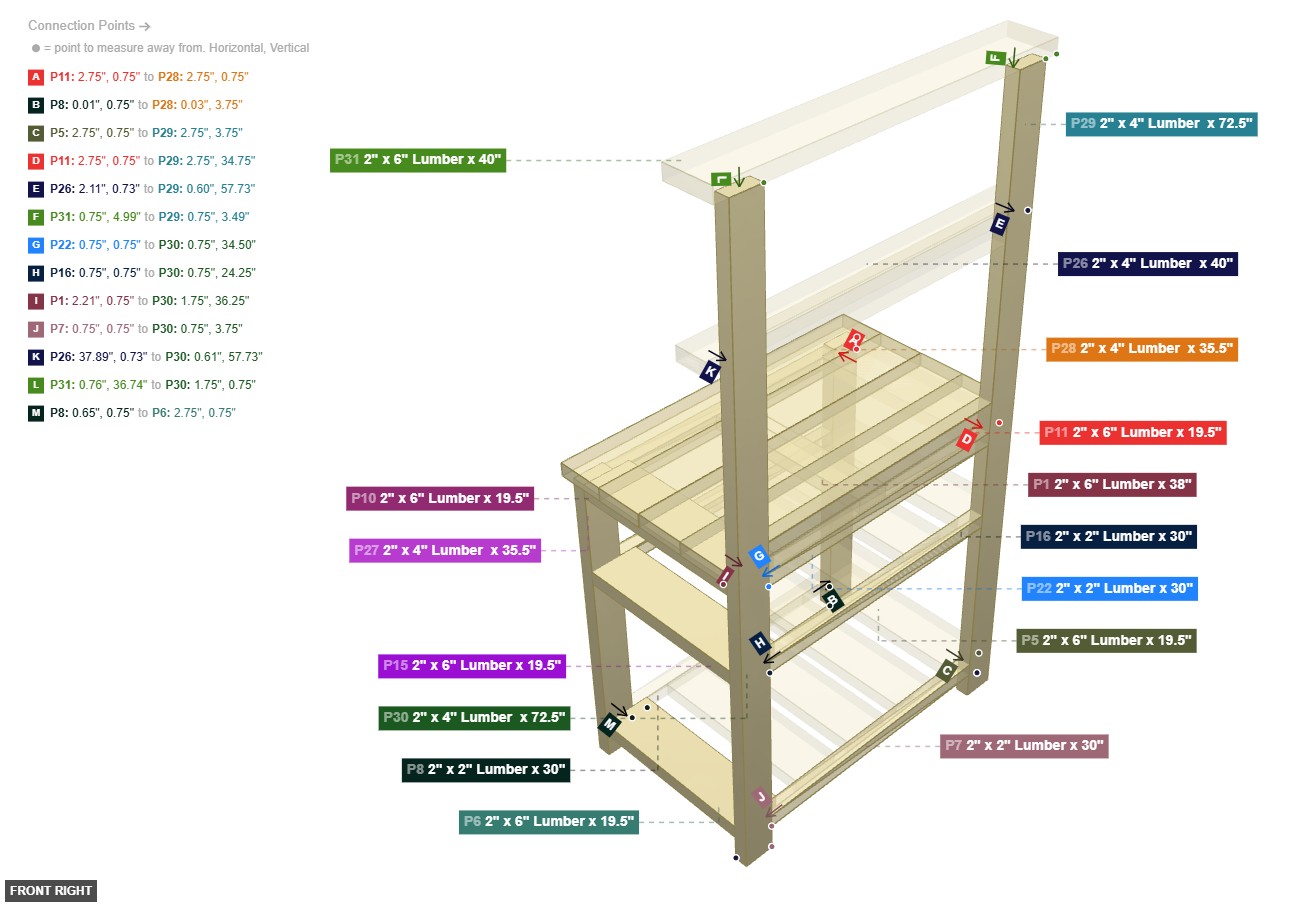
A multi-tiered wooden coffee station or kitchen cart, featuring a main countertop, two lower shelves for storage, and a tall hutch-like structure extending from the back. - Coffee Station
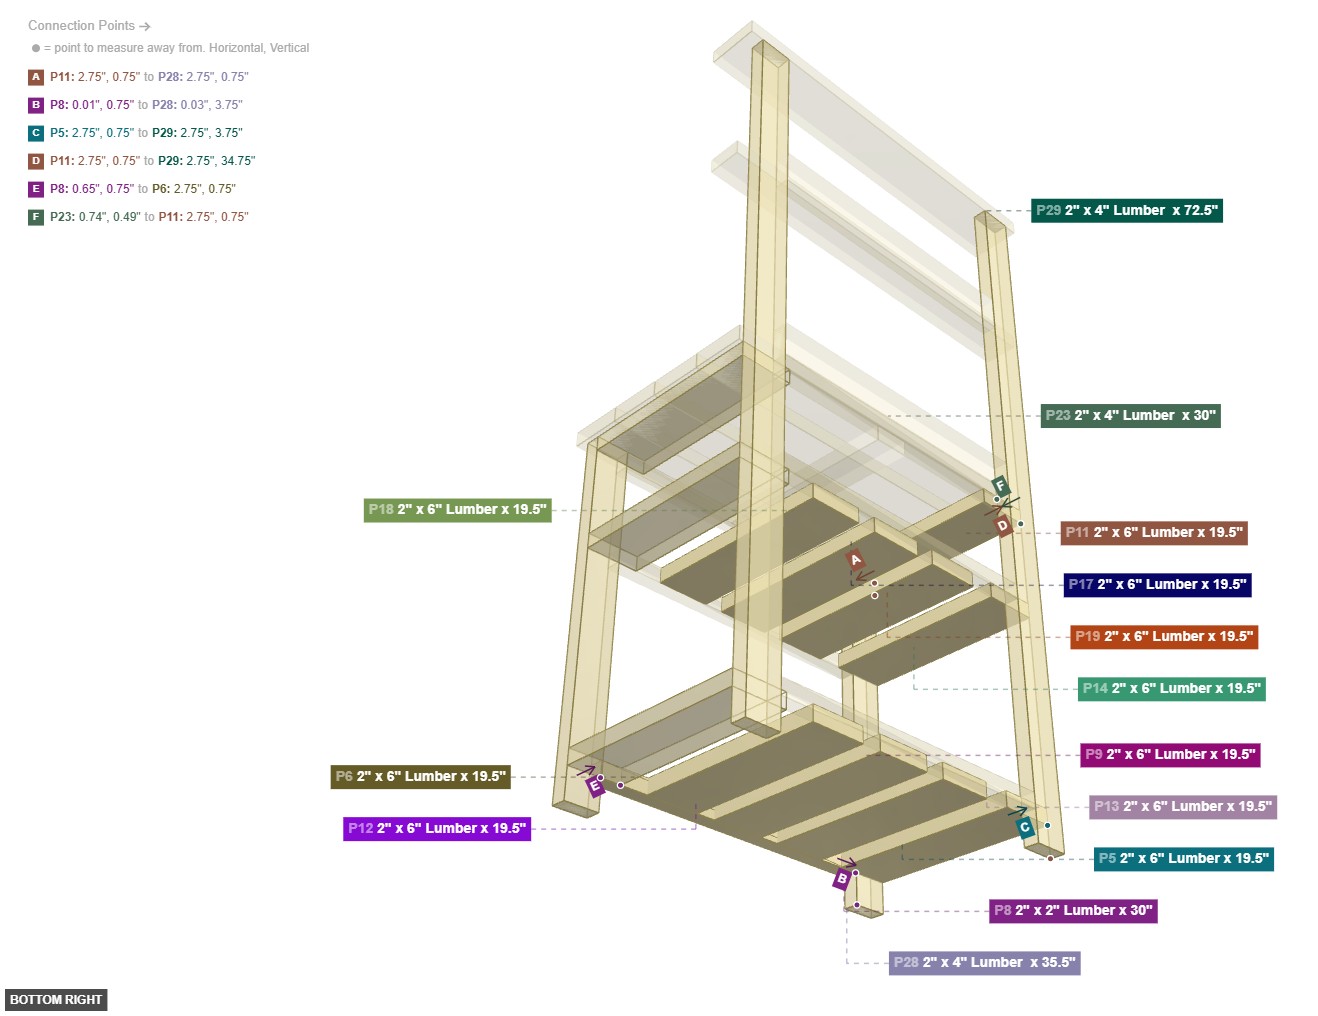
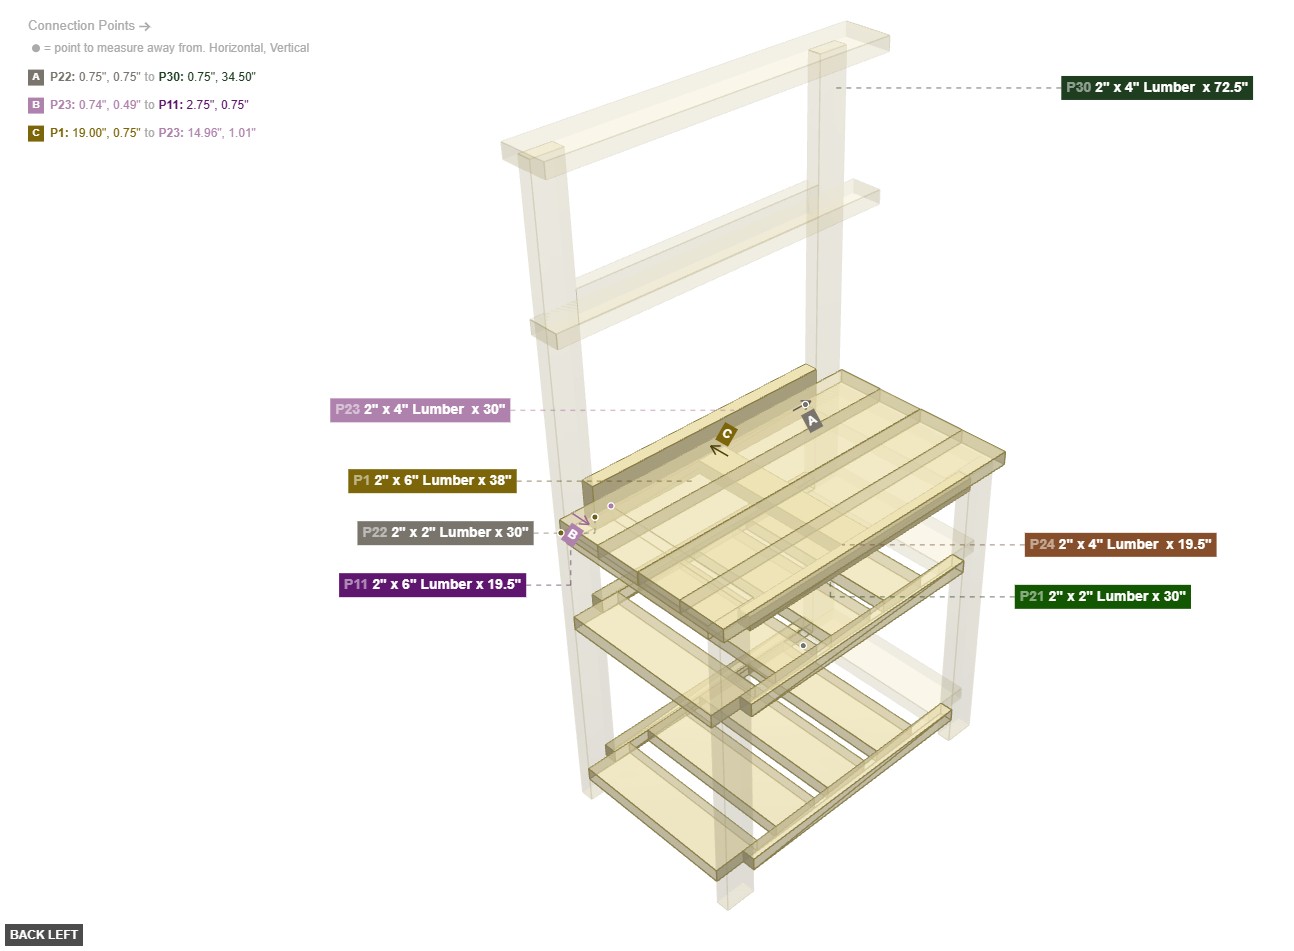
Phase 1: Group Overview
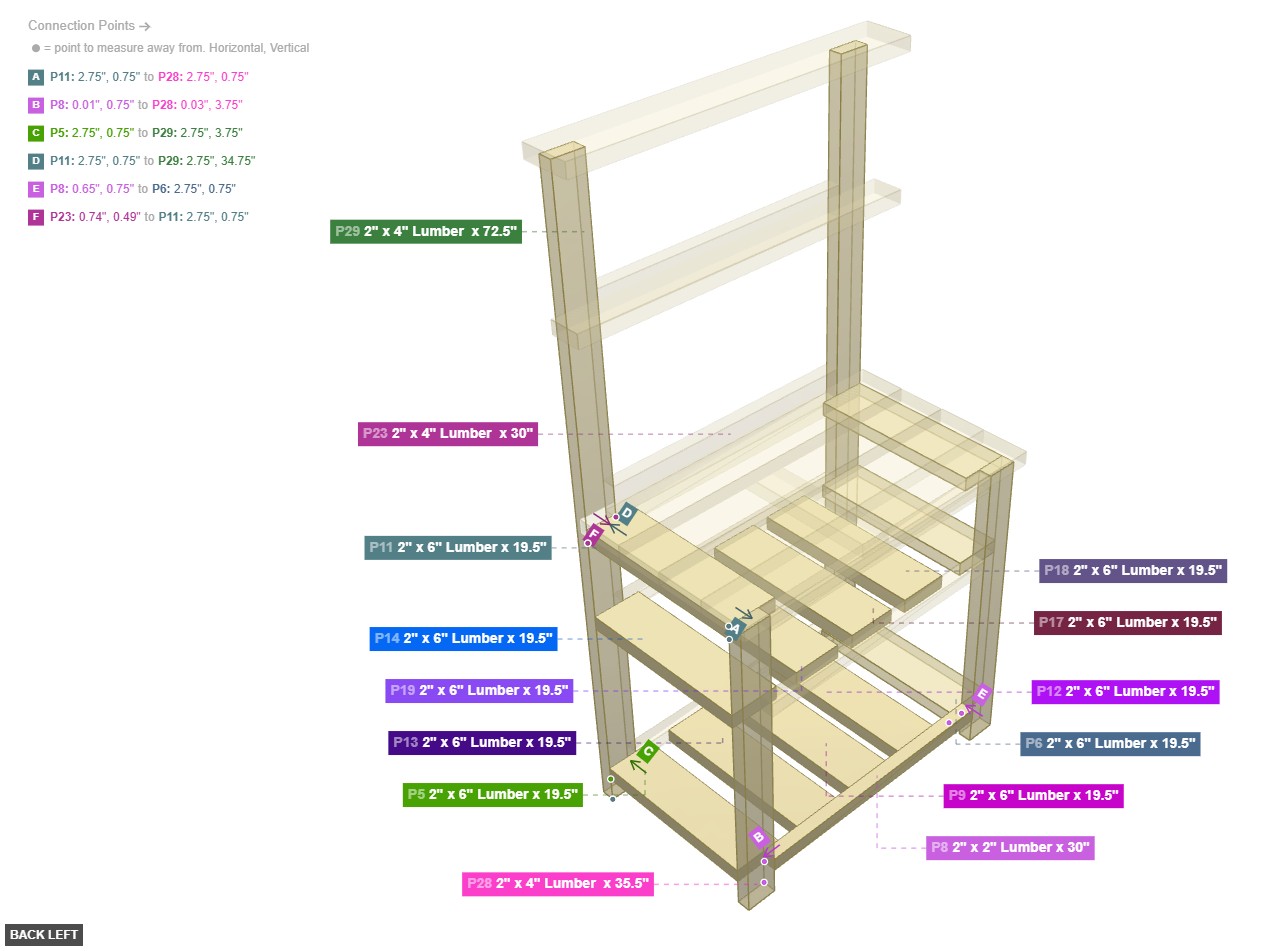
Angle: back left

Base Frame and Bottom Shelf
 2" x 4" Lumber x 35.5"x 2
2" x 4" Lumber x 72.5"x 2  2" x 6" Lumber x 19.5"x 3
Middle Shelf Assembly
 2" x 2" Lumber x 30"x 1
2" x 6" Lumber x 19.5"x 9 Right Side Support Frame
2" x 2" Lumber x 30"x 2 2" x 4" Lumber x 30"x 1 2" x 4" Lumber x 19.5"x 1 Countertop and Final Supports
2" x 6" Lumber x 38"x 4 2" x 2" Lumber x 30"x 3 Back Hutch
2" x 4" Lumber x 30"x 1 2" x 4" Lumber x 40"x 1 2" x 6" Lumber x 40"x 1
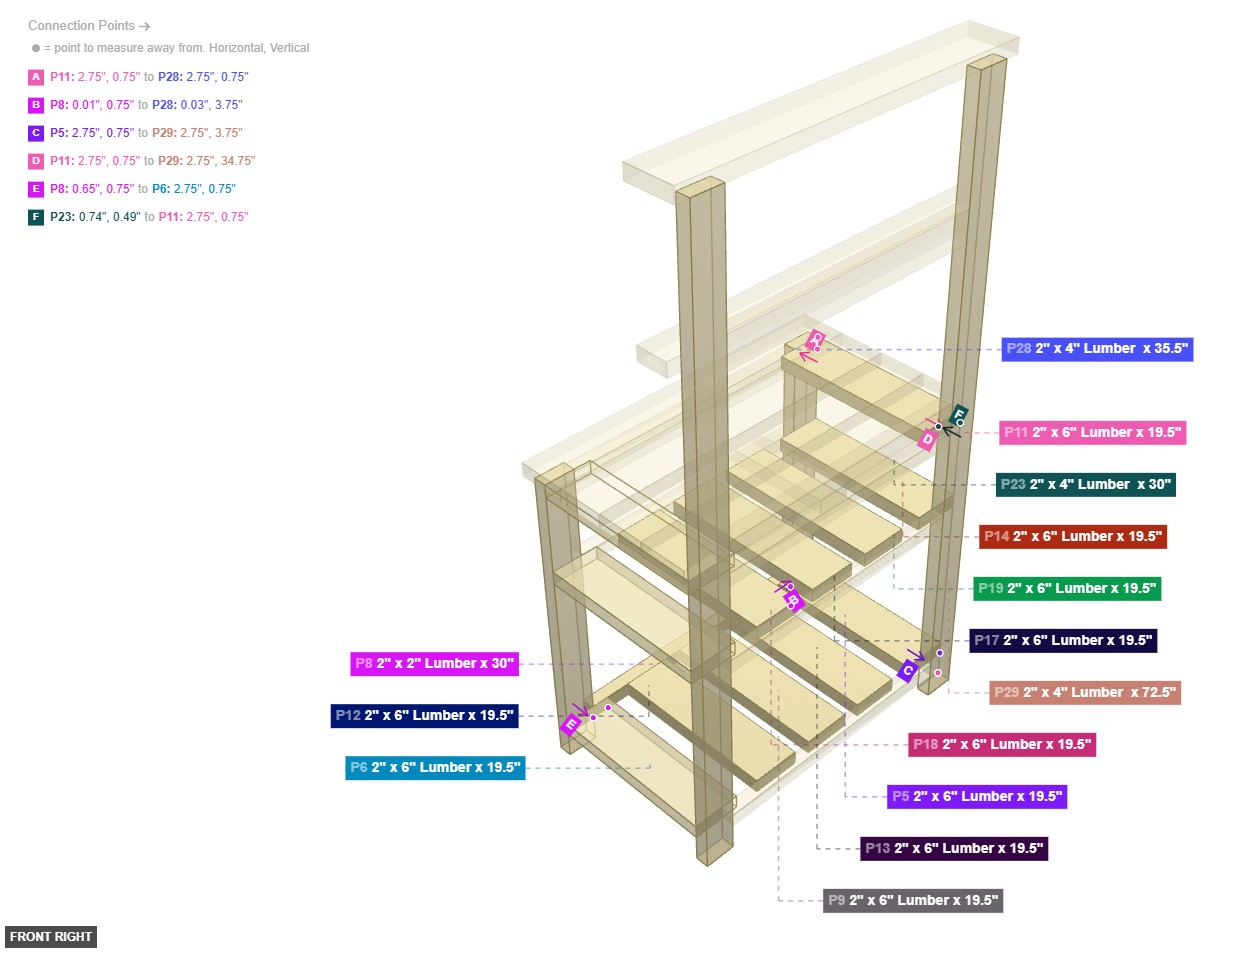
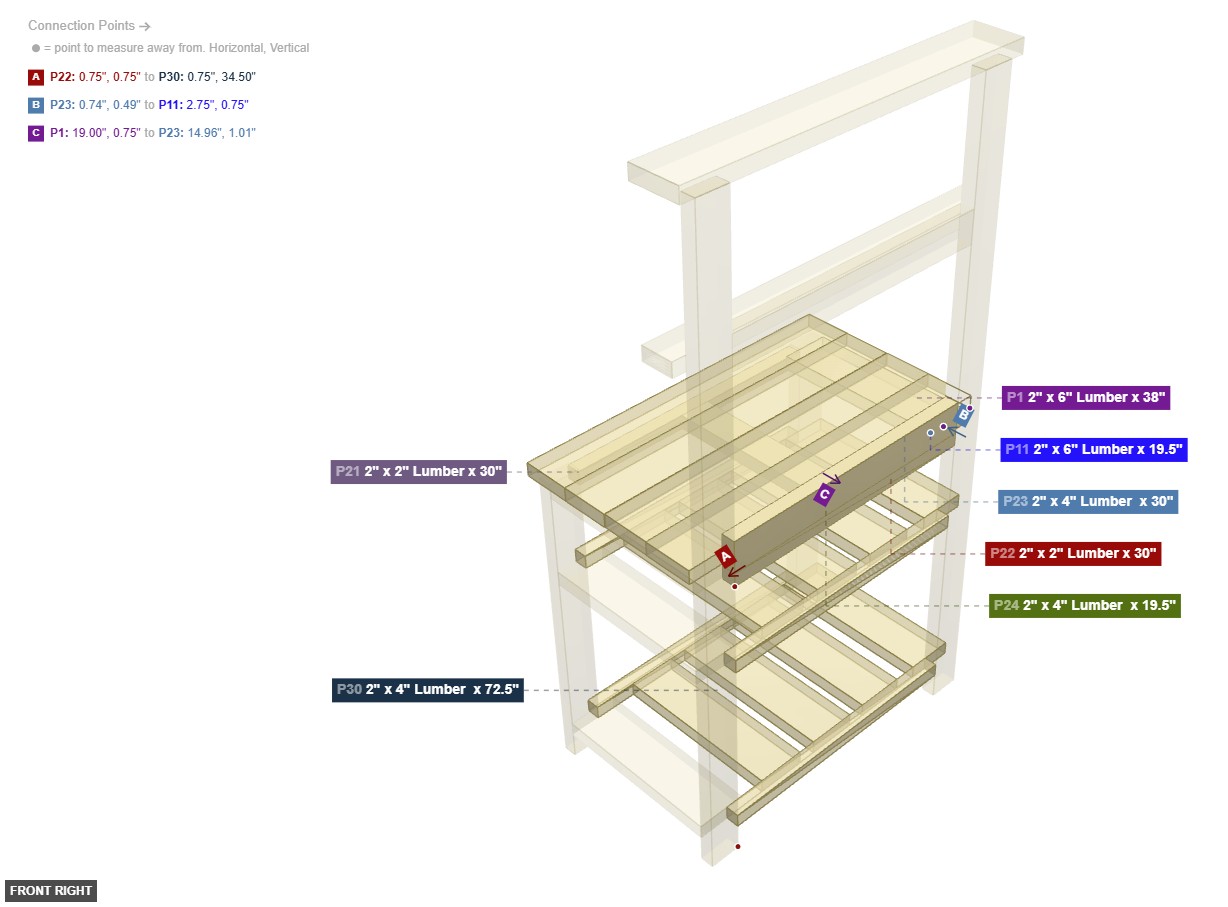
Angle: front right
Base Frame and Bottom Shelf
2" x 4" Lumber x 35.5"x 2 2" x 4" Lumber x 72.5"x 2 2" x 6" Lumber x 19.5"x 3 Middle Shelf Assembly
2" x 2" Lumber x 30"x 1 2" x 6" Lumber x 19.5"x 9 Right Side Support Frame
2" x 2" Lumber x 30"x 2 2" x 4" Lumber x 30"x 1 2" x 4" Lumber x 19.5"x 1 Countertop and Final Supports
2" x 6" Lumber x 38"x 4 2" x 2" Lumber x 30"x 3 Back Hutch
2" x 4" Lumber x 30"x 1 2" x 4" Lumber x 40"x 1 2" x 6" Lumber x 40"x 1
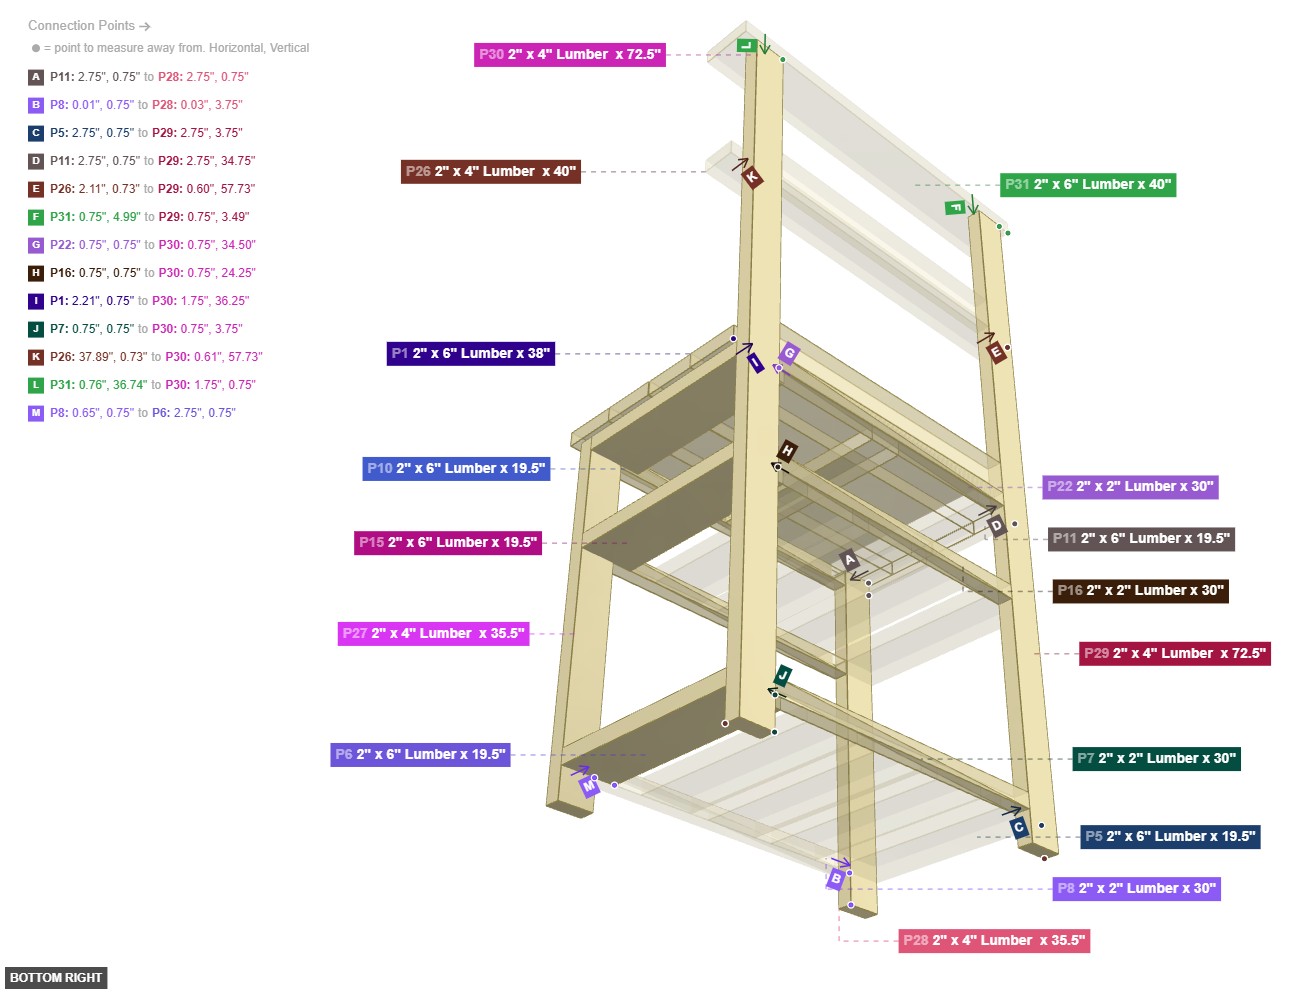
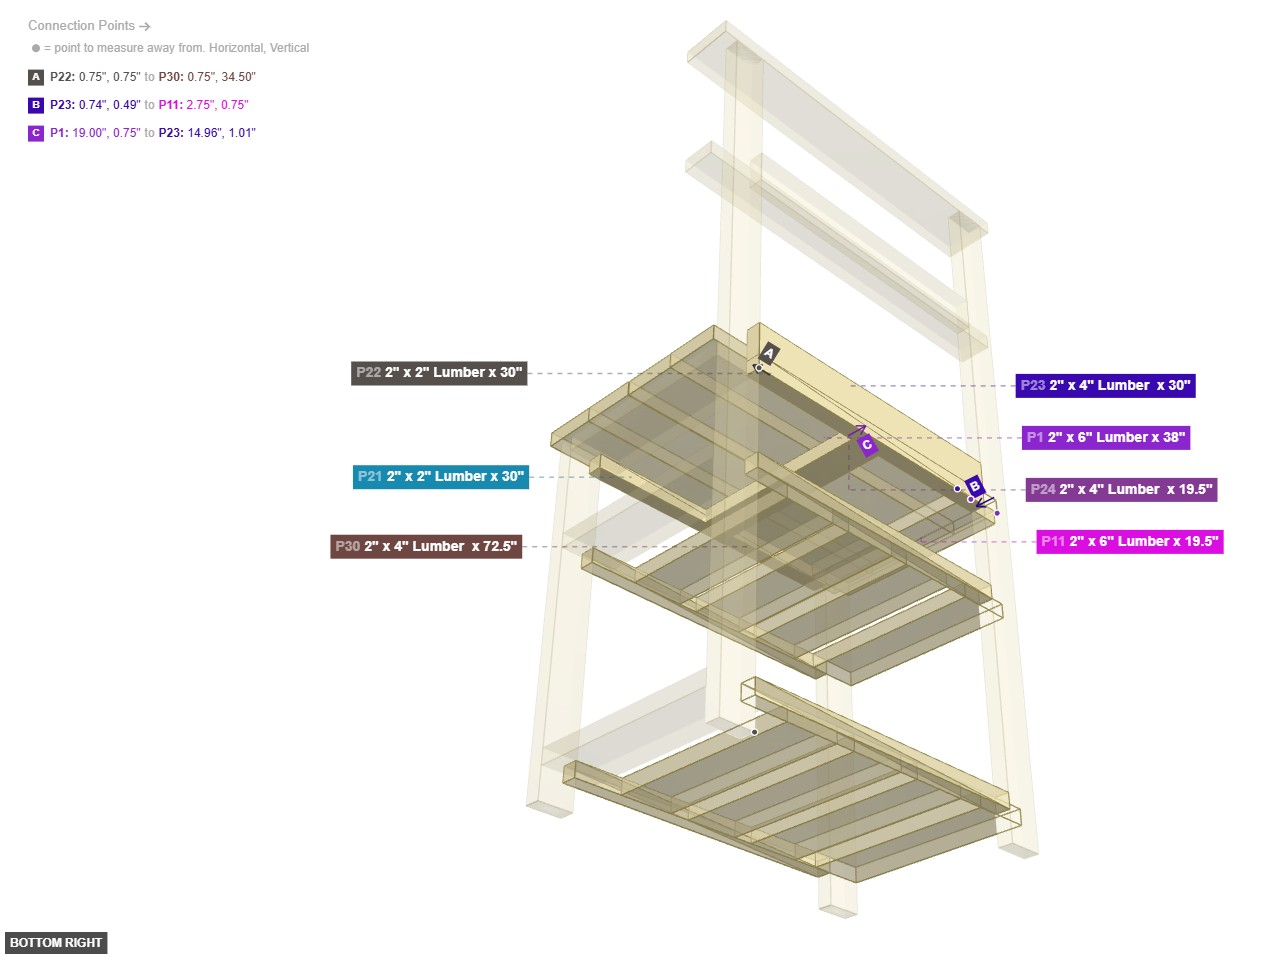
Angle: bottom right
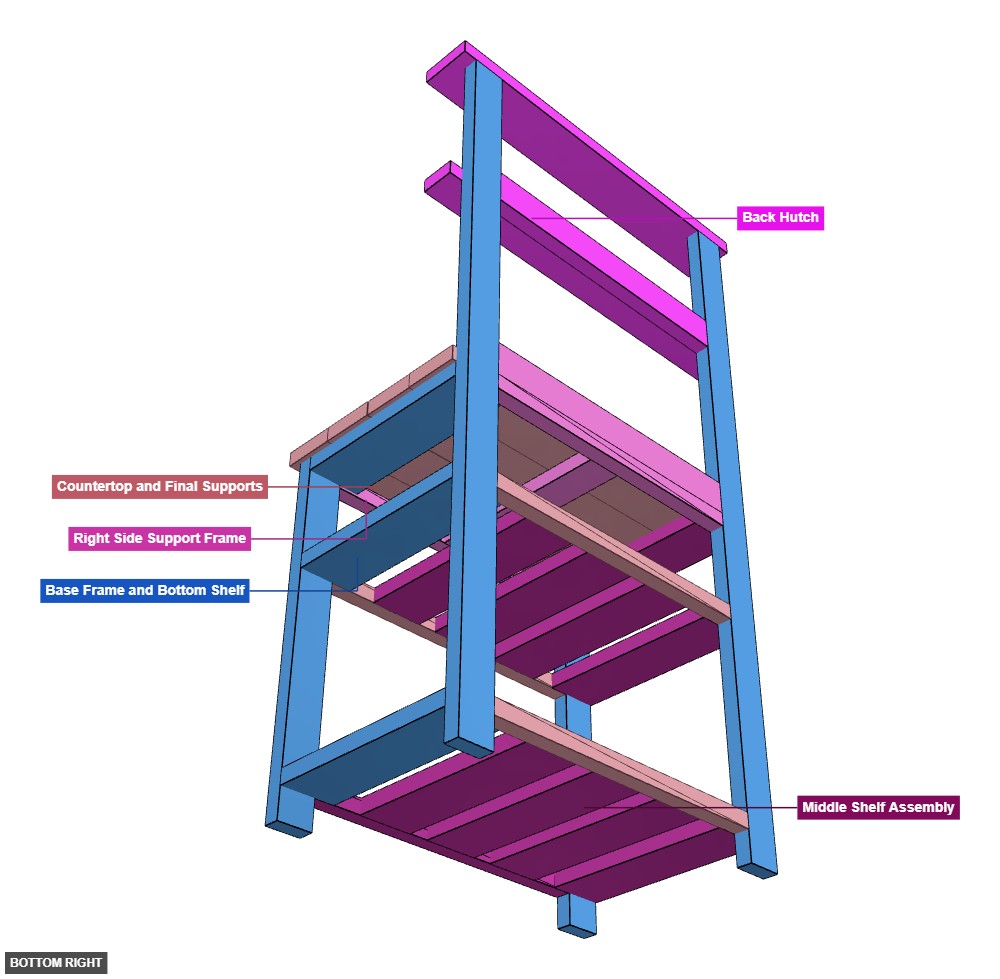
Base Frame and Bottom Shelf
2" x 4" Lumber x 35.5"x 2 2" x 4" Lumber x 72.5"x 2 2" x 6" Lumber x 19.5"x 3 Middle Shelf Assembly
2" x 2" Lumber x 30"x 1 2" x 6" Lumber x 19.5"x 9 Right Side Support Frame
2" x 2" Lumber x 30"x 2 2" x 4" Lumber x 30"x 1 2" x 4" Lumber x 19.5"x 1 Countertop and Final Supports
2" x 6" Lumber x 38"x 4 2" x 2" Lumber x 30"x 3 Back Hutch
2" x 4" Lumber x 30"x 1 2" x 4" Lumber x 40"x 1 2" x 6" Lumber x 40"x 1 Phase 2: Individual Group Assembly
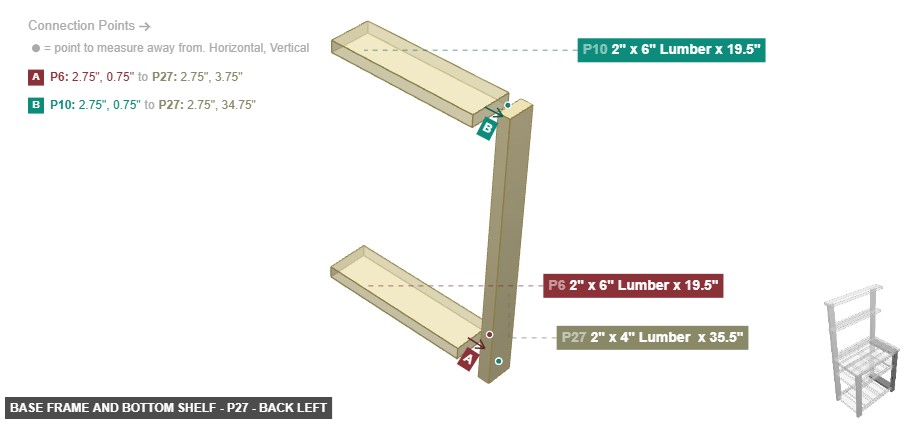
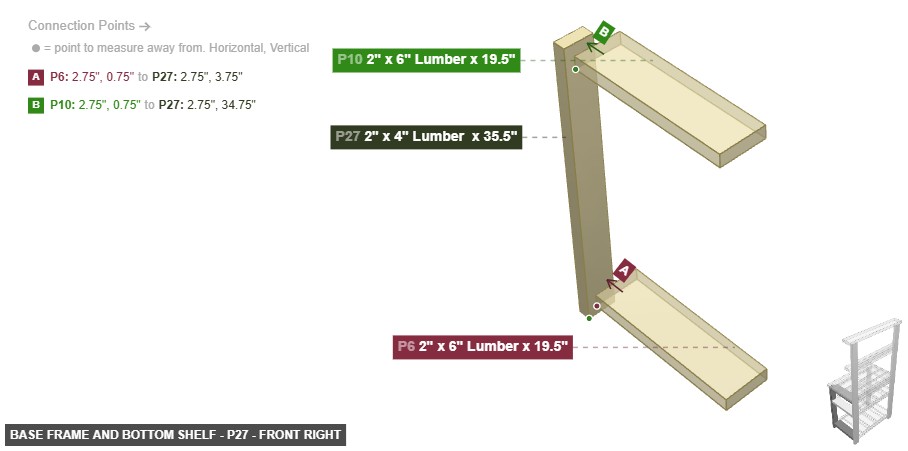
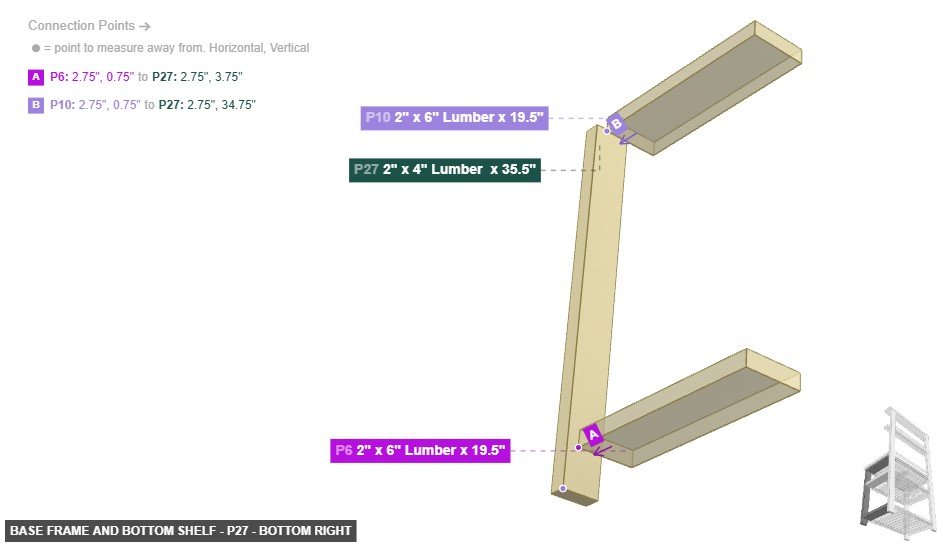
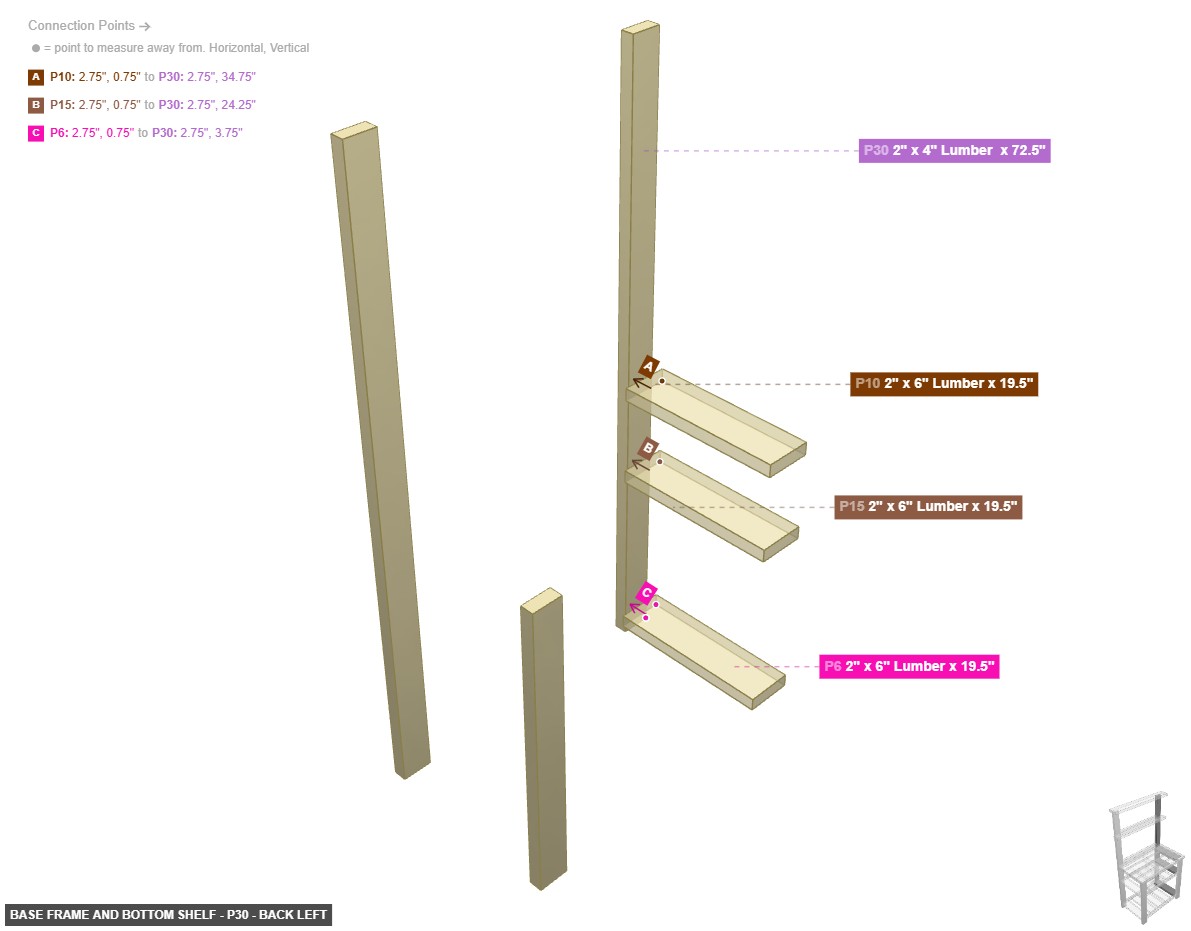
Group: Base Frame and Bottom Shelf
To construct the foundational four-legged structure and attach the bottom shelf slats for initial stability.
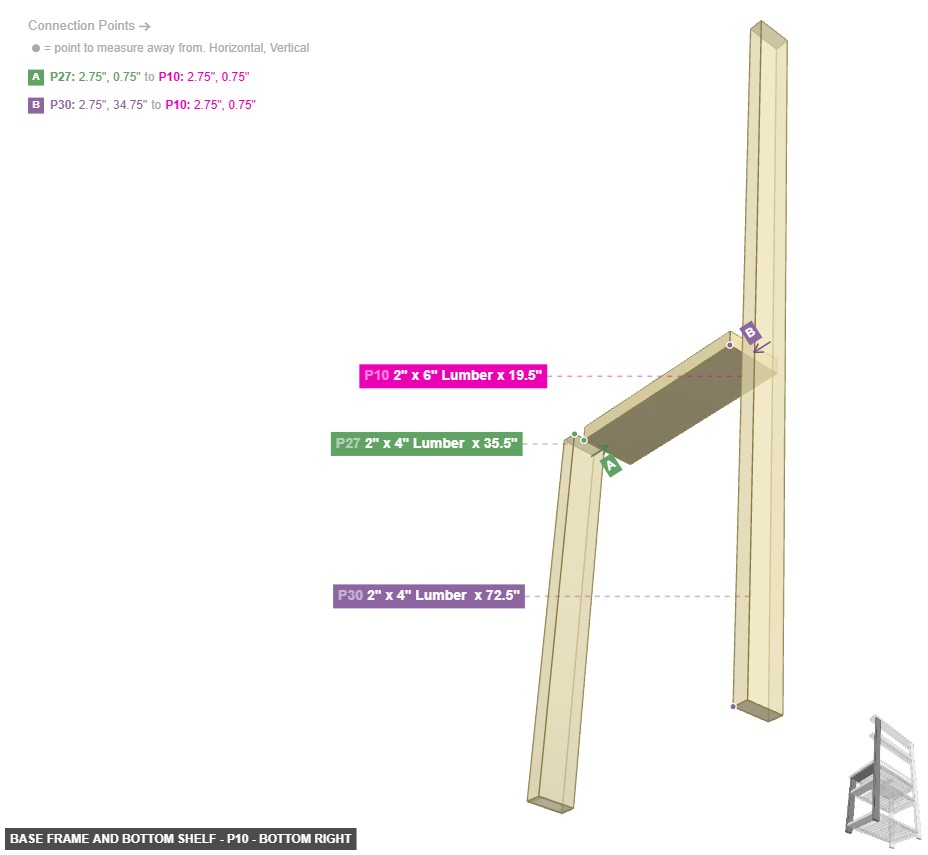
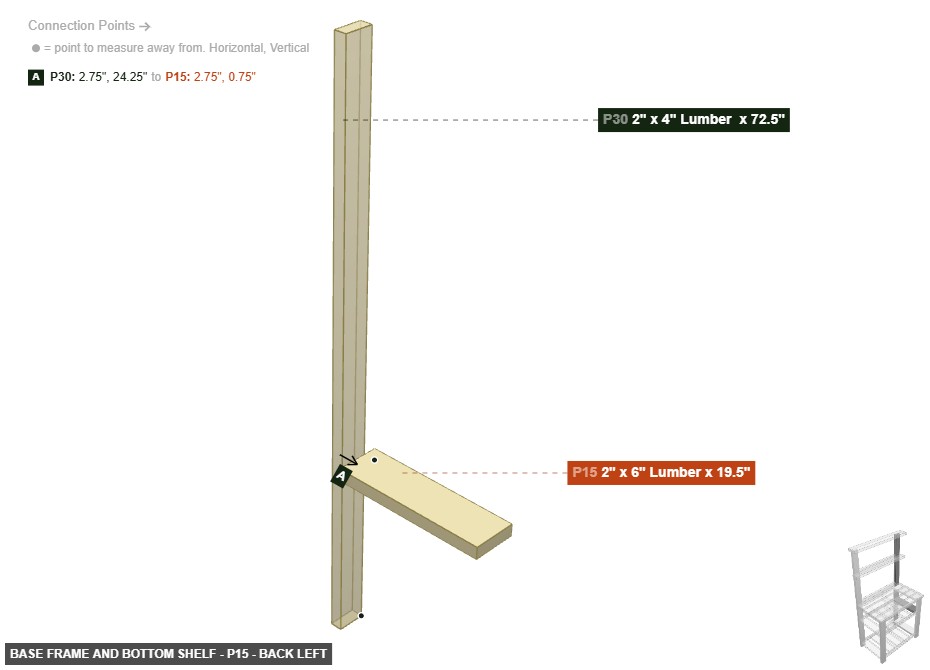
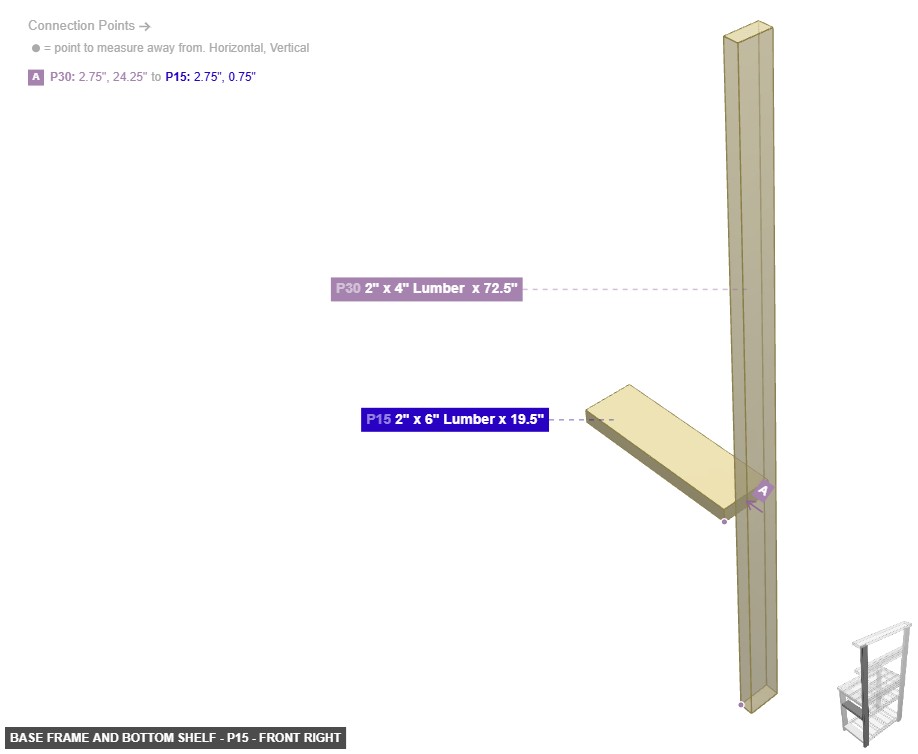
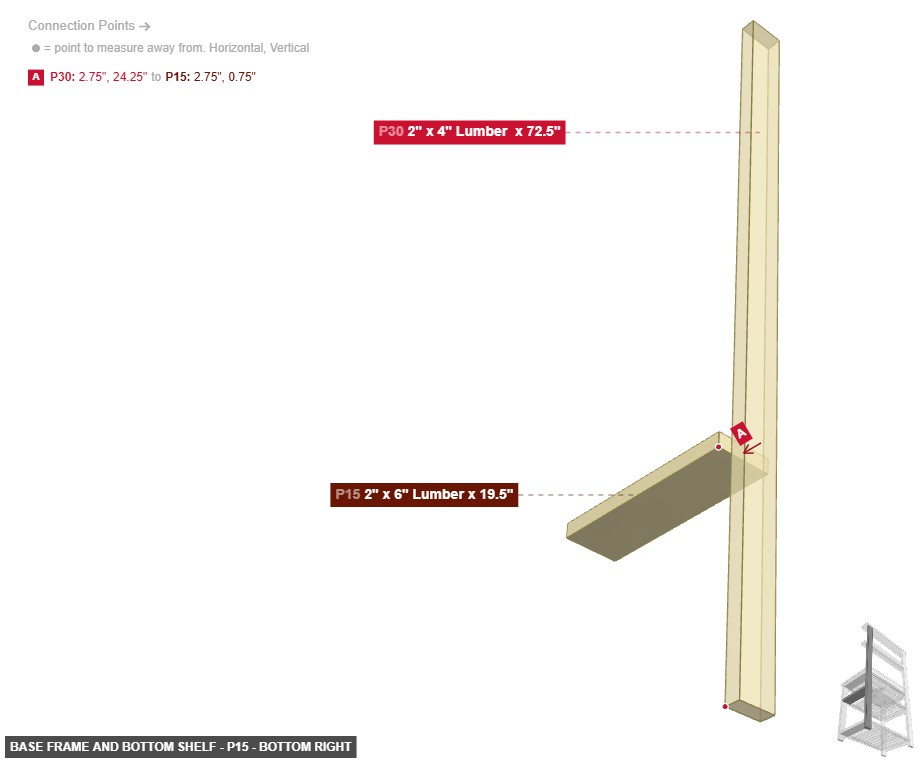
Begin by positioning the four main legs: the two tall back legs (P29, P30) and the two shorter front legs (P27, P28). Create the bottom shelf by attaching slats P6 and P10 to connect the back-right leg (P30) and the front-left leg (P27). Attach the final bottom slat (P15) to the back-right leg (P30).
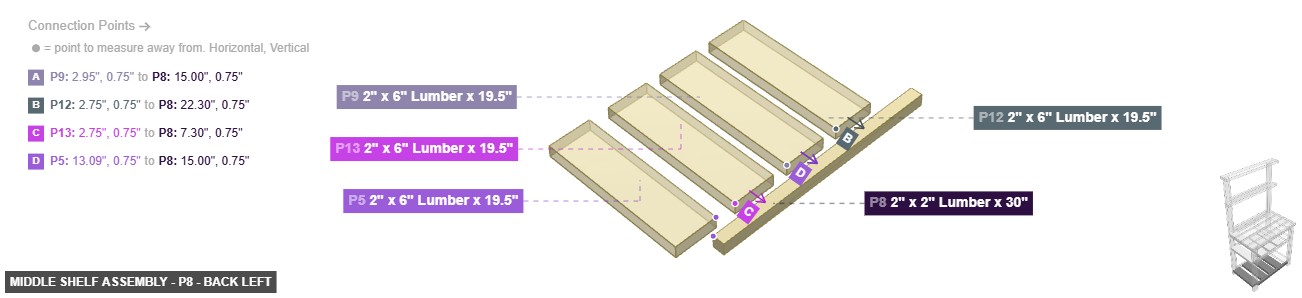
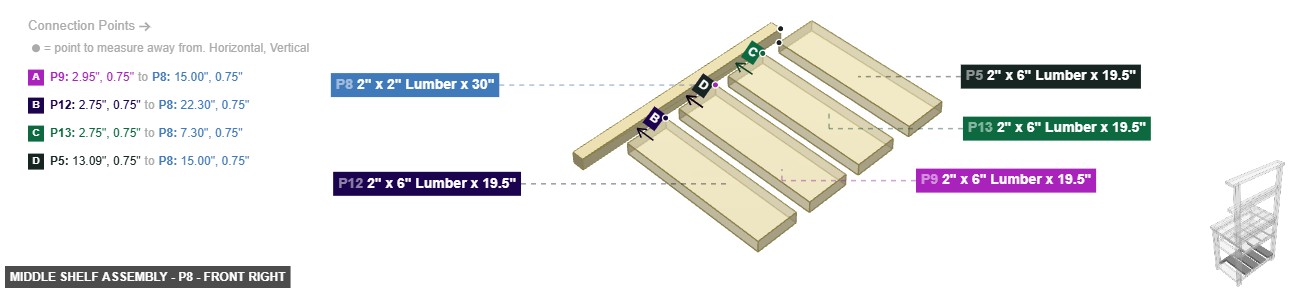
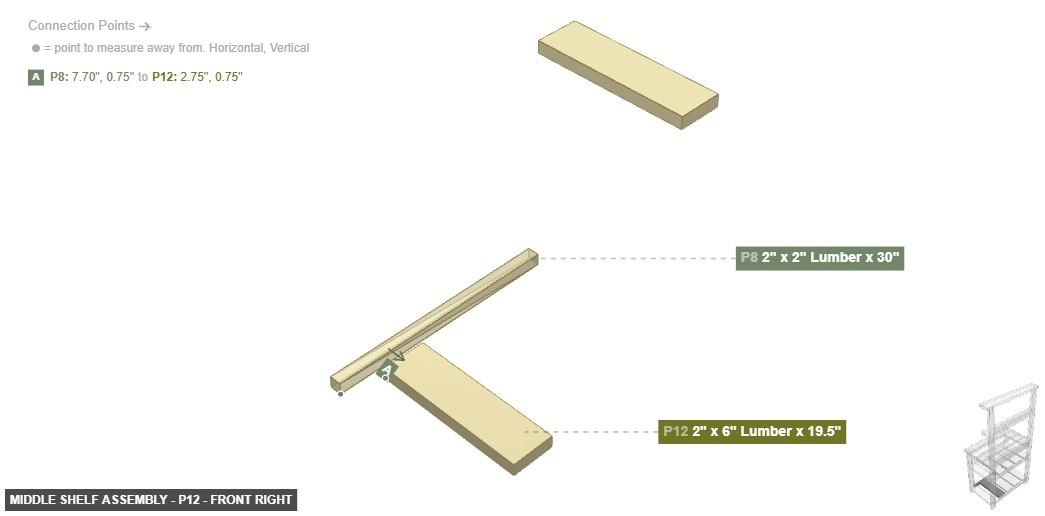
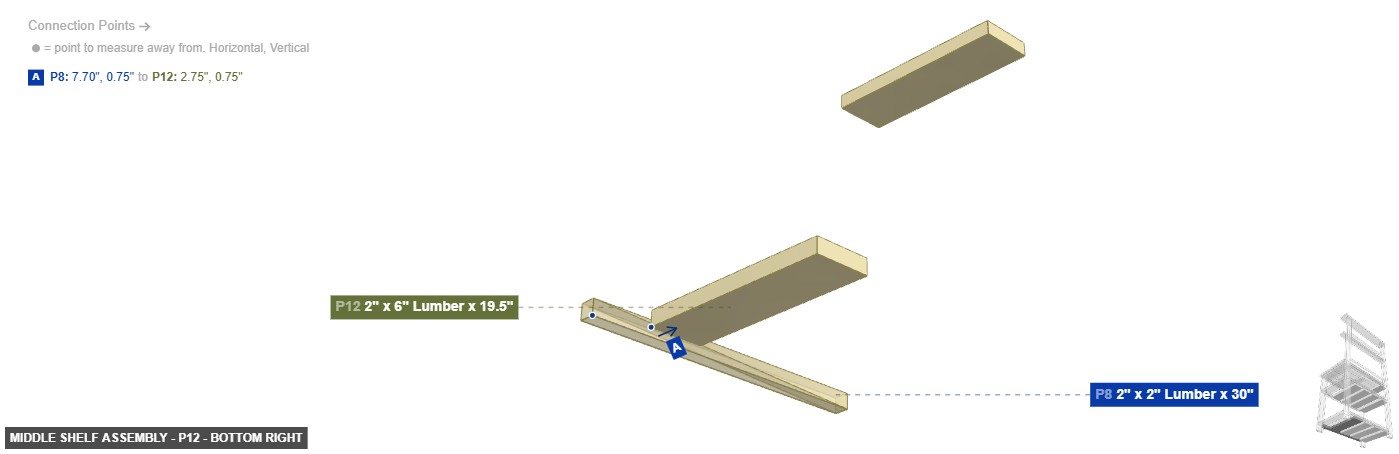
Group: Middle Shelf Assembly
To install the middle shelf and its primary support post, which adds significant rigidity and squares the main frame.
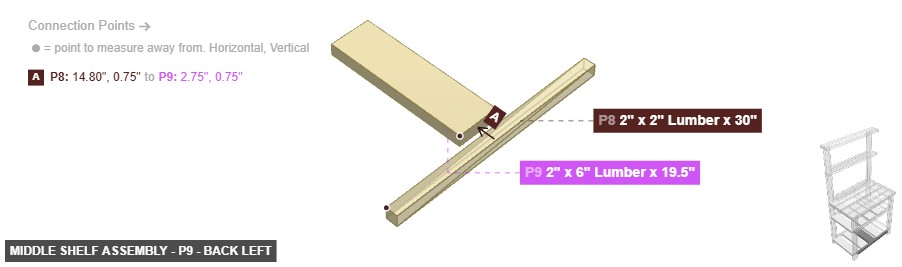
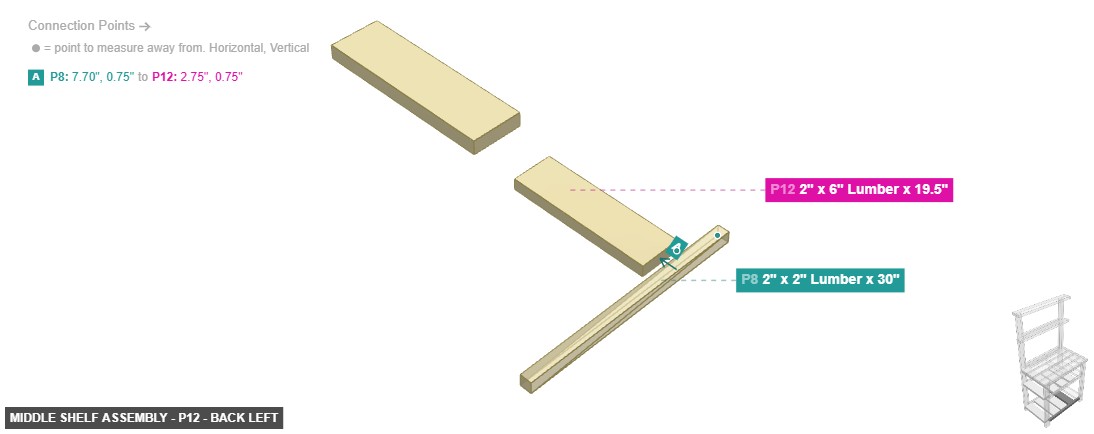
First, attach the vertical support post P8 to the inside of the front-right leg (P28). Install shelf slat P11 to connect the back-left leg (P29) and the front-right leg (P28). Install shelf slat P5 to connect the back-left leg (P29) to the support post P8. Attach slats P9, P12, and P13 to the support post P8. Finally, lay the remaining slats (P14, P17, P18, P19) in place to complete the shelf surface.
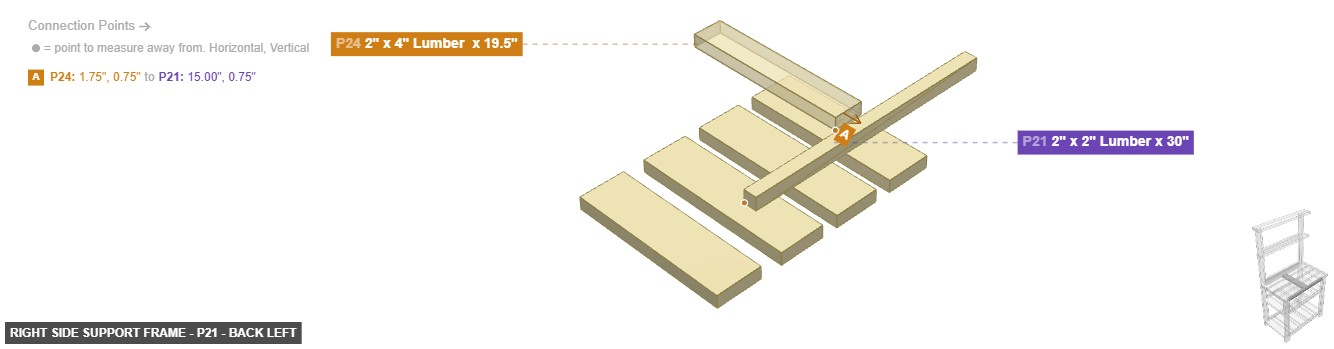
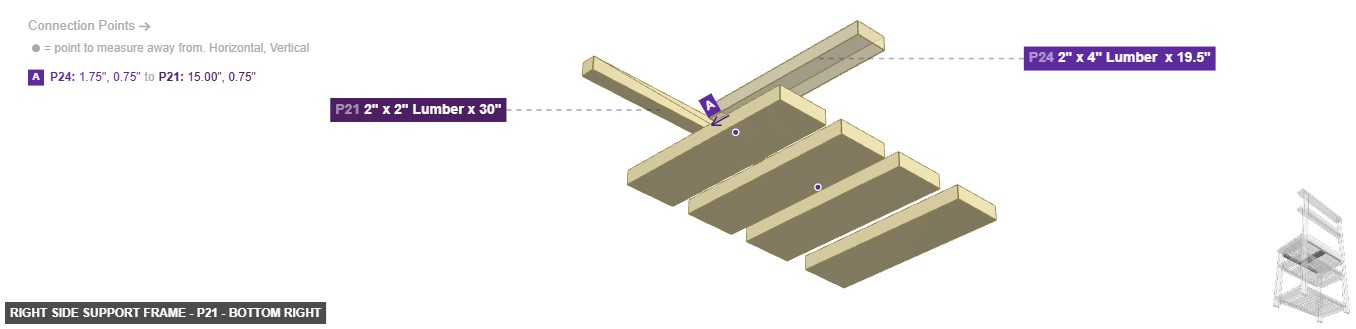
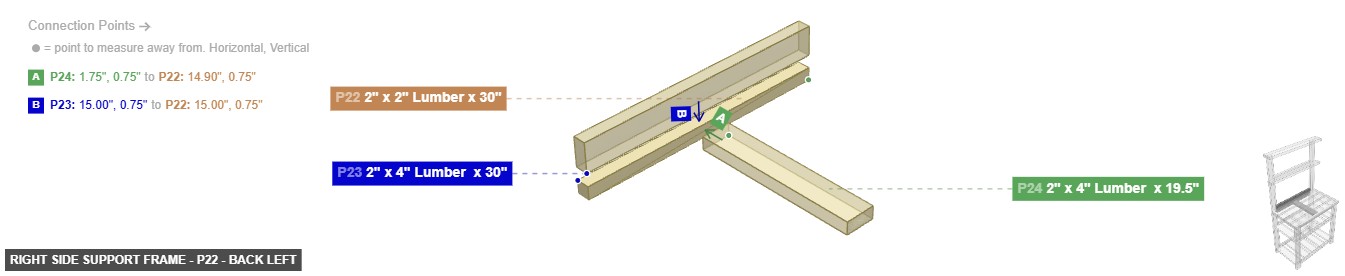
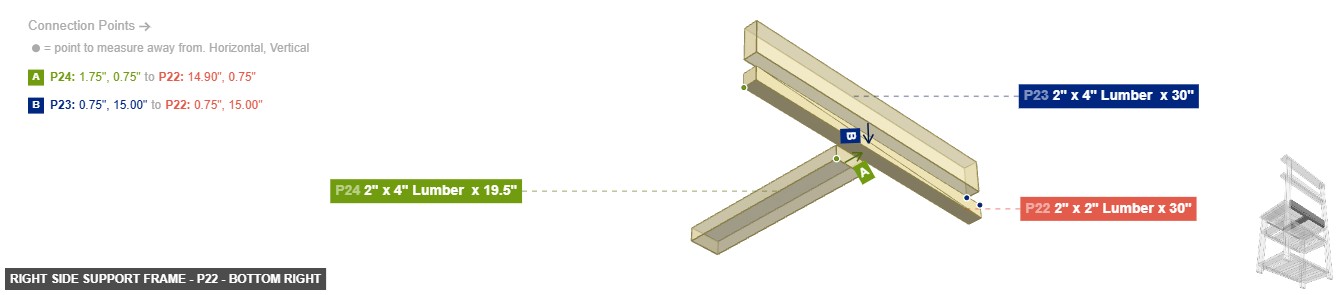
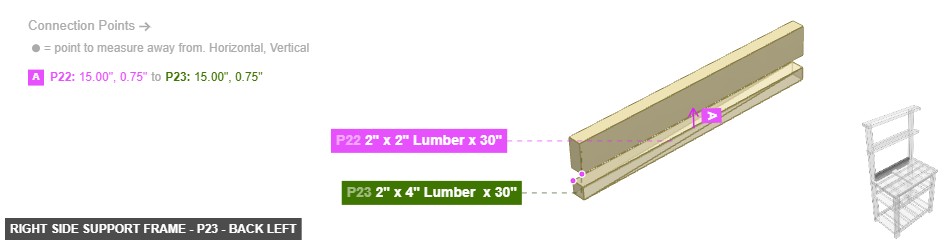
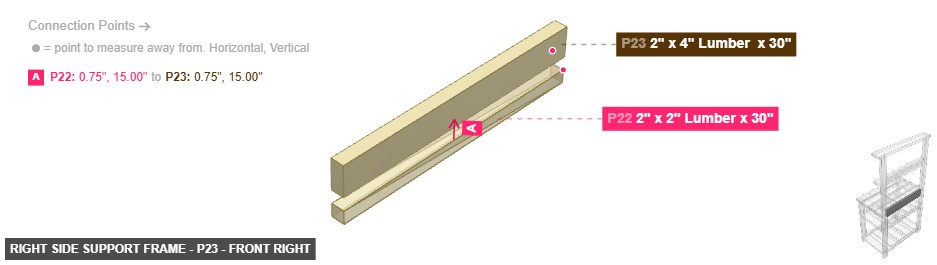
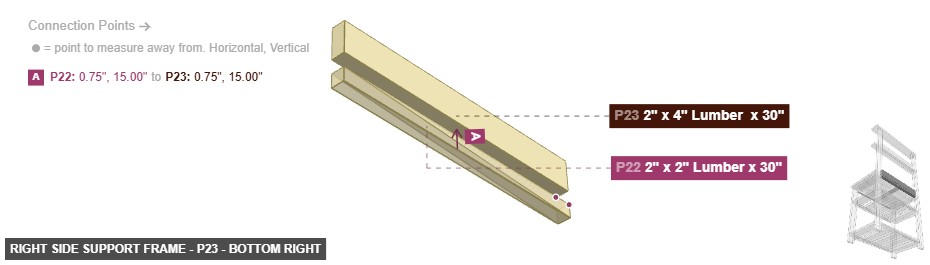
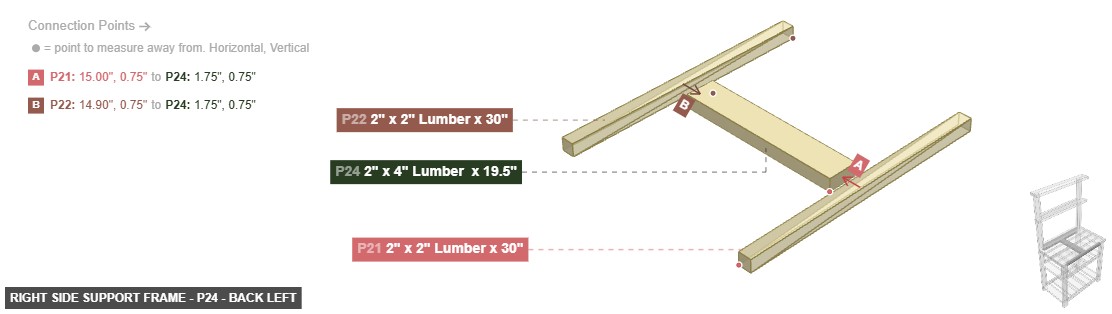
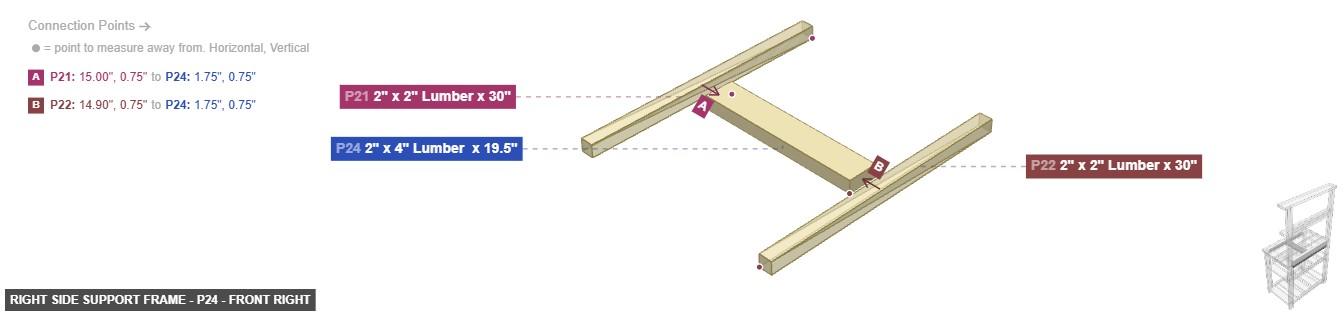
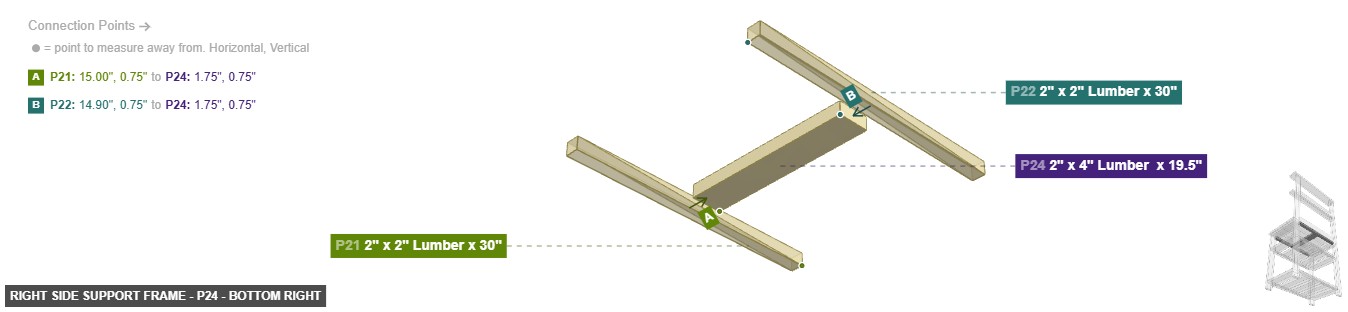
Group: Right Side Support Frame
To build and install a small support structure on the right side of the station.
Create a sub-assembly by connecting the horizontal piece P24 between the two vertical posts P21 and P22. Then, attach the top piece P23 to post P22.
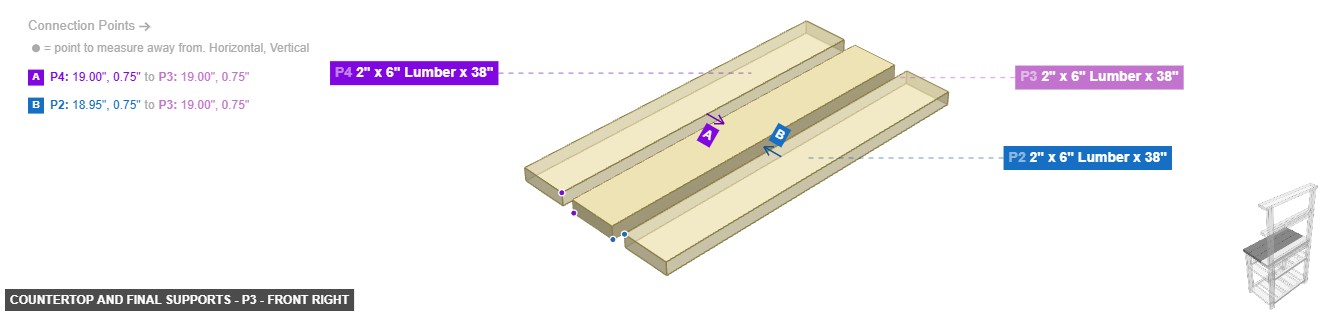
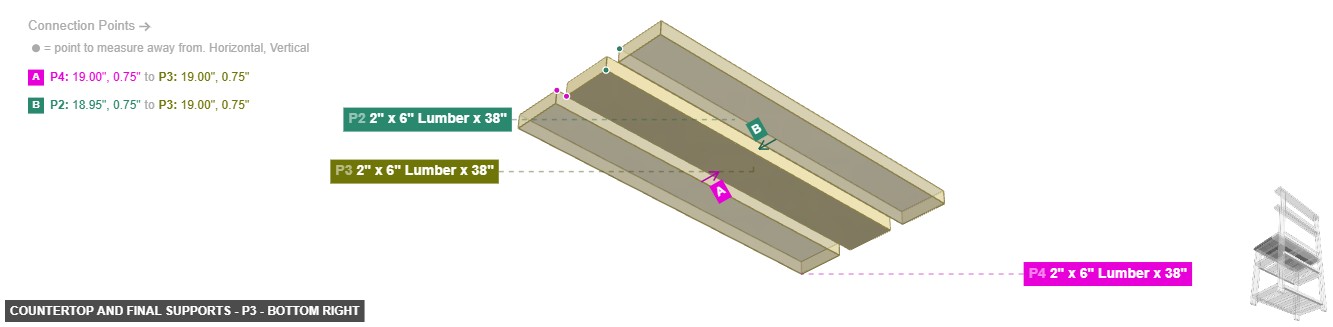
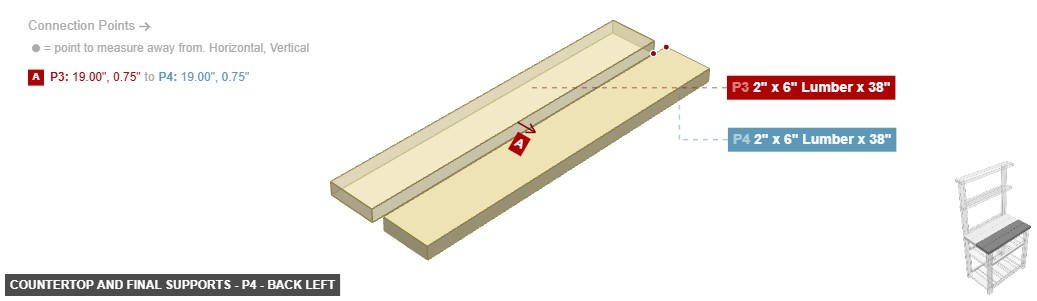
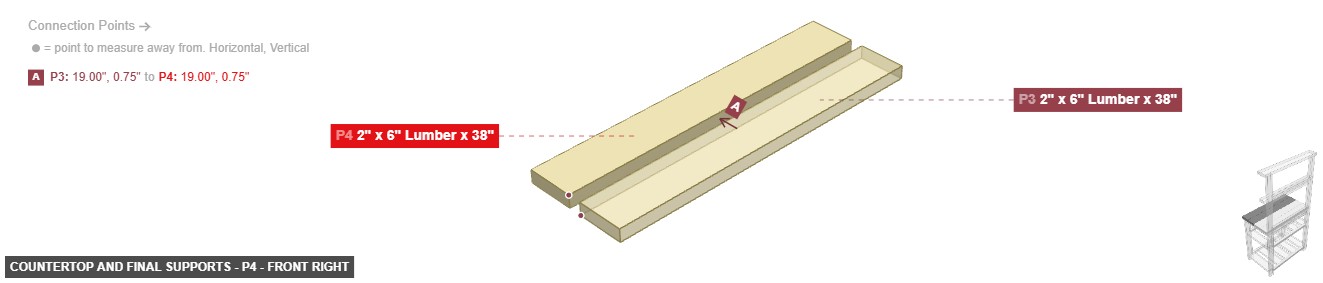
Group: Countertop and Final Supports
To add the remaining vertical supports and install the main work surface, or countertop.
Attach the vertical support posts P7 and P16 to the main frame, connecting them to the back-right leg (P30). Place the unattached support post P20. Assemble the countertop by joining the four long planks (P1, P2, P3, P4) side-by-side.
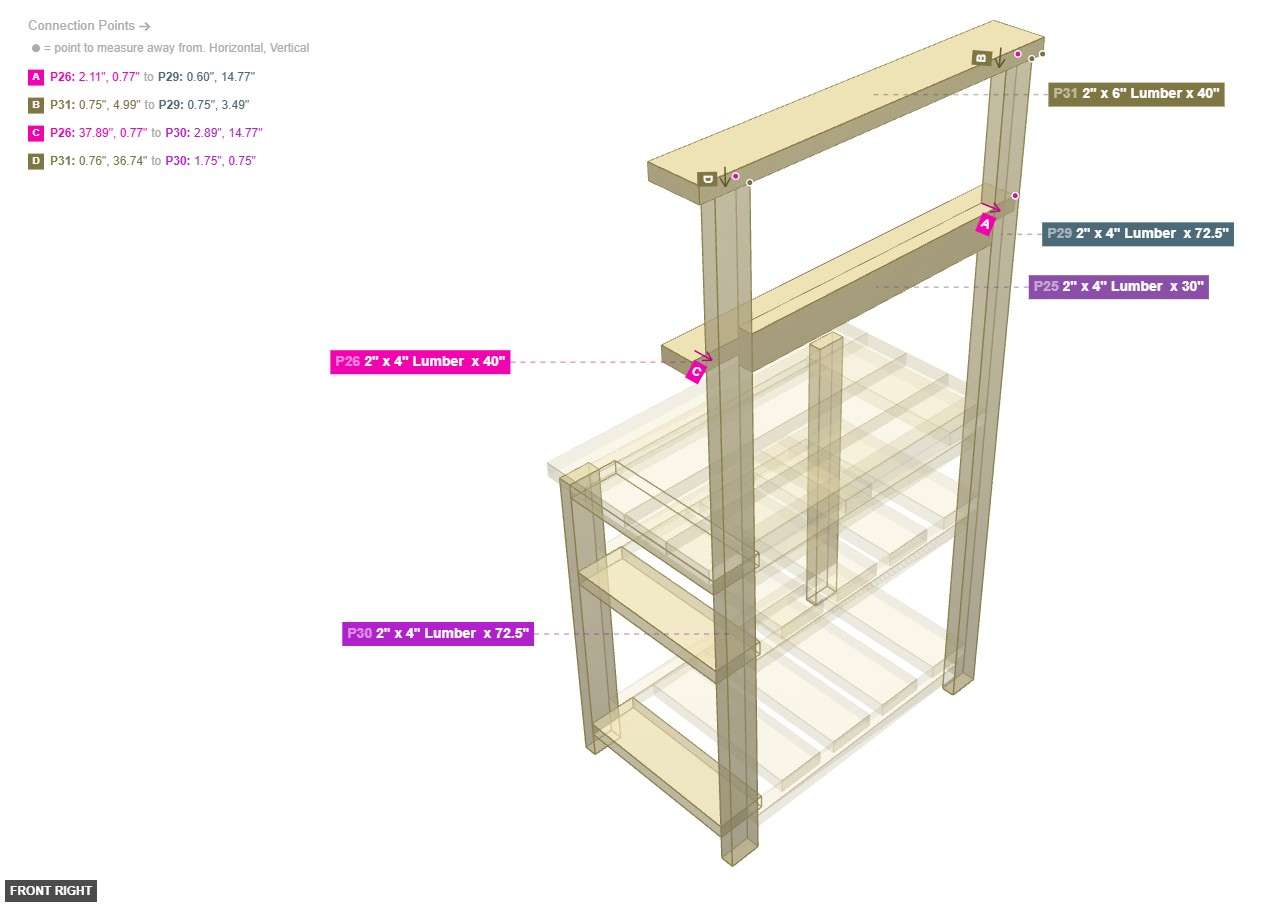
Group: Back Hutch
To construct the upper hutch that sits above the countertop, providing additional shelving or display space.
Attach the top shelf P31 across the very top ends of the two tall back legs (P29, P30). Below that, install the horizontal support P26 between the back legs. Finally, attach the small vertical piece P25 to P26.
Phase 3: Inter-Group Assembly
Attaching: Base Frame and Bottom Shelf
To construct the foundational four-legged structure and attach the bottom shelf slats for initial stability.
This is the first group and serves as the foundation for all subsequent assemblies.
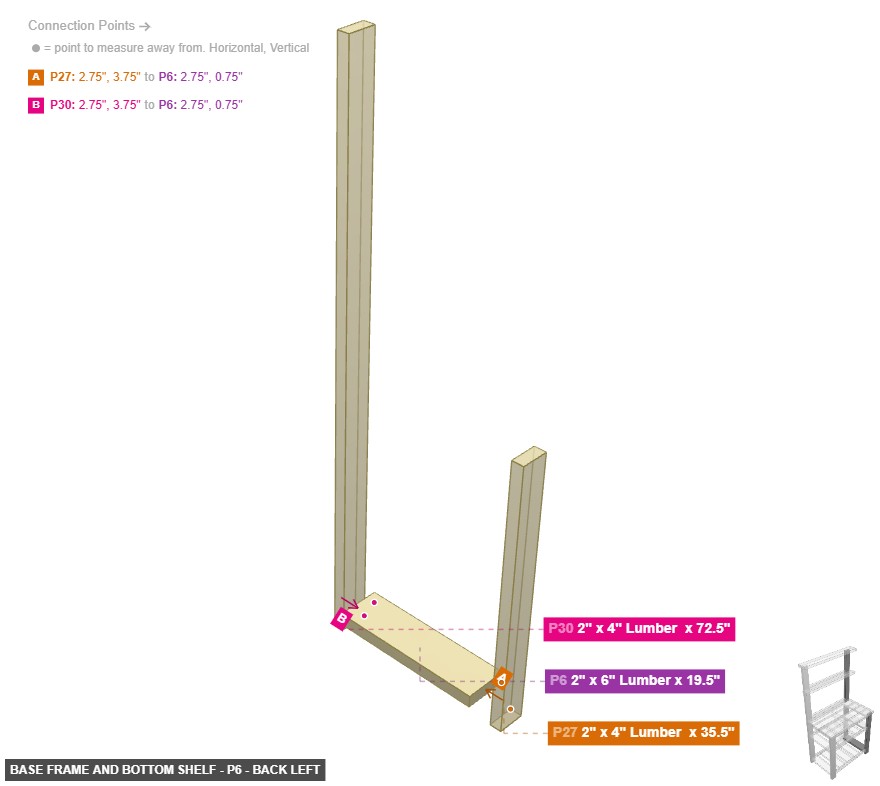
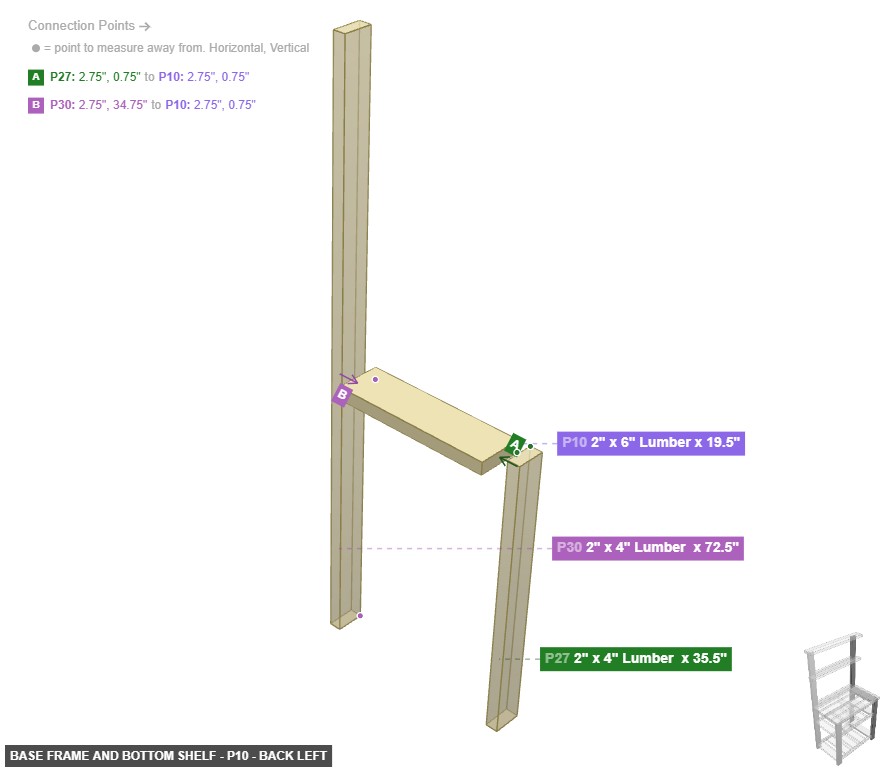
Angle: back left
P27 (2" x 4" Lumber 35.5" length) - attach its 2" x 4" Wood Side #4 facing right to part 6's 2" x 6" Wood End #2, plus its 2" x 4" Wood End #1 must be oriented bottom. Additionally, ensure its 2" x 4" Wood Side #1 faces back. Next, its 2" x 4" Wood Side #2 should be directed left. Next, its 2" x 4" Wood Side #3 must be oriented front, also its 2" x 4" Wood End #2 must be oriented top
P28 (2" x 4" Lumber 35.5" length) - connect its 2" x 4" Wood Side #3 oriented front links with part 8's 2" x 2" Wood End #2, plus connect its 2" x 4" Wood Side #4 oriented right links with part 11's 2" x 6" Wood End #2. Next, ensure its 2" x 4" Wood End #1 faces bottom, and ensure its 2" x 4" Wood Side #1 faces back, and ensure its 2" x 4" Wood Side #2 faces left, and ensure its 2" x 4" Wood End #2 faces top
P29 (2" x 4" Lumber 72.5" length) - its 2" x 4" Wood End #1, which is top-facing, should connect to part 31's 2" x 6" Wood Side #2, then its 2" x 4" Wood Side #4, which is left-facing, should connect to part 5's 2" x 6" Wood End #1. Next, its 2" x 4" Wood Side #1 should be directed back. Also, ensure its 2" x 4" Wood Side #2 faces right, also ensure its 2" x 4" Wood Side #3 faces front. After that, its 2" x 4" Wood End #2 should be directed bottom
P30 (2" x 4" Lumber 72.5" length) - its 2" x 4" Wood End #1, which is top-facing, should connect to part 31's 2" x 6" Wood Side #2, also attach its 2" x 4" Wood Side #1 facing back to part 22's 2" x 2" Wood End #1, plus its 2" x 4" Wood Side #4, which is left-facing, should connect to part 10's 2" x 6" Wood End #1, plus its 2" x 4" Wood Side #2 needs to point right, plus its 2" x 4" Wood Side #3 needs to point front. Also, ensure its 2" x 4" Wood End #2 faces bottom
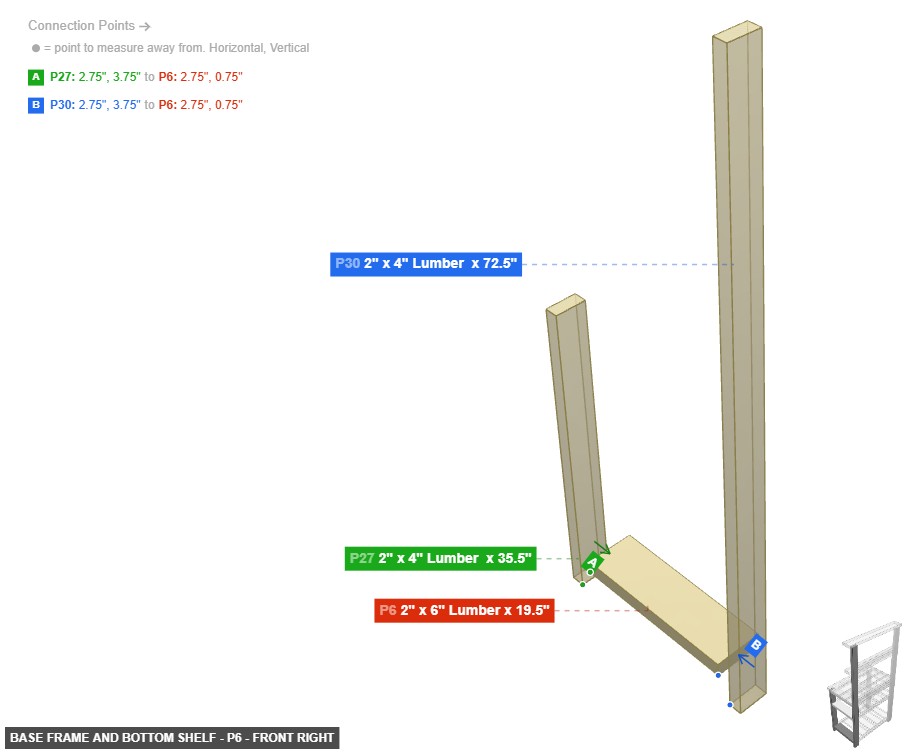
P6 (2" x 6" Lumber 19.5" length) - its 2" x 6" Wood End #1, which is right-facing, should connect to part 30's 2" x 4" Wood Side #4. After that, its 2" x 6" Wood End #2, which is left-facing, should connect to part 27's 2" x 4" Wood Side #4. Also, its 2" x 6" Wood Side #1 must be oriented front. Next, ensure its 2" x 6" Wood Side #2 faces top. Also, ensure its 2" x 6" Wood Side #3 faces back, also its 2" x 6" Wood Side #4 must be oriented bottom
P10 (2" x 6" Lumber 19.5" length) - its 2" x 6" Wood End #1, which is right-facing, should connect to part 30's 2" x 4" Wood Side #4. Next, its 2" x 6" Wood End #2, which is left-facing, should connect to part 27's 2" x 4" Wood Side #4, also ensure its 2" x 6" Wood Side #1 faces front, and its 2" x 6" Wood Side #2 needs to point top, plus its 2" x 6" Wood Side #3 should be directed back, then its 2" x 6" Wood Side #4 should be directed bottom
P15 (2" x 6" Lumber 19.5" length) - attach its 2" x 6" Wood End #1 facing right to part 30's 2" x 4" Wood Side #4. Also, its 2" x 6" Wood Side #1 should be directed front, and its 2" x 6" Wood Side #2 should be directed top. Also, its 2" x 6" Wood Side #3 should be directed back. Next, its 2" x 6" Wood Side #4 must be oriented bottom. After that, ensure its 2" x 6" Wood End #2 faces left
2" x 4" Lumber x 35.5"x 2 2" x 4" Lumber x 72.5"x 2 2" x 6" Lumber x 19.5"x 3
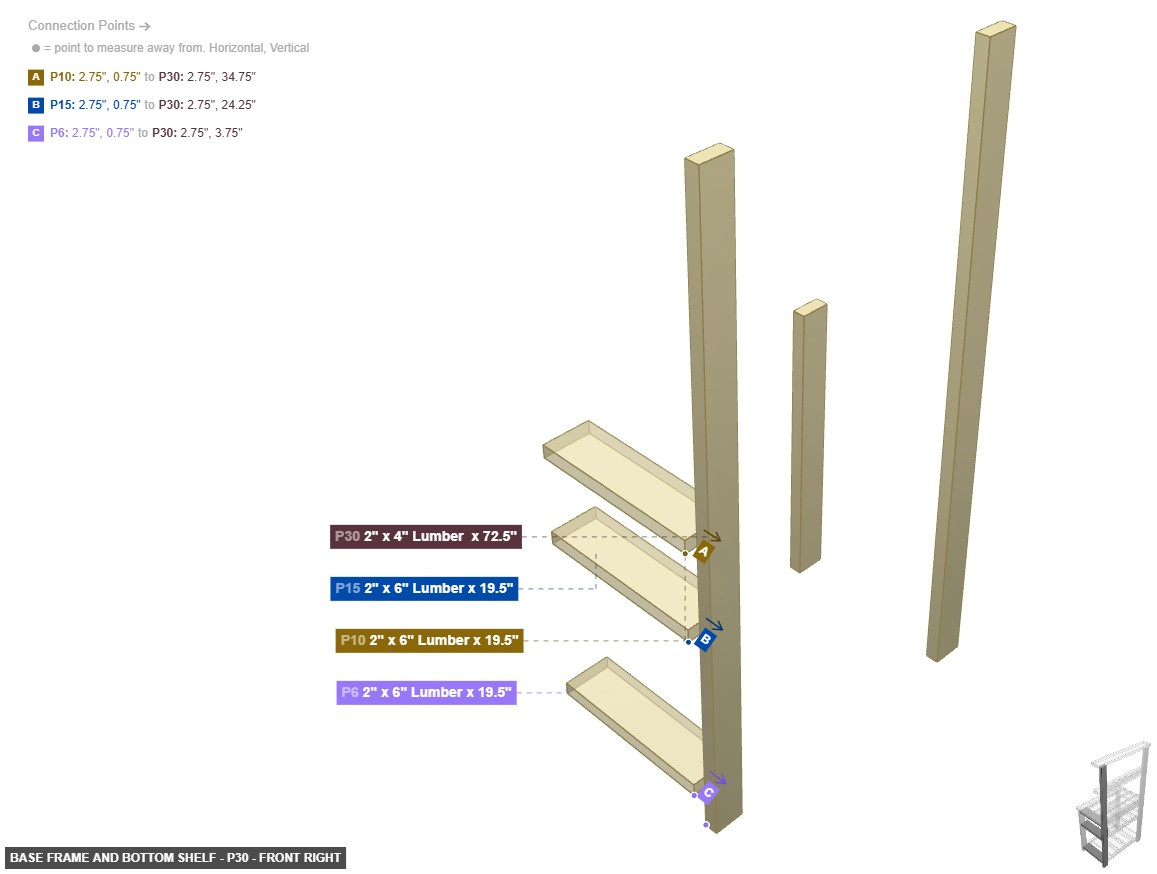
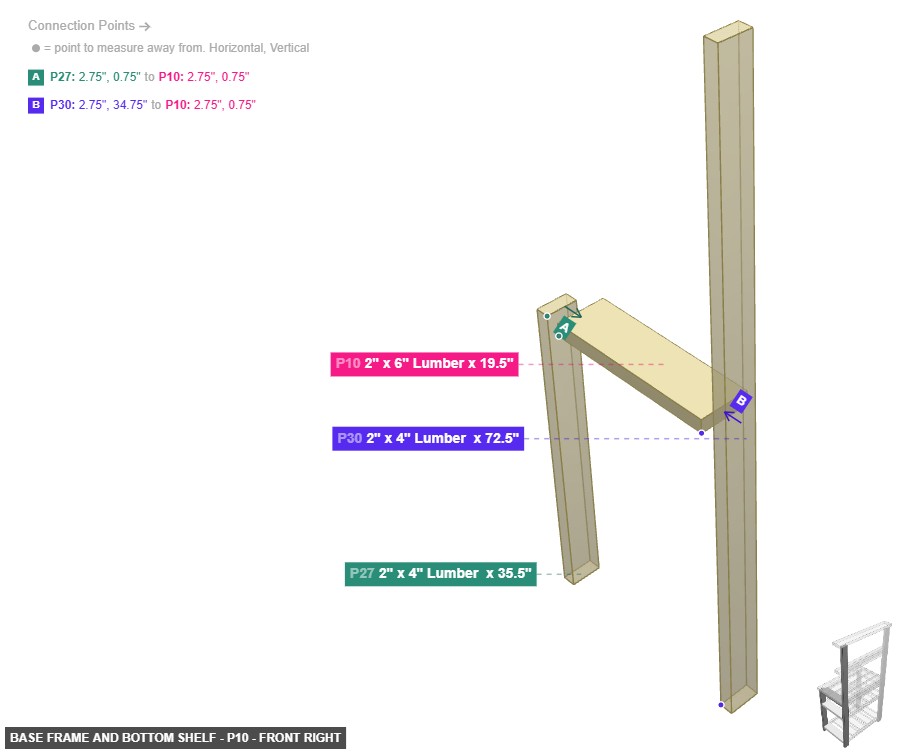
Angle: front right
P27 (2" x 4" Lumber 35.5" length) - attach its 2" x 4" Wood Side #4 facing right to part 6's 2" x 6" Wood End #2, plus its 2" x 4" Wood End #1 must be oriented bottom. Additionally, ensure its 2" x 4" Wood Side #1 faces back. Next, its 2" x 4" Wood Side #2 should be directed left. Next, its 2" x 4" Wood Side #3 must be oriented front, also its 2" x 4" Wood End #2 must be oriented top
P28 (2" x 4" Lumber 35.5" length) - connect its 2" x 4" Wood Side #3 oriented front links with part 8's 2" x 2" Wood End #2, plus connect its 2" x 4" Wood Side #4 oriented right links with part 11's 2" x 6" Wood End #2. Next, ensure its 2" x 4" Wood End #1 faces bottom, and ensure its 2" x 4" Wood Side #1 faces back, and ensure its 2" x 4" Wood Side #2 faces left, and ensure its 2" x 4" Wood End #2 faces top
P29 (2" x 4" Lumber 72.5" length) - its 2" x 4" Wood End #1, which is top-facing, should connect to part 31's 2" x 6" Wood Side #2, then its 2" x 4" Wood Side #4, which is left-facing, should connect to part 5's 2" x 6" Wood End #1. Next, its 2" x 4" Wood Side #1 should be directed back. Also, ensure its 2" x 4" Wood Side #2 faces right, also ensure its 2" x 4" Wood Side #3 faces front. After that, its 2" x 4" Wood End #2 should be directed bottom
P30 (2" x 4" Lumber 72.5" length) - its 2" x 4" Wood End #1, which is top-facing, should connect to part 31's 2" x 6" Wood Side #2, also attach its 2" x 4" Wood Side #1 facing back to part 22's 2" x 2" Wood End #1, plus its 2" x 4" Wood Side #4, which is left-facing, should connect to part 10's 2" x 6" Wood End #1, plus its 2" x 4" Wood Side #2 needs to point right, plus its 2" x 4" Wood Side #3 needs to point front. Also, ensure its 2" x 4" Wood End #2 faces bottom
P6 (2" x 6" Lumber 19.5" length) - its 2" x 6" Wood End #1, which is right-facing, should connect to part 30's 2" x 4" Wood Side #4. After that, its 2" x 6" Wood End #2, which is left-facing, should connect to part 27's 2" x 4" Wood Side #4. Also, its 2" x 6" Wood Side #1 must be oriented front. Next, ensure its 2" x 6" Wood Side #2 faces top. Also, ensure its 2" x 6" Wood Side #3 faces back, also its 2" x 6" Wood Side #4 must be oriented bottom
P10 (2" x 6" Lumber 19.5" length) - its 2" x 6" Wood End #1, which is right-facing, should connect to part 30's 2" x 4" Wood Side #4. Next, its 2" x 6" Wood End #2, which is left-facing, should connect to part 27's 2" x 4" Wood Side #4, also ensure its 2" x 6" Wood Side #1 faces front, and its 2" x 6" Wood Side #2 needs to point top, plus its 2" x 6" Wood Side #3 should be directed back, then its 2" x 6" Wood Side #4 should be directed bottom
P15 (2" x 6" Lumber 19.5" length) - attach its 2" x 6" Wood End #1 facing right to part 30's 2" x 4" Wood Side #4. Also, its 2" x 6" Wood Side #1 should be directed front, and its 2" x 6" Wood Side #2 should be directed top. Also, its 2" x 6" Wood Side #3 should be directed back. Next, its 2" x 6" Wood Side #4 must be oriented bottom. After that, ensure its 2" x 6" Wood End #2 faces left
2" x 4" Lumber x 35.5"x 2 2" x 4" Lumber x 72.5"x 2 2" x 6" Lumber x 19.5"x 3
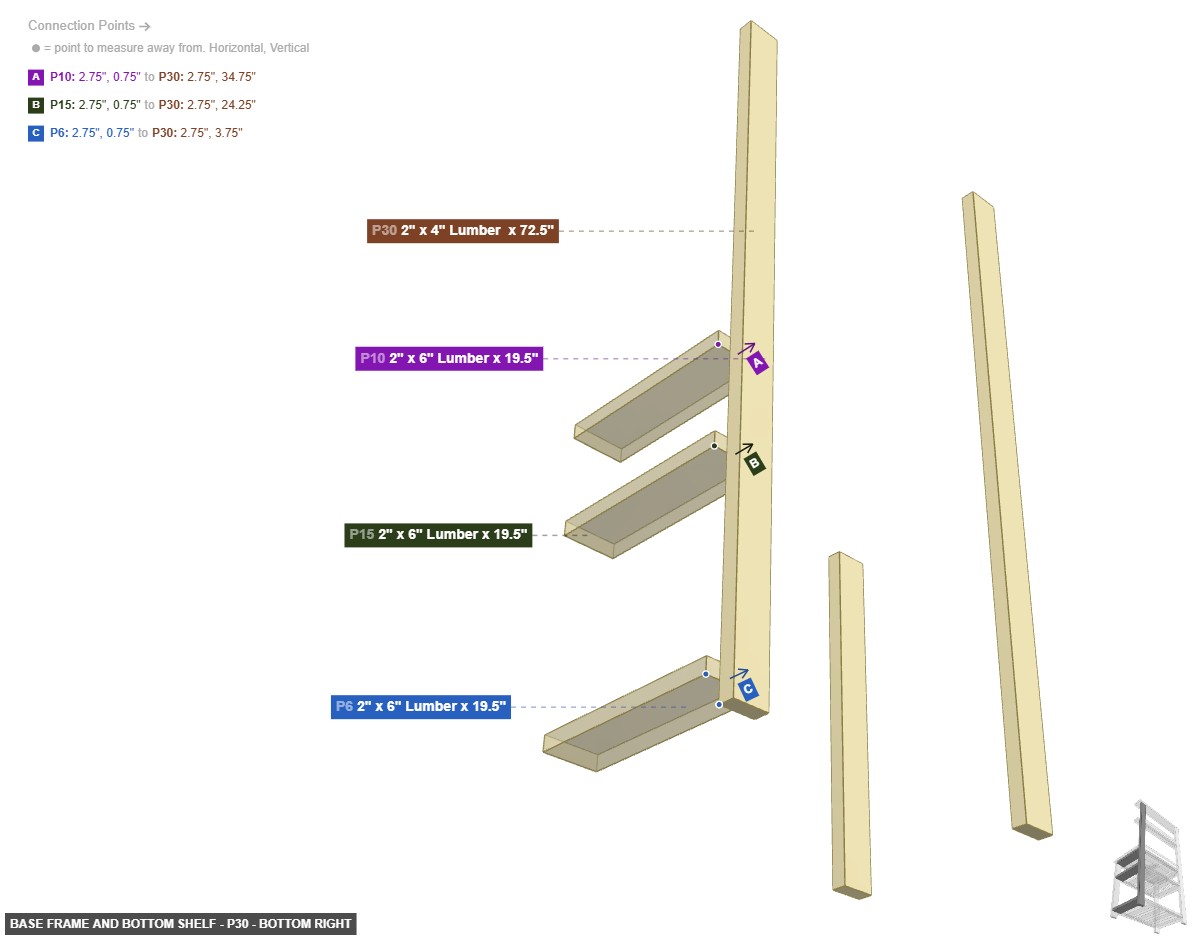
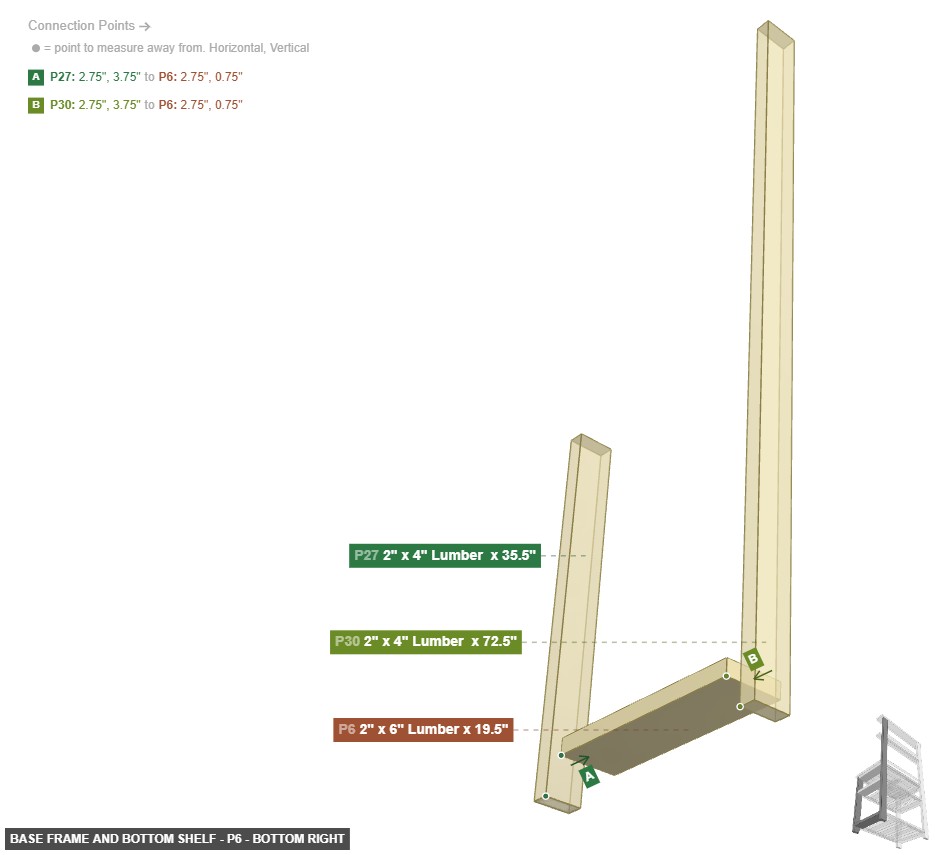
Angle: bottom right
P27 (2" x 4" Lumber 35.5" length) - attach its 2" x 4" Wood Side #4 facing right to part 6's 2" x 6" Wood End #2, plus its 2" x 4" Wood End #1 must be oriented bottom. Additionally, ensure its 2" x 4" Wood Side #1 faces back. Next, its 2" x 4" Wood Side #2 should be directed left. Next, its 2" x 4" Wood Side #3 must be oriented front, also its 2" x 4" Wood End #2 must be oriented top
P28 (2" x 4" Lumber 35.5" length) - connect its 2" x 4" Wood Side #3 oriented front links with part 8's 2" x 2" Wood End #2, plus connect its 2" x 4" Wood Side #4 oriented right links with part 11's 2" x 6" Wood End #2. Next, ensure its 2" x 4" Wood End #1 faces bottom, and ensure its 2" x 4" Wood Side #1 faces back, and ensure its 2" x 4" Wood Side #2 faces left, and ensure its 2" x 4" Wood End #2 faces top
P29 (2" x 4" Lumber 72.5" length) - its 2" x 4" Wood End #1, which is top-facing, should connect to part 31's 2" x 6" Wood Side #2, then its 2" x 4" Wood Side #4, which is left-facing, should connect to part 5's 2" x 6" Wood End #1. Next, its 2" x 4" Wood Side #1 should be directed back. Also, ensure its 2" x 4" Wood Side #2 faces right, also ensure its 2" x 4" Wood Side #3 faces front. After that, its 2" x 4" Wood End #2 should be directed bottom
P30 (2" x 4" Lumber 72.5" length) - its 2" x 4" Wood End #1, which is top-facing, should connect to part 31's 2" x 6" Wood Side #2, also attach its 2" x 4" Wood Side #1 facing back to part 22's 2" x 2" Wood End #1, plus its 2" x 4" Wood Side #4, which is left-facing, should connect to part 10's 2" x 6" Wood End #1, plus its 2" x 4" Wood Side #2 needs to point right, plus its 2" x 4" Wood Side #3 needs to point front. Also, ensure its 2" x 4" Wood End #2 faces bottom
P6 (2" x 6" Lumber 19.5" length) - its 2" x 6" Wood End #1, which is right-facing, should connect to part 30's 2" x 4" Wood Side #4. After that, its 2" x 6" Wood End #2, which is left-facing, should connect to part 27's 2" x 4" Wood Side #4. Also, its 2" x 6" Wood Side #1 must be oriented front. Next, ensure its 2" x 6" Wood Side #2 faces top. Also, ensure its 2" x 6" Wood Side #3 faces back, also its 2" x 6" Wood Side #4 must be oriented bottom
P10 (2" x 6" Lumber 19.5" length) - its 2" x 6" Wood End #1, which is right-facing, should connect to part 30's 2" x 4" Wood Side #4. Next, its 2" x 6" Wood End #2, which is left-facing, should connect to part 27's 2" x 4" Wood Side #4, also ensure its 2" x 6" Wood Side #1 faces front, and its 2" x 6" Wood Side #2 needs to point top, plus its 2" x 6" Wood Side #3 should be directed back, then its 2" x 6" Wood Side #4 should be directed bottom
P15 (2" x 6" Lumber 19.5" length) - attach its 2" x 6" Wood End #1 facing right to part 30's 2" x 4" Wood Side #4. Also, its 2" x 6" Wood Side #1 should be directed front, and its 2" x 6" Wood Side #2 should be directed top. Also, its 2" x 6" Wood Side #3 should be directed back. Next, its 2" x 6" Wood Side #4 must be oriented bottom. After that, ensure its 2" x 6" Wood End #2 faces left
2" x 4" Lumber x 35.5"x 2 2" x 4" Lumber x 72.5"x 2 2" x 6" Lumber x 19.5"x 3 Attaching: Middle Shelf Assembly
To install the middle shelf and its primary support post, which adds significant rigidity and squares the main frame.
This assembly is built directly onto the Base Frame from the previous step.
Angle: back left
P8 (2" x 2" Lumber 30" length) - connect its 2" x 2" Wood Side #3 oriented right links with part 9's 2" x 6" Wood End #2, also its 2" x 2" Wood End #2, which is back-facing, should connect to part 28's 2" x 4" Wood Side #3, plus ensure its 2" x 2" Wood End #1 faces front, plus its 2" x 2" Wood Side #1 needs to point left, then its 2" x 2" Wood Side #2 should be directed top, also its 2" x 2" Wood Side #4 needs to point bottom
P5 (2" x 6" Lumber 19.5" length) - connect its 2" x 6" Wood End #1 oriented right links with part 29's 2" x 4" Wood Side #4. After that, its 2" x 6" Wood End #2, which is left-facing, should connect to part 8's 2" x 2" Wood Side #3. Next, its 2" x 6" Wood Side #1 should be directed front, and its 2" x 6" Wood Side #2 needs to point top, plus its 2" x 6" Wood Side #3 should be directed back, then its 2" x 6" Wood Side #4 should be directed bottom
P9 (2" x 6" Lumber 19.5" length) - attach its 2" x 6" Wood End #2 facing left to part 8's 2" x 2" Wood Side #3, plus its 2" x 6" Wood End #1 should be directed right, plus its 2" x 6" Wood Side #1 must be oriented front, plus its 2" x 6" Wood Side #2 needs to point top. Additionally, its 2" x 6" Wood Side #3 should be directed back, also its 2" x 6" Wood Side #4 must be oriented bottom
P11 (2" x 6" Lumber 19.5" length) - its 2" x 6" Wood End #1, which is right-facing, should connect to part 29's 2" x 4" Wood Side #4. Next, connect its 2" x 6" Wood End #2 oriented left links with part 28's 2" x 4" Wood Side #4, also its 2" x 6" Wood Side #1 must be oriented front, plus its 2" x 6" Wood Side #2 must be oriented top. Next, its 2" x 6" Wood Side #3 should be directed back. Also, ensure its 2" x 6" Wood Side #4 faces bottom
P12 (2" x 6" Lumber 19.5" length) - attach its 2" x 6" Wood End #2 facing left to part 8's 2" x 2" Wood Side #3, then its 2" x 6" Wood End #1 should be directed right. Next, its 2" x 6" Wood Side #1 must be oriented front, also ensure its 2" x 6" Wood Side #2 faces top, also its 2" x 6" Wood Side #3 needs to point back, then its 2" x 6" Wood Side #4 should be directed bottom
P13 (2" x 6" Lumber 19.5" length) - attach its 2" x 6" Wood End #2 facing left to part 8's 2" x 2" Wood Side #3. Also, its 2" x 6" Wood End #1 must be oriented right, then its 2" x 6" Wood Side #1 should be directed front, also its 2" x 6" Wood Side #2 should be directed top, plus ensure its 2" x 6" Wood Side #3 faces back. After that, its 2" x 6" Wood Side #4 should be directed bottom
P14 (2" x 6" Lumber 19.5" length) - its 2" x 6" Wood End #1 should be directed right. Additionally, its 2" x 6" Wood Side #1 should be directed front, also its 2" x 6" Wood Side #2 needs to point top, then ensure its 2" x 6" Wood Side #3 faces back. Additionally, its 2" x 6" Wood Side #4 should be directed bottom. After that, its 2" x 6" Wood End #2 should be directed left
P17 (2" x 6" Lumber 19.5" length) - its 2" x 6" Wood End #1 must be oriented right. Additionally, its 2" x 6" Wood Side #1 needs to point front, also its 2" x 6" Wood Side #2 should be directed top, also its 2" x 6" Wood Side #3 needs to point back, then its 2" x 6" Wood Side #4 should be directed bottom. Also, its 2" x 6" Wood End #2 needs to point left
P18 (2" x 6" Lumber 19.5" length) - ensure its 2" x 6" Wood End #1 faces right, and ensure its 2" x 6" Wood Side #1 faces front. Additionally, its 2" x 6" Wood Side #2 must be oriented top. Additionally, its 2" x 6" Wood Side #3 should be directed back. Also, its 2" x 6" Wood Side #4 needs to point bottom. Next, its 2" x 6" Wood End #2 should be directed left
P19 (2" x 6" Lumber 19.5" length) - its 2" x 6" Wood End #1 needs to point right, then its 2" x 6" Wood Side #1 needs to point front, also ensure its 2" x 6" Wood Side #2 faces top. Next, its 2" x 6" Wood Side #3 must be oriented back, and its 2" x 6" Wood Side #4 must be oriented bottom. Also, ensure its 2" x 6" Wood End #2 faces left
2" x 2" Lumber x 30"x 1 2" x 6" Lumber x 19.5"x 9
Angle: front right
P8 (2" x 2" Lumber 30" length) - connect its 2" x 2" Wood Side #3 oriented right links with part 9's 2" x 6" Wood End #2, also its 2" x 2" Wood End #2, which is back-facing, should connect to part 28's 2" x 4" Wood Side #3, plus ensure its 2" x 2" Wood End #1 faces front, plus its 2" x 2" Wood Side #1 needs to point left, then its 2" x 2" Wood Side #2 should be directed top, also its 2" x 2" Wood Side #4 needs to point bottom
P5 (2" x 6" Lumber 19.5" length) - connect its 2" x 6" Wood End #1 oriented right links with part 29's 2" x 4" Wood Side #4. After that, its 2" x 6" Wood End #2, which is left-facing, should connect to part 8's 2" x 2" Wood Side #3. Next, its 2" x 6" Wood Side #1 should be directed front, and its 2" x 6" Wood Side #2 needs to point top, plus its 2" x 6" Wood Side #3 should be directed back, then its 2" x 6" Wood Side #4 should be directed bottom
P9 (2" x 6" Lumber 19.5" length) - attach its 2" x 6" Wood End #2 facing left to part 8's 2" x 2" Wood Side #3, plus its 2" x 6" Wood End #1 should be directed right, plus its 2" x 6" Wood Side #1 must be oriented front, plus its 2" x 6" Wood Side #2 needs to point top. Additionally, its 2" x 6" Wood Side #3 should be directed back, also its 2" x 6" Wood Side #4 must be oriented bottom
P11 (2" x 6" Lumber 19.5" length) - its 2" x 6" Wood End #1, which is right-facing, should connect to part 29's 2" x 4" Wood Side #4. Next, connect its 2" x 6" Wood End #2 oriented left links with part 28's 2" x 4" Wood Side #4, also its 2" x 6" Wood Side #1 must be oriented front, plus its 2" x 6" Wood Side #2 must be oriented top. Next, its 2" x 6" Wood Side #3 should be directed back. Also, ensure its 2" x 6" Wood Side #4 faces bottom
P12 (2" x 6" Lumber 19.5" length) - attach its 2" x 6" Wood End #2 facing left to part 8's 2" x 2" Wood Side #3, then its 2" x 6" Wood End #1 should be directed right. Next, its 2" x 6" Wood Side #1 must be oriented front, also ensure its 2" x 6" Wood Side #2 faces top, also its 2" x 6" Wood Side #3 needs to point back, then its 2" x 6" Wood Side #4 should be directed bottom
P13 (2" x 6" Lumber 19.5" length) - attach its 2" x 6" Wood End #2 facing left to part 8's 2" x 2" Wood Side #3. Also, its 2" x 6" Wood End #1 must be oriented right, then its 2" x 6" Wood Side #1 should be directed front, also its 2" x 6" Wood Side #2 should be directed top, plus ensure its 2" x 6" Wood Side #3 faces back. After that, its 2" x 6" Wood Side #4 should be directed bottom
P14 (2" x 6" Lumber 19.5" length) - its 2" x 6" Wood End #1 should be directed right. Additionally, its 2" x 6" Wood Side #1 should be directed front, also its 2" x 6" Wood Side #2 needs to point top, then ensure its 2" x 6" Wood Side #3 faces back. Additionally, its 2" x 6" Wood Side #4 should be directed bottom. After that, its 2" x 6" Wood End #2 should be directed left
P17 (2" x 6" Lumber 19.5" length) - its 2" x 6" Wood End #1 must be oriented right. Additionally, its 2" x 6" Wood Side #1 needs to point front, also its 2" x 6" Wood Side #2 should be directed top, also its 2" x 6" Wood Side #3 needs to point back, then its 2" x 6" Wood Side #4 should be directed bottom. Also, its 2" x 6" Wood End #2 needs to point left
P18 (2" x 6" Lumber 19.5" length) - ensure its 2" x 6" Wood End #1 faces right, and ensure its 2" x 6" Wood Side #1 faces front. Additionally, its 2" x 6" Wood Side #2 must be oriented top. Additionally, its 2" x 6" Wood Side #3 should be directed back. Also, its 2" x 6" Wood Side #4 needs to point bottom. Next, its 2" x 6" Wood End #2 should be directed left
P19 (2" x 6" Lumber 19.5" length) - its 2" x 6" Wood End #1 needs to point right, then its 2" x 6" Wood Side #1 needs to point front, also ensure its 2" x 6" Wood Side #2 faces top. Next, its 2" x 6" Wood Side #3 must be oriented back, and its 2" x 6" Wood Side #4 must be oriented bottom. Also, ensure its 2" x 6" Wood End #2 faces left
2" x 2" Lumber x 30"x 1 2" x 6" Lumber x 19.5"x 9
Angle: bottom right
P8 (2" x 2" Lumber 30" length) - connect its 2" x 2" Wood Side #3 oriented right links with part 9's 2" x 6" Wood End #2, also its 2" x 2" Wood End #2, which is back-facing, should connect to part 28's 2" x 4" Wood Side #3, plus ensure its 2" x 2" Wood End #1 faces front, plus its 2" x 2" Wood Side #1 needs to point left, then its 2" x 2" Wood Side #2 should be directed top, also its 2" x 2" Wood Side #4 needs to point bottom
P5 (2" x 6" Lumber 19.5" length) - connect its 2" x 6" Wood End #1 oriented right links with part 29's 2" x 4" Wood Side #4. After that, its 2" x 6" Wood End #2, which is left-facing, should connect to part 8's 2" x 2" Wood Side #3. Next, its 2" x 6" Wood Side #1 should be directed front, and its 2" x 6" Wood Side #2 needs to point top, plus its 2" x 6" Wood Side #3 should be directed back, then its 2" x 6" Wood Side #4 should be directed bottom
P9 (2" x 6" Lumber 19.5" length) - attach its 2" x 6" Wood End #2 facing left to part 8's 2" x 2" Wood Side #3, plus its 2" x 6" Wood End #1 should be directed right, plus its 2" x 6" Wood Side #1 must be oriented front, plus its 2" x 6" Wood Side #2 needs to point top. Additionally, its 2" x 6" Wood Side #3 should be directed back, also its 2" x 6" Wood Side #4 must be oriented bottom
P11 (2" x 6" Lumber 19.5" length) - its 2" x 6" Wood End #1, which is right-facing, should connect to part 29's 2" x 4" Wood Side #4. Next, connect its 2" x 6" Wood End #2 oriented left links with part 28's 2" x 4" Wood Side #4, also its 2" x 6" Wood Side #1 must be oriented front, plus its 2" x 6" Wood Side #2 must be oriented top. Next, its 2" x 6" Wood Side #3 should be directed back. Also, ensure its 2" x 6" Wood Side #4 faces bottom
P12 (2" x 6" Lumber 19.5" length) - attach its 2" x 6" Wood End #2 facing left to part 8's 2" x 2" Wood Side #3, then its 2" x 6" Wood End #1 should be directed right. Next, its 2" x 6" Wood Side #1 must be oriented front, also ensure its 2" x 6" Wood Side #2 faces top, also its 2" x 6" Wood Side #3 needs to point back, then its 2" x 6" Wood Side #4 should be directed bottom
P13 (2" x 6" Lumber 19.5" length) - attach its 2" x 6" Wood End #2 facing left to part 8's 2" x 2" Wood Side #3. Also, its 2" x 6" Wood End #1 must be oriented right, then its 2" x 6" Wood Side #1 should be directed front, also its 2" x 6" Wood Side #2 should be directed top, plus ensure its 2" x 6" Wood Side #3 faces back. After that, its 2" x 6" Wood Side #4 should be directed bottom
P14 (2" x 6" Lumber 19.5" length) - its 2" x 6" Wood End #1 should be directed right. Additionally, its 2" x 6" Wood Side #1 should be directed front, also its 2" x 6" Wood Side #2 needs to point top, then ensure its 2" x 6" Wood Side #3 faces back. Additionally, its 2" x 6" Wood Side #4 should be directed bottom. After that, its 2" x 6" Wood End #2 should be directed left
P17 (2" x 6" Lumber 19.5" length) - its 2" x 6" Wood End #1 must be oriented right. Additionally, its 2" x 6" Wood Side #1 needs to point front, also its 2" x 6" Wood Side #2 should be directed top, also its 2" x 6" Wood Side #3 needs to point back, then its 2" x 6" Wood Side #4 should be directed bottom. Also, its 2" x 6" Wood End #2 needs to point left
P18 (2" x 6" Lumber 19.5" length) - ensure its 2" x 6" Wood End #1 faces right, and ensure its 2" x 6" Wood Side #1 faces front. Additionally, its 2" x 6" Wood Side #2 must be oriented top. Additionally, its 2" x 6" Wood Side #3 should be directed back. Also, its 2" x 6" Wood Side #4 needs to point bottom. Next, its 2" x 6" Wood End #2 should be directed left
P19 (2" x 6" Lumber 19.5" length) - its 2" x 6" Wood End #1 needs to point right, then its 2" x 6" Wood Side #1 needs to point front, also ensure its 2" x 6" Wood Side #2 faces top. Next, its 2" x 6" Wood Side #3 must be oriented back, and its 2" x 6" Wood Side #4 must be oriented bottom. Also, ensure its 2" x 6" Wood End #2 faces left
2" x 2" Lumber x 30"x 1 2" x 6" Lumber x 19.5"x 9 Attaching: Right Side Support Frame
To build and install a small support structure on the right side of the station.
Attach this completed support frame to the inside of the back-right leg (P30) of the main assembly.
Angle: back left
P21 (2" x 2" Lumber 30" length) - its 2" x 2" Wood Side #3, which is right-facing, should connect to part 24's 2" x 4" Wood End #2. Additionally, its 2" x 2" Wood End #1 needs to point front. After that, ensure its 2" x 2" Wood Side #1 faces left, then its 2" x 2" Wood Side #2 must be oriented top, also its 2" x 2" Wood Side #4 must be oriented bottom, then its 2" x 2" Wood End #2 should be directed back
P22 (2" x 2" Lumber 30" length) - attach its 2" x 2" Wood End #1 facing front to part 30's 2" x 4" Wood Side #1. Also, attach its 2" x 2" Wood Side #1 facing left to part 24's 2" x 4" Wood End #1. Next, connect its 2" x 2" Wood Side #2 oriented top links with part 23's 2" x 4" Wood Side #1, plus its 2" x 2" Wood Side #3 must be oriented right, then ensure its 2" x 2" Wood Side #4 faces bottom. Next, ensure its 2" x 2" Wood End #2 faces back
P23 (2" x 4" Lumber 30" length) - its 2" x 4" Wood Side #1, which is bottom-facing, should connect to part 22's 2" x 2" Wood Side #2, plus its 2" x 4" Wood Side #4, which is left-facing, should connect to part 11's 2" x 6" Wood End #1. After that, its 2" x 4" Wood End #1 needs to point back. After that, its 2" x 4" Wood Side #2 should be directed right. Additionally, ensure its 2" x 4" Wood Side #3 faces top. After that, ensure its 2" x 4" Wood End #2 faces front
P24 (2" x 4" Lumber 19.5" length) - its 2" x 4" Wood End #1, which is right-facing, should connect to part 22's 2" x 2" Wood Side #1, and attach its 2" x 4" Wood End #2 facing left to part 21's 2" x 2" Wood Side #3. Next, its 2" x 4" Wood Side #1 needs to point front, and its 2" x 4" Wood Side #2 needs to point top, also ensure its 2" x 4" Wood Side #3 faces back, plus its 2" x 4" Wood Side #4 needs to point bottom
2" x 2" Lumber x 30"x 2 2" x 4" Lumber x 30"x 1 2" x 4" Lumber x 19.5"x 1
Angle: front right
P21 (2" x 2" Lumber 30" length) - its 2" x 2" Wood Side #3, which is right-facing, should connect to part 24's 2" x 4" Wood End #2. Additionally, its 2" x 2" Wood End #1 needs to point front. After that, ensure its 2" x 2" Wood Side #1 faces left, then its 2" x 2" Wood Side #2 must be oriented top, also its 2" x 2" Wood Side #4 must be oriented bottom, then its 2" x 2" Wood End #2 should be directed back
P22 (2" x 2" Lumber 30" length) - attach its 2" x 2" Wood End #1 facing front to part 30's 2" x 4" Wood Side #1. Also, attach its 2" x 2" Wood Side #1 facing left to part 24's 2" x 4" Wood End #1. Next, connect its 2" x 2" Wood Side #2 oriented top links with part 23's 2" x 4" Wood Side #1, plus its 2" x 2" Wood Side #3 must be oriented right, then ensure its 2" x 2" Wood Side #4 faces bottom. Next, ensure its 2" x 2" Wood End #2 faces back
P23 (2" x 4" Lumber 30" length) - its 2" x 4" Wood Side #1, which is bottom-facing, should connect to part 22's 2" x 2" Wood Side #2, plus its 2" x 4" Wood Side #4, which is left-facing, should connect to part 11's 2" x 6" Wood End #1. After that, its 2" x 4" Wood End #1 needs to point back. After that, its 2" x 4" Wood Side #2 should be directed right. Additionally, ensure its 2" x 4" Wood Side #3 faces top. After that, ensure its 2" x 4" Wood End #2 faces front
P24 (2" x 4" Lumber 19.5" length) - its 2" x 4" Wood End #1, which is right-facing, should connect to part 22's 2" x 2" Wood Side #1, and attach its 2" x 4" Wood End #2 facing left to part 21's 2" x 2" Wood Side #3. Next, its 2" x 4" Wood Side #1 needs to point front, and its 2" x 4" Wood Side #2 needs to point top, also ensure its 2" x 4" Wood Side #3 faces back, plus its 2" x 4" Wood Side #4 needs to point bottom
2" x 2" Lumber x 30"x 2 2" x 4" Lumber x 30"x 1 2" x 4" Lumber x 19.5"x 1
Angle: bottom right
P21 (2" x 2" Lumber 30" length) - its 2" x 2" Wood Side #3, which is right-facing, should connect to part 24's 2" x 4" Wood End #2. Additionally, its 2" x 2" Wood End #1 needs to point front. After that, ensure its 2" x 2" Wood Side #1 faces left, then its 2" x 2" Wood Side #2 must be oriented top, also its 2" x 2" Wood Side #4 must be oriented bottom, then its 2" x 2" Wood End #2 should be directed back
P22 (2" x 2" Lumber 30" length) - attach its 2" x 2" Wood End #1 facing front to part 30's 2" x 4" Wood Side #1. Also, attach its 2" x 2" Wood Side #1 facing left to part 24's 2" x 4" Wood End #1. Next, connect its 2" x 2" Wood Side #2 oriented top links with part 23's 2" x 4" Wood Side #1, plus its 2" x 2" Wood Side #3 must be oriented right, then ensure its 2" x 2" Wood Side #4 faces bottom. Next, ensure its 2" x 2" Wood End #2 faces back
P23 (2" x 4" Lumber 30" length) - its 2" x 4" Wood Side #1, which is bottom-facing, should connect to part 22's 2" x 2" Wood Side #2, plus its 2" x 4" Wood Side #4, which is left-facing, should connect to part 11's 2" x 6" Wood End #1. After that, its 2" x 4" Wood End #1 needs to point back. After that, its 2" x 4" Wood Side #2 should be directed right. Additionally, ensure its 2" x 4" Wood Side #3 faces top. After that, ensure its 2" x 4" Wood End #2 faces front
P24 (2" x 4" Lumber 19.5" length) - its 2" x 4" Wood End #1, which is right-facing, should connect to part 22's 2" x 2" Wood Side #1, and attach its 2" x 4" Wood End #2 facing left to part 21's 2" x 2" Wood Side #3. Next, its 2" x 4" Wood Side #1 needs to point front, and its 2" x 4" Wood Side #2 needs to point top, also ensure its 2" x 4" Wood Side #3 faces back, plus its 2" x 4" Wood Side #4 needs to point bottom
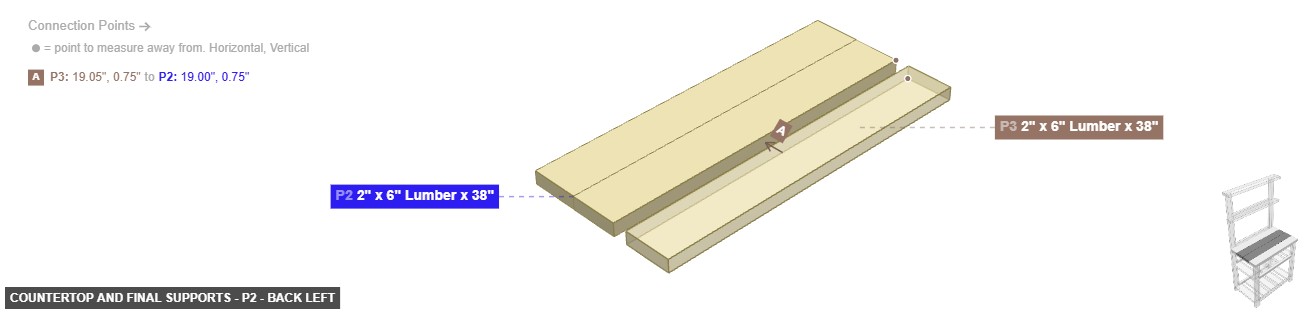
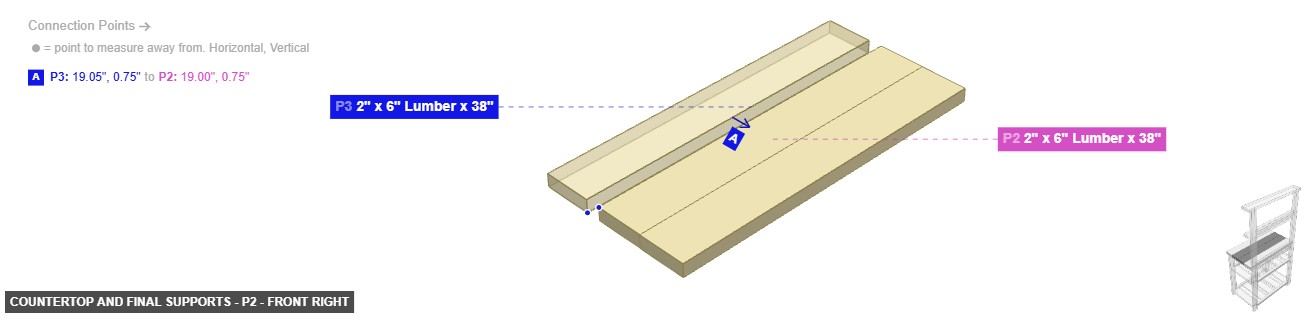
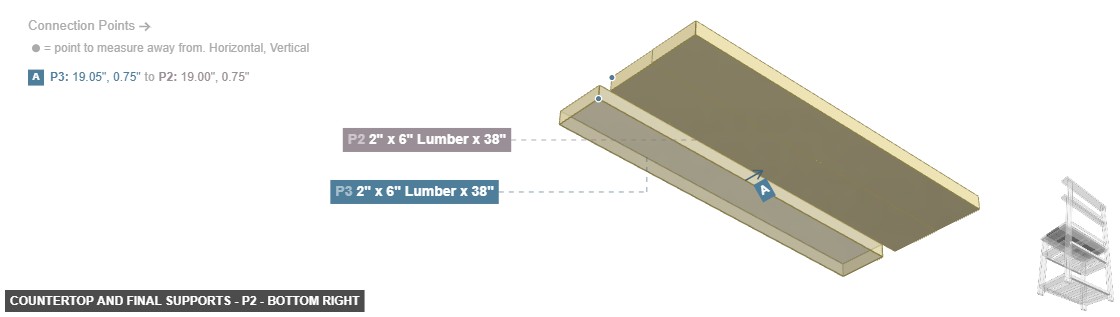
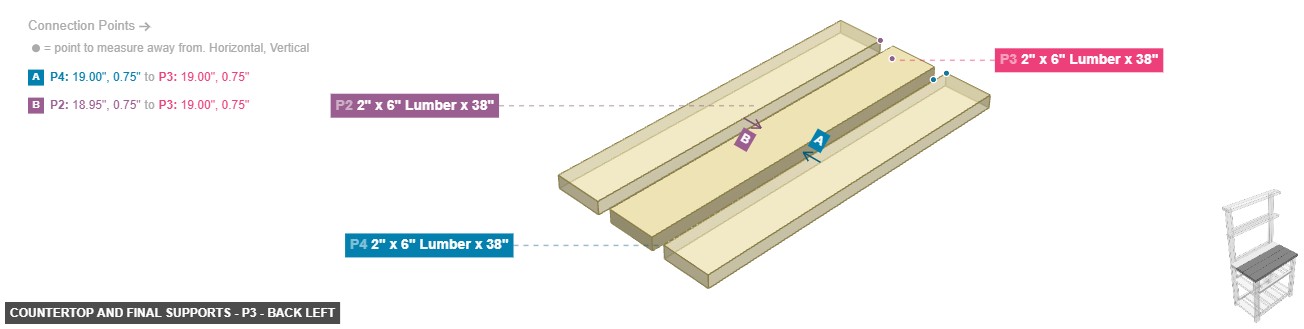
2" x 2" Lumber x 30"x 2 2" x 4" Lumber x 30"x 1 2" x 4" Lumber x 19.5"x 1 Attaching: Countertop and Final Supports
To add the remaining vertical supports and install the main work surface, or countertop.
Place the assembled countertop onto the top of the main frame, securing it to the front legs and the back-right leg (P30).
Angle: back left
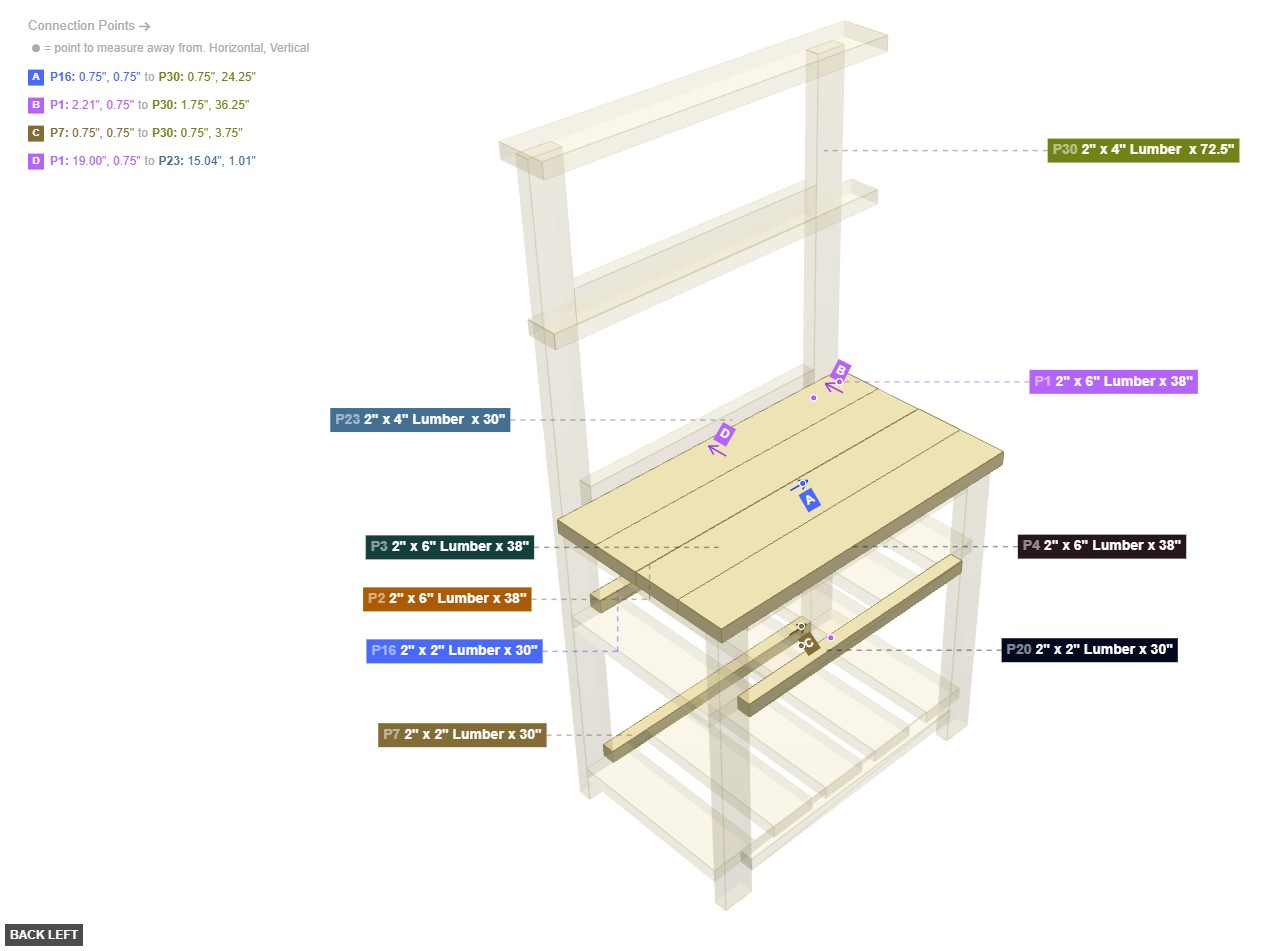
P1 (2" x 6" Lumber 38" length) - its 2" x 6" Wood Side #3, which is right-facing, should connect to part 30's 2" x 4" Wood Side #4, then ensure its 2" x 6" Wood End #1 faces front, then its 2" x 6" Wood Side #1 should be directed left. Additionally, its 2" x 6" Wood Side #2 needs to point top, plus its 2" x 6" Wood Side #4 needs to point bottom, then ensure its 2" x 6" Wood End #2 faces back
P2 (2" x 6" Lumber 38" length) - its 2" x 6" Wood Side #1, which is left-facing, should connect to part 3's 2" x 6" Wood Side #3. Also, its 2" x 6" Wood End #1 should be directed front, then its 2" x 6" Wood Side #2 needs to point top, then its 2" x 6" Wood Side #3 must be oriented right. Also, its 2" x 6" Wood Side #4 should be directed bottom, plus ensure its 2" x 6" Wood End #2 faces back
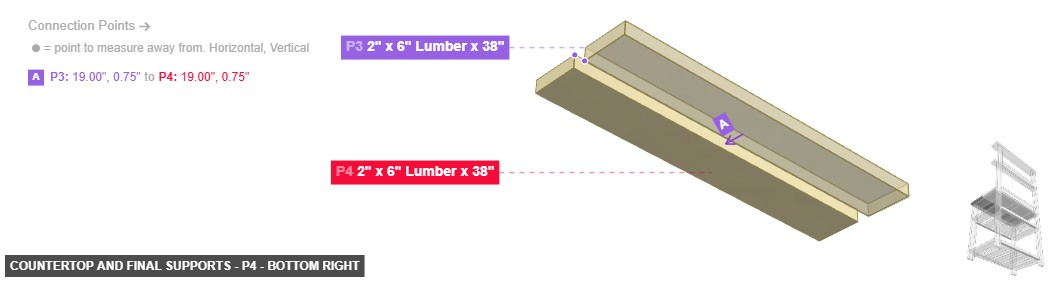
P3 (2" x 6" Lumber 38" length) - attach its 2" x 6" Wood Side #1 facing left to part 4's 2" x 6" Wood Side #3. Next, connect its 2" x 6" Wood Side #3 oriented right links with part 2's 2" x 6" Wood Side #1. Also, its 2" x 6" Wood End #1 needs to point front, and its 2" x 6" Wood Side #2 must be oriented top, also ensure its 2" x 6" Wood Side #4 faces bottom. Additionally, its 2" x 6" Wood End #2 needs to point back
P4 (2" x 6" Lumber 38" length) - attach its 2" x 6" Wood Side #3 facing right to part 3's 2" x 6" Wood Side #1, then ensure its 2" x 6" Wood End #1 faces front, and its 2" x 6" Wood Side #1 needs to point left, plus its 2" x 6" Wood Side #2 must be oriented top, plus its 2" x 6" Wood Side #4 must be oriented bottom, also its 2" x 6" Wood End #2 should be directed back
P7 (2" x 2" Lumber 30" length) - its 2" x 2" Wood End #1, which is front-facing, should connect to part 30's 2" x 4" Wood Side #1. After that, its 2" x 2" Wood Side #1 needs to point left, and its 2" x 2" Wood Side #2 should be directed top. Also, its 2" x 2" Wood Side #3 should be directed right. Also, its 2" x 2" Wood Side #4 should be directed bottom, plus ensure its 2" x 2" Wood End #2 faces back
P16 (2" x 2" Lumber 30" length) - connect its 2" x 2" Wood End #1 oriented front links with part 30's 2" x 4" Wood Side #1, plus its 2" x 2" Wood Side #1 should be directed left. Also, its 2" x 2" Wood Side #2 needs to point top, and its 2" x 2" Wood Side #3 must be oriented right, plus its 2" x 2" Wood Side #4 needs to point bottom, then its 2" x 2" Wood End #2 should be directed back
P20 (2" x 2" Lumber 30" length) - ensure its 2" x 2" Wood End #1 faces front. Next, its 2" x 2" Wood Side #1 must be oriented left, plus ensure its 2" x 2" Wood Side #2 faces top. After that, its 2" x 2" Wood Side #3 must be oriented right, then ensure its 2" x 2" Wood Side #4 faces bottom, plus its 2" x 2" Wood End #2 must be oriented back
2" x 6" Lumber x 38"x 4 2" x 2" Lumber x 30"x 3
Angle: front right
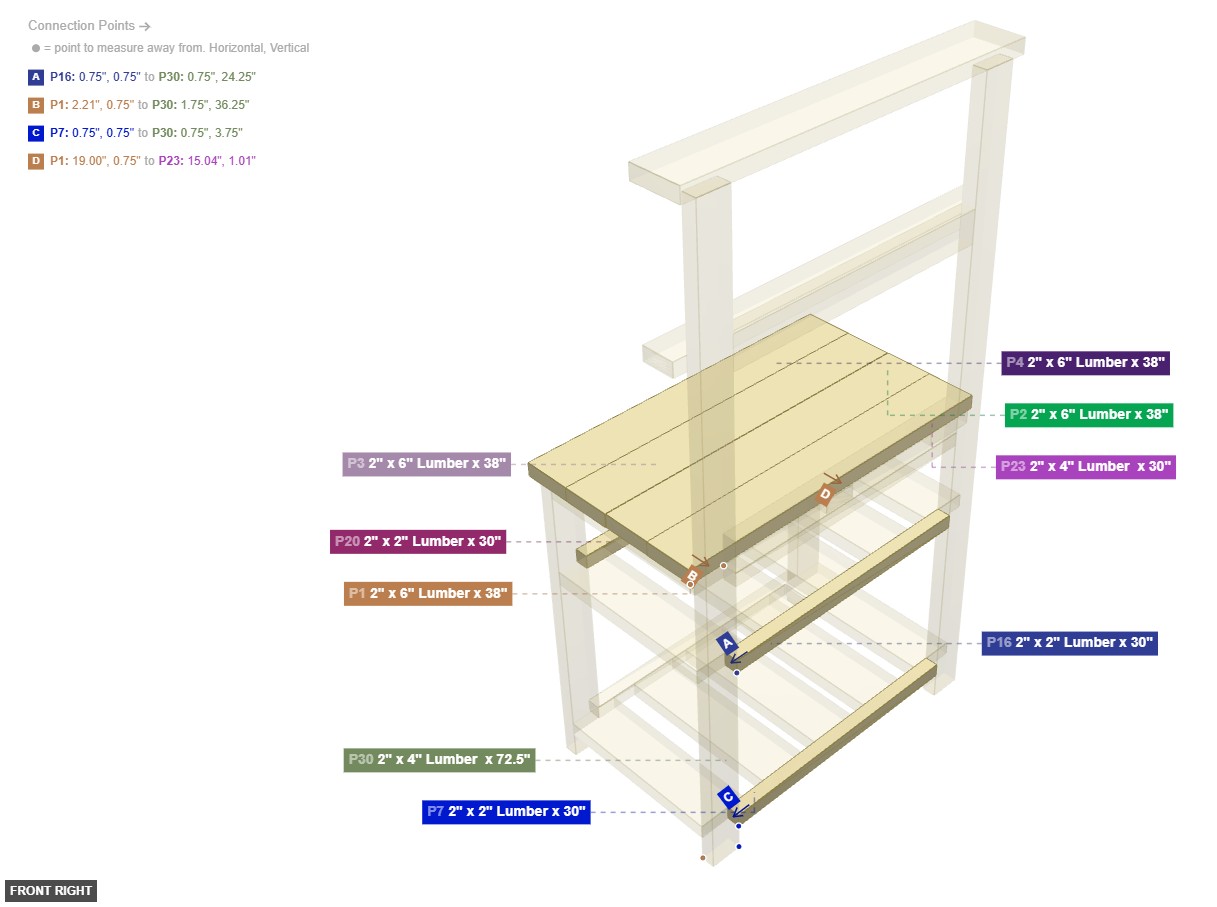
P1 (2" x 6" Lumber 38" length) - its 2" x 6" Wood Side #3, which is right-facing, should connect to part 30's 2" x 4" Wood Side #4, then ensure its 2" x 6" Wood End #1 faces front, then its 2" x 6" Wood Side #1 should be directed left. Additionally, its 2" x 6" Wood Side #2 needs to point top, plus its 2" x 6" Wood Side #4 needs to point bottom, then ensure its 2" x 6" Wood End #2 faces back
P2 (2" x 6" Lumber 38" length) - its 2" x 6" Wood Side #1, which is left-facing, should connect to part 3's 2" x 6" Wood Side #3. Also, its 2" x 6" Wood End #1 should be directed front, then its 2" x 6" Wood Side #2 needs to point top, then its 2" x 6" Wood Side #3 must be oriented right. Also, its 2" x 6" Wood Side #4 should be directed bottom, plus ensure its 2" x 6" Wood End #2 faces back
P3 (2" x 6" Lumber 38" length) - attach its 2" x 6" Wood Side #1 facing left to part 4's 2" x 6" Wood Side #3. Next, connect its 2" x 6" Wood Side #3 oriented right links with part 2's 2" x 6" Wood Side #1. Also, its 2" x 6" Wood End #1 needs to point front, and its 2" x 6" Wood Side #2 must be oriented top, also ensure its 2" x 6" Wood Side #4 faces bottom. Additionally, its 2" x 6" Wood End #2 needs to point back
P4 (2" x 6" Lumber 38" length) - attach its 2" x 6" Wood Side #3 facing right to part 3's 2" x 6" Wood Side #1, then ensure its 2" x 6" Wood End #1 faces front, and its 2" x 6" Wood Side #1 needs to point left, plus its 2" x 6" Wood Side #2 must be oriented top, plus its 2" x 6" Wood Side #4 must be oriented bottom, also its 2" x 6" Wood End #2 should be directed back
P7 (2" x 2" Lumber 30" length) - its 2" x 2" Wood End #1, which is front-facing, should connect to part 30's 2" x 4" Wood Side #1. After that, its 2" x 2" Wood Side #1 needs to point left, and its 2" x 2" Wood Side #2 should be directed top. Also, its 2" x 2" Wood Side #3 should be directed right. Also, its 2" x 2" Wood Side #4 should be directed bottom, plus ensure its 2" x 2" Wood End #2 faces back
P16 (2" x 2" Lumber 30" length) - connect its 2" x 2" Wood End #1 oriented front links with part 30's 2" x 4" Wood Side #1, plus its 2" x 2" Wood Side #1 should be directed left. Also, its 2" x 2" Wood Side #2 needs to point top, and its 2" x 2" Wood Side #3 must be oriented right, plus its 2" x 2" Wood Side #4 needs to point bottom, then its 2" x 2" Wood End #2 should be directed back
P20 (2" x 2" Lumber 30" length) - ensure its 2" x 2" Wood End #1 faces front. Next, its 2" x 2" Wood Side #1 must be oriented left, plus ensure its 2" x 2" Wood Side #2 faces top. After that, its 2" x 2" Wood Side #3 must be oriented right, then ensure its 2" x 2" Wood Side #4 faces bottom, plus its 2" x 2" Wood End #2 must be oriented back
2" x 6" Lumber x 38"x 4 2" x 2" Lumber x 30"x 3
Angle: bottom right
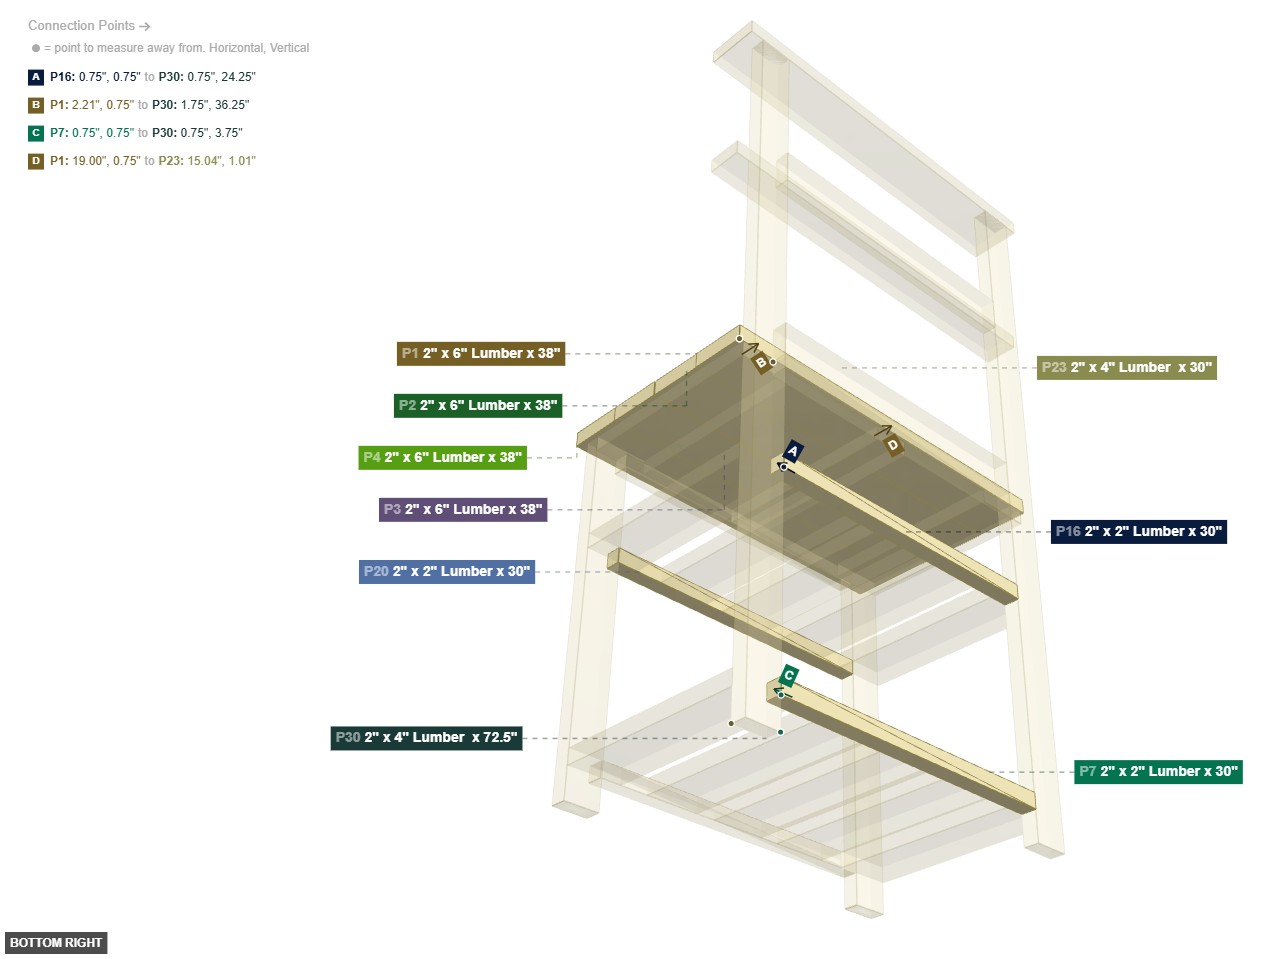
P1 (2" x 6" Lumber 38" length) - its 2" x 6" Wood Side #3, which is right-facing, should connect to part 30's 2" x 4" Wood Side #4, then ensure its 2" x 6" Wood End #1 faces front, then its 2" x 6" Wood Side #1 should be directed left. Additionally, its 2" x 6" Wood Side #2 needs to point top, plus its 2" x 6" Wood Side #4 needs to point bottom, then ensure its 2" x 6" Wood End #2 faces back
P2 (2" x 6" Lumber 38" length) - its 2" x 6" Wood Side #1, which is left-facing, should connect to part 3's 2" x 6" Wood Side #3. Also, its 2" x 6" Wood End #1 should be directed front, then its 2" x 6" Wood Side #2 needs to point top, then its 2" x 6" Wood Side #3 must be oriented right. Also, its 2" x 6" Wood Side #4 should be directed bottom, plus ensure its 2" x 6" Wood End #2 faces back
P3 (2" x 6" Lumber 38" length) - attach its 2" x 6" Wood Side #1 facing left to part 4's 2" x 6" Wood Side #3. Next, connect its 2" x 6" Wood Side #3 oriented right links with part 2's 2" x 6" Wood Side #1. Also, its 2" x 6" Wood End #1 needs to point front, and its 2" x 6" Wood Side #2 must be oriented top, also ensure its 2" x 6" Wood Side #4 faces bottom. Additionally, its 2" x 6" Wood End #2 needs to point back
P4 (2" x 6" Lumber 38" length) - attach its 2" x 6" Wood Side #3 facing right to part 3's 2" x 6" Wood Side #1, then ensure its 2" x 6" Wood End #1 faces front, and its 2" x 6" Wood Side #1 needs to point left, plus its 2" x 6" Wood Side #2 must be oriented top, plus its 2" x 6" Wood Side #4 must be oriented bottom, also its 2" x 6" Wood End #2 should be directed back
P7 (2" x 2" Lumber 30" length) - its 2" x 2" Wood End #1, which is front-facing, should connect to part 30's 2" x 4" Wood Side #1. After that, its 2" x 2" Wood Side #1 needs to point left, and its 2" x 2" Wood Side #2 should be directed top. Also, its 2" x 2" Wood Side #3 should be directed right. Also, its 2" x 2" Wood Side #4 should be directed bottom, plus ensure its 2" x 2" Wood End #2 faces back
P16 (2" x 2" Lumber 30" length) - connect its 2" x 2" Wood End #1 oriented front links with part 30's 2" x 4" Wood Side #1, plus its 2" x 2" Wood Side #1 should be directed left. Also, its 2" x 2" Wood Side #2 needs to point top, and its 2" x 2" Wood Side #3 must be oriented right, plus its 2" x 2" Wood Side #4 needs to point bottom, then its 2" x 2" Wood End #2 should be directed back
P20 (2" x 2" Lumber 30" length) - ensure its 2" x 2" Wood End #1 faces front. Next, its 2" x 2" Wood Side #1 must be oriented left, plus ensure its 2" x 2" Wood Side #2 faces top. After that, its 2" x 2" Wood Side #3 must be oriented right, then ensure its 2" x 2" Wood Side #4 faces bottom, plus its 2" x 2" Wood End #2 must be oriented back
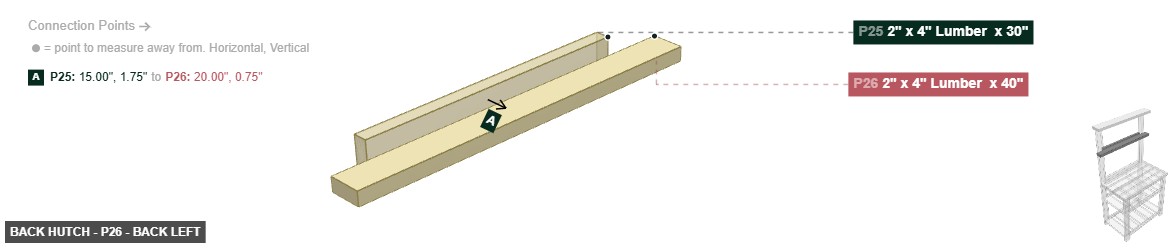
2" x 6" Lumber x 38"x 4 2" x 2" Lumber x 30"x 3 Attaching: Back Hutch
To construct the upper hutch that sits above the countertop, providing additional shelving or display space.
This hutch is assembled directly onto the top portion of the tall back legs of the completed main structure.
Angle: back left

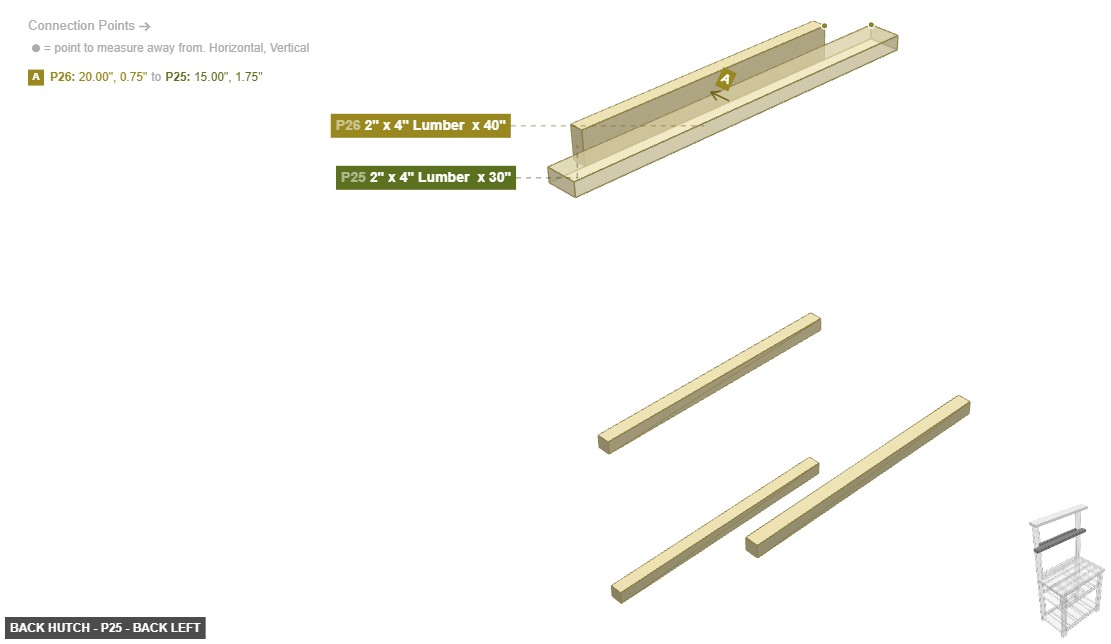
P25 (2" x 4" Lumber 30" length) - connect its 2" x 4" Wood Side #2 oriented left links with part 26's 2" x 4" Wood Side #1, and its 2" x 4" Wood End #1 must be oriented back. Next, its 2" x 4" Wood Side #1 should be directed top, also its 2" x 4" Wood Side #3 needs to point bottom, plus its 2" x 4" Wood Side #4 needs to point right. After that, its 2" x 4" Wood End #2 should be directed front
P26 (2" x 4" Lumber 40" length) - attach its 2" x 4" Wood Side #1 facing right to part 30's 2" x 4" Wood Side #4, plus its 2" x 4" Wood End #1 needs to point back. After that, its 2" x 4" Wood Side #2 must be oriented top. After that, its 2" x 4" Wood Side #3 must be oriented left. After that, its 2" x 4" Wood Side #4 needs to point bottom, and its 2" x 4" Wood End #2 needs to point front
P31 (2" x 6" Lumber 40" length) - connect its 2" x 6" Wood Side #2 oriented bottom links with part 29's 2" x 4" Wood End #1. Also, ensure its 2" x 6" Wood End #1 faces front, and its 2" x 6" Wood Side #1 needs to point right. Next, its 2" x 6" Wood Side #3 needs to point left, and its 2" x 6" Wood Side #4 should be directed top. After that, ensure its 2" x 6" Wood End #2 faces back
2" x 4" Lumber x 30"x 1 2" x 4" Lumber x 40"x 1 2" x 6" Lumber x 40"x 1
Angle: front right
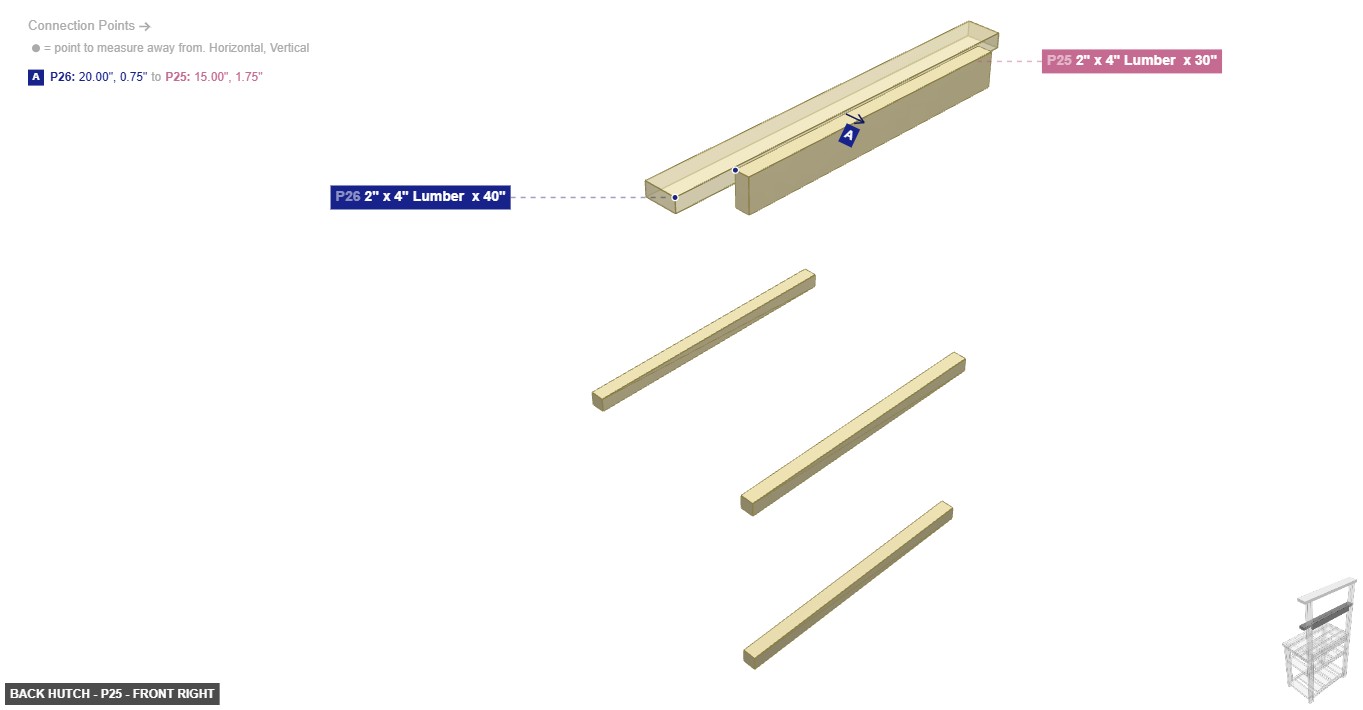
P25 (2" x 4" Lumber 30" length) - connect its 2" x 4" Wood Side #2 oriented left links with part 26's 2" x 4" Wood Side #1, and its 2" x 4" Wood End #1 must be oriented back. Next, its 2" x 4" Wood Side #1 should be directed top, also its 2" x 4" Wood Side #3 needs to point bottom, plus its 2" x 4" Wood Side #4 needs to point right. After that, its 2" x 4" Wood End #2 should be directed front
P26 (2" x 4" Lumber 40" length) - attach its 2" x 4" Wood Side #1 facing right to part 30's 2" x 4" Wood Side #4, plus its 2" x 4" Wood End #1 needs to point back. After that, its 2" x 4" Wood Side #2 must be oriented top. After that, its 2" x 4" Wood Side #3 must be oriented left. After that, its 2" x 4" Wood Side #4 needs to point bottom, and its 2" x 4" Wood End #2 needs to point front
P31 (2" x 6" Lumber 40" length) - connect its 2" x 6" Wood Side #2 oriented bottom links with part 29's 2" x 4" Wood End #1. Also, ensure its 2" x 6" Wood End #1 faces front, and its 2" x 6" Wood Side #1 needs to point right. Next, its 2" x 6" Wood Side #3 needs to point left, and its 2" x 6" Wood Side #4 should be directed top. After that, ensure its 2" x 6" Wood End #2 faces back
2" x 4" Lumber x 30"x 1 2" x 4" Lumber x 40"x 1 2" x 6" Lumber x 40"x 1
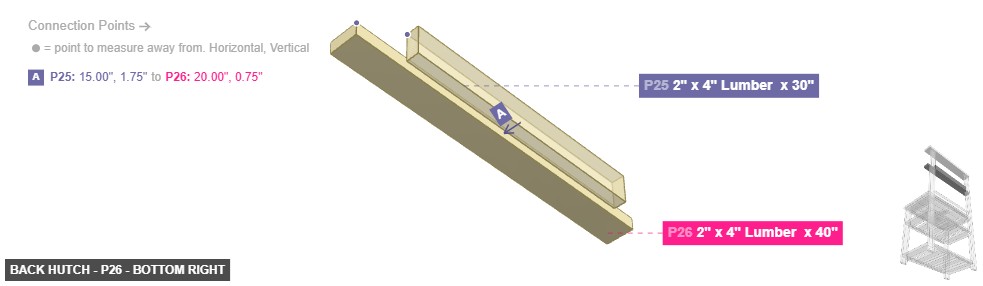
Angle: bottom right
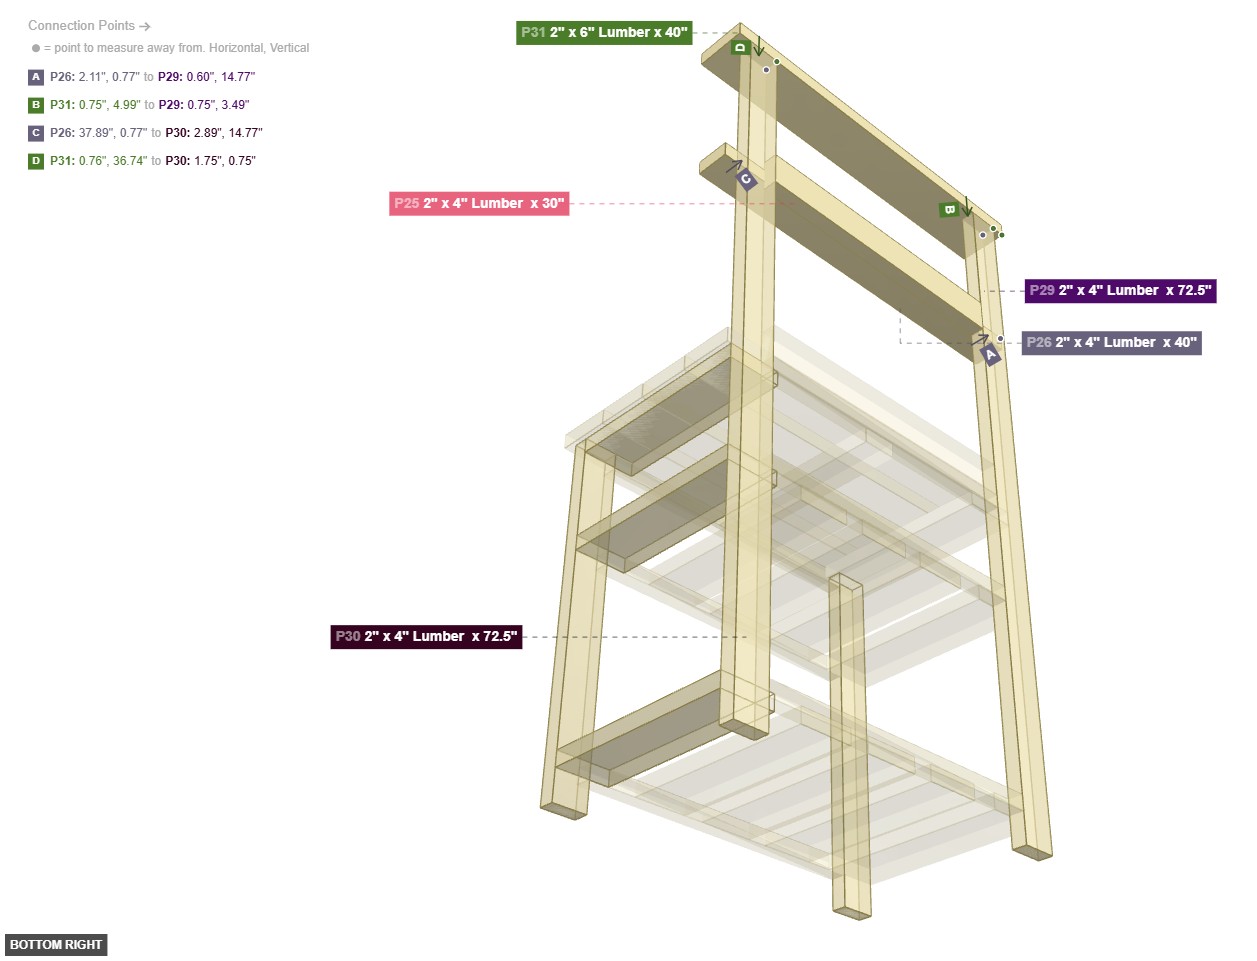
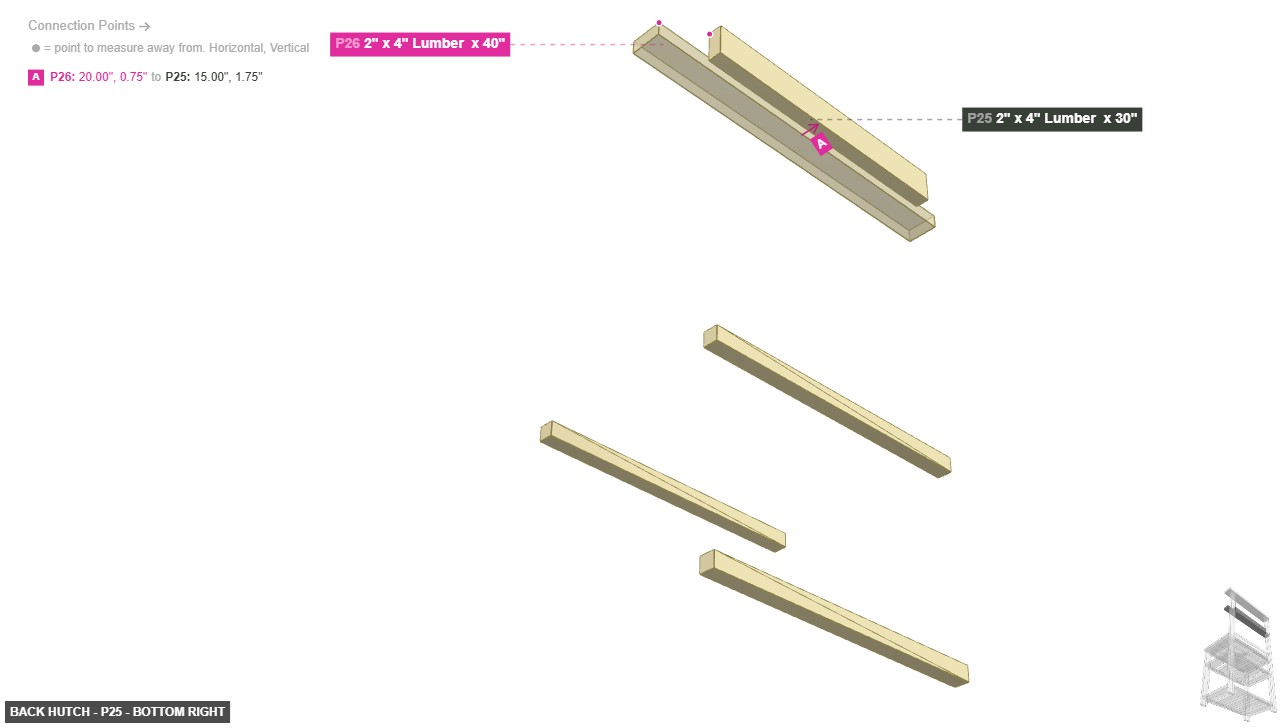
P25 (2" x 4" Lumber 30" length) - connect its 2" x 4" Wood Side #2 oriented left links with part 26's 2" x 4" Wood Side #1, and its 2" x 4" Wood End #1 must be oriented back. Next, its 2" x 4" Wood Side #1 should be directed top, also its 2" x 4" Wood Side #3 needs to point bottom, plus its 2" x 4" Wood Side #4 needs to point right. After that, its 2" x 4" Wood End #2 should be directed front
P26 (2" x 4" Lumber 40" length) - attach its 2" x 4" Wood Side #1 facing right to part 30's 2" x 4" Wood Side #4, plus its 2" x 4" Wood End #1 needs to point back. After that, its 2" x 4" Wood Side #2 must be oriented top. After that, its 2" x 4" Wood Side #3 must be oriented left. After that, its 2" x 4" Wood Side #4 needs to point bottom, and its 2" x 4" Wood End #2 needs to point front
P31 (2" x 6" Lumber 40" length) - connect its 2" x 6" Wood Side #2 oriented bottom links with part 29's 2" x 4" Wood End #1. Also, ensure its 2" x 6" Wood End #1 faces front, and its 2" x 6" Wood Side #1 needs to point right. Next, its 2" x 6" Wood Side #3 needs to point left, and its 2" x 6" Wood Side #4 should be directed top. After that, ensure its 2" x 6" Wood End #2 faces back
2" x 4" Lumber x 30"x 1 2" x 4" Lumber x 40"x 1 2" x 6" Lumber x 40"x 1