Plant Shelf 2 - Comprehensive Assembly Plan And Visual Guide
A three-tiered plant shelf constructed with wooden shelf boxes supported by black steel pipe frames on the left and right sides. The pipe frames feature flanges for shelf attachment and additional rear-facing flanges at the top and bottom levels, likely for stability or wall mounting. - Plant Shelf
-This is a three-tiered shelving unit named 'Plant Shelf 2'. It features three wooden shelf boxes supported by two vertical structures made from black steel pipes and fittings. Flanges connect the pipe structures to the sides of the wooden shelves and also serve as feet and top caps for the pipe supports. - Plant Shelf
Phase 1: Group Overview
Angle: back left
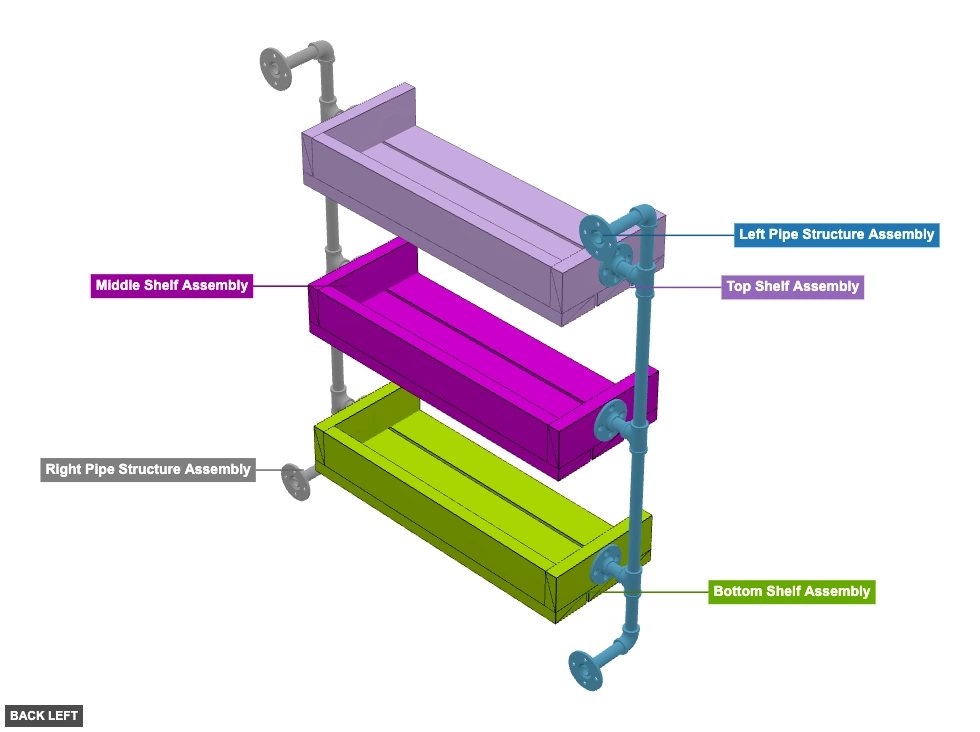
Left Pipe Structure Assembly
 1/2" Flange Black Steelx 5
 1/2" x 2" Long Nipple Black Steelx 3
 1/2" Tee Black Steelx 3
 1/2" x 11" Long Nipple Black Steelx 2
 1/2" x 4" Long Nipple Black Steelx 4
 1/2" 90° Elbow Black Steelx 2
Right Pipe Structure Assembly
1/2" Tee Black Steelx 3 1/2" x 11" Long Nipple Black Steelx 2 1/2" x 2" Long Nipple Black Steelx 3 1/2" Flange Black Steelx 5 1/2" x 4" Long Nipple Black Steelx 4 1/2" 90° Elbow Black Steelx 2 Bottom Shelf Assembly
 1" x 3" Lumber x 9.5"x 2
1" x 3" Lumber x 22"x 1 1" x 3" Lumber x 24"x 3 Middle Shelf Assembly
1" x 3" Lumber x 9.5"x 2 1" x 3" Lumber x 22"x 1 1" x 3" Lumber x 24"x 3 Top Shelf Assembly
1" x 3" Lumber x 9.5"x 2 1" x 3" Lumber x 22"x 1 1" x 3" Lumber x 24"x 3
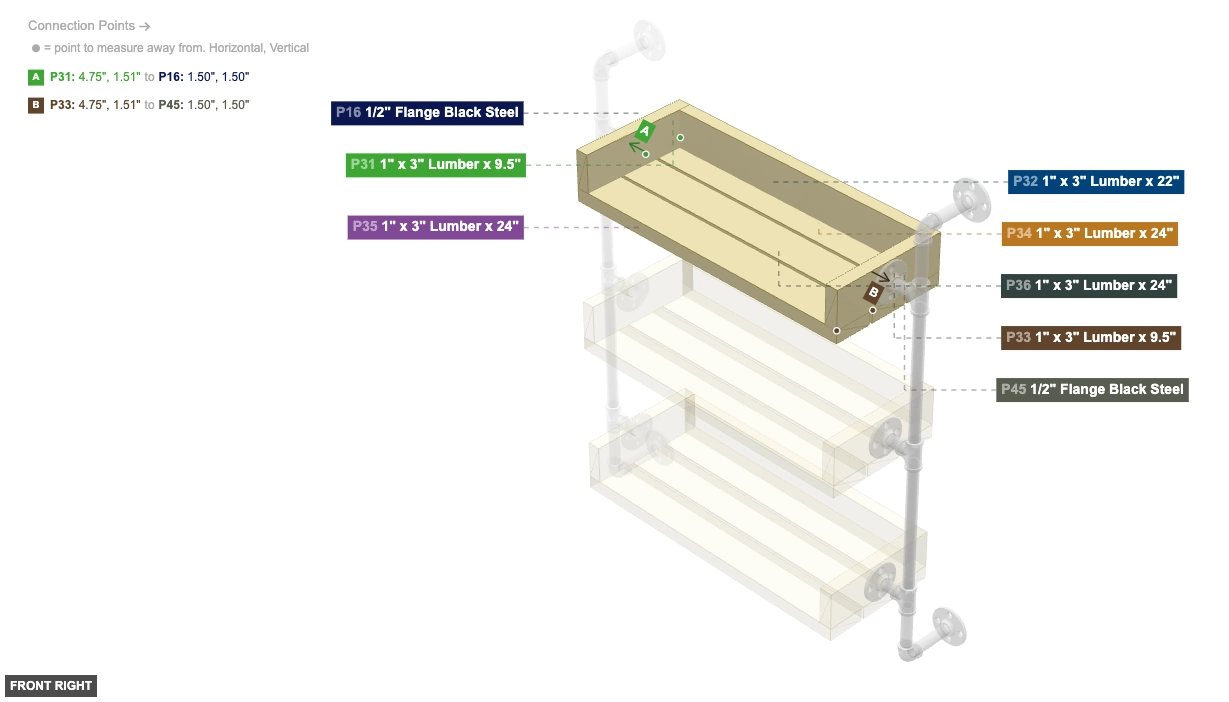
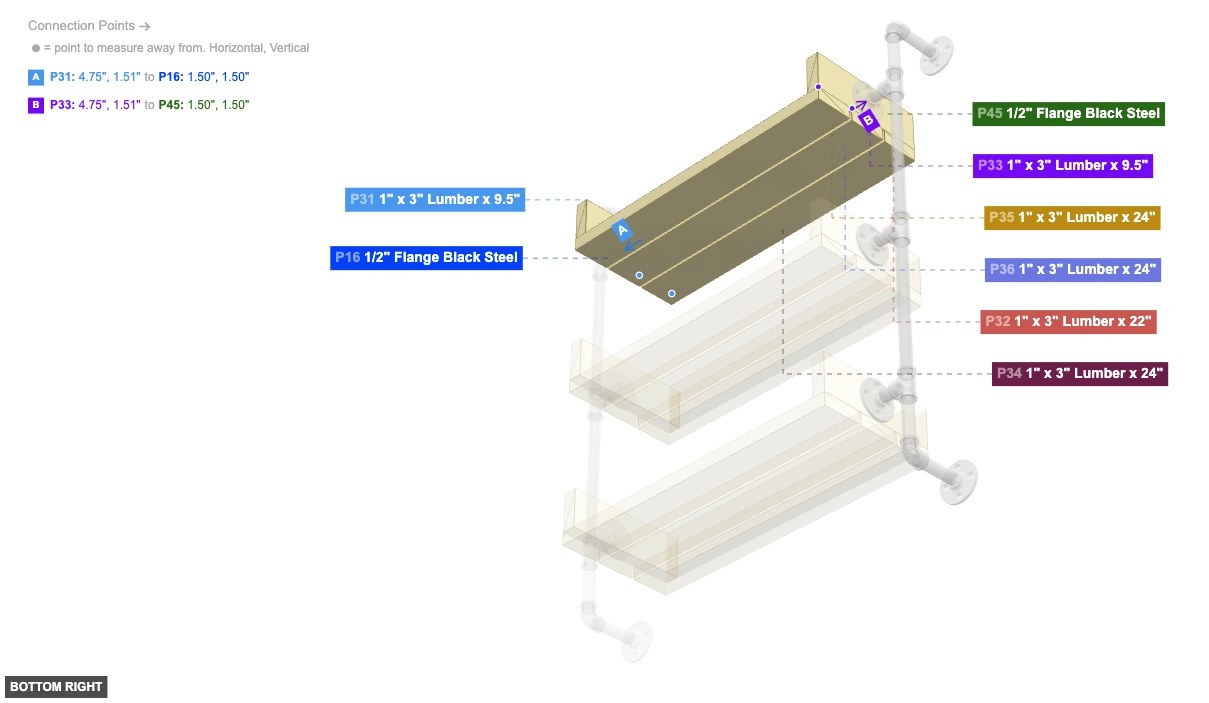
Angle: front right
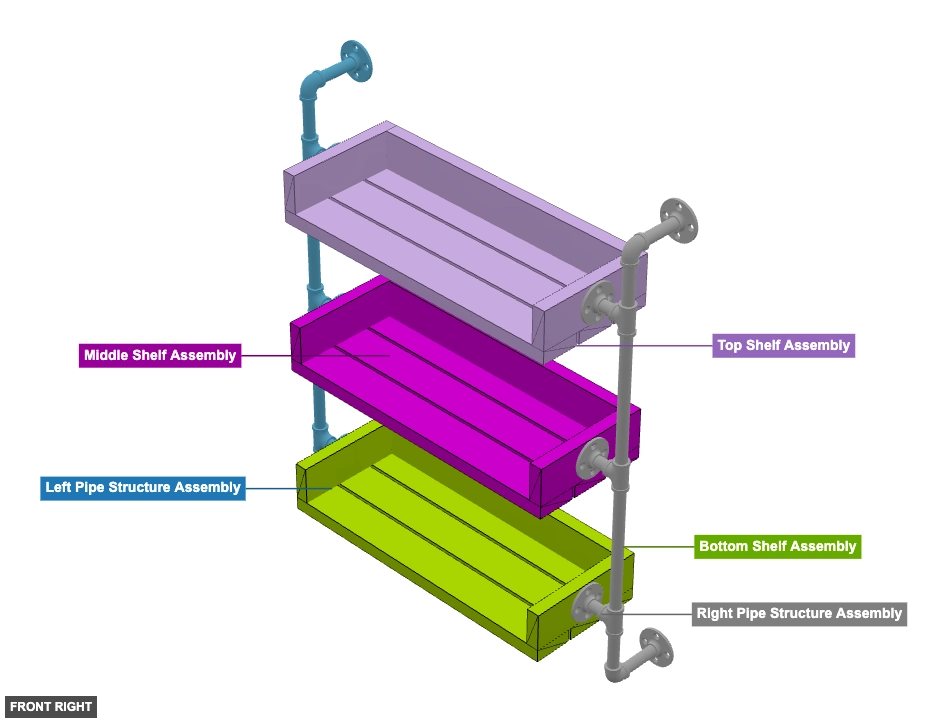
Left Pipe Structure Assembly
1/2" Flange Black Steelx 5 1/2" x 2" Long Nipple Black Steelx 3 1/2" Tee Black Steelx 3 1/2" x 11" Long Nipple Black Steelx 2 1/2" x 4" Long Nipple Black Steelx 4 1/2" 90° Elbow Black Steelx 2 Right Pipe Structure Assembly
1/2" Tee Black Steelx 3 1/2" x 11" Long Nipple Black Steelx 2 1/2" x 2" Long Nipple Black Steelx 3 1/2" Flange Black Steelx 5 1/2" x 4" Long Nipple Black Steelx 4 1/2" 90° Elbow Black Steelx 2 Bottom Shelf Assembly
1" x 3" Lumber x 9.5"x 2 1" x 3" Lumber x 22"x 1 1" x 3" Lumber x 24"x 3 Middle Shelf Assembly
1" x 3" Lumber x 9.5"x 2 1" x 3" Lumber x 22"x 1 1" x 3" Lumber x 24"x 3 Top Shelf Assembly
1" x 3" Lumber x 9.5"x 2 1" x 3" Lumber x 22"x 1 1" x 3" Lumber x 24"x 3
Angle: bottom right
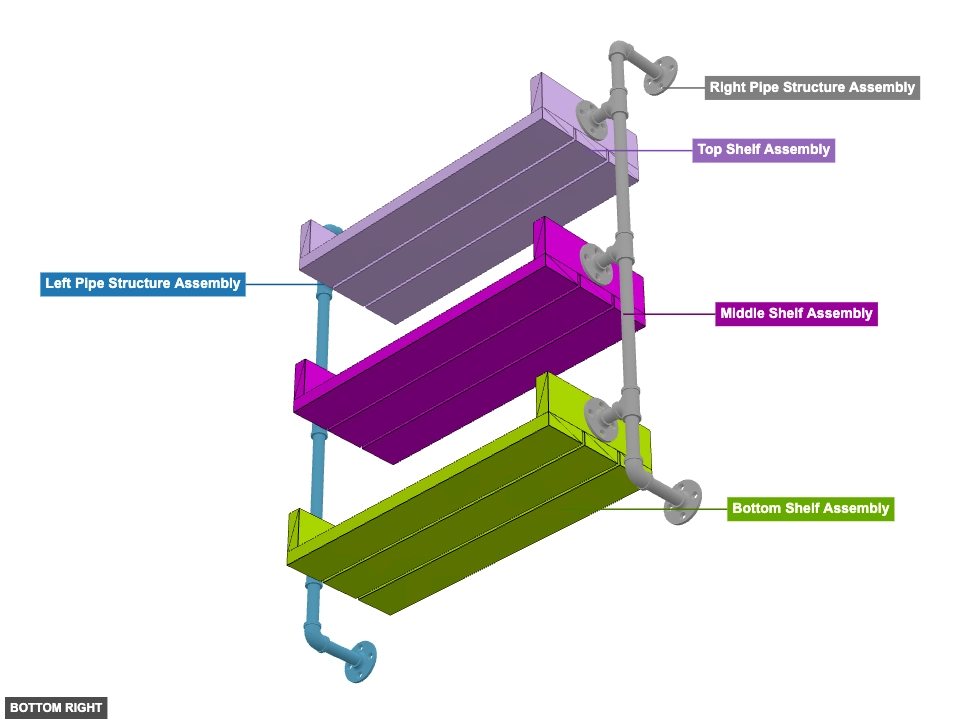
Left Pipe Structure Assembly
1/2" Flange Black Steelx 5 1/2" x 2" Long Nipple Black Steelx 3 1/2" Tee Black Steelx 3 1/2" x 11" Long Nipple Black Steelx 2 1/2" x 4" Long Nipple Black Steelx 4 1/2" 90° Elbow Black Steelx 2 Right Pipe Structure Assembly
1/2" Tee Black Steelx 3 1/2" x 11" Long Nipple Black Steelx 2 1/2" x 2" Long Nipple Black Steelx 3 1/2" Flange Black Steelx 5 1/2" x 4" Long Nipple Black Steelx 4 1/2" 90° Elbow Black Steelx 2 Bottom Shelf Assembly
1" x 3" Lumber x 9.5"x 2 1" x 3" Lumber x 22"x 1 1" x 3" Lumber x 24"x 3 Middle Shelf Assembly
1" x 3" Lumber x 9.5"x 2 1" x 3" Lumber x 22"x 1 1" x 3" Lumber x 24"x 3 Top Shelf Assembly
1" x 3" Lumber x 9.5"x 2 1" x 3" Lumber x 22"x 1 1" x 3" Lumber x 24"x 3 Phase 2: Individual Group Assembly
Group: Left Pipe Structure Assembly
Assemble the complete vertical pipe structure for the left side. Start from the bottom flange (foot) and work your way up, connecting all nipples, elbows, tees, and flanges.
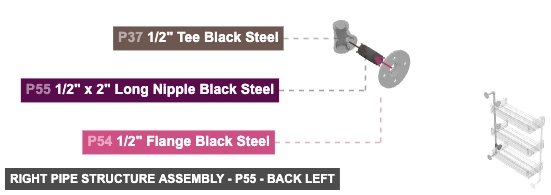
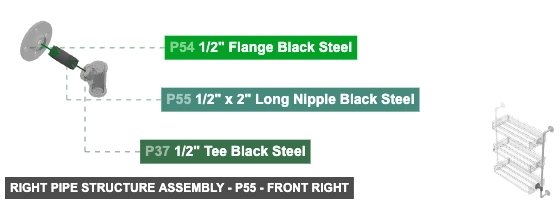
Group: Right Pipe Structure Assembly
Assemble the complete vertical pipe structure for the right side. Start from the bottom flange (foot) and work your way up, connecting all nipples, elbows, tees, and flanges.
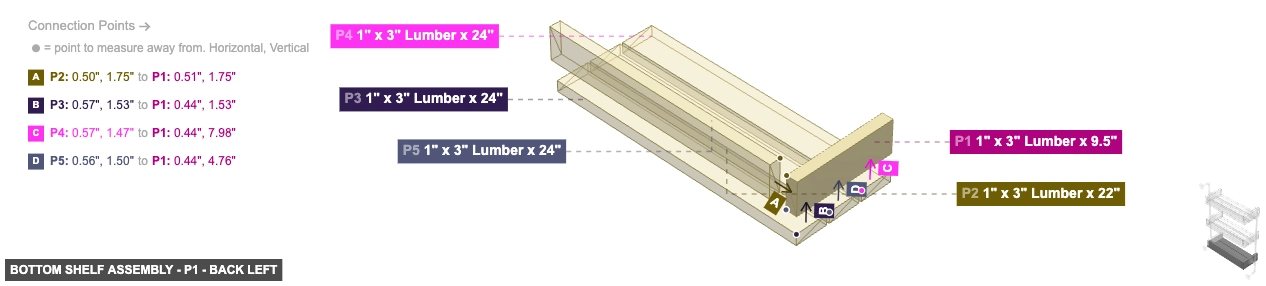
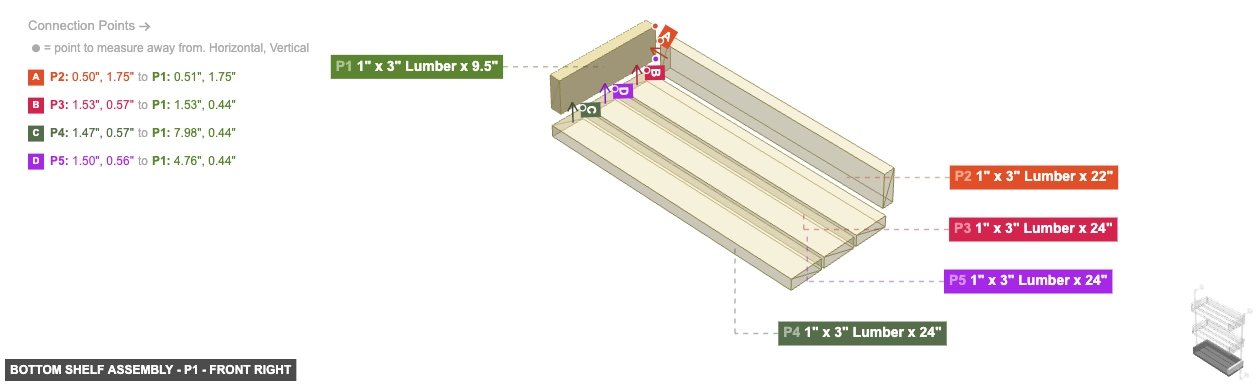
Group: Bottom Shelf Assembly
Assemble the wooden box for the bottom shelf using the side pieces, back piece, and bottom slats.
Group: Middle Shelf Assembly
Assemble the wooden box for the middle shelf using the side pieces, back piece, and bottom slats.
Group: Top Shelf Assembly
Assemble the wooden box for the top shelf using the side pieces, back piece, and bottom slats.
Phase 3: Inter-Group Assembly
Attaching: Left Pipe Structure Assembly
Assemble the complete vertical pipe structure for the left side. Start from the bottom flange (foot) and work your way up, connecting all nipples, elbows, tees, and flanges.
Angle: back left
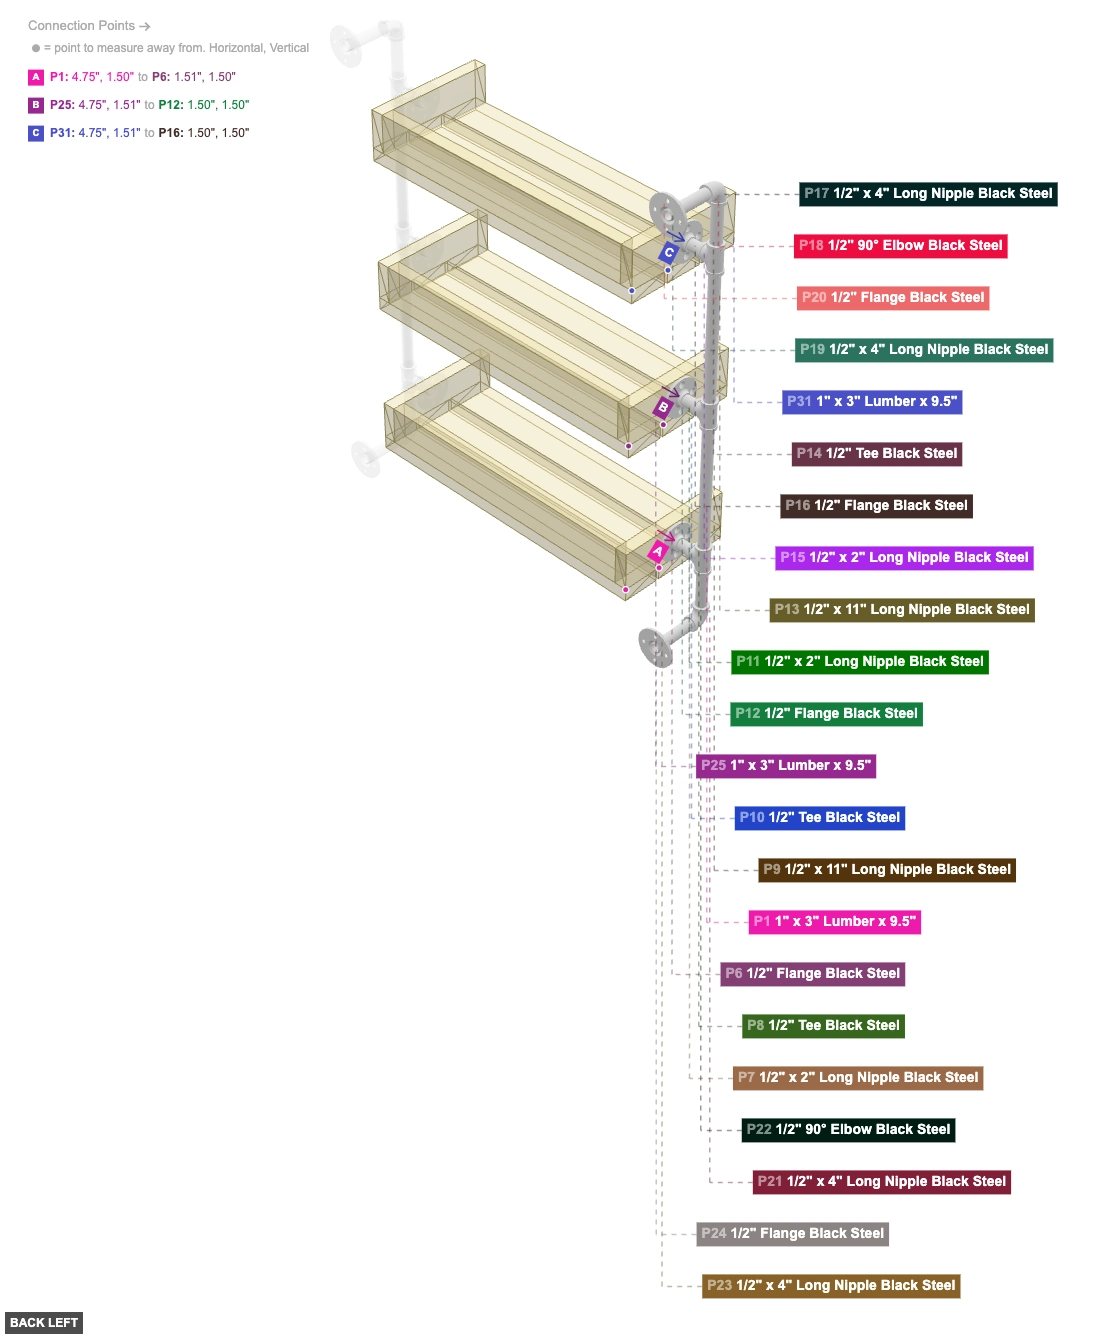
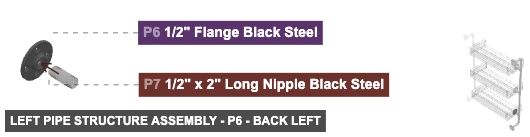
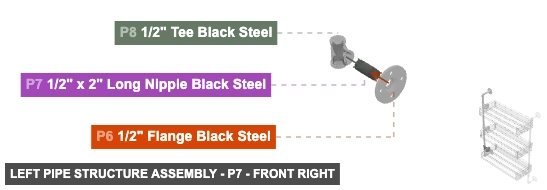
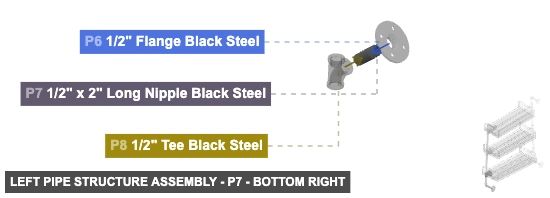
P6 (0.5" Flange Black Steel) - its 0.5" F Threaded #1, which is left-facing, should connect to part 7's 0.5" M Threaded #1. Additionally, attach its Screw-In Screw In #1 facing right to part 1's 1"x 3" Wood Side #4
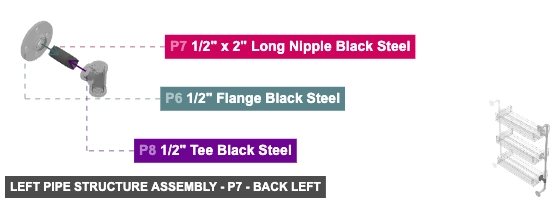
P7 (0.5" x 2" Long Nipple Black Steel) - connect its 0.5" M Threaded #1 oriented right links with part 6's 0.5" F Threaded #1. After that, attach its 0.5" M Threaded #2 facing left to part 8's 0.5" F Threaded #3
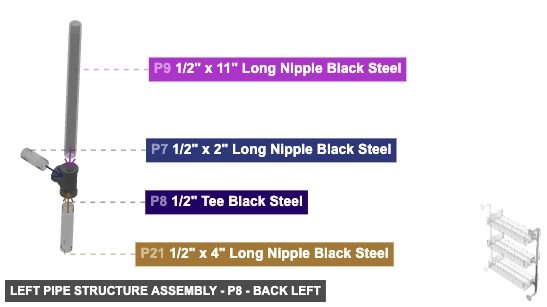
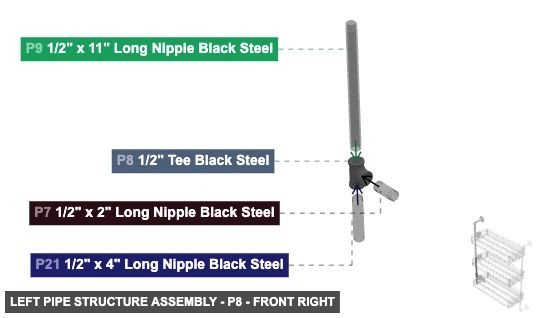
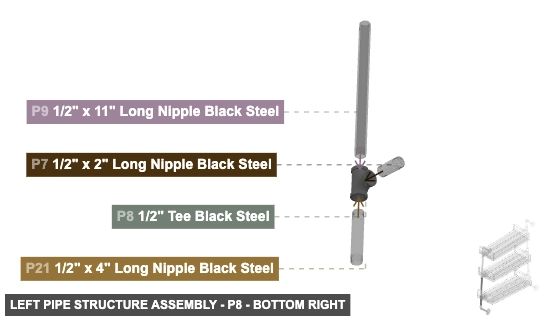
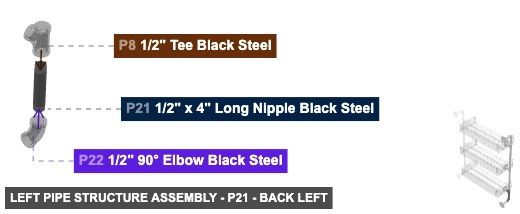
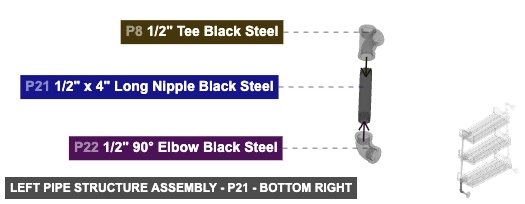
P8 (0.5" Tee Black Steel) - connect its 0.5" F Threaded #1 oriented bottom links with part 21's 0.5" M Threaded #1, plus attach its 0.5" F Threaded #2 facing top to part 9's 0.5" M Threaded #1. Additionally, connect its 0.5" F Threaded #3 oriented right links with part 7's 0.5" M Threaded #2
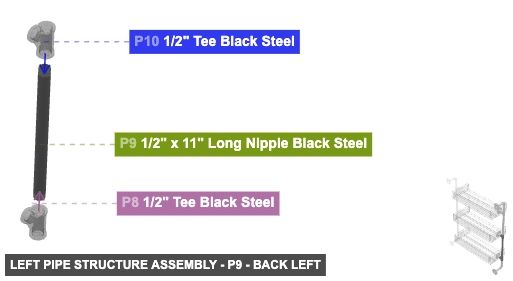
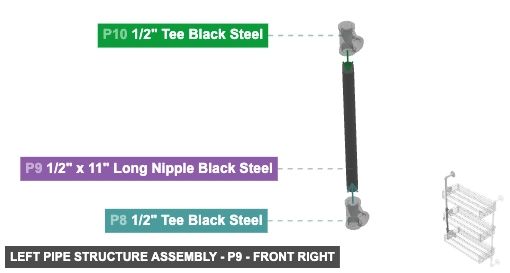
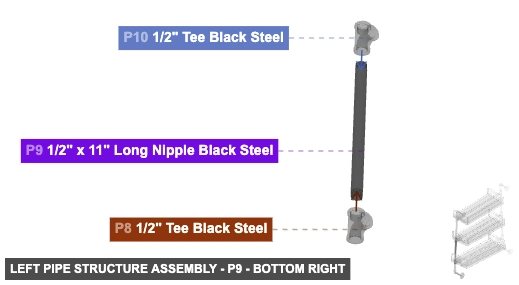
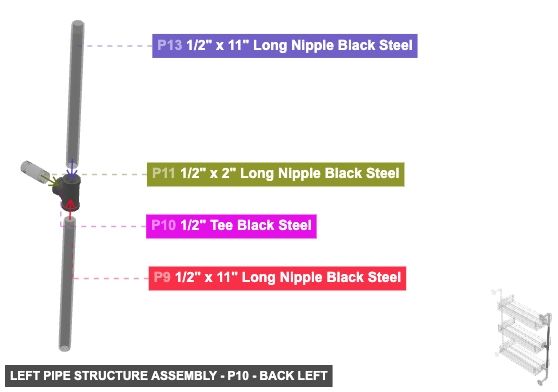
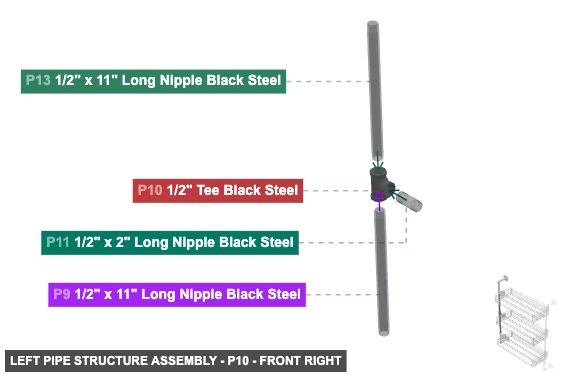
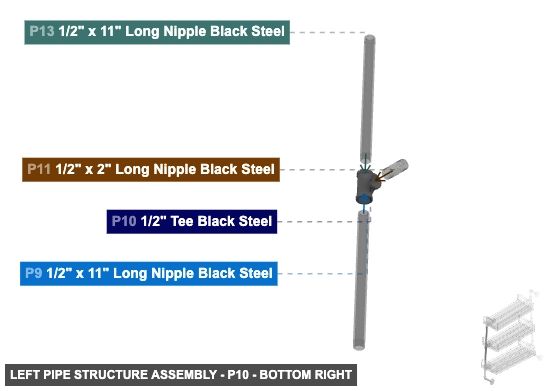
P9 (0.5" x 11" Long Nipple Black Steel) - connect its 0.5" M Threaded #1 oriented bottom links with part 8's 0.5" F Threaded #2, and connect its 0.5" M Threaded #2 oriented top links with part 10's 0.5" F Threaded #1
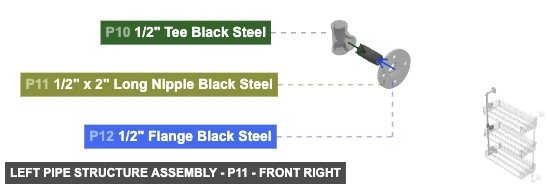
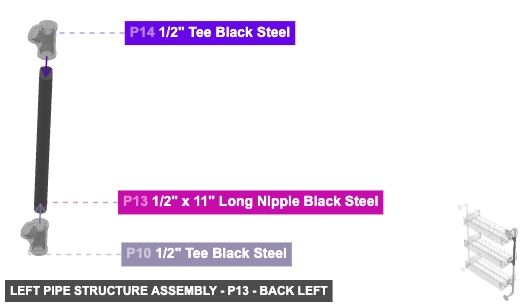
P10 (0.5" Tee Black Steel) - attach its 0.5" F Threaded #1 facing bottom to part 9's 0.5" M Threaded #2, and attach its 0.5" F Threaded #2 facing top to part 13's 0.5" M Threaded #1. After that, connect its 0.5" F Threaded #3 oriented right links with part 11's 0.5" M Threaded #1
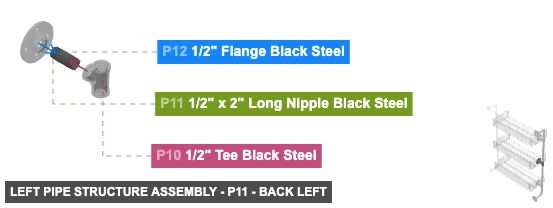
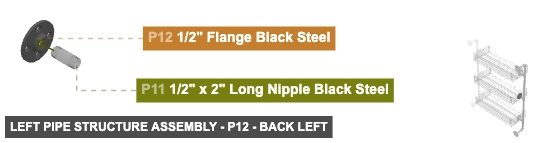
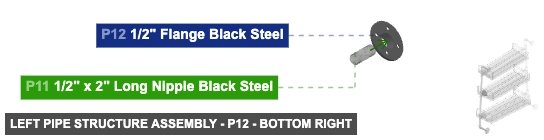
P11 (0.5" x 2" Long Nipple Black Steel) - connect its 0.5" M Threaded #1 oriented left links with part 10's 0.5" F Threaded #3. Also, connect its 0.5" M Threaded #2 oriented right links with part 12's 0.5" F Threaded #1
P12 (0.5" Flange Black Steel) - attach its 0.5" F Threaded #1 facing left to part 11's 0.5" M Threaded #2. After that, connect its Screw-In Screw In #1 oriented right links with part 25's 1"x 3" Wood Side #4
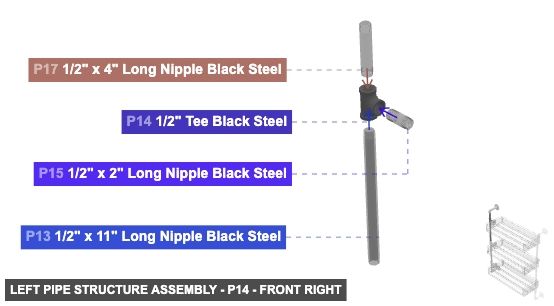
P13 (0.5" x 11" Long Nipple Black Steel) - connect its 0.5" M Threaded #1 oriented bottom links with part 10's 0.5" F Threaded #2. Next, its 0.5" M Threaded #2, which is top-facing, should connect to part 14's 0.5" F Threaded #1
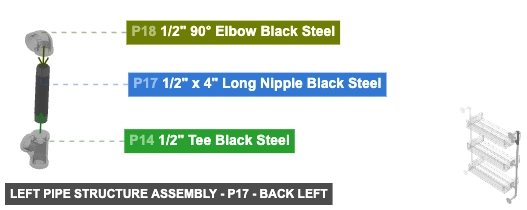
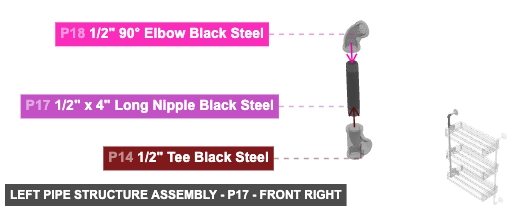
P14 (0.5" Tee Black Steel) - connect its 0.5" F Threaded #1 oriented bottom links with part 13's 0.5" M Threaded #2, then its 0.5" F Threaded #2, which is top-facing, should connect to part 17's 0.5" M Threaded #1, plus attach its 0.5" F Threaded #3 facing right to part 15's 0.5" M Threaded #1
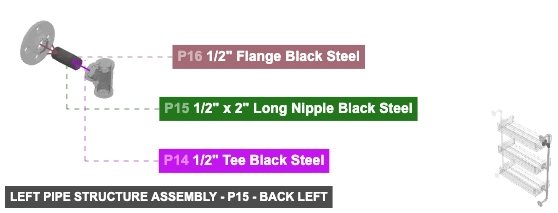
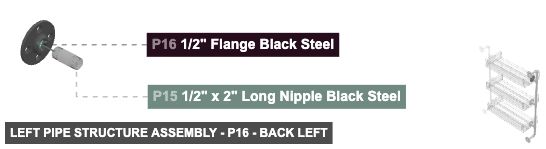
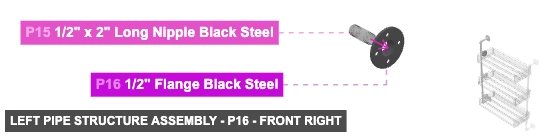
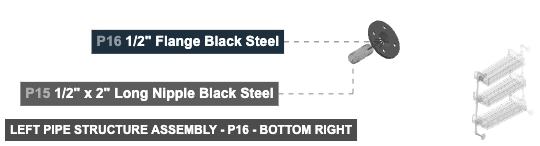
P15 (0.5" x 2" Long Nipple Black Steel) - connect its 0.5" M Threaded #1 oriented left links with part 14's 0.5" F Threaded #3. Next, connect its 0.5" M Threaded #2 oriented right links with part 16's 0.5" F Threaded #1
P16 (0.5" Flange Black Steel) - connect its 0.5" F Threaded #1 oriented left links with part 15's 0.5" M Threaded #2, plus connect its Screw-In Screw In #1 oriented right links with part 31's 1"x 3" Wood Side #4
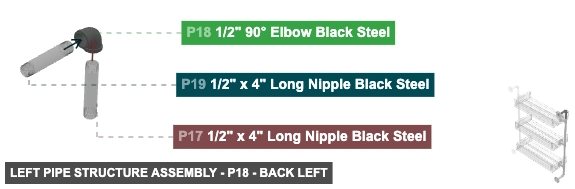
P17 (0.5" x 4" Long Nipple Black Steel) - its 0.5" M Threaded #1, which is bottom-facing, should connect to part 14's 0.5" F Threaded #2. Additionally, its 0.5" M Threaded #2, which is top-facing, should connect to part 18's 0.5" F Threaded #1
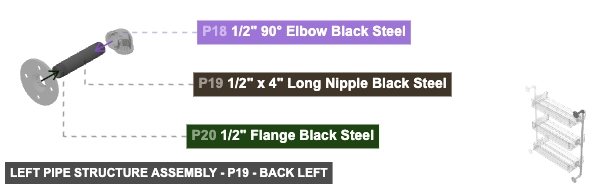
P18 (0.5" 90° Elbow Black Steel) - its 0.5" F Threaded #1, which is bottom-facing, should connect to part 17's 0.5" M Threaded #2. After that, attach its 0.5" F Threaded #2 facing back to part 19's 0.5" M Threaded #1
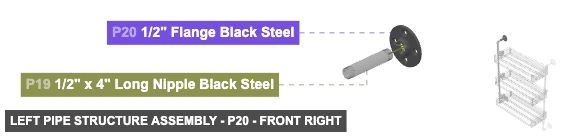
P19 (0.5" x 4" Long Nipple Black Steel) - attach its 0.5" M Threaded #1 facing front to part 18's 0.5" F Threaded #2, and connect its 0.5" M Threaded #2 oriented back links with part 20's 0.5" F Threaded #1
P20 (0.5" Flange Black Steel) - its 0.5" F Threaded #1, which is front-facing, should connect to part 19's 0.5" M Threaded #2. After that, its Screw-In Screw In #1 should be directed back
P21 (0.5" x 4" Long Nipple Black Steel) - connect its 0.5" M Threaded #1 oriented top links with part 8's 0.5" F Threaded #1. Additionally, its 0.5" M Threaded #2, which is bottom-facing, should connect to part 22's 0.5" F Threaded #1
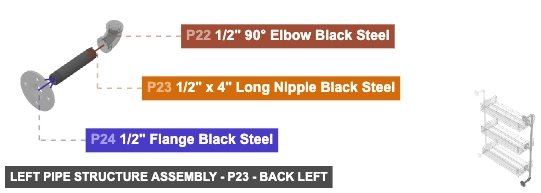
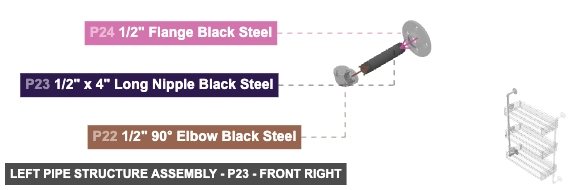
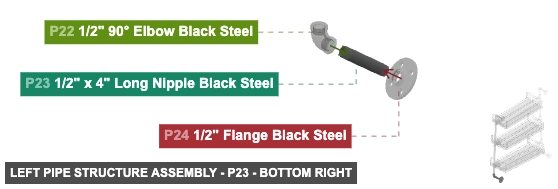
P22 (0.5" 90° Elbow Black Steel) - attach its 0.5" F Threaded #1 facing top to part 21's 0.5" M Threaded #2, and attach its 0.5" F Threaded #2 facing back to part 23's 0.5" M Threaded #1
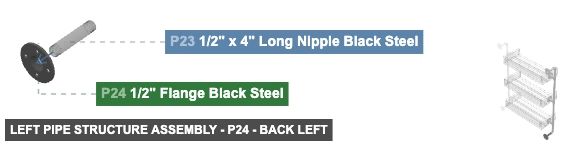
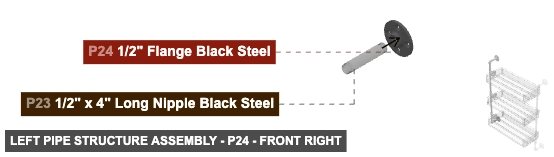
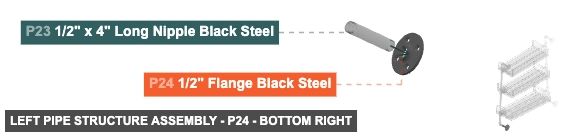
P23 (0.5" x 4" Long Nipple Black Steel) - its 0.5" M Threaded #1, which is front-facing, should connect to part 22's 0.5" F Threaded #2, also its 0.5" M Threaded #2, which is back-facing, should connect to part 24's 0.5" F Threaded #1
P24 (0.5" Flange Black Steel) - attach its 0.5" F Threaded #1 facing front to part 23's 0.5" M Threaded #2. Next, its Screw-In Screw In #1 must be oriented back
1/2" Flange Black Steelx 5 1/2" x 2" Long Nipple Black Steelx 3 1/2" Tee Black Steelx 3 1/2" x 11" Long Nipple Black Steelx 2 1/2" x 4" Long Nipple Black Steelx 4 1/2" 90° Elbow Black Steelx 2
Angle: front right
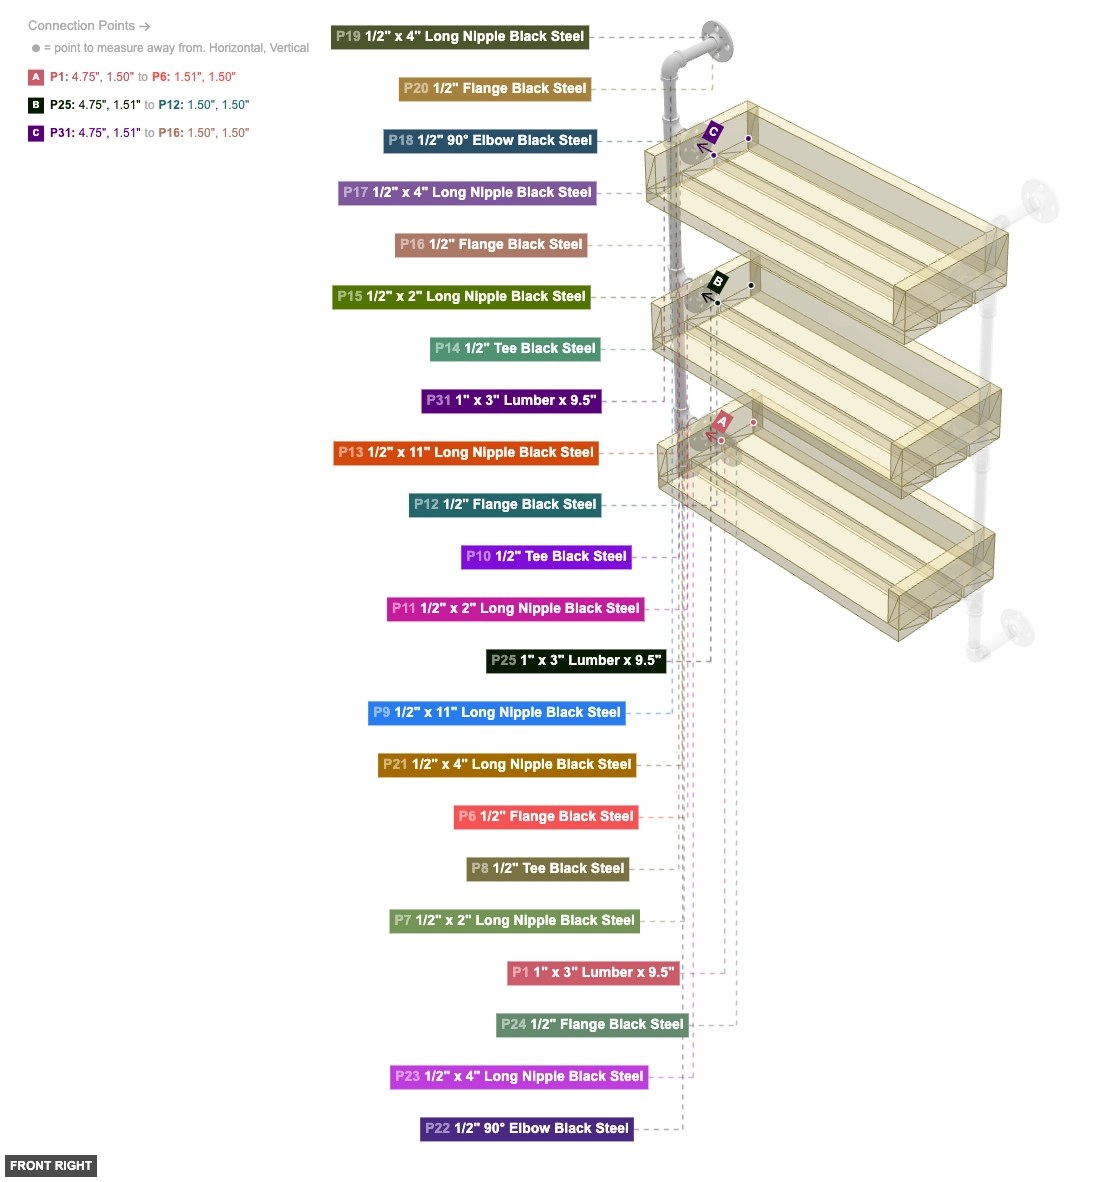
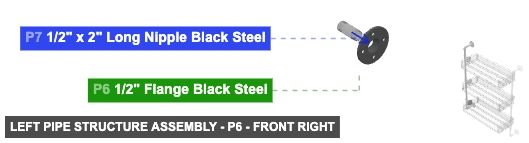
P6 (0.5" Flange Black Steel) - its 0.5" F Threaded #1, which is left-facing, should connect to part 7's 0.5" M Threaded #1. Additionally, attach its Screw-In Screw In #1 facing right to part 1's 1"x 3" Wood Side #4
P7 (0.5" x 2" Long Nipple Black Steel) - connect its 0.5" M Threaded #1 oriented right links with part 6's 0.5" F Threaded #1. After that, attach its 0.5" M Threaded #2 facing left to part 8's 0.5" F Threaded #3
P8 (0.5" Tee Black Steel) - connect its 0.5" F Threaded #1 oriented bottom links with part 21's 0.5" M Threaded #1, plus attach its 0.5" F Threaded #2 facing top to part 9's 0.5" M Threaded #1. Additionally, connect its 0.5" F Threaded #3 oriented right links with part 7's 0.5" M Threaded #2
P9 (0.5" x 11" Long Nipple Black Steel) - connect its 0.5" M Threaded #1 oriented bottom links with part 8's 0.5" F Threaded #2, and connect its 0.5" M Threaded #2 oriented top links with part 10's 0.5" F Threaded #1
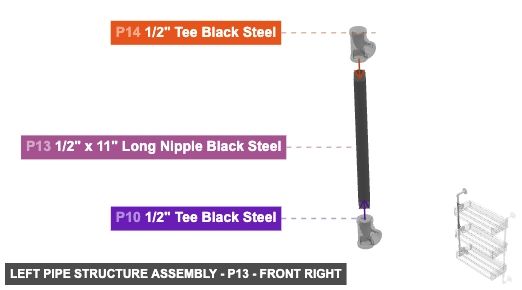
P10 (0.5" Tee Black Steel) - attach its 0.5" F Threaded #1 facing bottom to part 9's 0.5" M Threaded #2, and attach its 0.5" F Threaded #2 facing top to part 13's 0.5" M Threaded #1. After that, connect its 0.5" F Threaded #3 oriented right links with part 11's 0.5" M Threaded #1
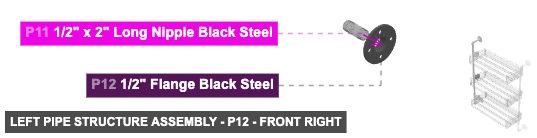
P11 (0.5" x 2" Long Nipple Black Steel) - connect its 0.5" M Threaded #1 oriented left links with part 10's 0.5" F Threaded #3. Also, connect its 0.5" M Threaded #2 oriented right links with part 12's 0.5" F Threaded #1
P12 (0.5" Flange Black Steel) - attach its 0.5" F Threaded #1 facing left to part 11's 0.5" M Threaded #2. After that, connect its Screw-In Screw In #1 oriented right links with part 25's 1"x 3" Wood Side #4
P13 (0.5" x 11" Long Nipple Black Steel) - connect its 0.5" M Threaded #1 oriented bottom links with part 10's 0.5" F Threaded #2. Next, its 0.5" M Threaded #2, which is top-facing, should connect to part 14's 0.5" F Threaded #1
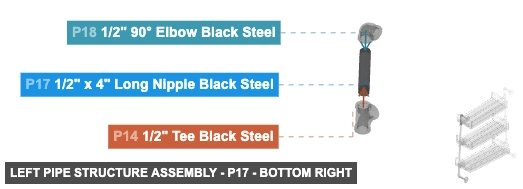
P14 (0.5" Tee Black Steel) - connect its 0.5" F Threaded #1 oriented bottom links with part 13's 0.5" M Threaded #2, then its 0.5" F Threaded #2, which is top-facing, should connect to part 17's 0.5" M Threaded #1, plus attach its 0.5" F Threaded #3 facing right to part 15's 0.5" M Threaded #1
P15 (0.5" x 2" Long Nipple Black Steel) - connect its 0.5" M Threaded #1 oriented left links with part 14's 0.5" F Threaded #3. Next, connect its 0.5" M Threaded #2 oriented right links with part 16's 0.5" F Threaded #1
P16 (0.5" Flange Black Steel) - connect its 0.5" F Threaded #1 oriented left links with part 15's 0.5" M Threaded #2, plus connect its Screw-In Screw In #1 oriented right links with part 31's 1"x 3" Wood Side #4
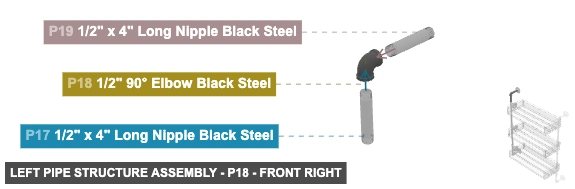
P17 (0.5" x 4" Long Nipple Black Steel) - its 0.5" M Threaded #1, which is bottom-facing, should connect to part 14's 0.5" F Threaded #2. Additionally, its 0.5" M Threaded #2, which is top-facing, should connect to part 18's 0.5" F Threaded #1
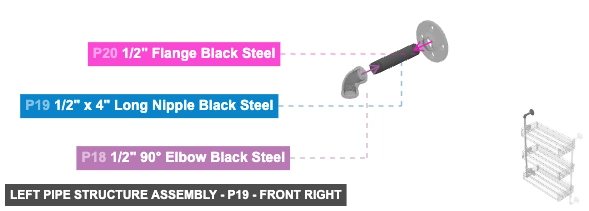
P18 (0.5" 90° Elbow Black Steel) - its 0.5" F Threaded #1, which is bottom-facing, should connect to part 17's 0.5" M Threaded #2. After that, attach its 0.5" F Threaded #2 facing back to part 19's 0.5" M Threaded #1
P19 (0.5" x 4" Long Nipple Black Steel) - attach its 0.5" M Threaded #1 facing front to part 18's 0.5" F Threaded #2, and connect its 0.5" M Threaded #2 oriented back links with part 20's 0.5" F Threaded #1
P20 (0.5" Flange Black Steel) - its 0.5" F Threaded #1, which is front-facing, should connect to part 19's 0.5" M Threaded #2. After that, its Screw-In Screw In #1 should be directed back
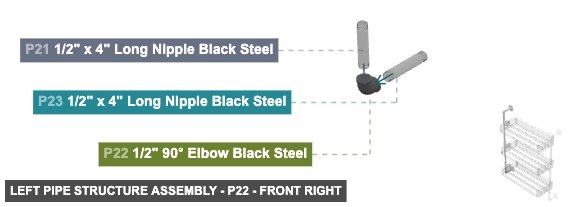
P21 (0.5" x 4" Long Nipple Black Steel) - connect its 0.5" M Threaded #1 oriented top links with part 8's 0.5" F Threaded #1. Additionally, its 0.5" M Threaded #2, which is bottom-facing, should connect to part 22's 0.5" F Threaded #1
P22 (0.5" 90° Elbow Black Steel) - attach its 0.5" F Threaded #1 facing top to part 21's 0.5" M Threaded #2, and attach its 0.5" F Threaded #2 facing back to part 23's 0.5" M Threaded #1
P23 (0.5" x 4" Long Nipple Black Steel) - its 0.5" M Threaded #1, which is front-facing, should connect to part 22's 0.5" F Threaded #2, also its 0.5" M Threaded #2, which is back-facing, should connect to part 24's 0.5" F Threaded #1
P24 (0.5" Flange Black Steel) - attach its 0.5" F Threaded #1 facing front to part 23's 0.5" M Threaded #2. Next, its Screw-In Screw In #1 must be oriented back
1/2" Flange Black Steelx 5 1/2" x 2" Long Nipple Black Steelx 3 1/2" Tee Black Steelx 3 1/2" x 11" Long Nipple Black Steelx 2 1/2" x 4" Long Nipple Black Steelx 4 1/2" 90° Elbow Black Steelx 2
Angle: bottom right
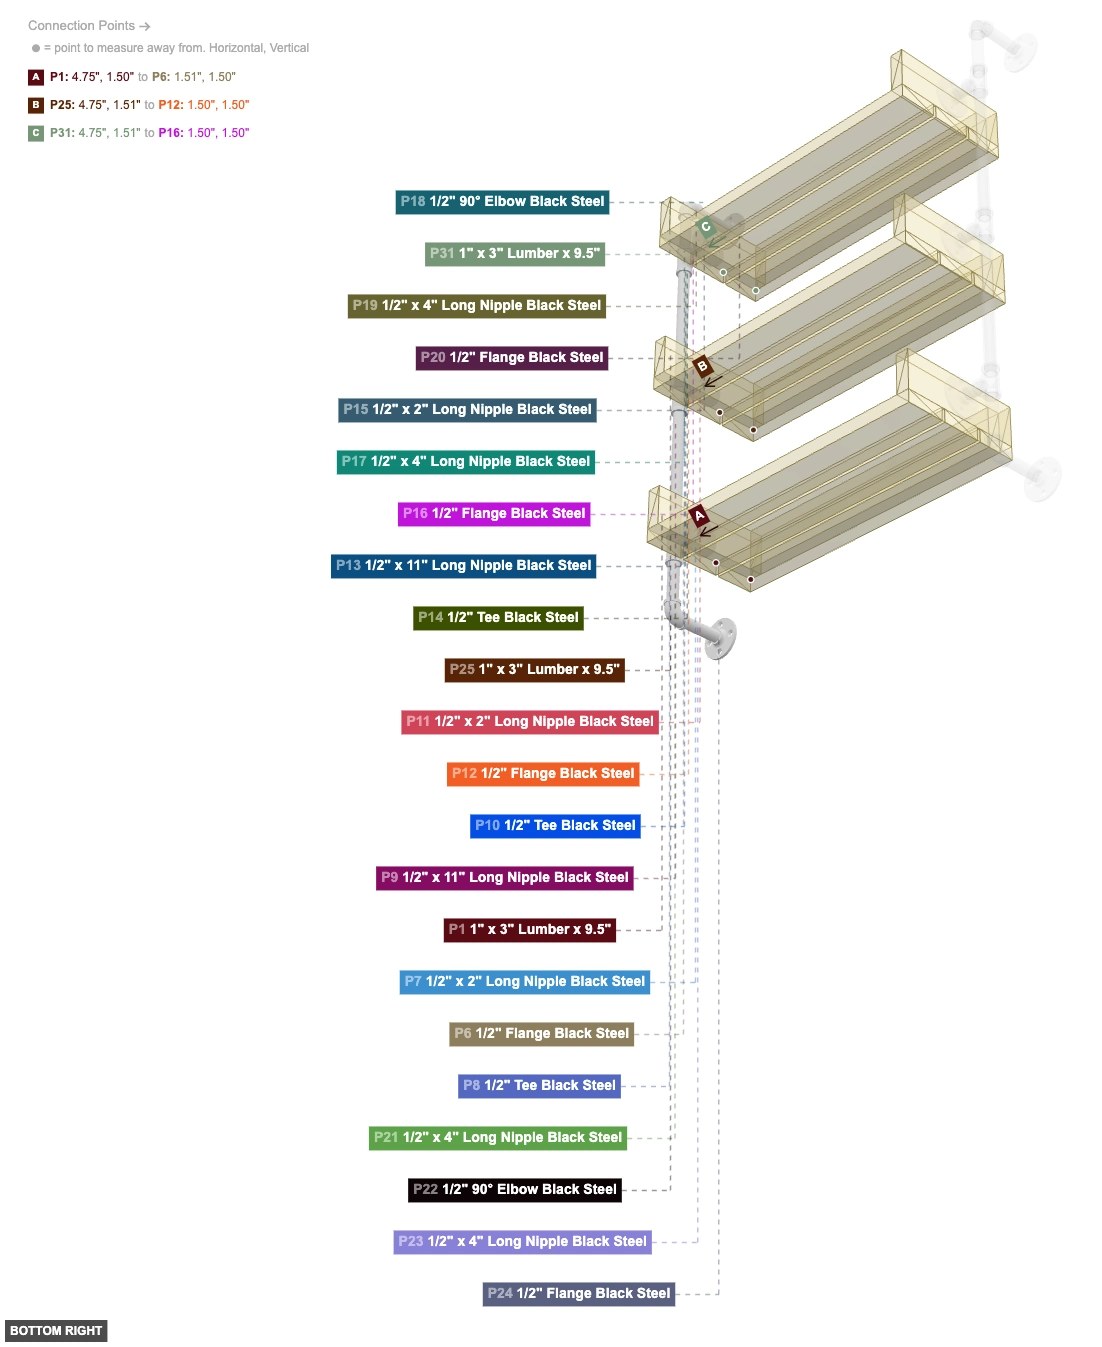
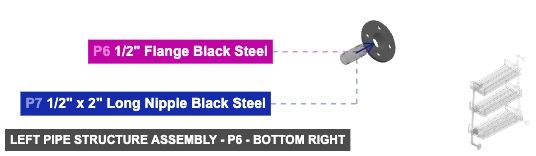
P6 (0.5" Flange Black Steel) - its 0.5" F Threaded #1, which is left-facing, should connect to part 7's 0.5" M Threaded #1. Additionally, attach its Screw-In Screw In #1 facing right to part 1's 1"x 3" Wood Side #4
P7 (0.5" x 2" Long Nipple Black Steel) - connect its 0.5" M Threaded #1 oriented right links with part 6's 0.5" F Threaded #1. After that, attach its 0.5" M Threaded #2 facing left to part 8's 0.5" F Threaded #3
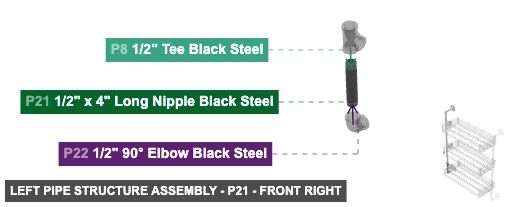
P8 (0.5" Tee Black Steel) - connect its 0.5" F Threaded #1 oriented bottom links with part 21's 0.5" M Threaded #1, plus attach its 0.5" F Threaded #2 facing top to part 9's 0.5" M Threaded #1. Additionally, connect its 0.5" F Threaded #3 oriented right links with part 7's 0.5" M Threaded #2
P9 (0.5" x 11" Long Nipple Black Steel) - connect its 0.5" M Threaded #1 oriented bottom links with part 8's 0.5" F Threaded #2, and connect its 0.5" M Threaded #2 oriented top links with part 10's 0.5" F Threaded #1
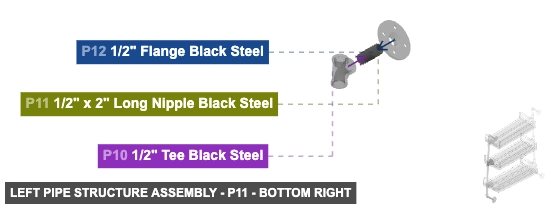
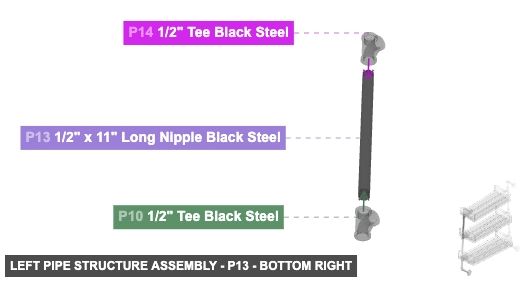
P10 (0.5" Tee Black Steel) - attach its 0.5" F Threaded #1 facing bottom to part 9's 0.5" M Threaded #2, and attach its 0.5" F Threaded #2 facing top to part 13's 0.5" M Threaded #1. After that, connect its 0.5" F Threaded #3 oriented right links with part 11's 0.5" M Threaded #1
P11 (0.5" x 2" Long Nipple Black Steel) - connect its 0.5" M Threaded #1 oriented left links with part 10's 0.5" F Threaded #3. Also, connect its 0.5" M Threaded #2 oriented right links with part 12's 0.5" F Threaded #1
P12 (0.5" Flange Black Steel) - attach its 0.5" F Threaded #1 facing left to part 11's 0.5" M Threaded #2. After that, connect its Screw-In Screw In #1 oriented right links with part 25's 1"x 3" Wood Side #4
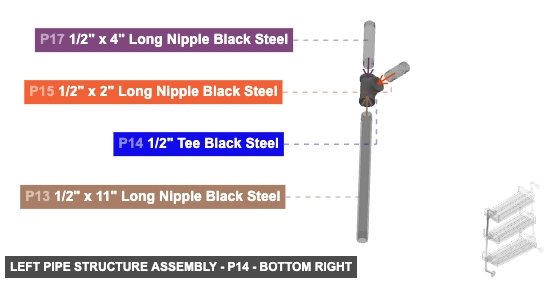
P13 (0.5" x 11" Long Nipple Black Steel) - connect its 0.5" M Threaded #1 oriented bottom links with part 10's 0.5" F Threaded #2. Next, its 0.5" M Threaded #2, which is top-facing, should connect to part 14's 0.5" F Threaded #1
P14 (0.5" Tee Black Steel) - connect its 0.5" F Threaded #1 oriented bottom links with part 13's 0.5" M Threaded #2, then its 0.5" F Threaded #2, which is top-facing, should connect to part 17's 0.5" M Threaded #1, plus attach its 0.5" F Threaded #3 facing right to part 15's 0.5" M Threaded #1
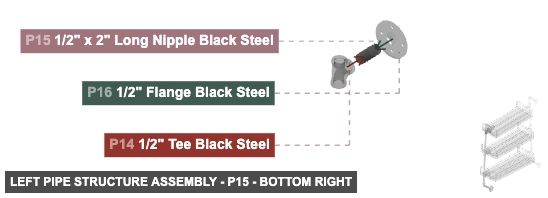
P15 (0.5" x 2" Long Nipple Black Steel) - connect its 0.5" M Threaded #1 oriented left links with part 14's 0.5" F Threaded #3. Next, connect its 0.5" M Threaded #2 oriented right links with part 16's 0.5" F Threaded #1
P16 (0.5" Flange Black Steel) - connect its 0.5" F Threaded #1 oriented left links with part 15's 0.5" M Threaded #2, plus connect its Screw-In Screw In #1 oriented right links with part 31's 1"x 3" Wood Side #4
P17 (0.5" x 4" Long Nipple Black Steel) - its 0.5" M Threaded #1, which is bottom-facing, should connect to part 14's 0.5" F Threaded #2. Additionally, its 0.5" M Threaded #2, which is top-facing, should connect to part 18's 0.5" F Threaded #1
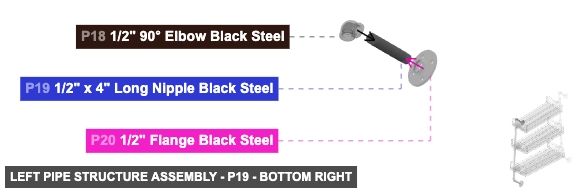
P18 (0.5" 90° Elbow Black Steel) - its 0.5" F Threaded #1, which is bottom-facing, should connect to part 17's 0.5" M Threaded #2. After that, attach its 0.5" F Threaded #2 facing back to part 19's 0.5" M Threaded #1
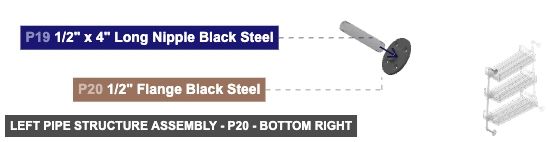
P19 (0.5" x 4" Long Nipple Black Steel) - attach its 0.5" M Threaded #1 facing front to part 18's 0.5" F Threaded #2, and connect its 0.5" M Threaded #2 oriented back links with part 20's 0.5" F Threaded #1
P20 (0.5" Flange Black Steel) - its 0.5" F Threaded #1, which is front-facing, should connect to part 19's 0.5" M Threaded #2. After that, its Screw-In Screw In #1 should be directed back
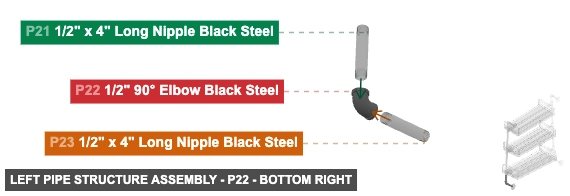
P21 (0.5" x 4" Long Nipple Black Steel) - connect its 0.5" M Threaded #1 oriented top links with part 8's 0.5" F Threaded #1. Additionally, its 0.5" M Threaded #2, which is bottom-facing, should connect to part 22's 0.5" F Threaded #1
P22 (0.5" 90° Elbow Black Steel) - attach its 0.5" F Threaded #1 facing top to part 21's 0.5" M Threaded #2, and attach its 0.5" F Threaded #2 facing back to part 23's 0.5" M Threaded #1
P23 (0.5" x 4" Long Nipple Black Steel) - its 0.5" M Threaded #1, which is front-facing, should connect to part 22's 0.5" F Threaded #2, also its 0.5" M Threaded #2, which is back-facing, should connect to part 24's 0.5" F Threaded #1
P24 (0.5" Flange Black Steel) - attach its 0.5" F Threaded #1 facing front to part 23's 0.5" M Threaded #2. Next, its Screw-In Screw In #1 must be oriented back
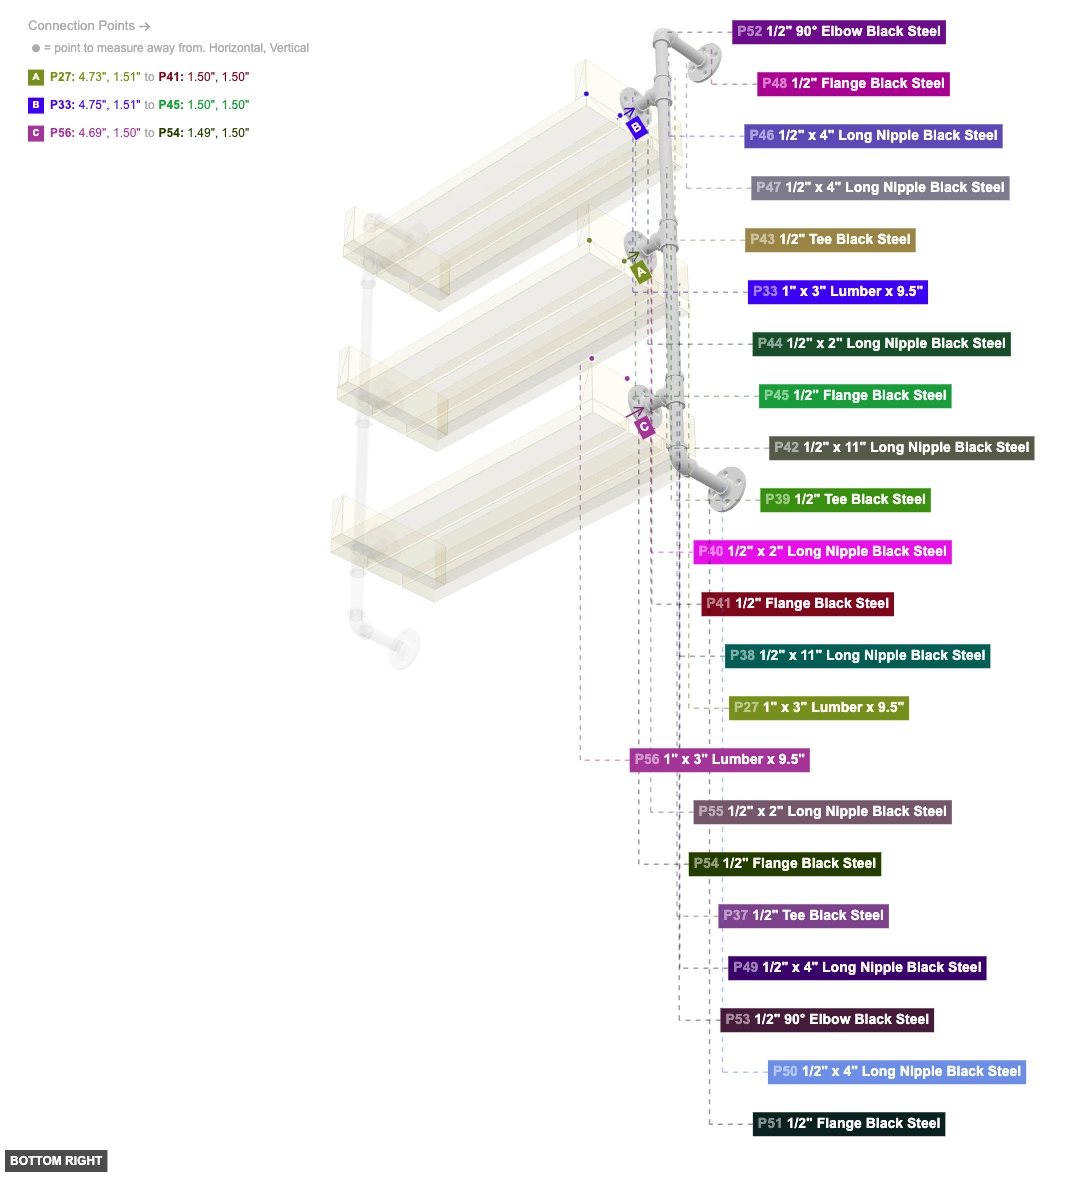
1/2" Flange Black Steelx 5 1/2" x 2" Long Nipple Black Steelx 3 1/2" Tee Black Steelx 3 1/2" x 11" Long Nipple Black Steelx 2 1/2" x 4" Long Nipple Black Steelx 4 1/2" 90° Elbow Black Steelx 2 Attaching: Right Pipe Structure Assembly
Assemble the complete vertical pipe structure for the right side. Start from the bottom flange (foot) and work your way up, connecting all nipples, elbows, tees, and flanges.
Angle: back left
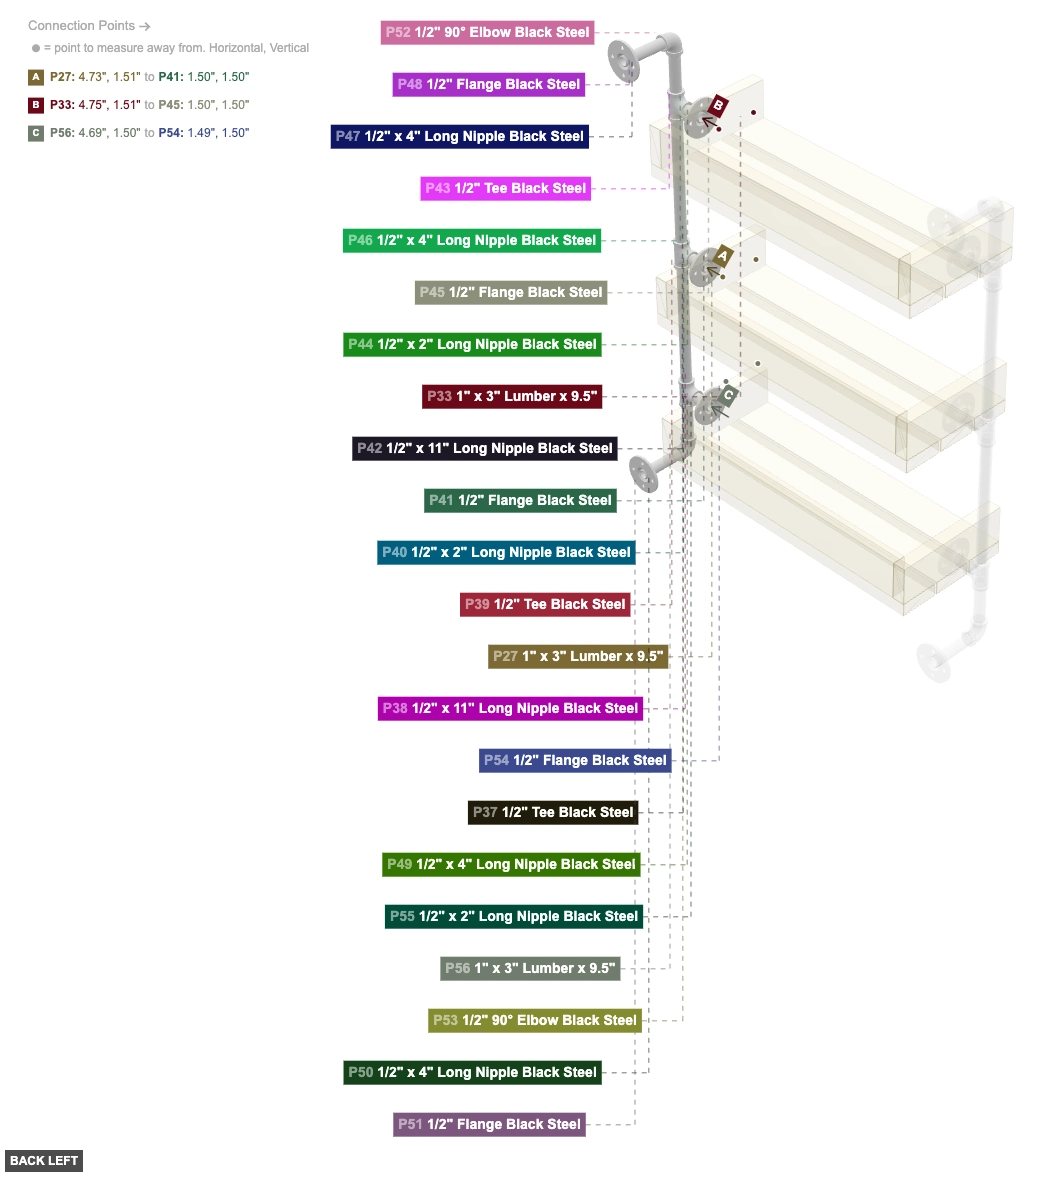
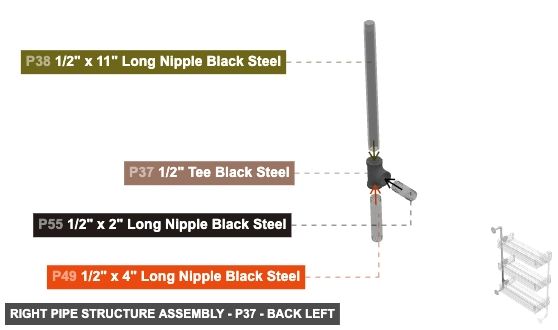
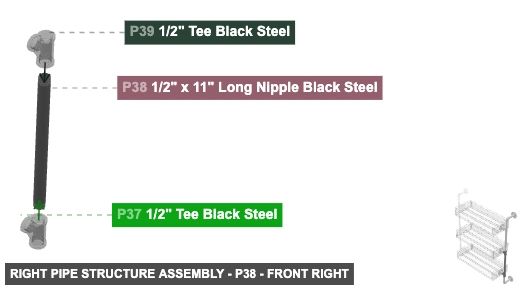
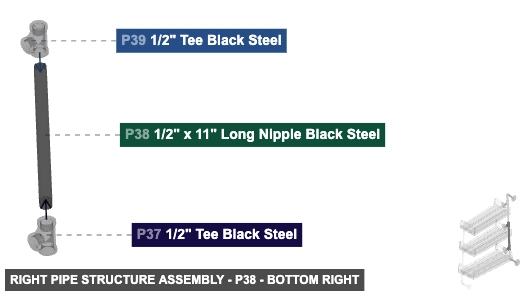
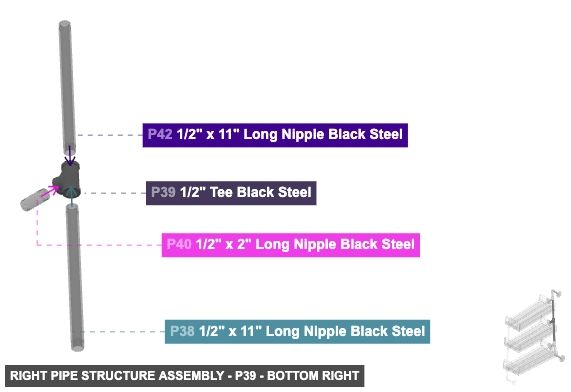
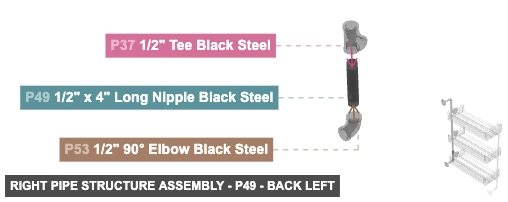
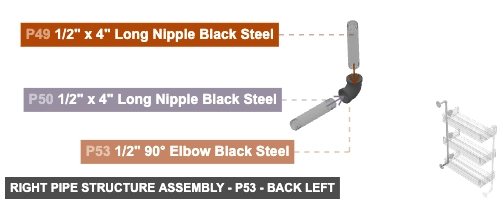
P37 (0.5" Tee Black Steel) - its 0.5" F Threaded #1, which is bottom-facing, should connect to part 49's 0.5" M Threaded #1, also connect its 0.5" F Threaded #2 oriented top links with part 38's 0.5" M Threaded #1, and connect its 0.5" F Threaded #3 oriented left links with part 55's 0.5" M Threaded #1
P38 (0.5" x 11" Long Nipple Black Steel) - connect its 0.5" M Threaded #1 oriented bottom links with part 37's 0.5" F Threaded #2, plus connect its 0.5" M Threaded #2 oriented top links with part 39's 0.5" F Threaded #1
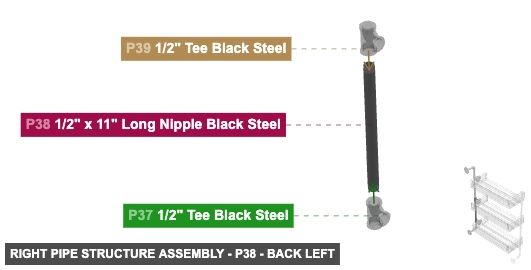
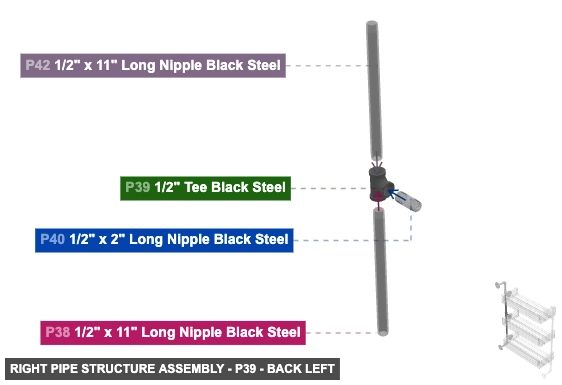
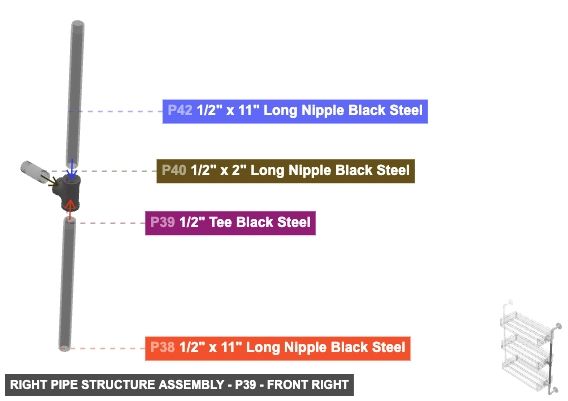
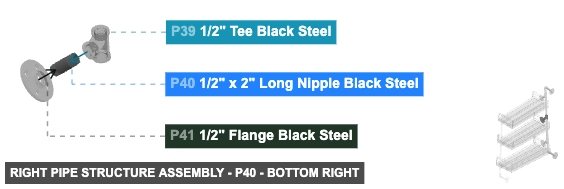
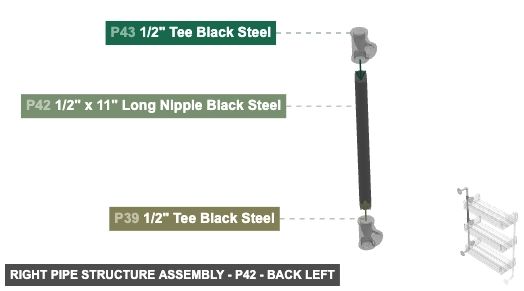
P39 (0.5" Tee Black Steel) - connect its 0.5" F Threaded #1 oriented bottom links with part 38's 0.5" M Threaded #2. After that, its 0.5" F Threaded #2, which is top-facing, should connect to part 42's 0.5" M Threaded #1. Also, attach its 0.5" F Threaded #3 facing left to part 40's 0.5" M Threaded #1
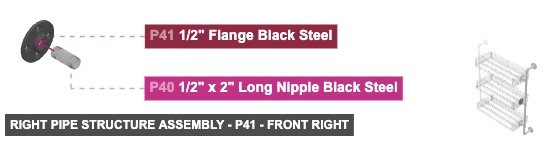
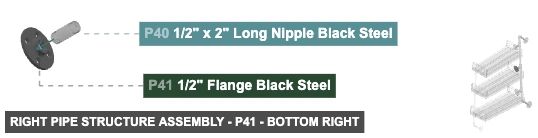
P40 (0.5" x 2" Long Nipple Black Steel) - connect its 0.5" M Threaded #1 oriented right links with part 39's 0.5" F Threaded #3. Next, connect its 0.5" M Threaded #2 oriented left links with part 41's 0.5" F Threaded #1
P41 (0.5" Flange Black Steel) - attach its 0.5" F Threaded #1 facing right to part 40's 0.5" M Threaded #2. Also, connect its Screw-In Screw In #1 oriented left links with part 27's 1"x 3" Wood Side #4
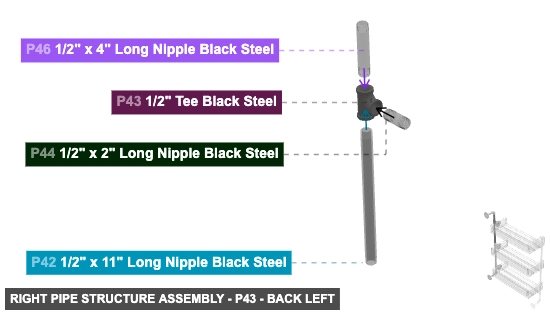
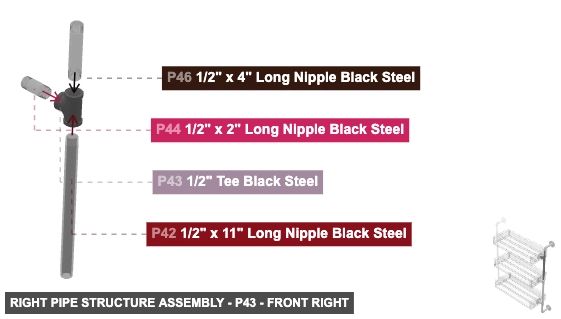
P42 (0.5" x 11" Long Nipple Black Steel) - connect its 0.5" M Threaded #1 oriented bottom links with part 39's 0.5" F Threaded #2. Next, its 0.5" M Threaded #2, which is top-facing, should connect to part 43's 0.5" F Threaded #1
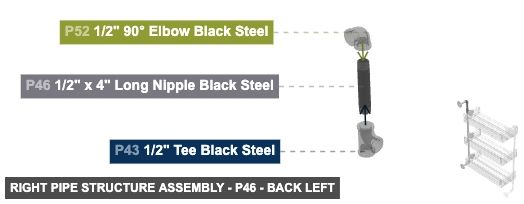
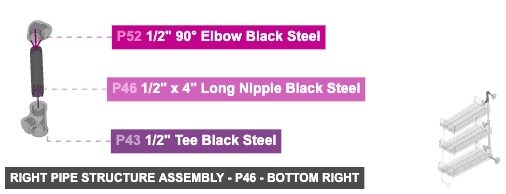
P43 (0.5" Tee Black Steel) - its 0.5" F Threaded #1, which is bottom-facing, should connect to part 42's 0.5" M Threaded #2. Also, connect its 0.5" F Threaded #2 oriented top links with part 46's 0.5" M Threaded #1, also its 0.5" F Threaded #3, which is left-facing, should connect to part 44's 0.5" M Threaded #1
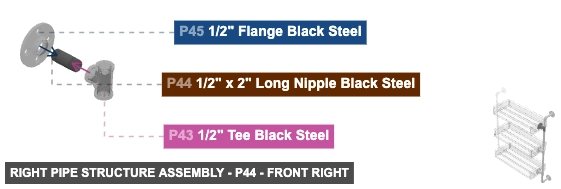
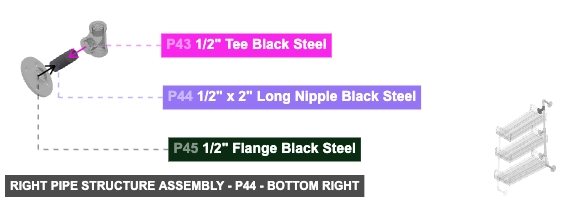
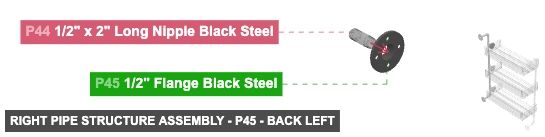
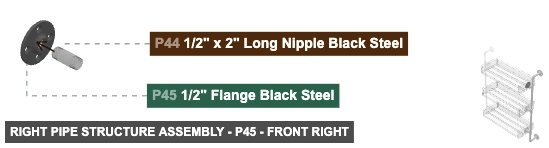
P44 (0.5" x 2" Long Nipple Black Steel) - connect its 0.5" M Threaded #1 oriented right links with part 43's 0.5" F Threaded #3. Additionally, attach its 0.5" M Threaded #2 facing left to part 45's 0.5" F Threaded #1
P45 (0.5" Flange Black Steel) - connect its 0.5" F Threaded #1 oriented right links with part 44's 0.5" M Threaded #2, and attach its Screw-In Screw In #1 facing left to part 33's 1"x 3" Wood Side #4
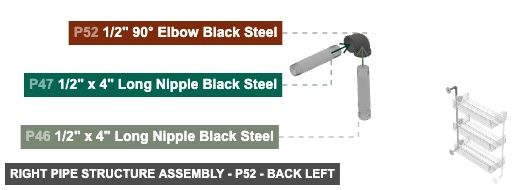
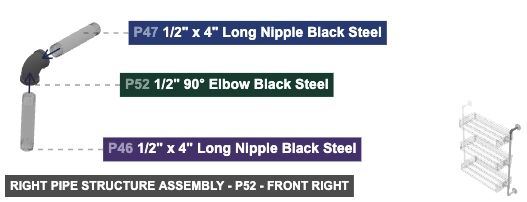
P46 (0.5" x 4" Long Nipple Black Steel) - its 0.5" M Threaded #1, which is bottom-facing, should connect to part 43's 0.5" F Threaded #2. Also, its 0.5" M Threaded #2, which is top-facing, should connect to part 52's 0.5" F Threaded #1
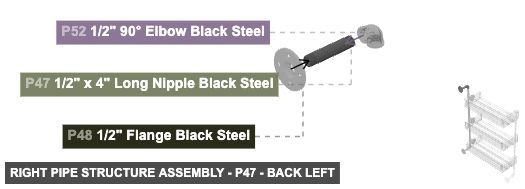
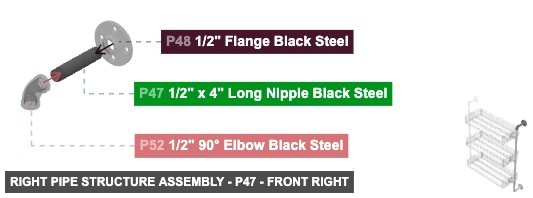
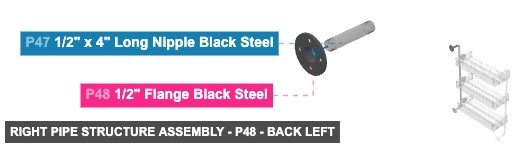
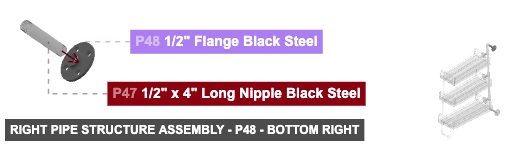
P47 (0.5" x 4" Long Nipple Black Steel) - attach its 0.5" M Threaded #1 facing front to part 52's 0.5" F Threaded #2, also its 0.5" M Threaded #2, which is back-facing, should connect to part 48's 0.5" F Threaded #1
P48 (0.5" Flange Black Steel) - attach its 0.5" F Threaded #1 facing front to part 47's 0.5" M Threaded #2. Additionally, its Screw-In Screw In #1 needs to point back
P49 (0.5" x 4" Long Nipple Black Steel) - connect its 0.5" M Threaded #1 oriented top links with part 37's 0.5" F Threaded #1. Also, its 0.5" M Threaded #2, which is bottom-facing, should connect to part 53's 0.5" F Threaded #1
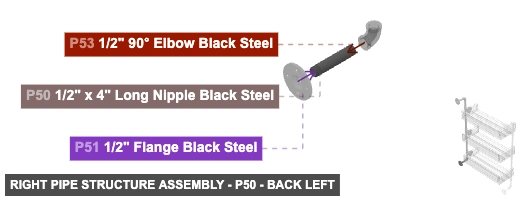
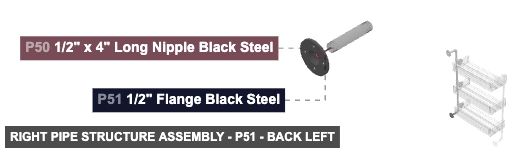
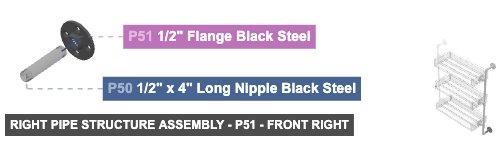
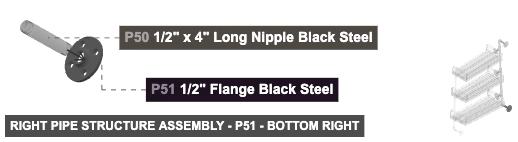
P50 (0.5" x 4" Long Nipple Black Steel) - connect its 0.5" M Threaded #1 oriented front links with part 53's 0.5" F Threaded #2. Next, connect its 0.5" M Threaded #2 oriented back links with part 51's 0.5" F Threaded #1
P51 (0.5" Flange Black Steel) - connect its 0.5" F Threaded #1 oriented front links with part 50's 0.5" M Threaded #2, plus its Screw-In Screw In #1 must be oriented back
P52 (0.5" 90° Elbow Black Steel) - its 0.5" F Threaded #1, which is bottom-facing, should connect to part 46's 0.5" M Threaded #2, and its 0.5" F Threaded #2, which is back-facing, should connect to part 47's 0.5" M Threaded #1
P53 (0.5" 90° Elbow Black Steel) - its 0.5" F Threaded #1, which is top-facing, should connect to part 49's 0.5" M Threaded #2, and its 0.5" F Threaded #2, which is back-facing, should connect to part 50's 0.5" M Threaded #1
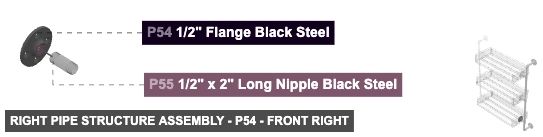
P54 (0.5" Flange Black Steel) - attach its 0.5" F Threaded #1 facing right to part 55's 0.5" M Threaded #2, also its Screw-In Screw In #1, which is left-facing, should connect to part 56's 1"x 3" Wood Side #4
P55 (0.5" x 2" Long Nipple Black Steel) - connect its 0.5" M Threaded #1 oriented right links with part 37's 0.5" F Threaded #3, and attach its 0.5" M Threaded #2 facing left to part 54's 0.5" F Threaded #1
1/2" Tee Black Steelx 3 1/2" x 11" Long Nipple Black Steelx 2 1/2" x 2" Long Nipple Black Steelx 3 1/2" Flange Black Steelx 5 1/2" x 4" Long Nipple Black Steelx 4 1/2" 90° Elbow Black Steelx 2
Angle: front right

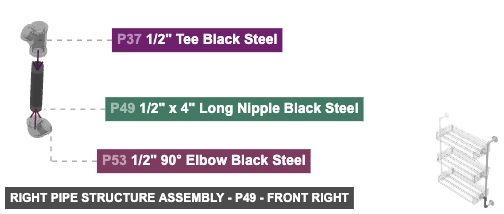
P37 (0.5" Tee Black Steel) - its 0.5" F Threaded #1, which is bottom-facing, should connect to part 49's 0.5" M Threaded #1, also connect its 0.5" F Threaded #2 oriented top links with part 38's 0.5" M Threaded #1, and connect its 0.5" F Threaded #3 oriented left links with part 55's 0.5" M Threaded #1
P38 (0.5" x 11" Long Nipple Black Steel) - connect its 0.5" M Threaded #1 oriented bottom links with part 37's 0.5" F Threaded #2, plus connect its 0.5" M Threaded #2 oriented top links with part 39's 0.5" F Threaded #1
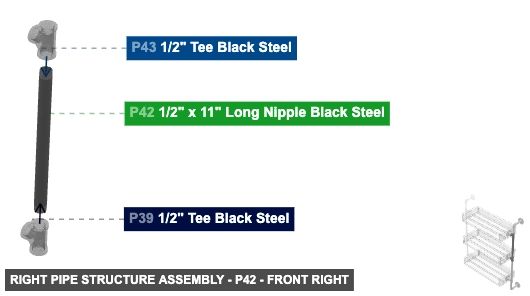
P39 (0.5" Tee Black Steel) - connect its 0.5" F Threaded #1 oriented bottom links with part 38's 0.5" M Threaded #2. After that, its 0.5" F Threaded #2, which is top-facing, should connect to part 42's 0.5" M Threaded #1. Also, attach its 0.5" F Threaded #3 facing left to part 40's 0.5" M Threaded #1
P40 (0.5" x 2" Long Nipple Black Steel) - connect its 0.5" M Threaded #1 oriented right links with part 39's 0.5" F Threaded #3. Next, connect its 0.5" M Threaded #2 oriented left links with part 41's 0.5" F Threaded #1
P41 (0.5" Flange Black Steel) - attach its 0.5" F Threaded #1 facing right to part 40's 0.5" M Threaded #2. Also, connect its Screw-In Screw In #1 oriented left links with part 27's 1"x 3" Wood Side #4
P42 (0.5" x 11" Long Nipple Black Steel) - connect its 0.5" M Threaded #1 oriented bottom links with part 39's 0.5" F Threaded #2. Next, its 0.5" M Threaded #2, which is top-facing, should connect to part 43's 0.5" F Threaded #1
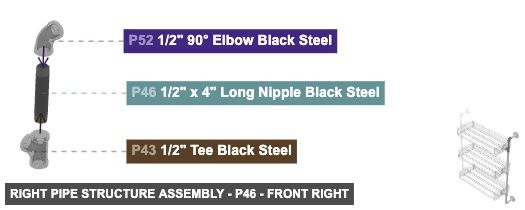
P43 (0.5" Tee Black Steel) - its 0.5" F Threaded #1, which is bottom-facing, should connect to part 42's 0.5" M Threaded #2. Also, connect its 0.5" F Threaded #2 oriented top links with part 46's 0.5" M Threaded #1, also its 0.5" F Threaded #3, which is left-facing, should connect to part 44's 0.5" M Threaded #1
P44 (0.5" x 2" Long Nipple Black Steel) - connect its 0.5" M Threaded #1 oriented right links with part 43's 0.5" F Threaded #3. Additionally, attach its 0.5" M Threaded #2 facing left to part 45's 0.5" F Threaded #1
P45 (0.5" Flange Black Steel) - connect its 0.5" F Threaded #1 oriented right links with part 44's 0.5" M Threaded #2, and attach its Screw-In Screw In #1 facing left to part 33's 1"x 3" Wood Side #4
P46 (0.5" x 4" Long Nipple Black Steel) - its 0.5" M Threaded #1, which is bottom-facing, should connect to part 43's 0.5" F Threaded #2. Also, its 0.5" M Threaded #2, which is top-facing, should connect to part 52's 0.5" F Threaded #1
P47 (0.5" x 4" Long Nipple Black Steel) - attach its 0.5" M Threaded #1 facing front to part 52's 0.5" F Threaded #2, also its 0.5" M Threaded #2, which is back-facing, should connect to part 48's 0.5" F Threaded #1
P48 (0.5" Flange Black Steel) - attach its 0.5" F Threaded #1 facing front to part 47's 0.5" M Threaded #2. Additionally, its Screw-In Screw In #1 needs to point back
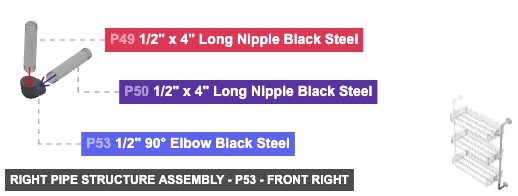
P49 (0.5" x 4" Long Nipple Black Steel) - connect its 0.5" M Threaded #1 oriented top links with part 37's 0.5" F Threaded #1. Also, its 0.5" M Threaded #2, which is bottom-facing, should connect to part 53's 0.5" F Threaded #1
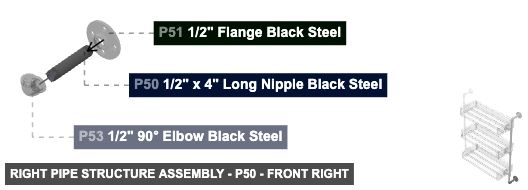
P50 (0.5" x 4" Long Nipple Black Steel) - connect its 0.5" M Threaded #1 oriented front links with part 53's 0.5" F Threaded #2. Next, connect its 0.5" M Threaded #2 oriented back links with part 51's 0.5" F Threaded #1
P51 (0.5" Flange Black Steel) - connect its 0.5" F Threaded #1 oriented front links with part 50's 0.5" M Threaded #2, plus its Screw-In Screw In #1 must be oriented back
P52 (0.5" 90° Elbow Black Steel) - its 0.5" F Threaded #1, which is bottom-facing, should connect to part 46's 0.5" M Threaded #2, and its 0.5" F Threaded #2, which is back-facing, should connect to part 47's 0.5" M Threaded #1
P53 (0.5" 90° Elbow Black Steel) - its 0.5" F Threaded #1, which is top-facing, should connect to part 49's 0.5" M Threaded #2, and its 0.5" F Threaded #2, which is back-facing, should connect to part 50's 0.5" M Threaded #1
P54 (0.5" Flange Black Steel) - attach its 0.5" F Threaded #1 facing right to part 55's 0.5" M Threaded #2, also its Screw-In Screw In #1, which is left-facing, should connect to part 56's 1"x 3" Wood Side #4
P55 (0.5" x 2" Long Nipple Black Steel) - connect its 0.5" M Threaded #1 oriented right links with part 37's 0.5" F Threaded #3, and attach its 0.5" M Threaded #2 facing left to part 54's 0.5" F Threaded #1
1/2" Tee Black Steelx 3 1/2" x 11" Long Nipple Black Steelx 2 1/2" x 2" Long Nipple Black Steelx 3 1/2" Flange Black Steelx 5 1/2" x 4" Long Nipple Black Steelx 4 1/2" 90° Elbow Black Steelx 2
Angle: bottom right
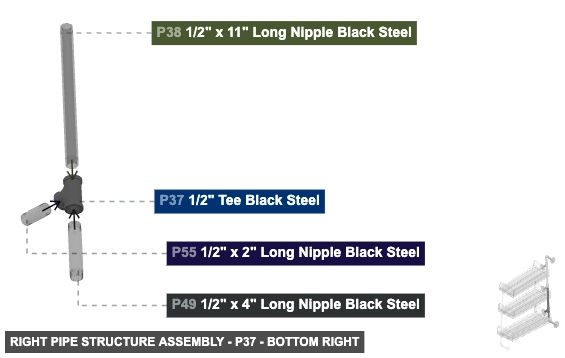
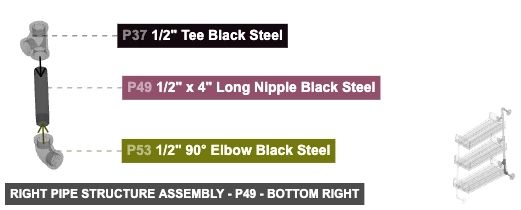
P37 (0.5" Tee Black Steel) - its 0.5" F Threaded #1, which is bottom-facing, should connect to part 49's 0.5" M Threaded #1, also connect its 0.5" F Threaded #2 oriented top links with part 38's 0.5" M Threaded #1, and connect its 0.5" F Threaded #3 oriented left links with part 55's 0.5" M Threaded #1
P38 (0.5" x 11" Long Nipple Black Steel) - connect its 0.5" M Threaded #1 oriented bottom links with part 37's 0.5" F Threaded #2, plus connect its 0.5" M Threaded #2 oriented top links with part 39's 0.5" F Threaded #1
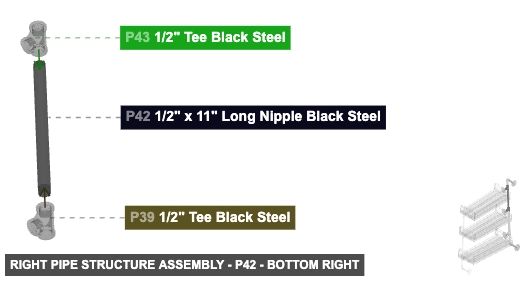
P39 (0.5" Tee Black Steel) - connect its 0.5" F Threaded #1 oriented bottom links with part 38's 0.5" M Threaded #2. After that, its 0.5" F Threaded #2, which is top-facing, should connect to part 42's 0.5" M Threaded #1. Also, attach its 0.5" F Threaded #3 facing left to part 40's 0.5" M Threaded #1
P40 (0.5" x 2" Long Nipple Black Steel) - connect its 0.5" M Threaded #1 oriented right links with part 39's 0.5" F Threaded #3. Next, connect its 0.5" M Threaded #2 oriented left links with part 41's 0.5" F Threaded #1
P41 (0.5" Flange Black Steel) - attach its 0.5" F Threaded #1 facing right to part 40's 0.5" M Threaded #2. Also, connect its Screw-In Screw In #1 oriented left links with part 27's 1"x 3" Wood Side #4
P42 (0.5" x 11" Long Nipple Black Steel) - connect its 0.5" M Threaded #1 oriented bottom links with part 39's 0.5" F Threaded #2. Next, its 0.5" M Threaded #2, which is top-facing, should connect to part 43's 0.5" F Threaded #1
P43 (0.5" Tee Black Steel) - its 0.5" F Threaded #1, which is bottom-facing, should connect to part 42's 0.5" M Threaded #2. Also, connect its 0.5" F Threaded #2 oriented top links with part 46's 0.5" M Threaded #1, also its 0.5" F Threaded #3, which is left-facing, should connect to part 44's 0.5" M Threaded #1
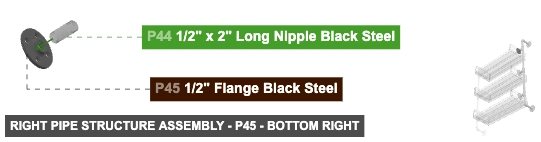
P44 (0.5" x 2" Long Nipple Black Steel) - connect its 0.5" M Threaded #1 oriented right links with part 43's 0.5" F Threaded #3. Additionally, attach its 0.5" M Threaded #2 facing left to part 45's 0.5" F Threaded #1
P45 (0.5" Flange Black Steel) - connect its 0.5" F Threaded #1 oriented right links with part 44's 0.5" M Threaded #2, and attach its Screw-In Screw In #1 facing left to part 33's 1"x 3" Wood Side #4
P46 (0.5" x 4" Long Nipple Black Steel) - its 0.5" M Threaded #1, which is bottom-facing, should connect to part 43's 0.5" F Threaded #2. Also, its 0.5" M Threaded #2, which is top-facing, should connect to part 52's 0.5" F Threaded #1
P47 (0.5" x 4" Long Nipple Black Steel) - attach its 0.5" M Threaded #1 facing front to part 52's 0.5" F Threaded #2, also its 0.5" M Threaded #2, which is back-facing, should connect to part 48's 0.5" F Threaded #1
P48 (0.5" Flange Black Steel) - attach its 0.5" F Threaded #1 facing front to part 47's 0.5" M Threaded #2. Additionally, its Screw-In Screw In #1 needs to point back
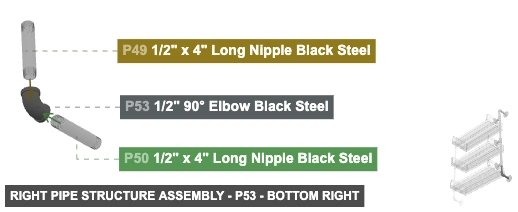
P49 (0.5" x 4" Long Nipple Black Steel) - connect its 0.5" M Threaded #1 oriented top links with part 37's 0.5" F Threaded #1. Also, its 0.5" M Threaded #2, which is bottom-facing, should connect to part 53's 0.5" F Threaded #1
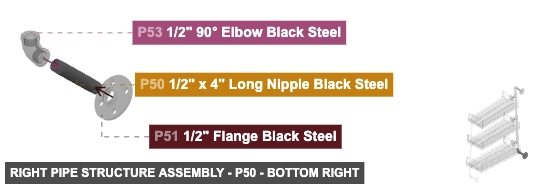
P50 (0.5" x 4" Long Nipple Black Steel) - connect its 0.5" M Threaded #1 oriented front links with part 53's 0.5" F Threaded #2. Next, connect its 0.5" M Threaded #2 oriented back links with part 51's 0.5" F Threaded #1
P51 (0.5" Flange Black Steel) - connect its 0.5" F Threaded #1 oriented front links with part 50's 0.5" M Threaded #2, plus its Screw-In Screw In #1 must be oriented back
P52 (0.5" 90° Elbow Black Steel) - its 0.5" F Threaded #1, which is bottom-facing, should connect to part 46's 0.5" M Threaded #2, and its 0.5" F Threaded #2, which is back-facing, should connect to part 47's 0.5" M Threaded #1
P53 (0.5" 90° Elbow Black Steel) - its 0.5" F Threaded #1, which is top-facing, should connect to part 49's 0.5" M Threaded #2, and its 0.5" F Threaded #2, which is back-facing, should connect to part 50's 0.5" M Threaded #1
P54 (0.5" Flange Black Steel) - attach its 0.5" F Threaded #1 facing right to part 55's 0.5" M Threaded #2, also its Screw-In Screw In #1, which is left-facing, should connect to part 56's 1"x 3" Wood Side #4
P55 (0.5" x 2" Long Nipple Black Steel) - connect its 0.5" M Threaded #1 oriented right links with part 37's 0.5" F Threaded #3, and attach its 0.5" M Threaded #2 facing left to part 54's 0.5" F Threaded #1
1/2" Tee Black Steelx 3 1/2" x 11" Long Nipple Black Steelx 2 1/2" x 2" Long Nipple Black Steelx 3 1/2" Flange Black Steelx 5 1/2" x 4" Long Nipple Black Steelx 4 1/2" 90° Elbow Black Steelx 2 Attaching: Bottom Shelf Assembly
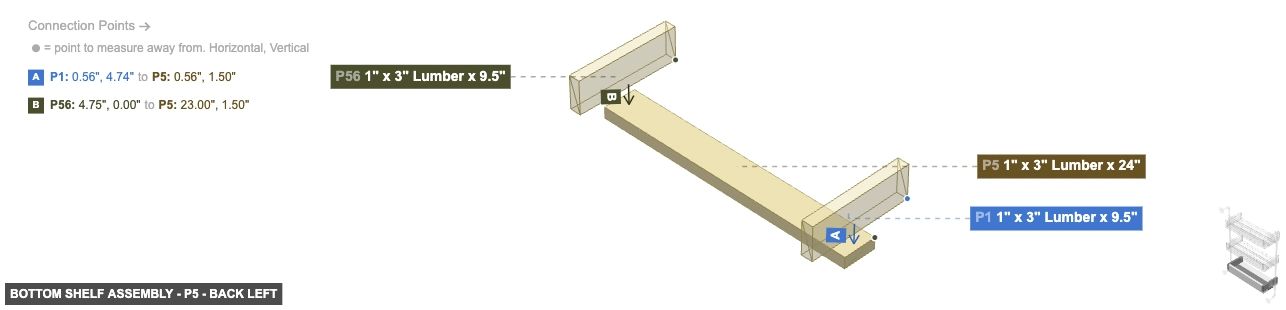
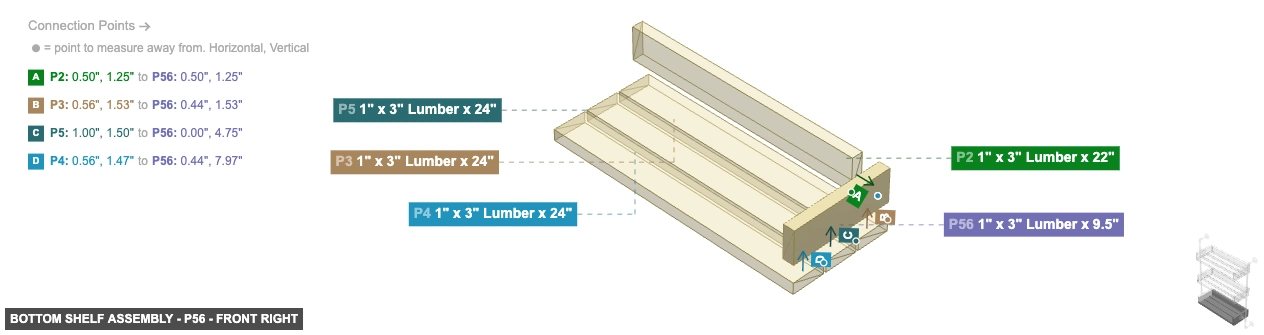
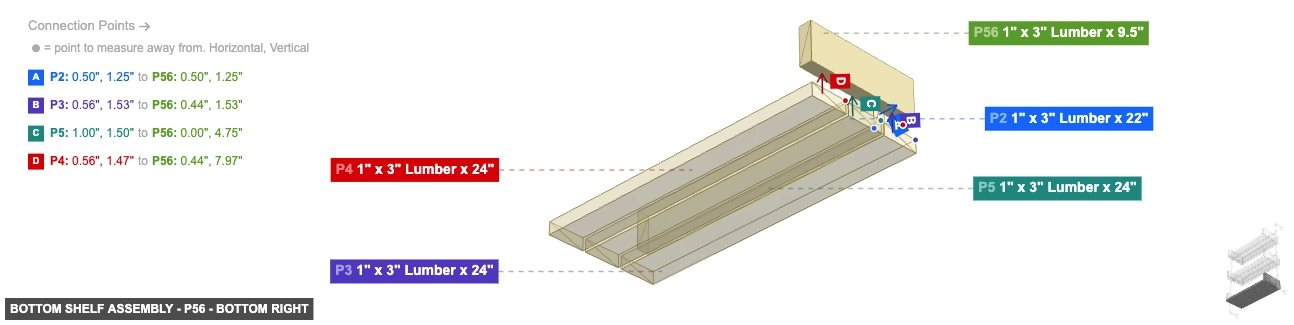
Assemble the wooden box for the bottom shelf using the side pieces, back piece, and bottom slats.
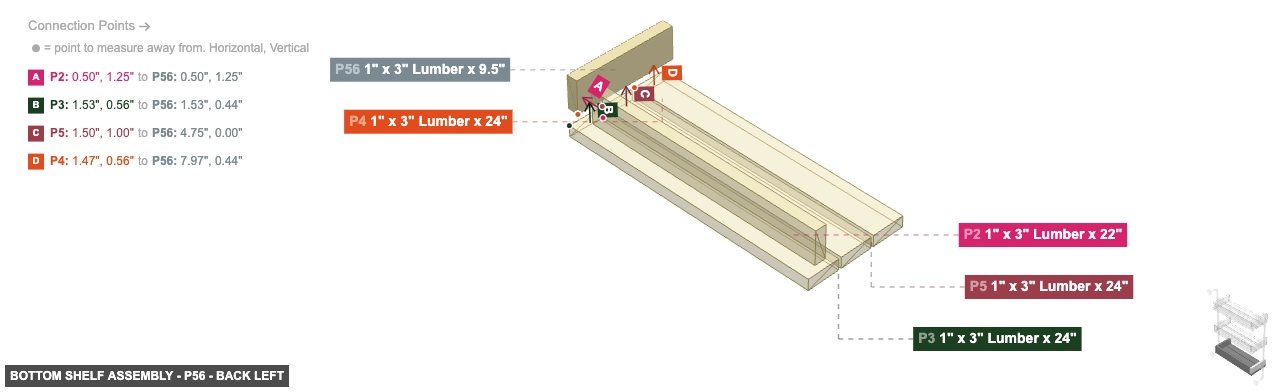
Angle: back left
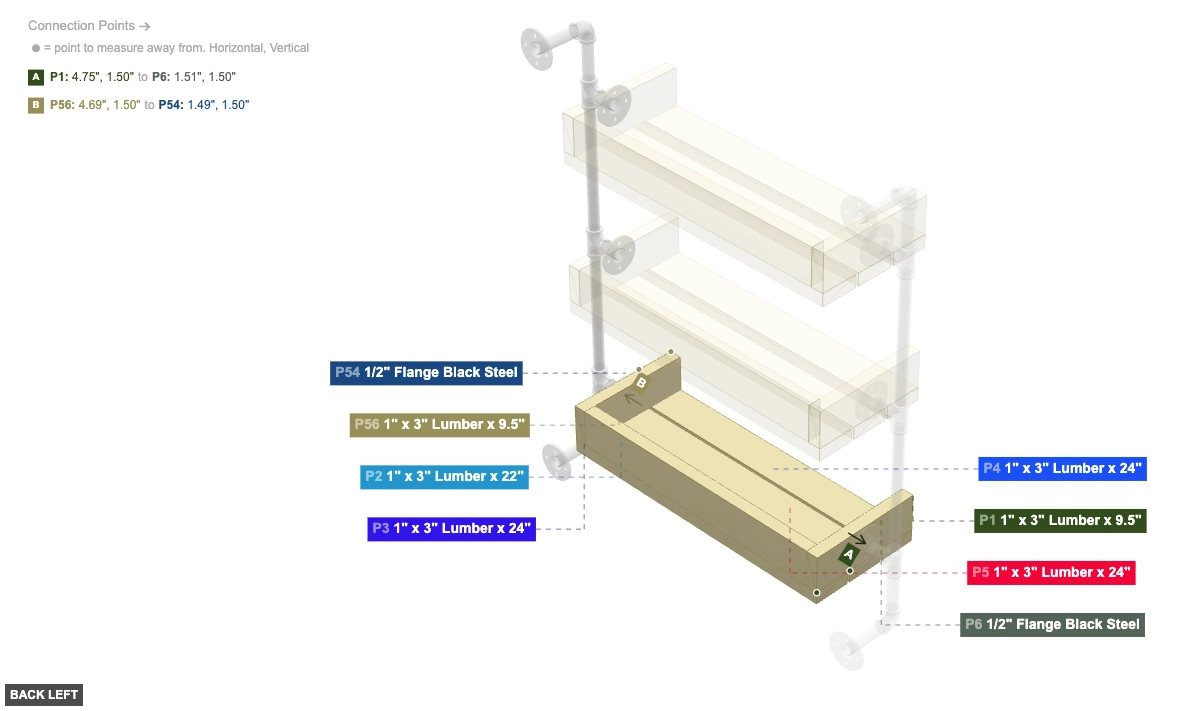
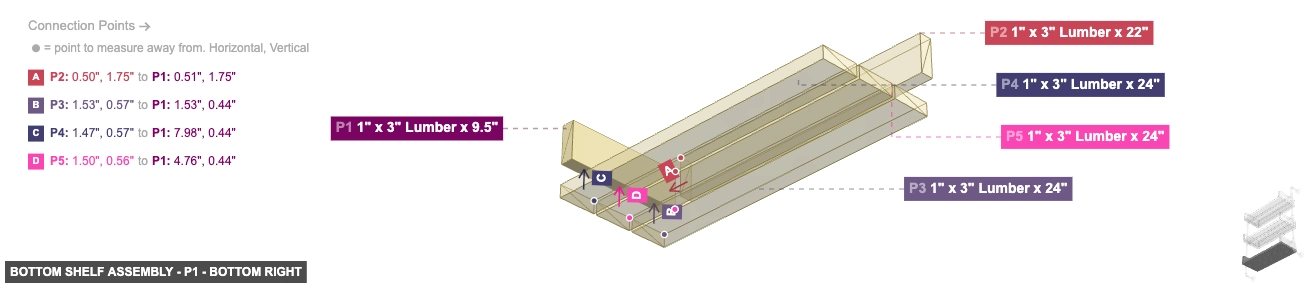
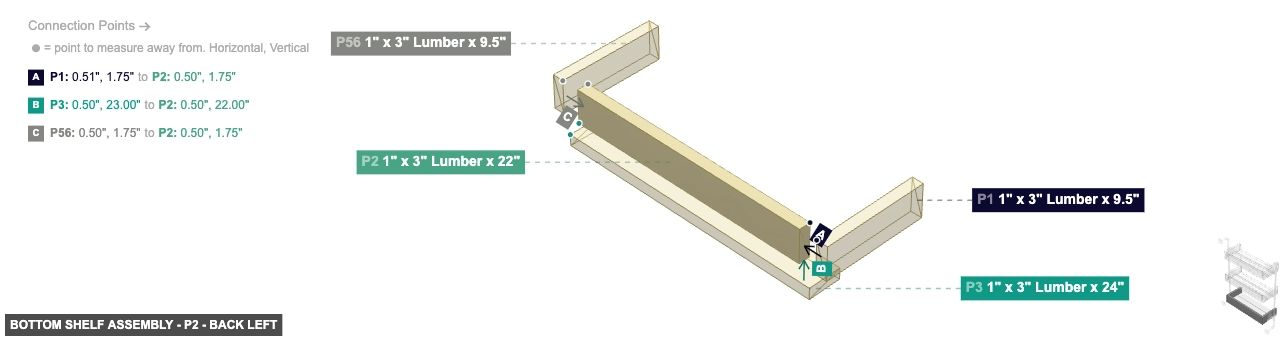
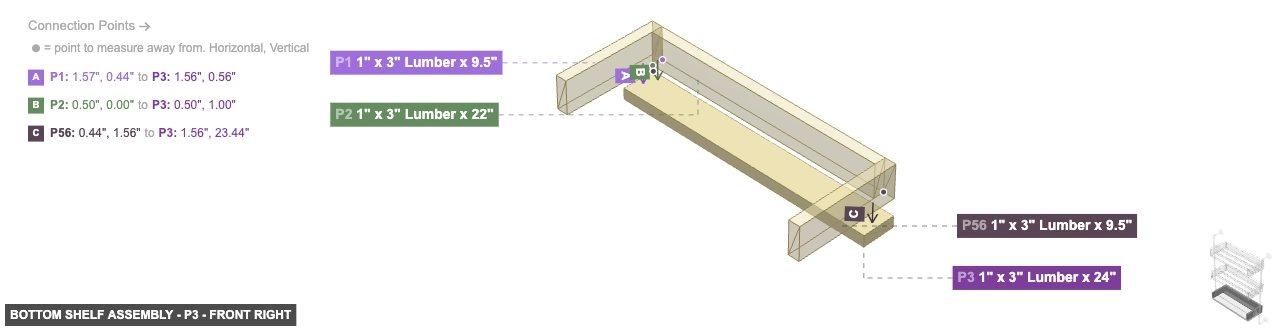
P1 (1" x 3" Lumber 9.5" length) - connect its 1"x 3" Wood Side #2 oriented right links with part 2's 1"x 3" Wood End #2, also its 1"x 3" Wood Side #3, which is bottom-facing, should connect to part 3's 1"x 3" Wood Side #2. Additionally, its 1"x 3" Wood Side #4, which is left-facing, should connect to part 6's Screw-In Screw In #1. Additionally, its 1"x 3" Wood End #1 should be directed front. Additionally, ensure its 1"x 3" Wood Side #1 faces top. After that, ensure its 1"x 3" Wood End #2 faces back
P2 (1" x 3" Lumber 22" length) - connect its 1"x 3" Wood End #1 oriented right links with part 56's 1"x 3" Wood Side #2. After that, connect its 1"x 3" Wood Side #3 oriented bottom links with part 3's 1"x 3" Wood Side #2. Additionally, attach its 1"x 3" Wood End #2 facing left to part 1's 1"x 3" Wood Side #2. Additionally, its 1"x 3" Wood Side #1 needs to point top. Also, ensure its 1"x 3" Wood Side #2 faces back, also its 1"x 3" Wood Side #4 should be directed front
P3 (1" x 3" Lumber 24" length) - its 1"x 3" Wood Side #2, which is top-facing, should connect to part 1's 1"x 3" Wood Side #3, then its 1"x 3" Wood End #1 should be directed right. After that, its 1"x 3" Wood Side #1 must be oriented front. After that, ensure its 1"x 3" Wood Side #3 faces back, then ensure its 1"x 3" Wood Side #4 faces bottom. Also, its 1"x 3" Wood End #2 should be directed left
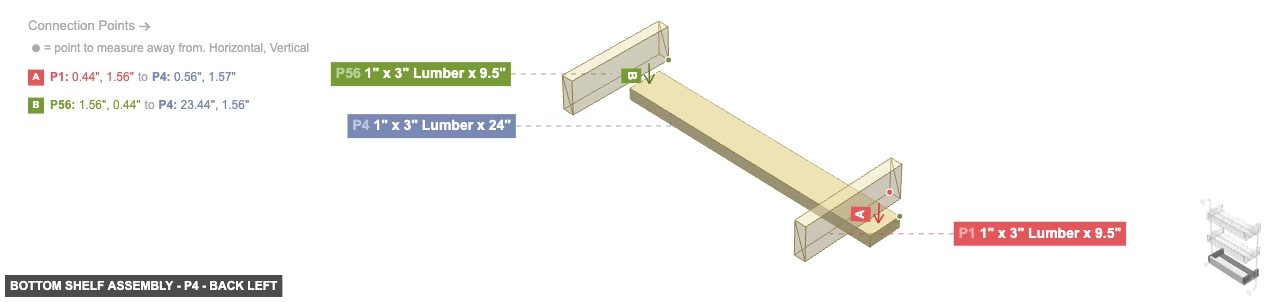
P4 (1" x 3" Lumber 24" length) - attach its 1"x 3" Wood Side #2 facing top to part 1's 1"x 3" Wood Side #3, and its 1"x 3" Wood End #1 must be oriented right. After that, its 1"x 3" Wood Side #1 should be directed front. After that, its 1"x 3" Wood Side #3 must be oriented back, also ensure its 1"x 3" Wood Side #4 faces bottom, also its 1"x 3" Wood End #2 needs to point left
P5 (1" x 3" Lumber 24" length) - connect its 1"x 3" Wood Side #2 oriented top links with part 1's 1"x 3" Wood Side #3, plus ensure its 1"x 3" Wood End #1 faces right. Also, its 1"x 3" Wood Side #1 should be directed front, and ensure its 1"x 3" Wood Side #3 faces back, plus ensure its 1"x 3" Wood Side #4 faces bottom. After that, its 1"x 3" Wood End #2 should be directed left
P56 (1" x 3" Lumber 9.5" length) - attach its 1"x 3" Wood Side #1 facing bottom to part 3's 1"x 3" Wood Side #2. Next, its 1"x 3" Wood Side #2, which is left-facing, should connect to part 2's 1"x 3" Wood End #1. Additionally, attach its 1"x 3" Wood Side #4 facing right to part 54's Screw-In Screw In #1. Next, ensure its 1"x 3" Wood End #1 faces front. Additionally, its 1"x 3" Wood Side #3 should be directed top. Additionally, its 1"x 3" Wood End #2 must be oriented back
1" x 3" Lumber x 9.5"x 2 1" x 3" Lumber x 22"x 1 1" x 3" Lumber x 24"x 3
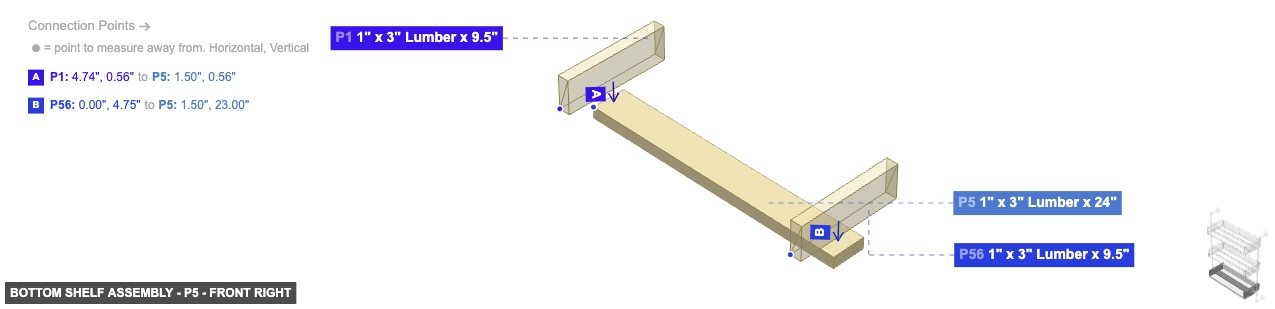
Angle: front right
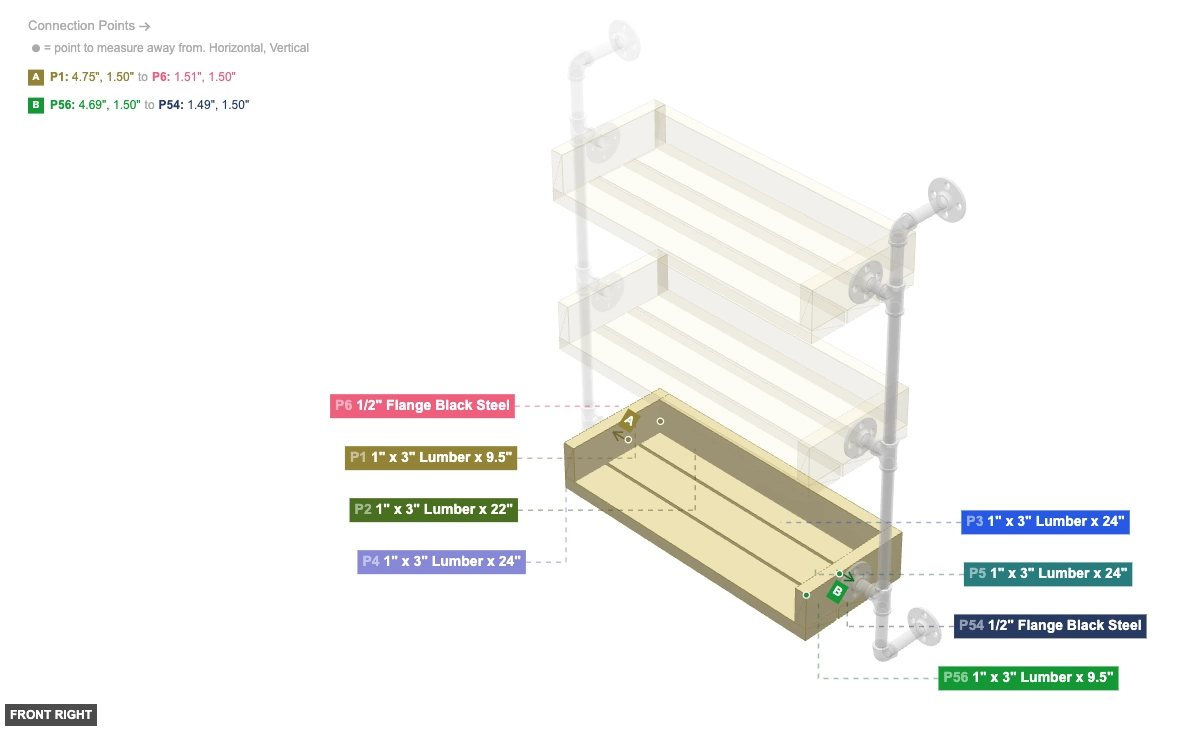
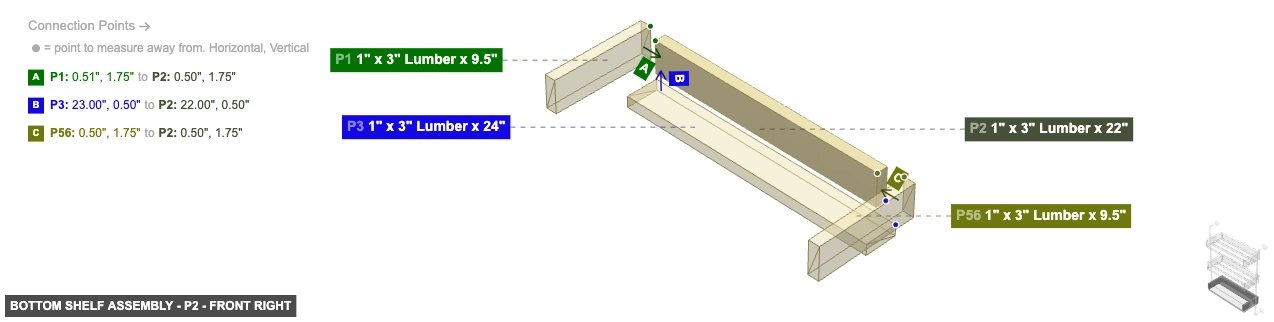
P1 (1" x 3" Lumber 9.5" length) - connect its 1"x 3" Wood Side #2 oriented right links with part 2's 1"x 3" Wood End #2, also its 1"x 3" Wood Side #3, which is bottom-facing, should connect to part 3's 1"x 3" Wood Side #2. Additionally, its 1"x 3" Wood Side #4, which is left-facing, should connect to part 6's Screw-In Screw In #1. Additionally, its 1"x 3" Wood End #1 should be directed front. Additionally, ensure its 1"x 3" Wood Side #1 faces top. After that, ensure its 1"x 3" Wood End #2 faces back
P2 (1" x 3" Lumber 22" length) - connect its 1"x 3" Wood End #1 oriented right links with part 56's 1"x 3" Wood Side #2. After that, connect its 1"x 3" Wood Side #3 oriented bottom links with part 3's 1"x 3" Wood Side #2. Additionally, attach its 1"x 3" Wood End #2 facing left to part 1's 1"x 3" Wood Side #2. Additionally, its 1"x 3" Wood Side #1 needs to point top. Also, ensure its 1"x 3" Wood Side #2 faces back, also its 1"x 3" Wood Side #4 should be directed front
P3 (1" x 3" Lumber 24" length) - its 1"x 3" Wood Side #2, which is top-facing, should connect to part 1's 1"x 3" Wood Side #3, then its 1"x 3" Wood End #1 should be directed right. After that, its 1"x 3" Wood Side #1 must be oriented front. After that, ensure its 1"x 3" Wood Side #3 faces back, then ensure its 1"x 3" Wood Side #4 faces bottom. Also, its 1"x 3" Wood End #2 should be directed left
P4 (1" x 3" Lumber 24" length) - attach its 1"x 3" Wood Side #2 facing top to part 1's 1"x 3" Wood Side #3, and its 1"x 3" Wood End #1 must be oriented right. After that, its 1"x 3" Wood Side #1 should be directed front. After that, its 1"x 3" Wood Side #3 must be oriented back, also ensure its 1"x 3" Wood Side #4 faces bottom, also its 1"x 3" Wood End #2 needs to point left
P5 (1" x 3" Lumber 24" length) - connect its 1"x 3" Wood Side #2 oriented top links with part 1's 1"x 3" Wood Side #3, plus ensure its 1"x 3" Wood End #1 faces right. Also, its 1"x 3" Wood Side #1 should be directed front, and ensure its 1"x 3" Wood Side #3 faces back, plus ensure its 1"x 3" Wood Side #4 faces bottom. After that, its 1"x 3" Wood End #2 should be directed left
P56 (1" x 3" Lumber 9.5" length) - attach its 1"x 3" Wood Side #1 facing bottom to part 3's 1"x 3" Wood Side #2. Next, its 1"x 3" Wood Side #2, which is left-facing, should connect to part 2's 1"x 3" Wood End #1. Additionally, attach its 1"x 3" Wood Side #4 facing right to part 54's Screw-In Screw In #1. Next, ensure its 1"x 3" Wood End #1 faces front. Additionally, its 1"x 3" Wood Side #3 should be directed top. Additionally, its 1"x 3" Wood End #2 must be oriented back
1" x 3" Lumber x 9.5"x 2 1" x 3" Lumber x 22"x 1 1" x 3" Lumber x 24"x 3
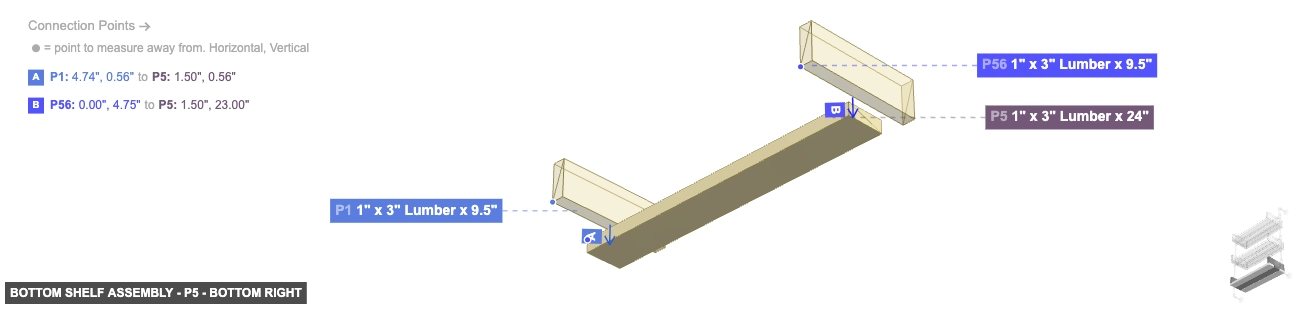
Angle: bottom right
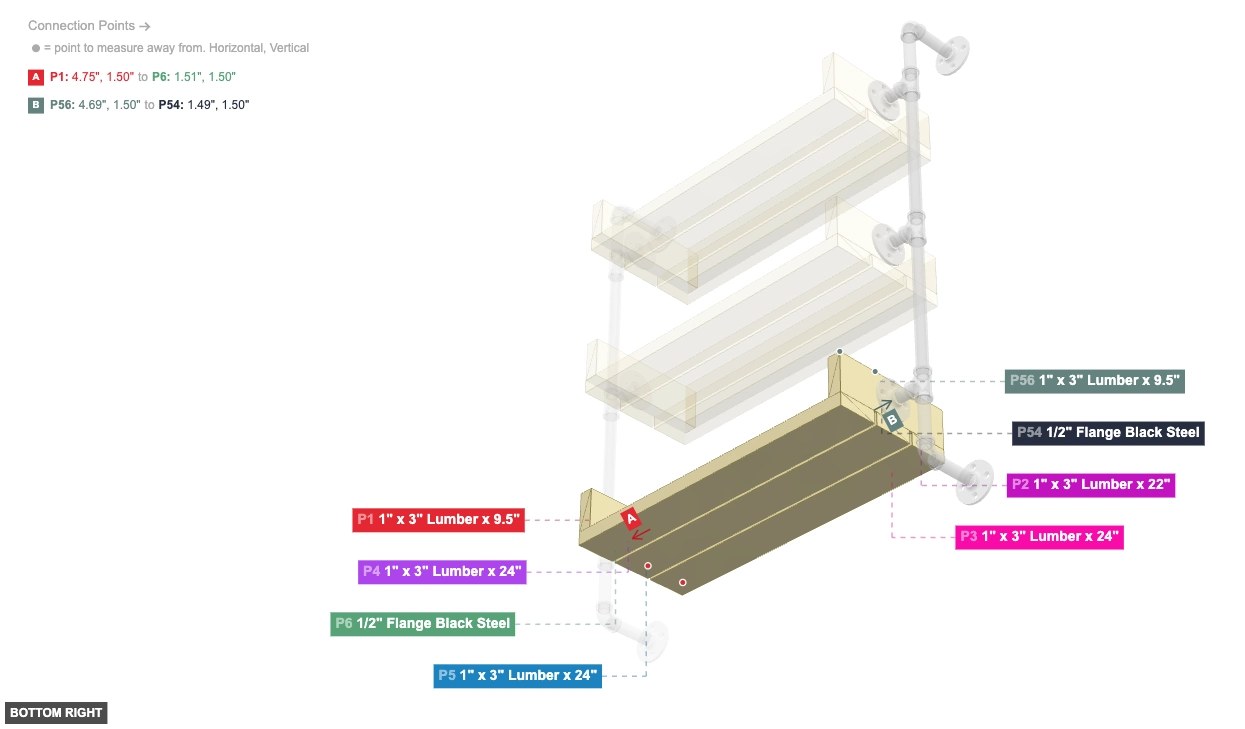
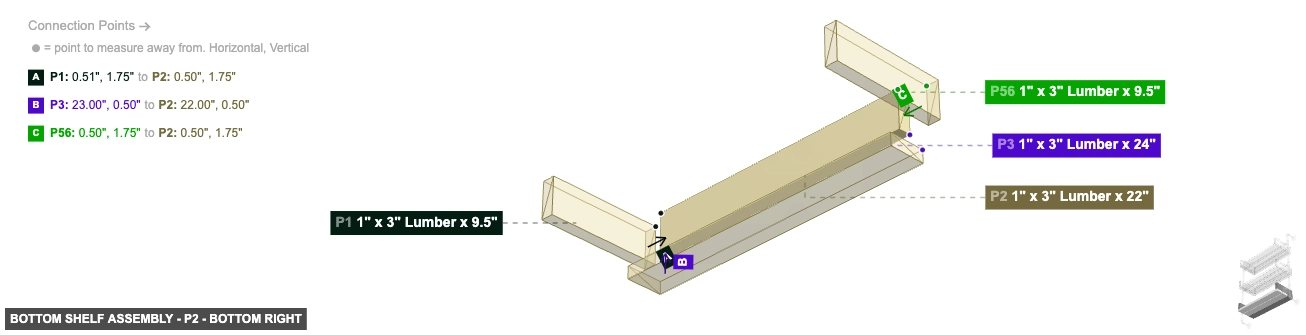
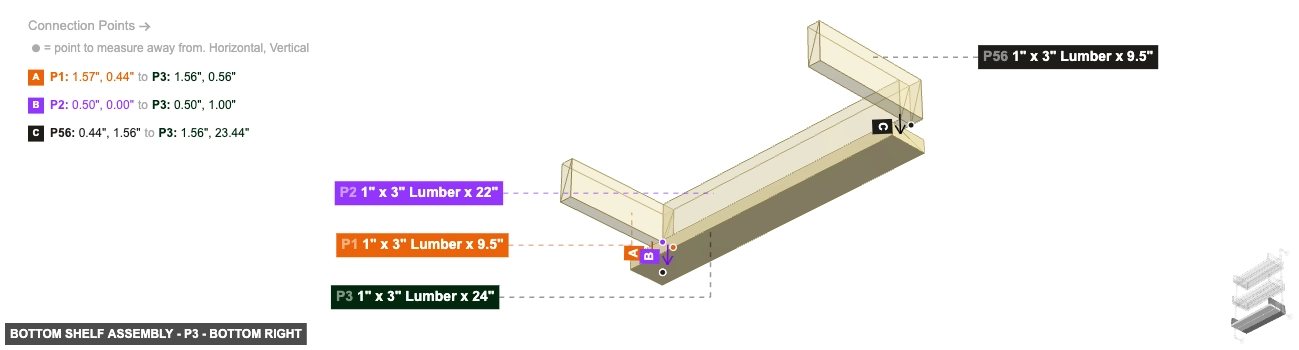
P1 (1" x 3" Lumber 9.5" length) - connect its 1"x 3" Wood Side #2 oriented right links with part 2's 1"x 3" Wood End #2, also its 1"x 3" Wood Side #3, which is bottom-facing, should connect to part 3's 1"x 3" Wood Side #2. Additionally, its 1"x 3" Wood Side #4, which is left-facing, should connect to part 6's Screw-In Screw In #1. Additionally, its 1"x 3" Wood End #1 should be directed front. Additionally, ensure its 1"x 3" Wood Side #1 faces top. After that, ensure its 1"x 3" Wood End #2 faces back
P2 (1" x 3" Lumber 22" length) - connect its 1"x 3" Wood End #1 oriented right links with part 56's 1"x 3" Wood Side #2. After that, connect its 1"x 3" Wood Side #3 oriented bottom links with part 3's 1"x 3" Wood Side #2. Additionally, attach its 1"x 3" Wood End #2 facing left to part 1's 1"x 3" Wood Side #2. Additionally, its 1"x 3" Wood Side #1 needs to point top. Also, ensure its 1"x 3" Wood Side #2 faces back, also its 1"x 3" Wood Side #4 should be directed front
P3 (1" x 3" Lumber 24" length) - its 1"x 3" Wood Side #2, which is top-facing, should connect to part 1's 1"x 3" Wood Side #3, then its 1"x 3" Wood End #1 should be directed right. After that, its 1"x 3" Wood Side #1 must be oriented front. After that, ensure its 1"x 3" Wood Side #3 faces back, then ensure its 1"x 3" Wood Side #4 faces bottom. Also, its 1"x 3" Wood End #2 should be directed left
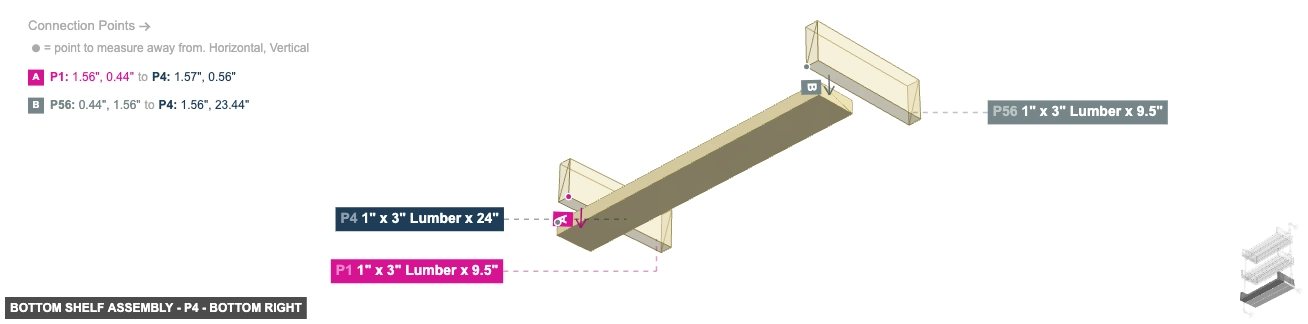
P4 (1" x 3" Lumber 24" length) - attach its 1"x 3" Wood Side #2 facing top to part 1's 1"x 3" Wood Side #3, and its 1"x 3" Wood End #1 must be oriented right. After that, its 1"x 3" Wood Side #1 should be directed front. After that, its 1"x 3" Wood Side #3 must be oriented back, also ensure its 1"x 3" Wood Side #4 faces bottom, also its 1"x 3" Wood End #2 needs to point left
P5 (1" x 3" Lumber 24" length) - connect its 1"x 3" Wood Side #2 oriented top links with part 1's 1"x 3" Wood Side #3, plus ensure its 1"x 3" Wood End #1 faces right. Also, its 1"x 3" Wood Side #1 should be directed front, and ensure its 1"x 3" Wood Side #3 faces back, plus ensure its 1"x 3" Wood Side #4 faces bottom. After that, its 1"x 3" Wood End #2 should be directed left
P56 (1" x 3" Lumber 9.5" length) - attach its 1"x 3" Wood Side #1 facing bottom to part 3's 1"x 3" Wood Side #2. Next, its 1"x 3" Wood Side #2, which is left-facing, should connect to part 2's 1"x 3" Wood End #1. Additionally, attach its 1"x 3" Wood Side #4 facing right to part 54's Screw-In Screw In #1. Next, ensure its 1"x 3" Wood End #1 faces front. Additionally, its 1"x 3" Wood Side #3 should be directed top. Additionally, its 1"x 3" Wood End #2 must be oriented back
1" x 3" Lumber x 9.5"x 2 1" x 3" Lumber x 22"x 1 1" x 3" Lumber x 24"x 3 Attaching: Middle Shelf Assembly
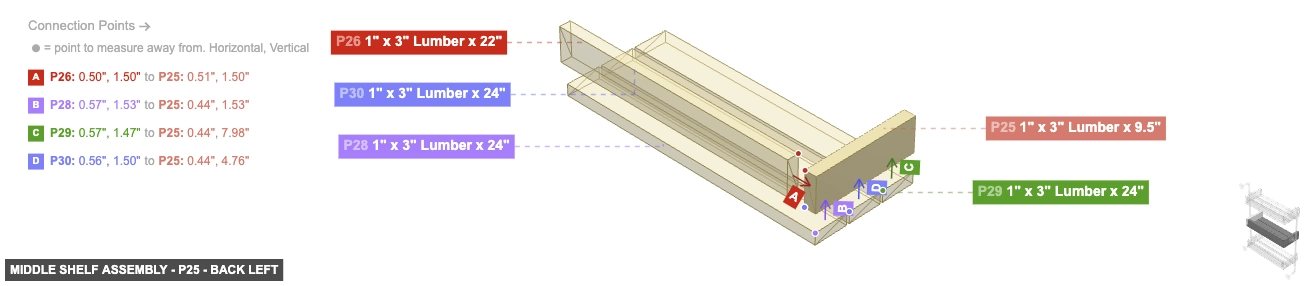
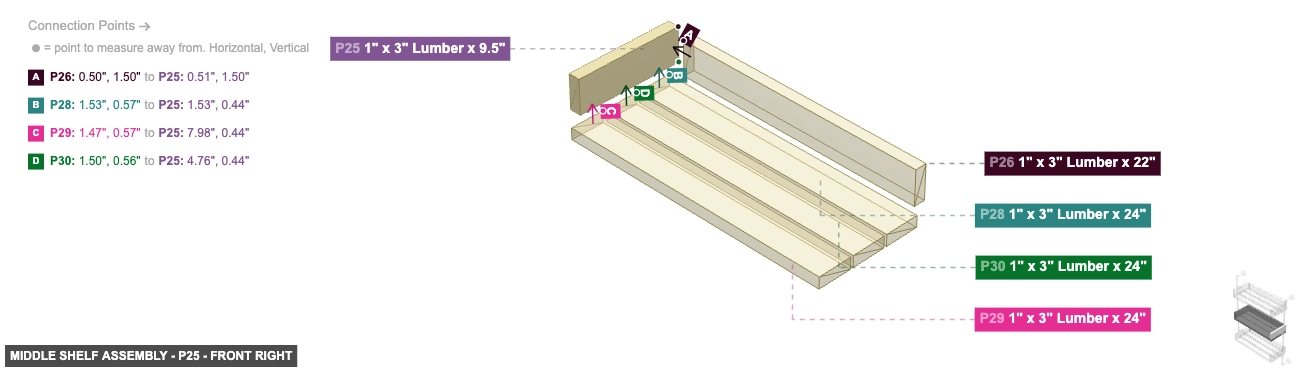
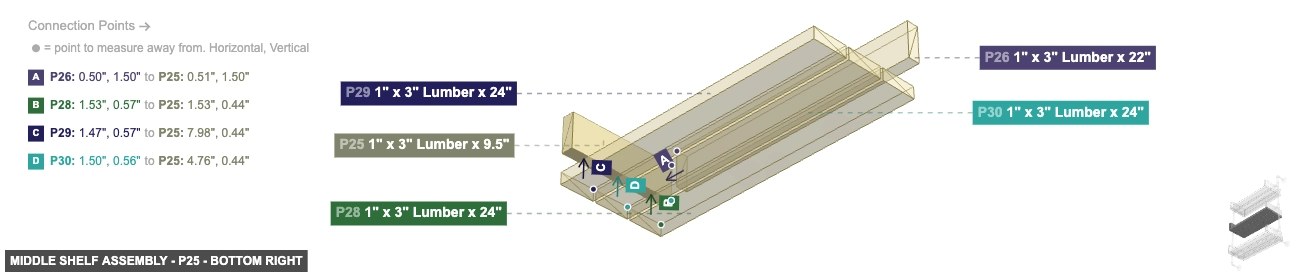
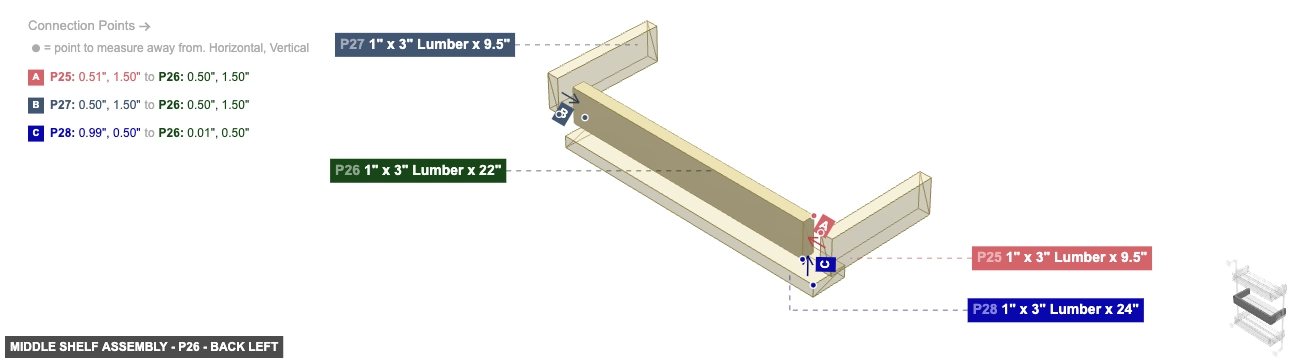
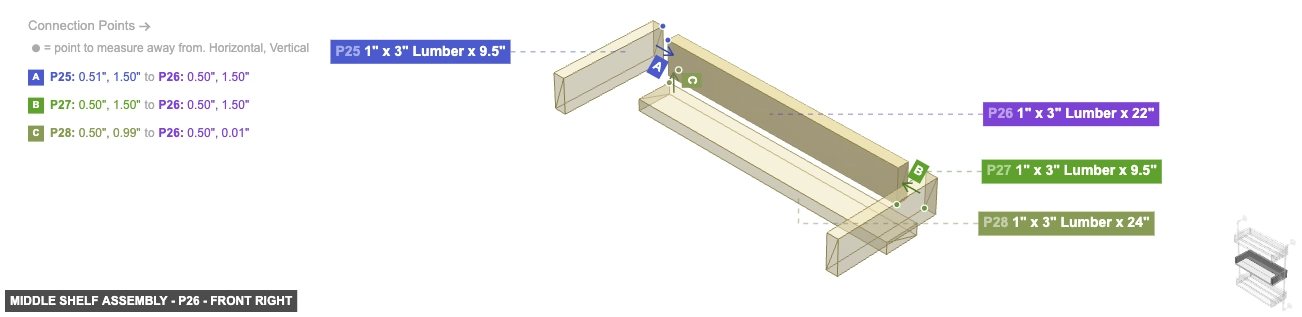
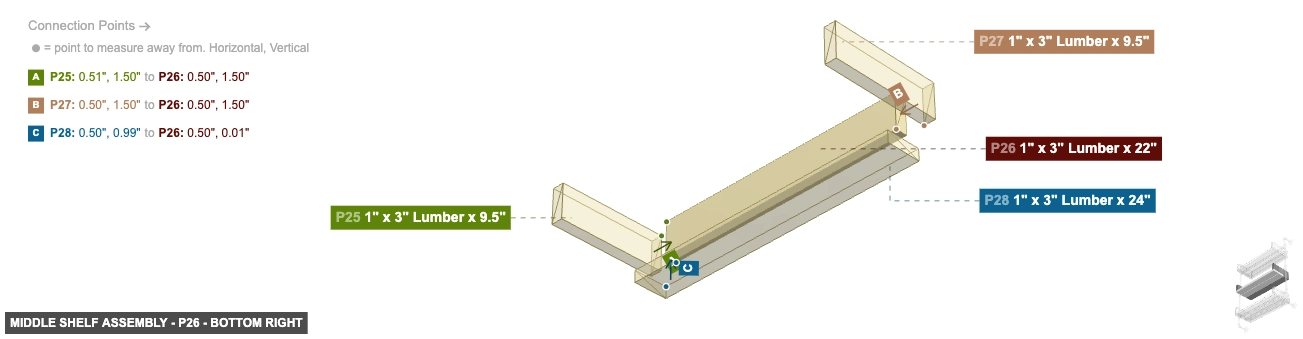
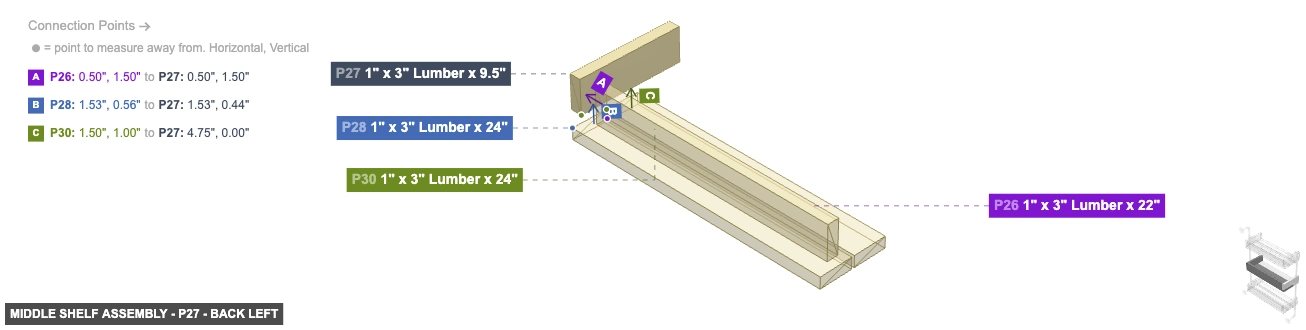
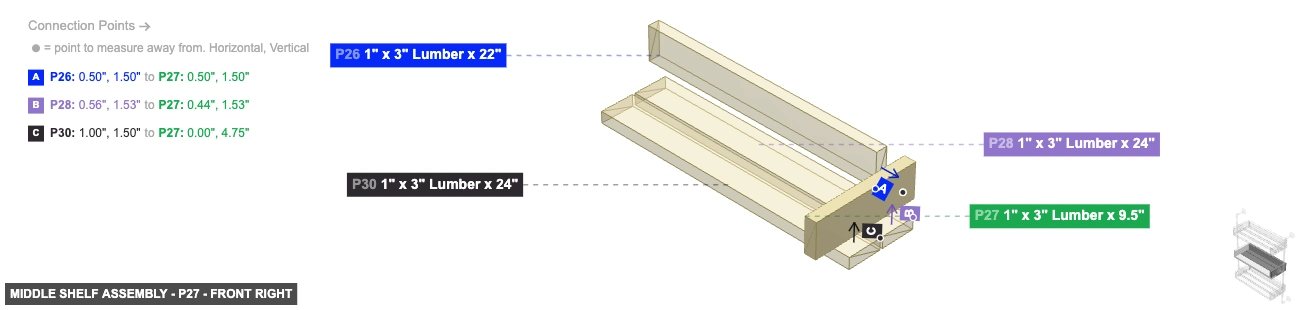
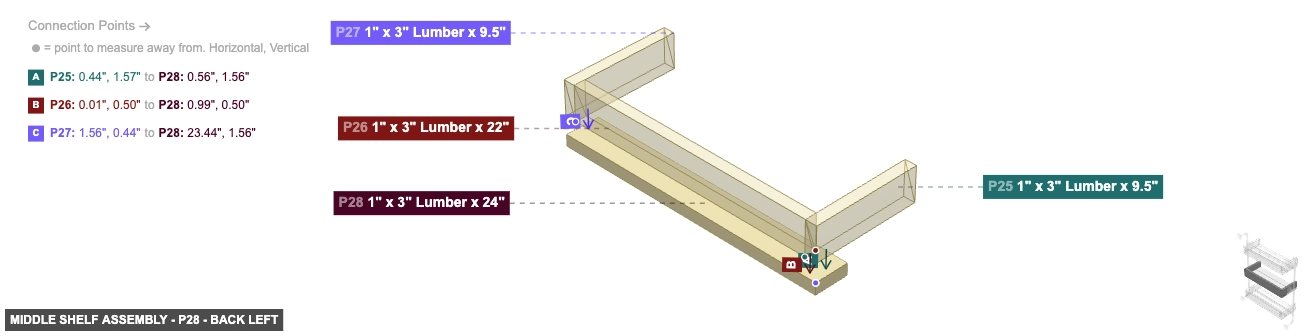
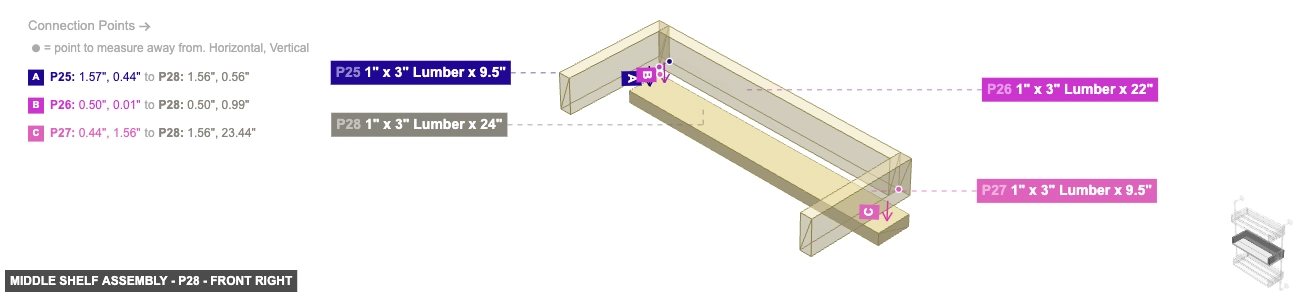
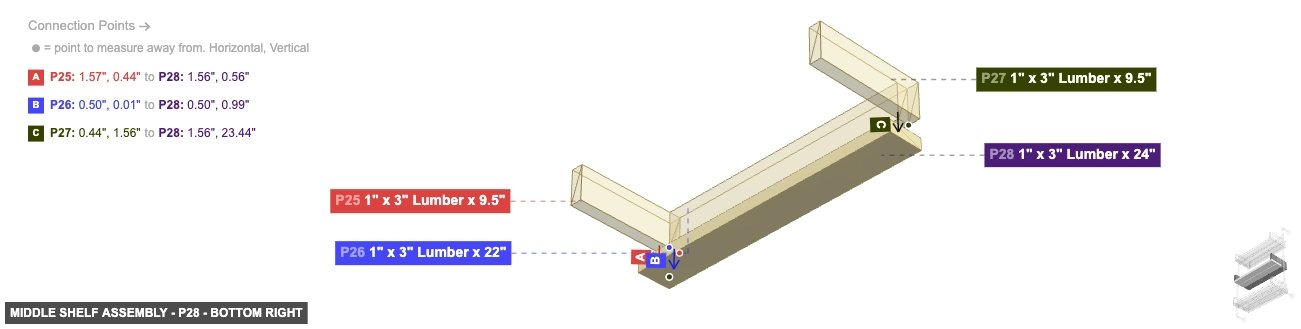
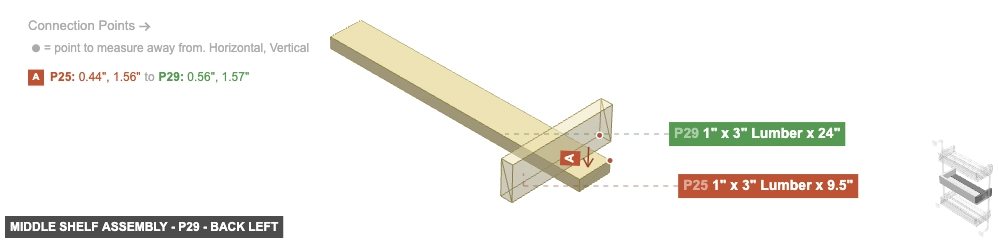
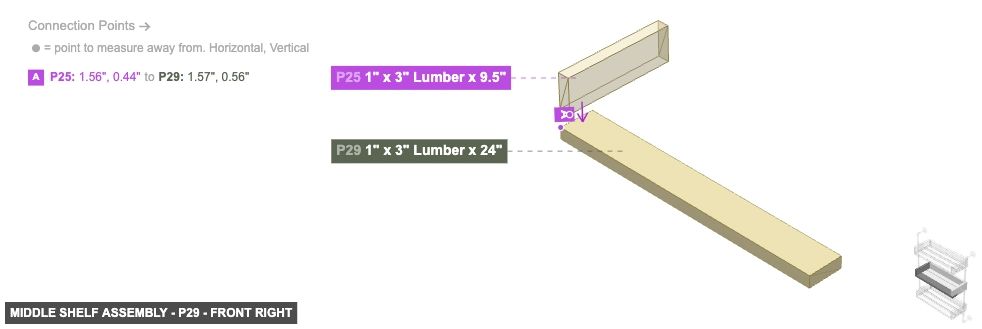
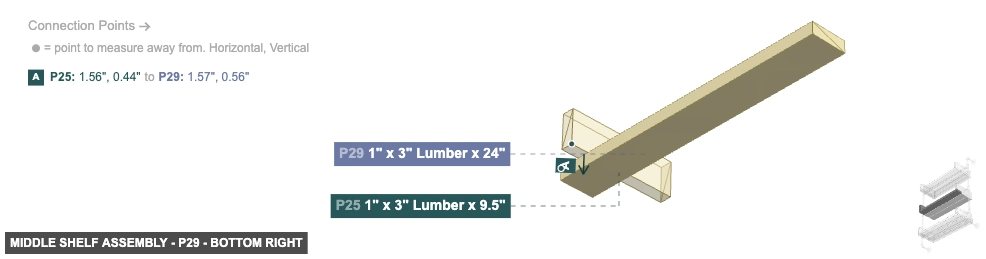
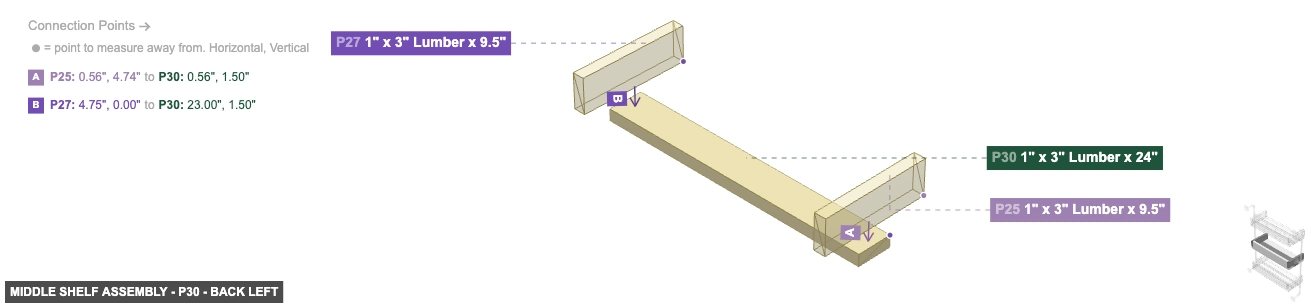
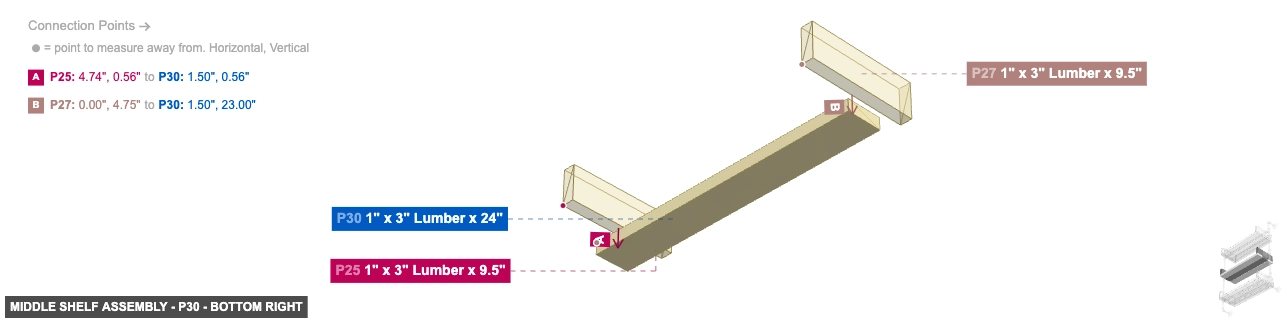
Assemble the wooden box for the middle shelf using the side pieces, back piece, and bottom slats.
Angle: back left
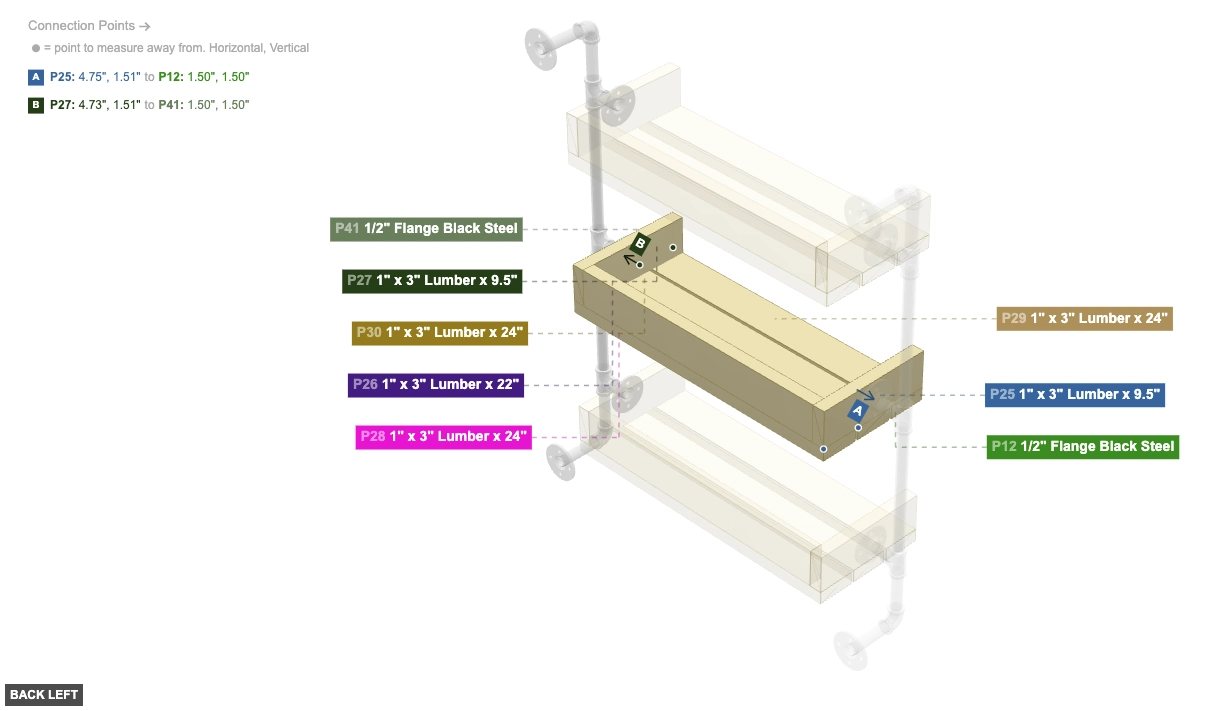
P25 (1" x 3" Lumber 9.5" length) - connect its 1"x 3" Wood Side #2 oriented right links with part 26's 1"x 3" Wood End #2. After that, its 1"x 3" Wood Side #3, which is bottom-facing, should connect to part 28's 1"x 3" Wood Side #2, and connect its 1"x 3" Wood Side #4 oriented left links with part 12's Screw-In Screw In #1. Next, its 1"x 3" Wood End #1 should be directed front, then its 1"x 3" Wood Side #1 should be directed top. Additionally, its 1"x 3" Wood End #2 needs to point back
P26 (1" x 3" Lumber 22" length) - connect its 1"x 3" Wood End #1 oriented right links with part 27's 1"x 3" Wood Side #2. Also, attach its 1"x 3" Wood Side #3 facing bottom to part 28's 1"x 3" Wood Side #2. Next, connect its 1"x 3" Wood End #2 oriented left links with part 25's 1"x 3" Wood Side #2, then its 1"x 3" Wood Side #1 must be oriented top, plus ensure its 1"x 3" Wood Side #2 faces back, plus ensure its 1"x 3" Wood Side #4 faces front
P27 (1" x 3" Lumber 9.5" length) - connect its 1"x 3" Wood Side #1 oriented bottom links with part 28's 1"x 3" Wood Side #2. Also, attach its 1"x 3" Wood Side #2 facing left to part 26's 1"x 3" Wood End #1. After that, connect its 1"x 3" Wood Side #4 oriented right links with part 41's Screw-In Screw In #1. Additionally, its 1"x 3" Wood End #1 should be directed front. Next, its 1"x 3" Wood Side #3 needs to point top. After that, ensure its 1"x 3" Wood End #2 faces back
P28 (1" x 3" Lumber 24" length) - attach its 1"x 3" Wood Side #2 facing top to part 25's 1"x 3" Wood Side #3. After that, ensure its 1"x 3" Wood End #1 faces right, plus its 1"x 3" Wood Side #1 must be oriented front. Also, its 1"x 3" Wood Side #3 must be oriented back, also its 1"x 3" Wood Side #4 needs to point bottom. Also, ensure its 1"x 3" Wood End #2 faces left
P29 (1" x 3" Lumber 24" length) - connect its 1"x 3" Wood Side #2 oriented top links with part 25's 1"x 3" Wood Side #3. After that, its 1"x 3" Wood End #1 must be oriented right, and its 1"x 3" Wood Side #1 should be directed front, plus ensure its 1"x 3" Wood Side #3 faces back. Additionally, its 1"x 3" Wood Side #4 must be oriented bottom. After that, its 1"x 3" Wood End #2 must be oriented left
P30 (1" x 3" Lumber 24" length) - connect its 1"x 3" Wood Side #2 oriented top links with part 25's 1"x 3" Wood Side #3. Additionally, ensure its 1"x 3" Wood End #1 faces right, also ensure its 1"x 3" Wood Side #1 faces front, then its 1"x 3" Wood Side #3 must be oriented back. Additionally, ensure its 1"x 3" Wood Side #4 faces bottom, plus ensure its 1"x 3" Wood End #2 faces left
1" x 3" Lumber x 9.5"x 2 1" x 3" Lumber x 22"x 1 1" x 3" Lumber x 24"x 3
Angle: front right
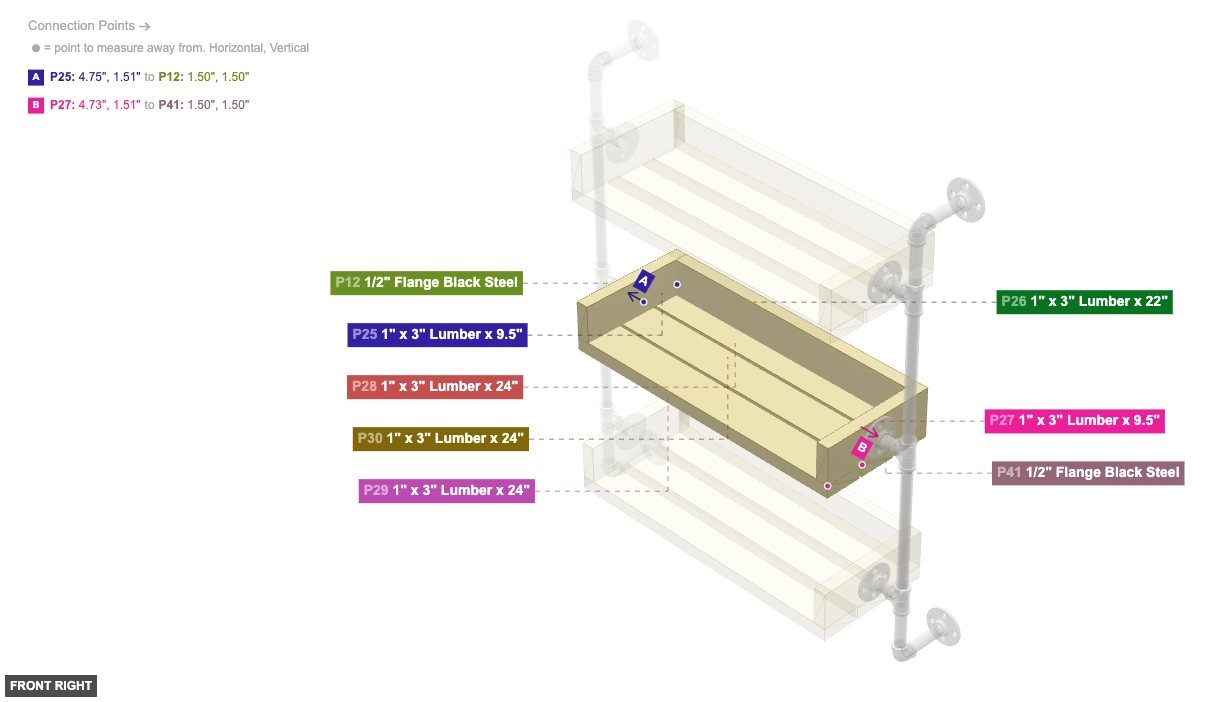
P25 (1" x 3" Lumber 9.5" length) - connect its 1"x 3" Wood Side #2 oriented right links with part 26's 1"x 3" Wood End #2. After that, its 1"x 3" Wood Side #3, which is bottom-facing, should connect to part 28's 1"x 3" Wood Side #2, and connect its 1"x 3" Wood Side #4 oriented left links with part 12's Screw-In Screw In #1. Next, its 1"x 3" Wood End #1 should be directed front, then its 1"x 3" Wood Side #1 should be directed top. Additionally, its 1"x 3" Wood End #2 needs to point back
P26 (1" x 3" Lumber 22" length) - connect its 1"x 3" Wood End #1 oriented right links with part 27's 1"x 3" Wood Side #2. Also, attach its 1"x 3" Wood Side #3 facing bottom to part 28's 1"x 3" Wood Side #2. Next, connect its 1"x 3" Wood End #2 oriented left links with part 25's 1"x 3" Wood Side #2, then its 1"x 3" Wood Side #1 must be oriented top, plus ensure its 1"x 3" Wood Side #2 faces back, plus ensure its 1"x 3" Wood Side #4 faces front
P27 (1" x 3" Lumber 9.5" length) - connect its 1"x 3" Wood Side #1 oriented bottom links with part 28's 1"x 3" Wood Side #2. Also, attach its 1"x 3" Wood Side #2 facing left to part 26's 1"x 3" Wood End #1. After that, connect its 1"x 3" Wood Side #4 oriented right links with part 41's Screw-In Screw In #1. Additionally, its 1"x 3" Wood End #1 should be directed front. Next, its 1"x 3" Wood Side #3 needs to point top. After that, ensure its 1"x 3" Wood End #2 faces back
P28 (1" x 3" Lumber 24" length) - attach its 1"x 3" Wood Side #2 facing top to part 25's 1"x 3" Wood Side #3. After that, ensure its 1"x 3" Wood End #1 faces right, plus its 1"x 3" Wood Side #1 must be oriented front. Also, its 1"x 3" Wood Side #3 must be oriented back, also its 1"x 3" Wood Side #4 needs to point bottom. Also, ensure its 1"x 3" Wood End #2 faces left
P29 (1" x 3" Lumber 24" length) - connect its 1"x 3" Wood Side #2 oriented top links with part 25's 1"x 3" Wood Side #3. After that, its 1"x 3" Wood End #1 must be oriented right, and its 1"x 3" Wood Side #1 should be directed front, plus ensure its 1"x 3" Wood Side #3 faces back. Additionally, its 1"x 3" Wood Side #4 must be oriented bottom. After that, its 1"x 3" Wood End #2 must be oriented left
P30 (1" x 3" Lumber 24" length) - connect its 1"x 3" Wood Side #2 oriented top links with part 25's 1"x 3" Wood Side #3. Additionally, ensure its 1"x 3" Wood End #1 faces right, also ensure its 1"x 3" Wood Side #1 faces front, then its 1"x 3" Wood Side #3 must be oriented back. Additionally, ensure its 1"x 3" Wood Side #4 faces bottom, plus ensure its 1"x 3" Wood End #2 faces left
1" x 3" Lumber x 9.5"x 2 1" x 3" Lumber x 22"x 1 1" x 3" Lumber x 24"x 3
Angle: bottom right
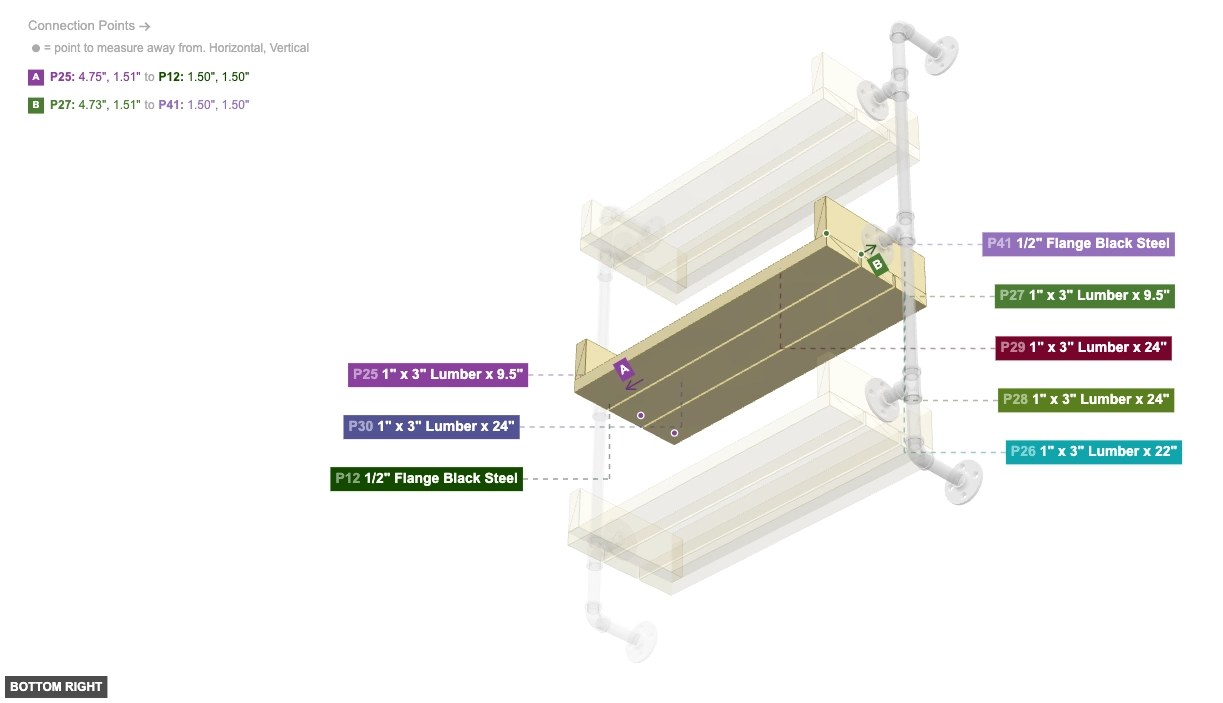
P25 (1" x 3" Lumber 9.5" length) - connect its 1"x 3" Wood Side #2 oriented right links with part 26's 1"x 3" Wood End #2. After that, its 1"x 3" Wood Side #3, which is bottom-facing, should connect to part 28's 1"x 3" Wood Side #2, and connect its 1"x 3" Wood Side #4 oriented left links with part 12's Screw-In Screw In #1. Next, its 1"x 3" Wood End #1 should be directed front, then its 1"x 3" Wood Side #1 should be directed top. Additionally, its 1"x 3" Wood End #2 needs to point back
P26 (1" x 3" Lumber 22" length) - connect its 1"x 3" Wood End #1 oriented right links with part 27's 1"x 3" Wood Side #2. Also, attach its 1"x 3" Wood Side #3 facing bottom to part 28's 1"x 3" Wood Side #2. Next, connect its 1"x 3" Wood End #2 oriented left links with part 25's 1"x 3" Wood Side #2, then its 1"x 3" Wood Side #1 must be oriented top, plus ensure its 1"x 3" Wood Side #2 faces back, plus ensure its 1"x 3" Wood Side #4 faces front
P27 (1" x 3" Lumber 9.5" length) - connect its 1"x 3" Wood Side #1 oriented bottom links with part 28's 1"x 3" Wood Side #2. Also, attach its 1"x 3" Wood Side #2 facing left to part 26's 1"x 3" Wood End #1. After that, connect its 1"x 3" Wood Side #4 oriented right links with part 41's Screw-In Screw In #1. Additionally, its 1"x 3" Wood End #1 should be directed front. Next, its 1"x 3" Wood Side #3 needs to point top. After that, ensure its 1"x 3" Wood End #2 faces back
P28 (1" x 3" Lumber 24" length) - attach its 1"x 3" Wood Side #2 facing top to part 25's 1"x 3" Wood Side #3. After that, ensure its 1"x 3" Wood End #1 faces right, plus its 1"x 3" Wood Side #1 must be oriented front. Also, its 1"x 3" Wood Side #3 must be oriented back, also its 1"x 3" Wood Side #4 needs to point bottom. Also, ensure its 1"x 3" Wood End #2 faces left
P29 (1" x 3" Lumber 24" length) - connect its 1"x 3" Wood Side #2 oriented top links with part 25's 1"x 3" Wood Side #3. After that, its 1"x 3" Wood End #1 must be oriented right, and its 1"x 3" Wood Side #1 should be directed front, plus ensure its 1"x 3" Wood Side #3 faces back. Additionally, its 1"x 3" Wood Side #4 must be oriented bottom. After that, its 1"x 3" Wood End #2 must be oriented left
P30 (1" x 3" Lumber 24" length) - connect its 1"x 3" Wood Side #2 oriented top links with part 25's 1"x 3" Wood Side #3. Additionally, ensure its 1"x 3" Wood End #1 faces right, also ensure its 1"x 3" Wood Side #1 faces front, then its 1"x 3" Wood Side #3 must be oriented back. Additionally, ensure its 1"x 3" Wood Side #4 faces bottom, plus ensure its 1"x 3" Wood End #2 faces left
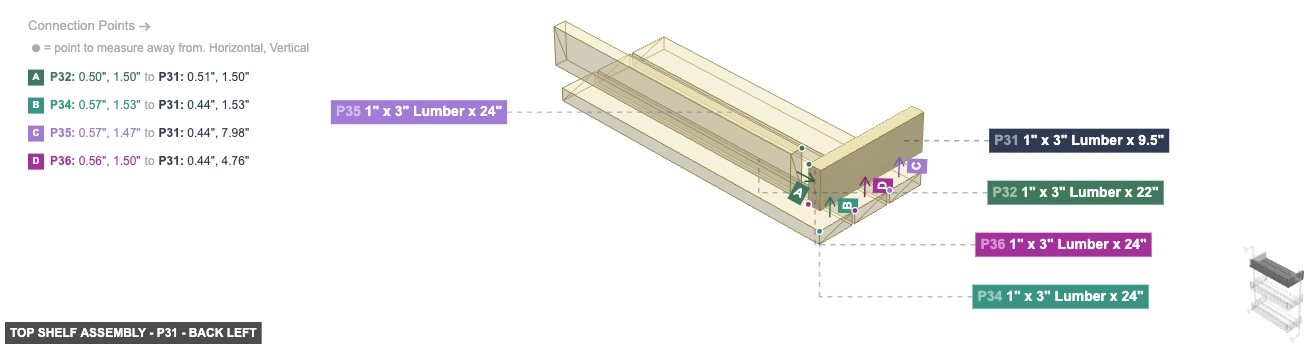
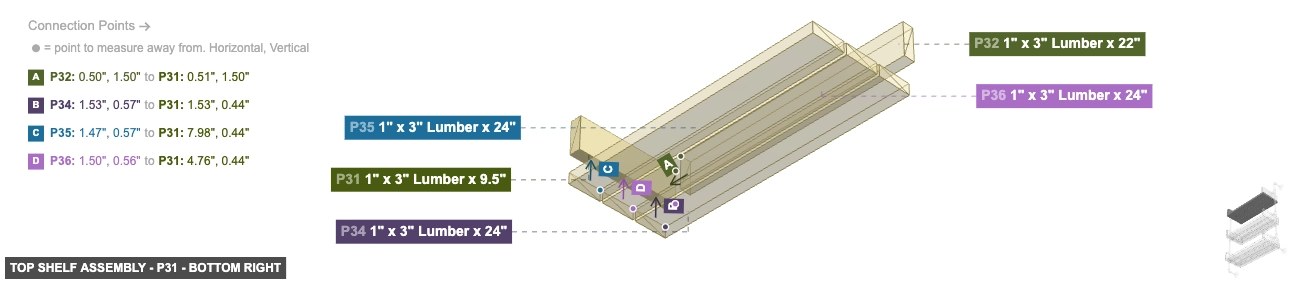
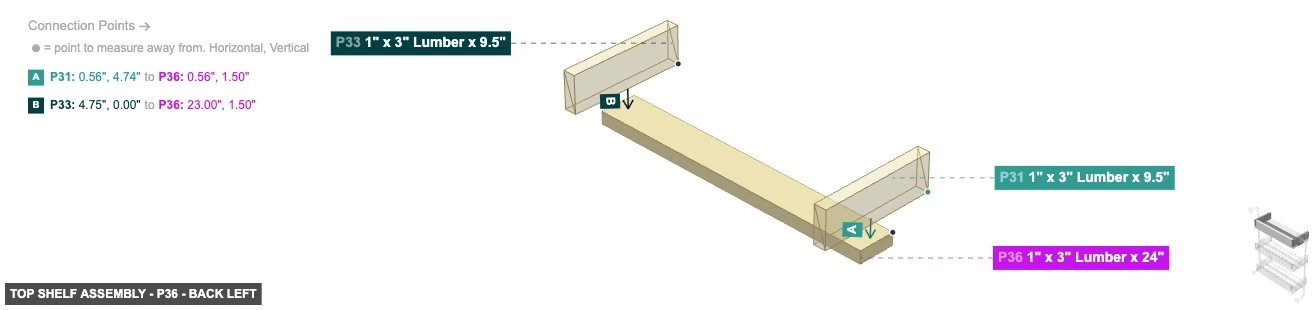
1" x 3" Lumber x 9.5"x 2 1" x 3" Lumber x 22"x 1 1" x 3" Lumber x 24"x 3 Attaching: Top Shelf Assembly
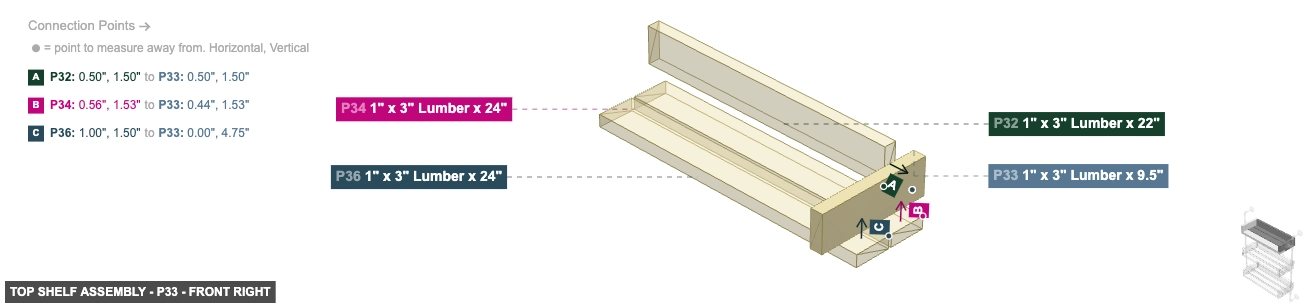
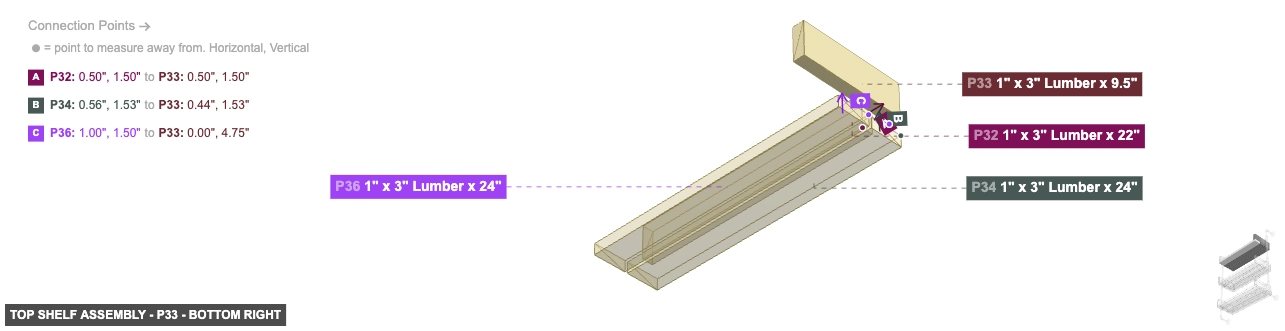
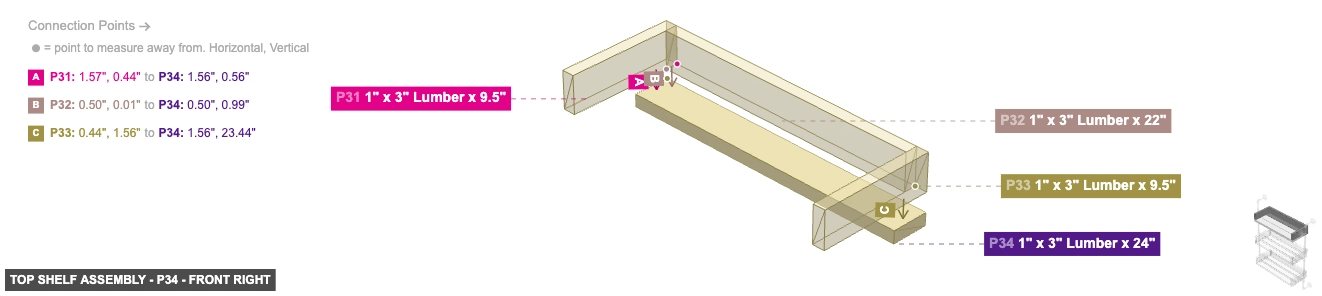
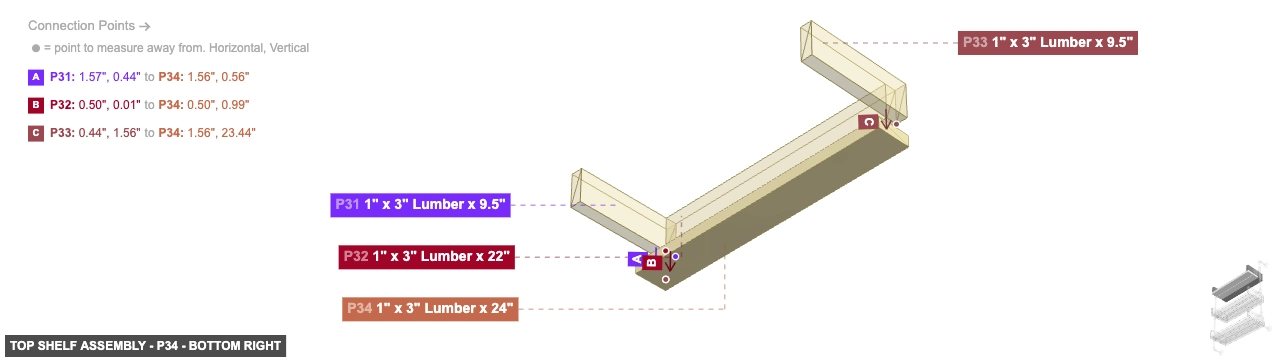
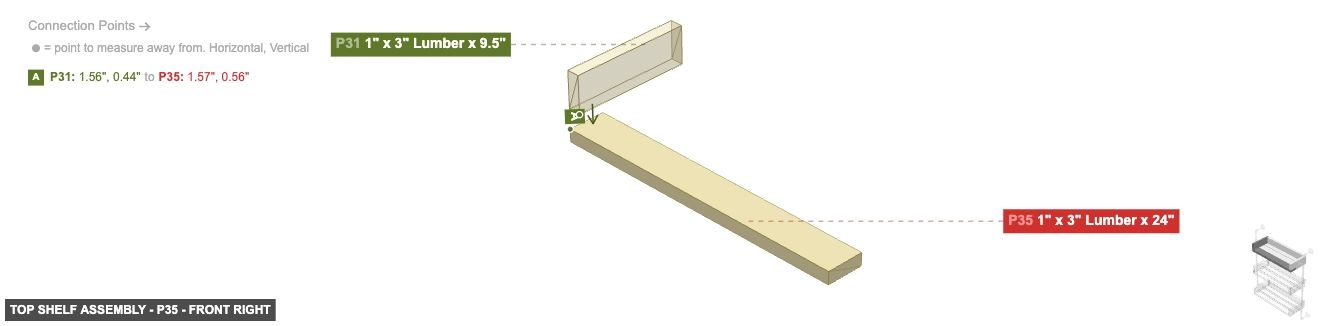
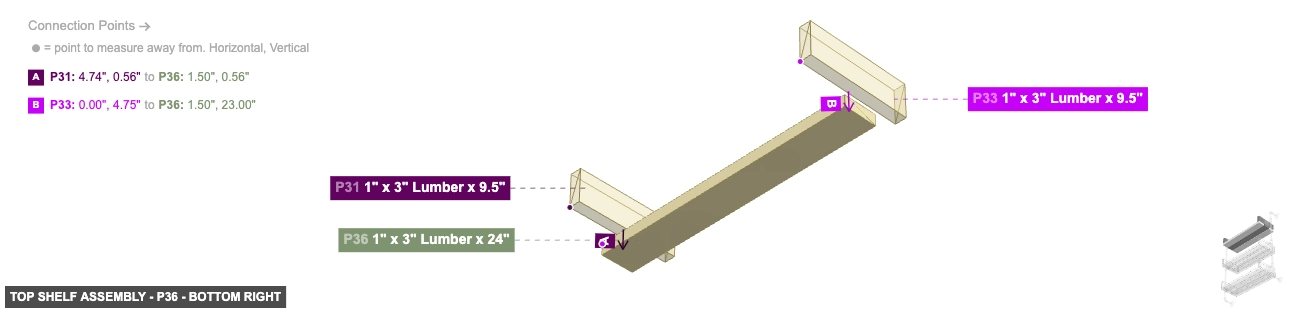
Assemble the wooden box for the top shelf using the side pieces, back piece, and bottom slats.
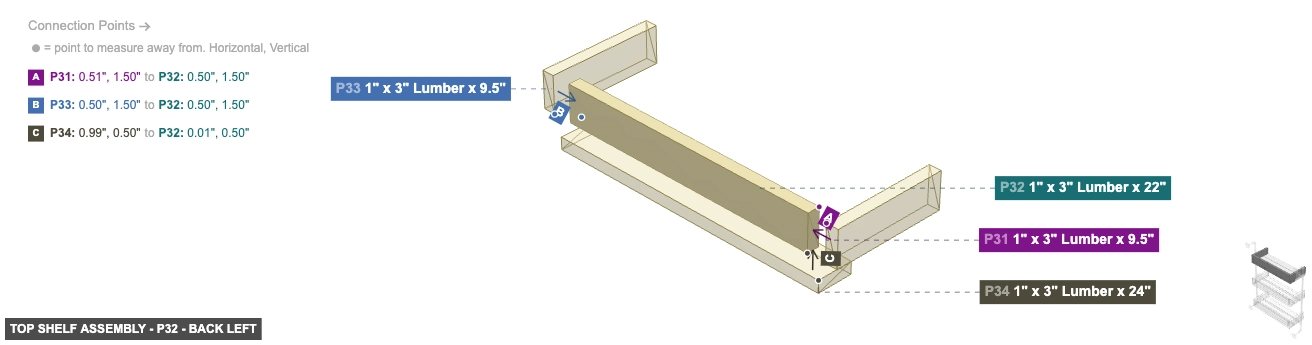
Angle: back left
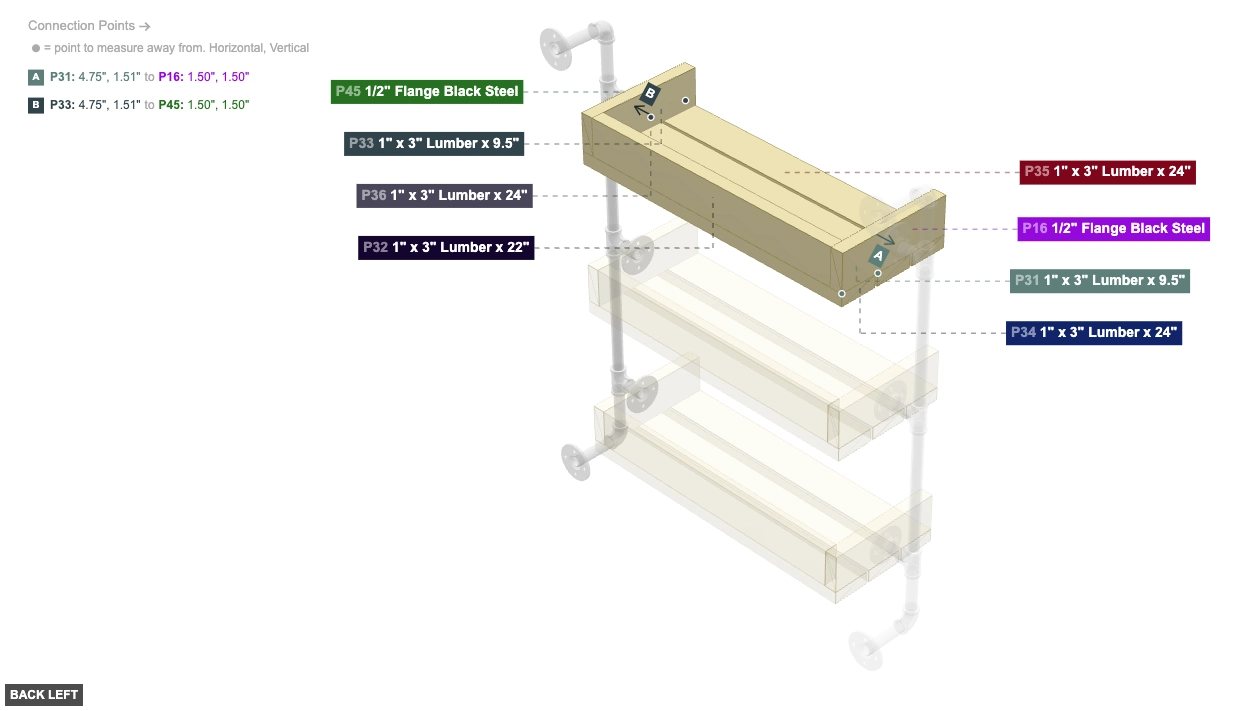
P31 (1" x 3" Lumber 9.5" length) - connect its 1"x 3" Wood Side #2 oriented right links with part 32's 1"x 3" Wood End #2. Also, attach its 1"x 3" Wood Side #3 facing bottom to part 34's 1"x 3" Wood Side #2, then attach its 1"x 3" Wood Side #4 facing left to part 16's Screw-In Screw In #1, plus its 1"x 3" Wood End #1 should be directed front, and its 1"x 3" Wood Side #1 should be directed top. Additionally, its 1"x 3" Wood End #2 needs to point back
P32 (1" x 3" Lumber 22" length) - attach its 1"x 3" Wood End #1 facing right to part 33's 1"x 3" Wood Side #2, also its 1"x 3" Wood Side #3, which is bottom-facing, should connect to part 34's 1"x 3" Wood Side #2. Next, its 1"x 3" Wood End #2, which is left-facing, should connect to part 31's 1"x 3" Wood Side #2, also its 1"x 3" Wood Side #1 should be directed top, then ensure its 1"x 3" Wood Side #2 faces back, plus ensure its 1"x 3" Wood Side #4 faces front
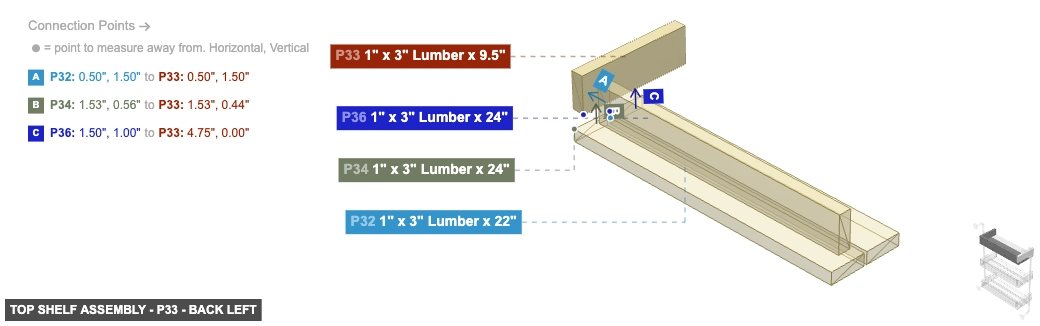
P33 (1" x 3" Lumber 9.5" length) - connect its 1"x 3" Wood Side #1 oriented bottom links with part 34's 1"x 3" Wood Side #2, plus its 1"x 3" Wood Side #2, which is left-facing, should connect to part 32's 1"x 3" Wood End #1, then attach its 1"x 3" Wood Side #4 facing right to part 45's Screw-In Screw In #1, then its 1"x 3" Wood End #1 should be directed front. Next, its 1"x 3" Wood Side #3 must be oriented top. After that, its 1"x 3" Wood End #2 must be oriented back
P34 (1" x 3" Lumber 24" length) - connect its 1"x 3" Wood Side #2 oriented top links with part 31's 1"x 3" Wood Side #3, also its 1"x 3" Wood End #1 must be oriented right, and its 1"x 3" Wood Side #1 must be oriented front, and its 1"x 3" Wood Side #3 must be oriented back. Next, its 1"x 3" Wood Side #4 must be oriented bottom, and its 1"x 3" Wood End #2 should be directed left
P35 (1" x 3" Lumber 24" length) - connect its 1"x 3" Wood Side #2 oriented top links with part 31's 1"x 3" Wood Side #3, plus its 1"x 3" Wood End #1 should be directed right. Additionally, its 1"x 3" Wood Side #1 should be directed front, plus its 1"x 3" Wood Side #3 must be oriented back, plus its 1"x 3" Wood Side #4 needs to point bottom. Also, ensure its 1"x 3" Wood End #2 faces left
P36 (1" x 3" Lumber 24" length) - its 1"x 3" Wood Side #2, which is top-facing, should connect to part 31's 1"x 3" Wood Side #3. Also, its 1"x 3" Wood End #1 must be oriented right. Next, ensure its 1"x 3" Wood Side #1 faces front. Additionally, its 1"x 3" Wood Side #3 must be oriented back, plus its 1"x 3" Wood Side #4 should be directed bottom, also its 1"x 3" Wood End #2 must be oriented left
1" x 3" Lumber x 9.5"x 2 1" x 3" Lumber x 22"x 1 1" x 3" Lumber x 24"x 3
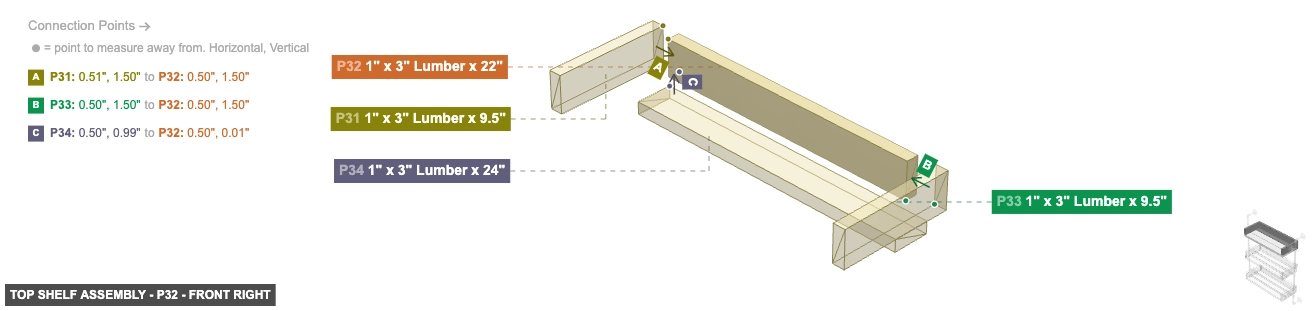
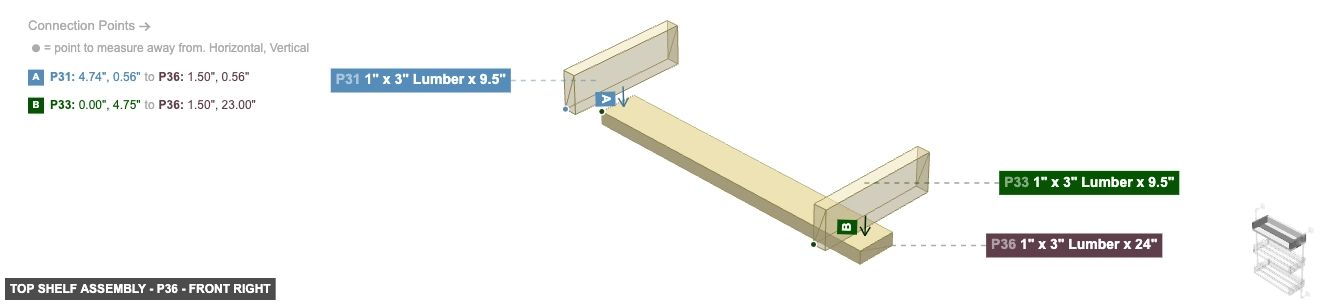
Angle: front right
P31 (1" x 3" Lumber 9.5" length) - connect its 1"x 3" Wood Side #2 oriented right links with part 32's 1"x 3" Wood End #2. Also, attach its 1"x 3" Wood Side #3 facing bottom to part 34's 1"x 3" Wood Side #2, then attach its 1"x 3" Wood Side #4 facing left to part 16's Screw-In Screw In #1, plus its 1"x 3" Wood End #1 should be directed front, and its 1"x 3" Wood Side #1 should be directed top. Additionally, its 1"x 3" Wood End #2 needs to point back
P32 (1" x 3" Lumber 22" length) - attach its 1"x 3" Wood End #1 facing right to part 33's 1"x 3" Wood Side #2, also its 1"x 3" Wood Side #3, which is bottom-facing, should connect to part 34's 1"x 3" Wood Side #2. Next, its 1"x 3" Wood End #2, which is left-facing, should connect to part 31's 1"x 3" Wood Side #2, also its 1"x 3" Wood Side #1 should be directed top, then ensure its 1"x 3" Wood Side #2 faces back, plus ensure its 1"x 3" Wood Side #4 faces front
P33 (1" x 3" Lumber 9.5" length) - connect its 1"x 3" Wood Side #1 oriented bottom links with part 34's 1"x 3" Wood Side #2, plus its 1"x 3" Wood Side #2, which is left-facing, should connect to part 32's 1"x 3" Wood End #1, then attach its 1"x 3" Wood Side #4 facing right to part 45's Screw-In Screw In #1, then its 1"x 3" Wood End #1 should be directed front. Next, its 1"x 3" Wood Side #3 must be oriented top. After that, its 1"x 3" Wood End #2 must be oriented back
P34 (1" x 3" Lumber 24" length) - connect its 1"x 3" Wood Side #2 oriented top links with part 31's 1"x 3" Wood Side #3, also its 1"x 3" Wood End #1 must be oriented right, and its 1"x 3" Wood Side #1 must be oriented front, and its 1"x 3" Wood Side #3 must be oriented back. Next, its 1"x 3" Wood Side #4 must be oriented bottom, and its 1"x 3" Wood End #2 should be directed left
P35 (1" x 3" Lumber 24" length) - connect its 1"x 3" Wood Side #2 oriented top links with part 31's 1"x 3" Wood Side #3, plus its 1"x 3" Wood End #1 should be directed right. Additionally, its 1"x 3" Wood Side #1 should be directed front, plus its 1"x 3" Wood Side #3 must be oriented back, plus its 1"x 3" Wood Side #4 needs to point bottom. Also, ensure its 1"x 3" Wood End #2 faces left
P36 (1" x 3" Lumber 24" length) - its 1"x 3" Wood Side #2, which is top-facing, should connect to part 31's 1"x 3" Wood Side #3. Also, its 1"x 3" Wood End #1 must be oriented right. Next, ensure its 1"x 3" Wood Side #1 faces front. Additionally, its 1"x 3" Wood Side #3 must be oriented back, plus its 1"x 3" Wood Side #4 should be directed bottom, also its 1"x 3" Wood End #2 must be oriented left
1" x 3" Lumber x 9.5"x 2 1" x 3" Lumber x 22"x 1 1" x 3" Lumber x 24"x 3
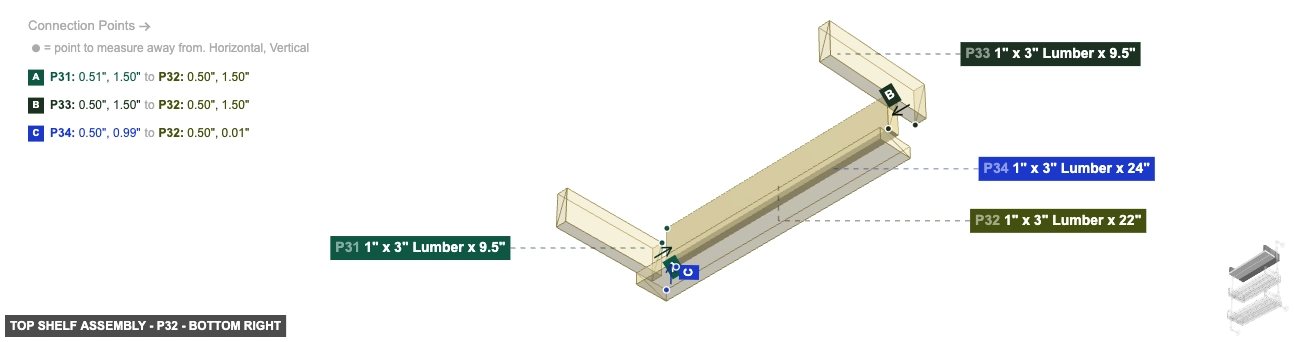
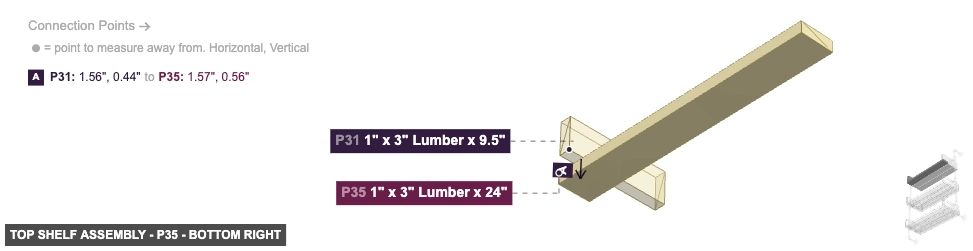
Angle: bottom right
P31 (1" x 3" Lumber 9.5" length) - connect its 1"x 3" Wood Side #2 oriented right links with part 32's 1"x 3" Wood End #2. Also, attach its 1"x 3" Wood Side #3 facing bottom to part 34's 1"x 3" Wood Side #2, then attach its 1"x 3" Wood Side #4 facing left to part 16's Screw-In Screw In #1, plus its 1"x 3" Wood End #1 should be directed front, and its 1"x 3" Wood Side #1 should be directed top. Additionally, its 1"x 3" Wood End #2 needs to point back
P32 (1" x 3" Lumber 22" length) - attach its 1"x 3" Wood End #1 facing right to part 33's 1"x 3" Wood Side #2, also its 1"x 3" Wood Side #3, which is bottom-facing, should connect to part 34's 1"x 3" Wood Side #2. Next, its 1"x 3" Wood End #2, which is left-facing, should connect to part 31's 1"x 3" Wood Side #2, also its 1"x 3" Wood Side #1 should be directed top, then ensure its 1"x 3" Wood Side #2 faces back, plus ensure its 1"x 3" Wood Side #4 faces front
P33 (1" x 3" Lumber 9.5" length) - connect its 1"x 3" Wood Side #1 oriented bottom links with part 34's 1"x 3" Wood Side #2, plus its 1"x 3" Wood Side #2, which is left-facing, should connect to part 32's 1"x 3" Wood End #1, then attach its 1"x 3" Wood Side #4 facing right to part 45's Screw-In Screw In #1, then its 1"x 3" Wood End #1 should be directed front. Next, its 1"x 3" Wood Side #3 must be oriented top. After that, its 1"x 3" Wood End #2 must be oriented back
P34 (1" x 3" Lumber 24" length) - connect its 1"x 3" Wood Side #2 oriented top links with part 31's 1"x 3" Wood Side #3, also its 1"x 3" Wood End #1 must be oriented right, and its 1"x 3" Wood Side #1 must be oriented front, and its 1"x 3" Wood Side #3 must be oriented back. Next, its 1"x 3" Wood Side #4 must be oriented bottom, and its 1"x 3" Wood End #2 should be directed left
P35 (1" x 3" Lumber 24" length) - connect its 1"x 3" Wood Side #2 oriented top links with part 31's 1"x 3" Wood Side #3, plus its 1"x 3" Wood End #1 should be directed right. Additionally, its 1"x 3" Wood Side #1 should be directed front, plus its 1"x 3" Wood Side #3 must be oriented back, plus its 1"x 3" Wood Side #4 needs to point bottom. Also, ensure its 1"x 3" Wood End #2 faces left
P36 (1" x 3" Lumber 24" length) - its 1"x 3" Wood Side #2, which is top-facing, should connect to part 31's 1"x 3" Wood Side #3. Also, its 1"x 3" Wood End #1 must be oriented right. Next, ensure its 1"x 3" Wood Side #1 faces front. Additionally, its 1"x 3" Wood Side #3 must be oriented back, plus its 1"x 3" Wood Side #4 should be directed bottom, also its 1"x 3" Wood End #2 must be oriented left
1" x 3" Lumber x 9.5"x 2 1" x 3" Lumber x 22"x 1 1" x 3" Lumber x 24"x 3