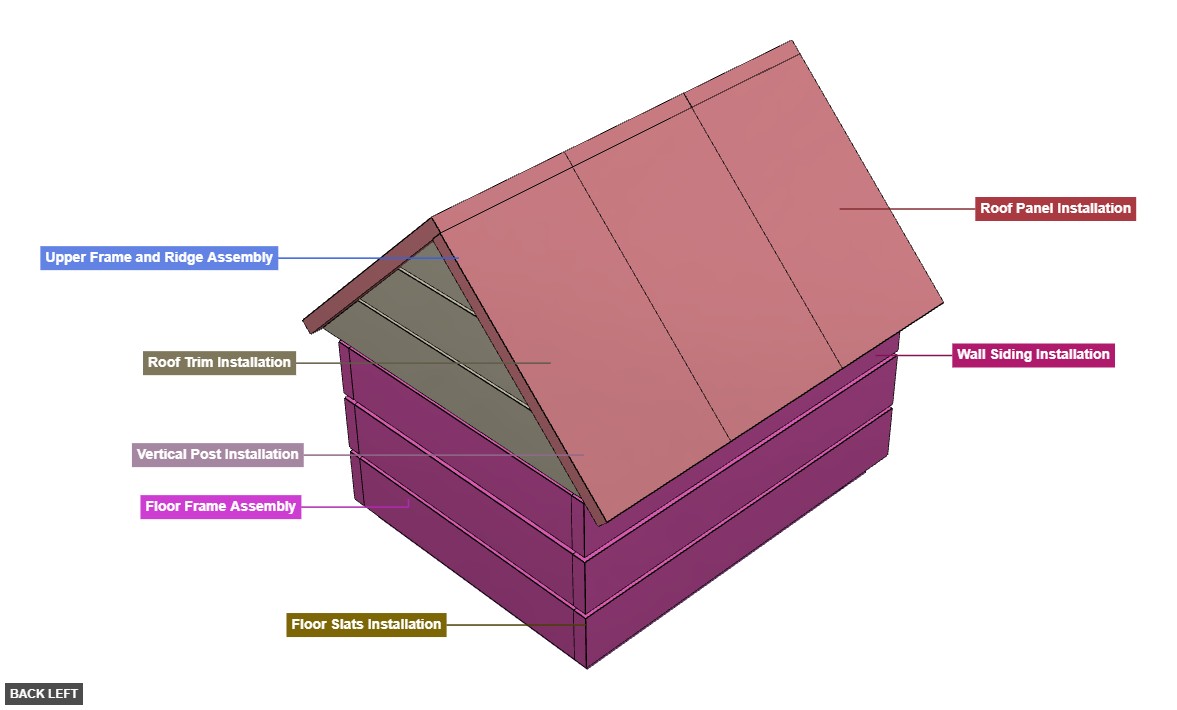
Dog House 3 - Comprehensive Assembly Plan And Visual Guide
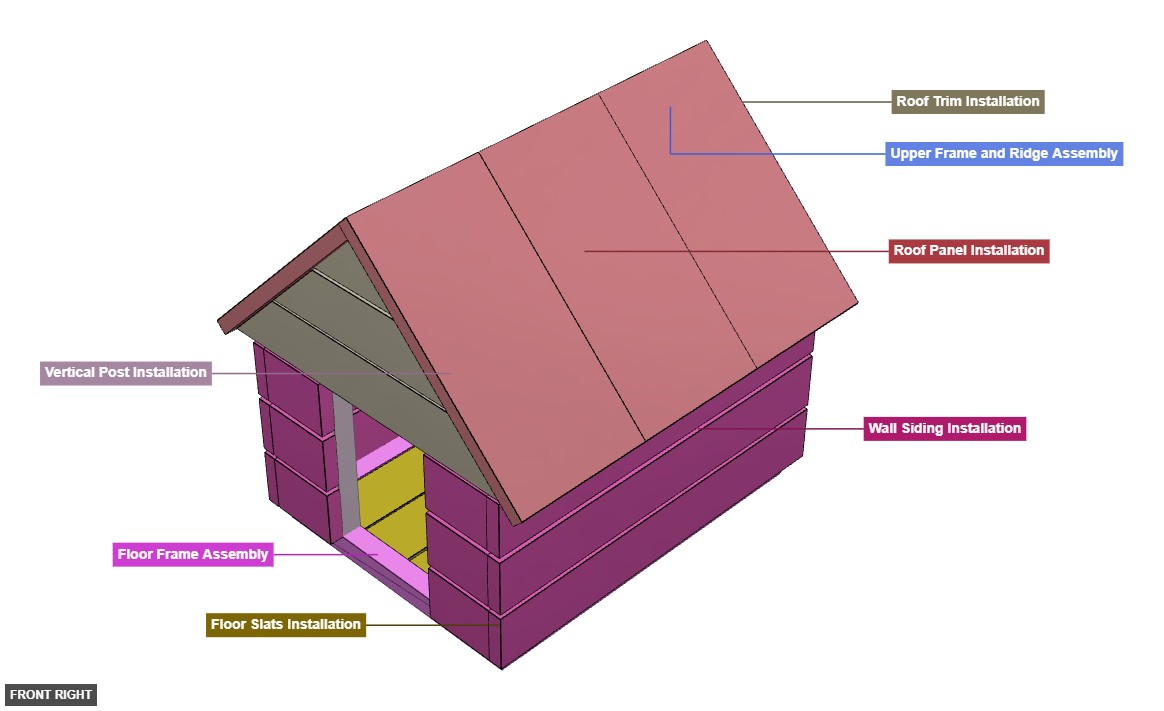
This is a wooden dog house with a pitched roof. It consists of a rectangular base frame, floor planks, wall framing (including vertical supports and angled rafters for the roof), wall cladding planks (vertical and horizontal), a roof ridge beam, and roof cladding planks. There is an opening at the front. - Dog HouseA wooden dog house with a gabled roof, featuring a framed structure, side and back wall slats, a front opening, and roof panels with trim. - Dog House 3
Phase 1: Group Overview
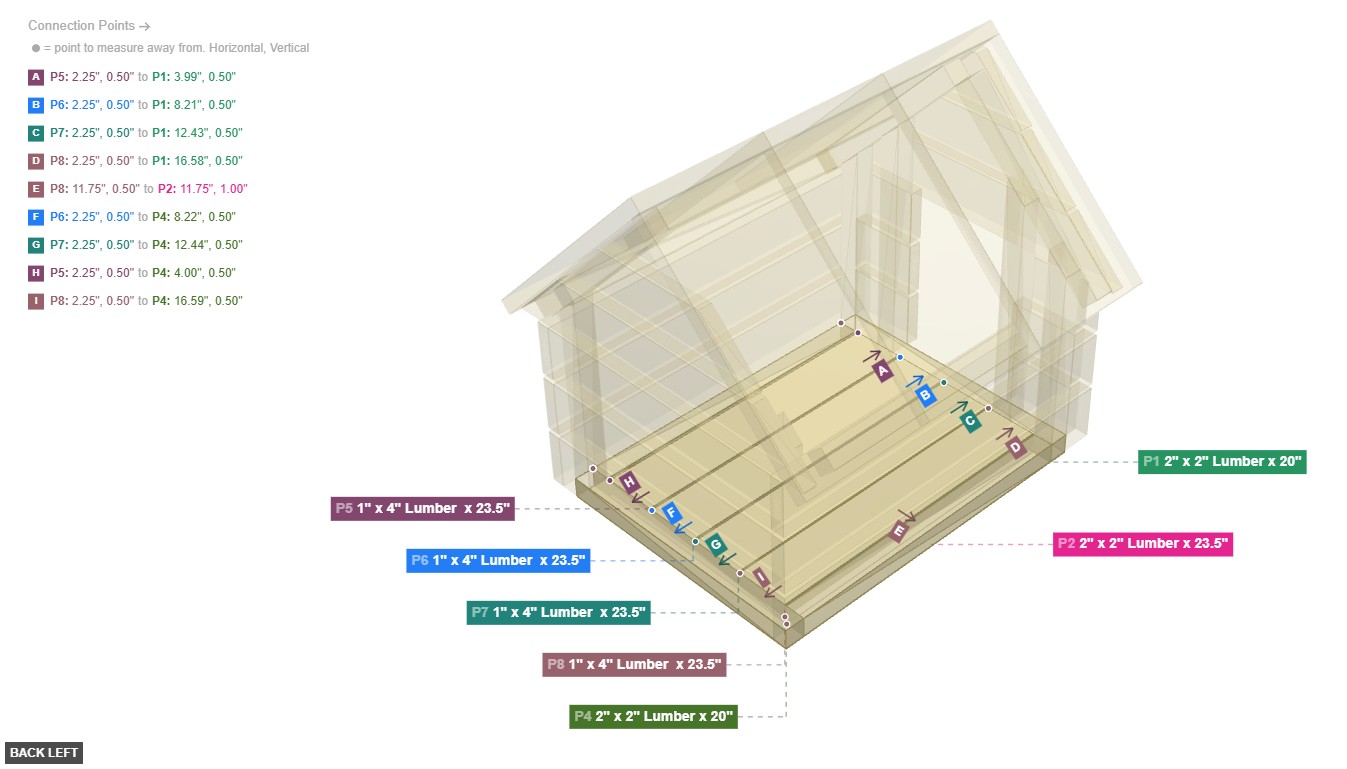
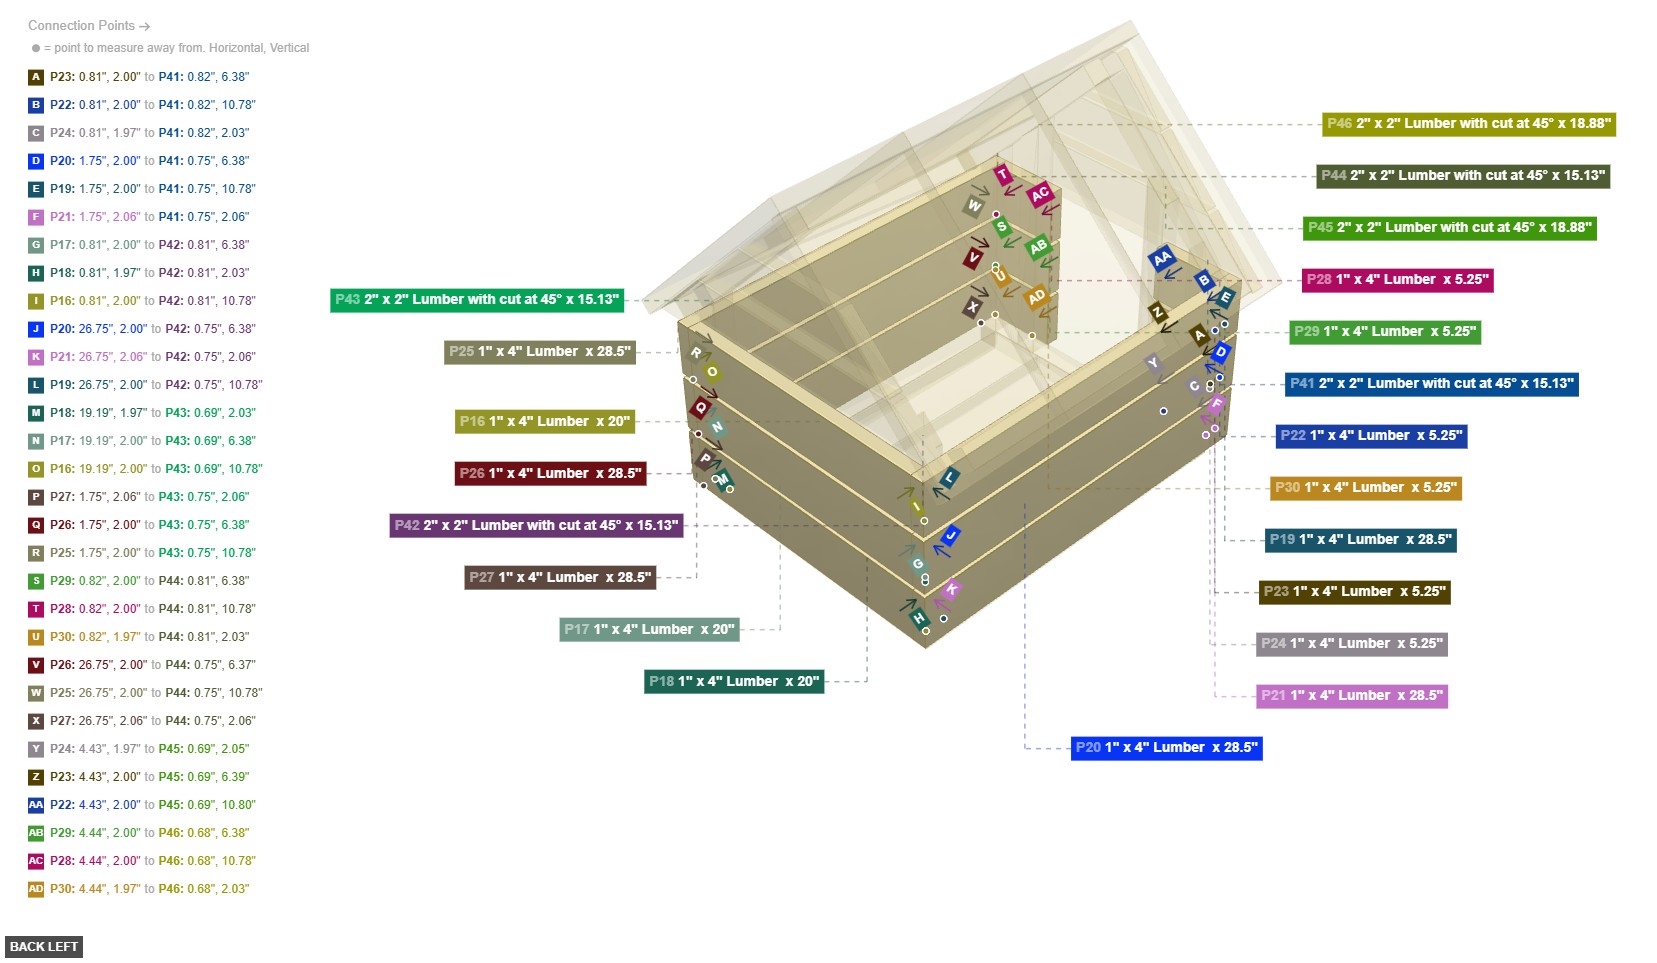
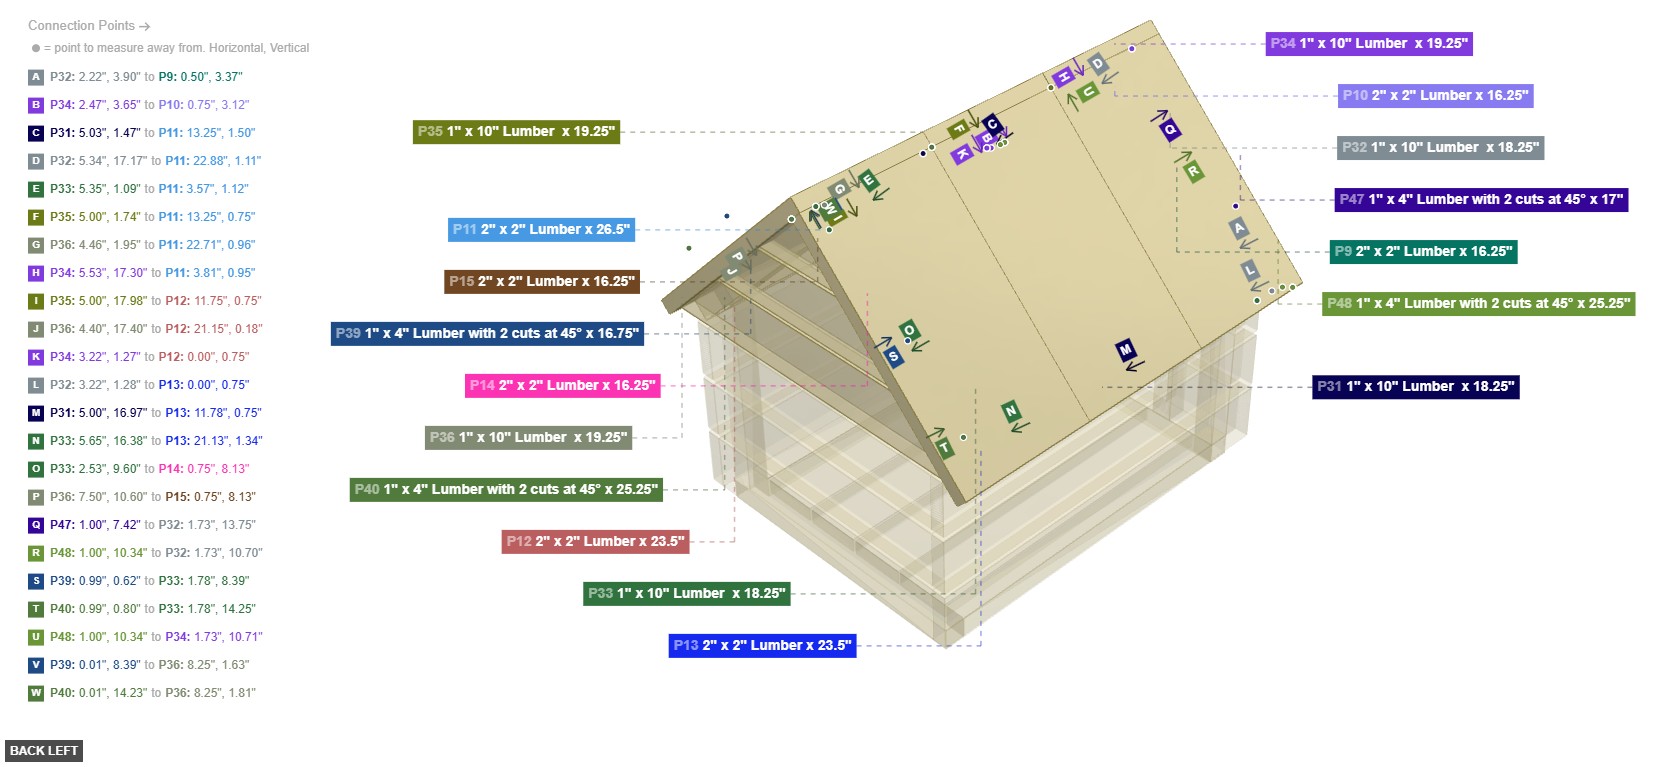
Angle: back left

Floor Frame Assembly
 2" x 2" Lumber x 20"x 2
2" x 2" Lumber x 23.5"x 2 Floor Slats Installation
 1" x 4" Lumber x 23.5"x 4
Vertical Post Installation
 2" x 2" Lumber with cut at 45° x 15.13"x 4
2" x 2" Lumber with cut at 45° x 18.88"x 2 Upper Frame and Ridge Assembly
2" x 2" Lumber x 16.25"x 4 2" x 2" Lumber x 26.5"x 1 2" x 2" Lumber x 23.5"x 2 Wall Siding Installation
1" x 4" Lumber x 20"x 3 1" x 4" Lumber x 28.5"x 6 1" x 4" Lumber x 5.25"x 6 Roof Panel Installation
 1" x 10" Lumber x 18.25"x 3
1" x 10" Lumber x 19.25"x 3 Roof Trim Installation
 1" x 4" Lumber with 2 cuts at 45° x 9"x 2
1" x 4" Lumber with 2 cuts at 45° x 16.75"x 1 1" x 4" Lumber with 2 cuts at 45° x 25.25"x 2 1" x 4" Lumber with 2 cuts at 45° x 17"x 1
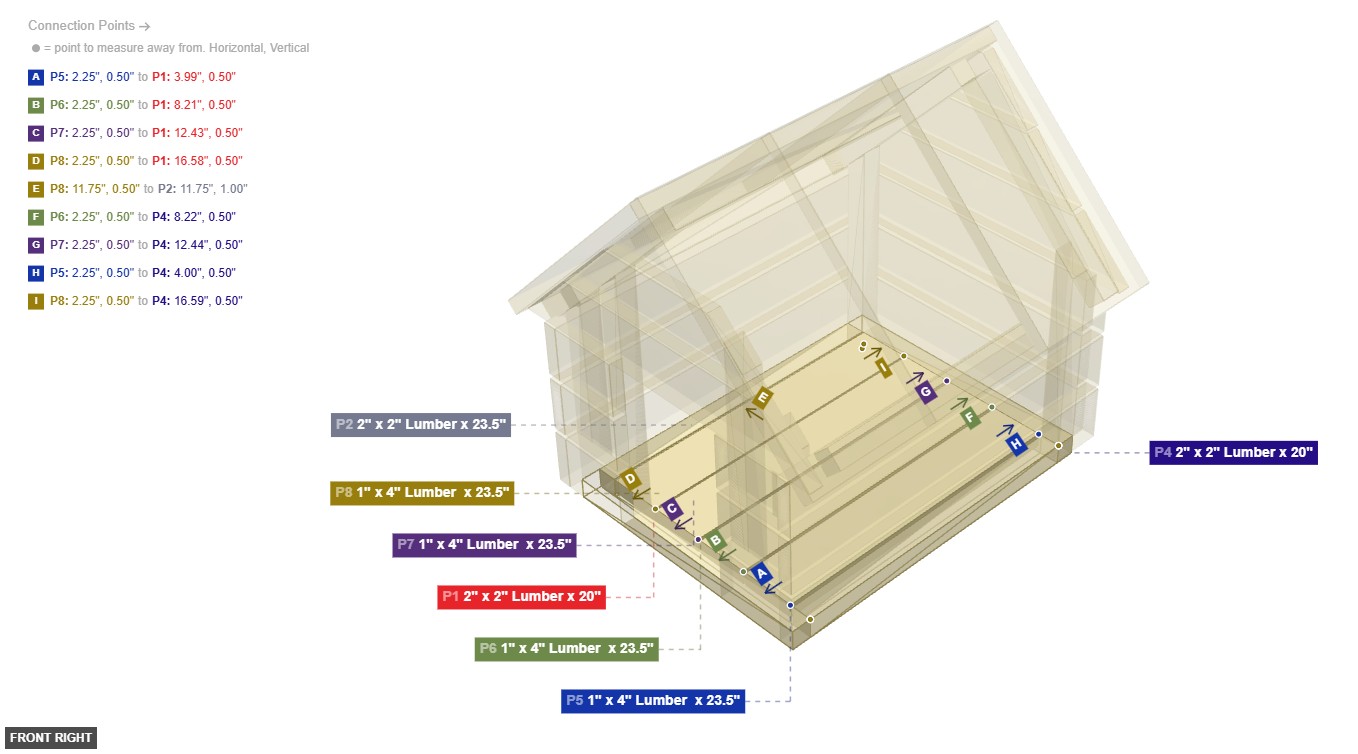
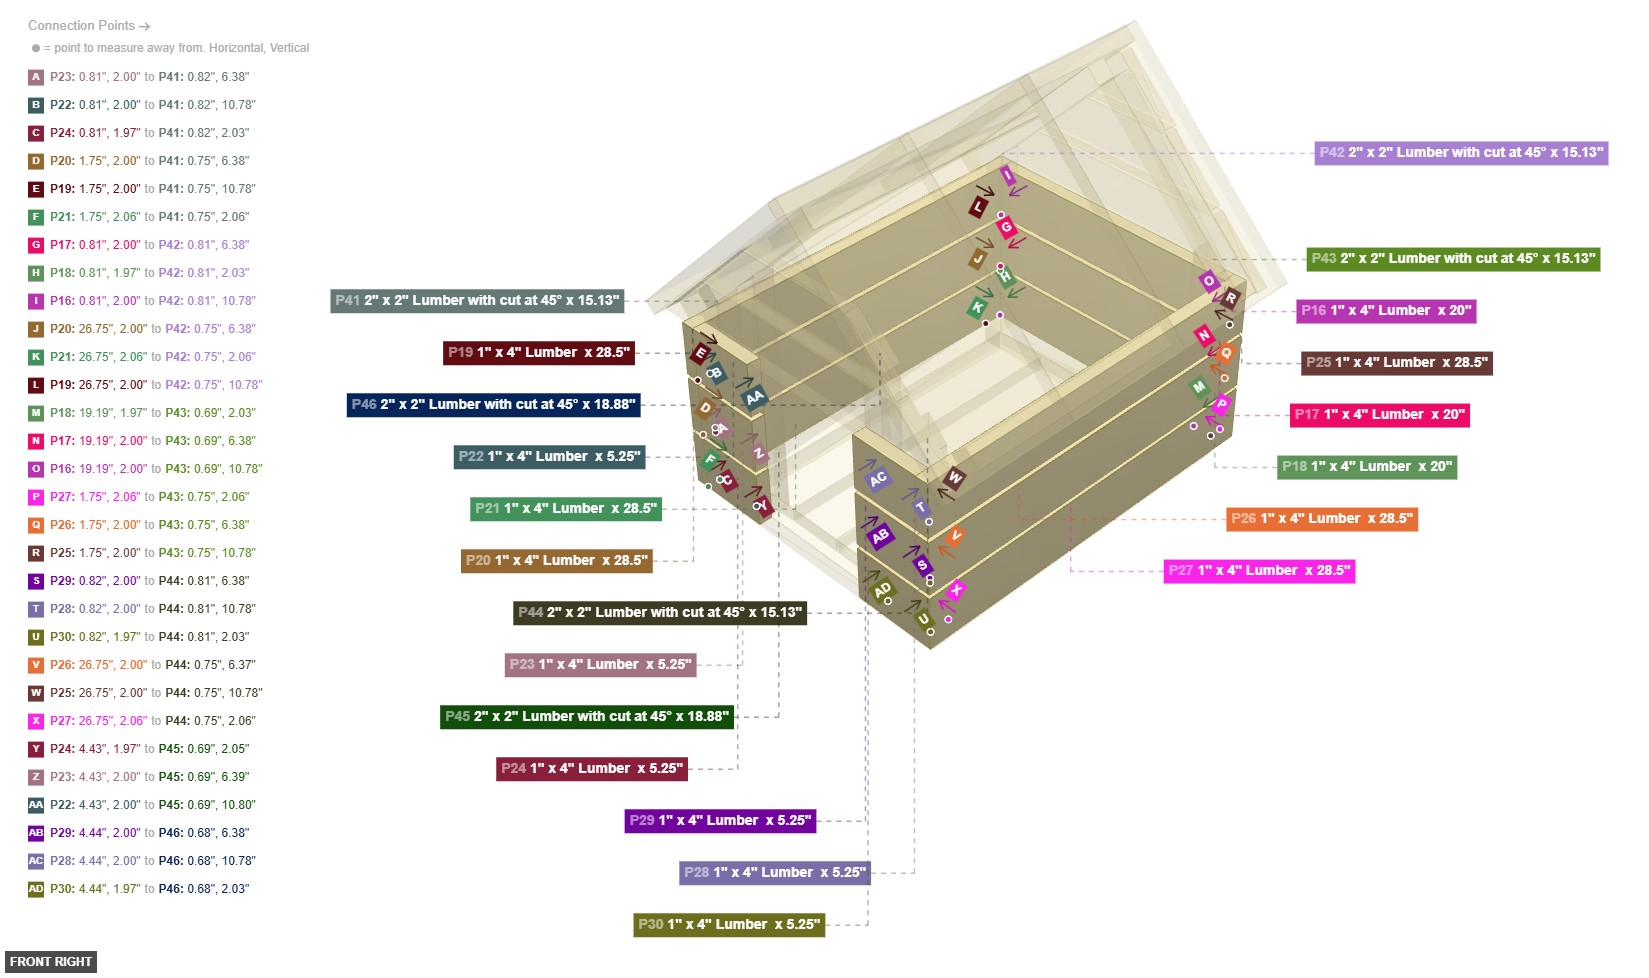
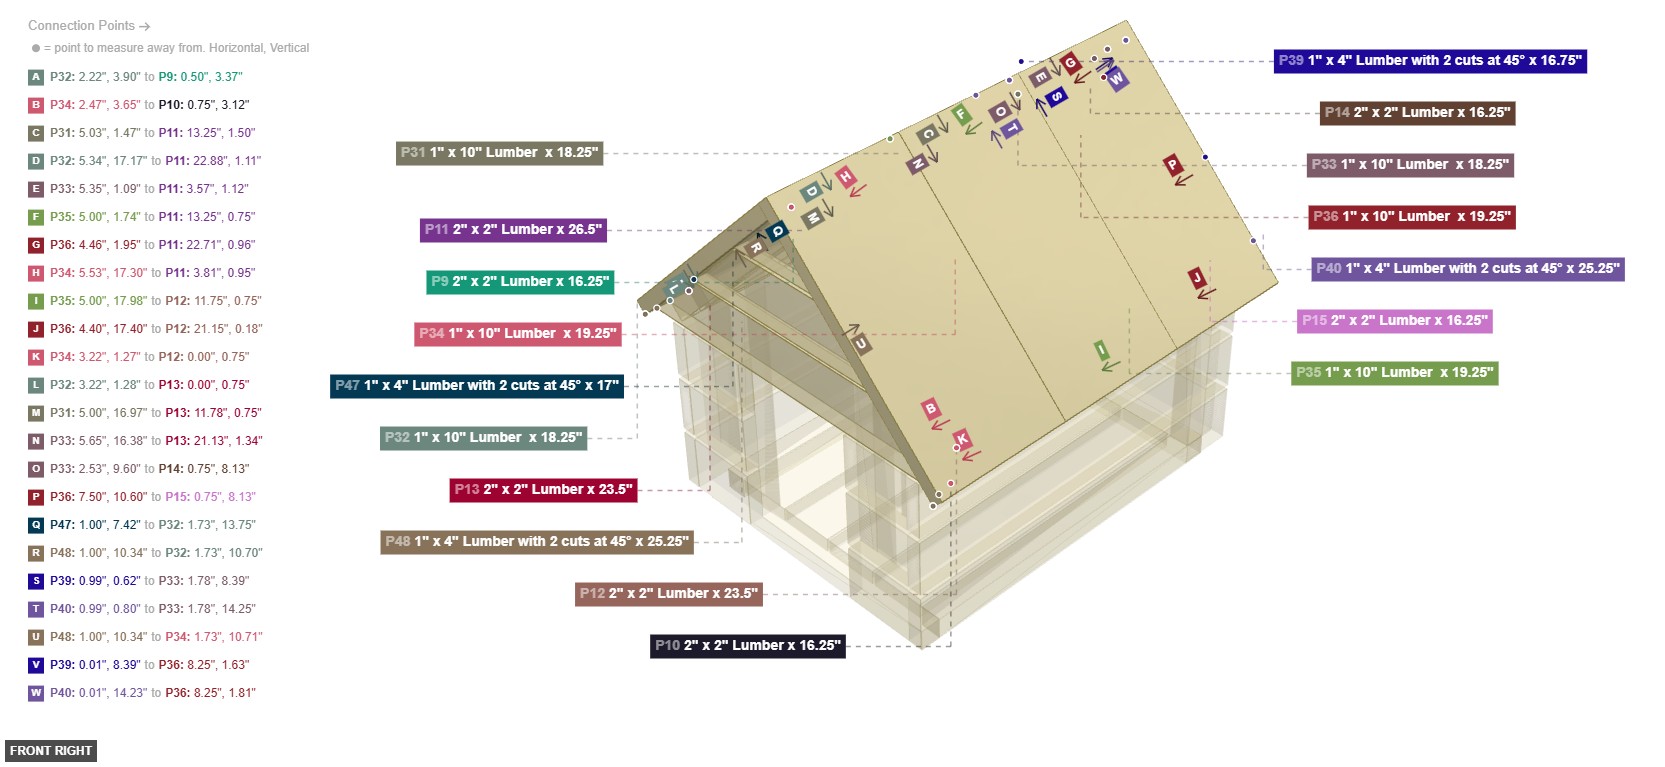
Angle: front right
Floor Frame Assembly
2" x 2" Lumber x 20"x 2 2" x 2" Lumber x 23.5"x 2 Floor Slats Installation
1" x 4" Lumber x 23.5"x 4 Vertical Post Installation
2" x 2" Lumber with cut at 45° x 15.13"x 4 2" x 2" Lumber with cut at 45° x 18.88"x 2 Upper Frame and Ridge Assembly
2" x 2" Lumber x 16.25"x 4 2" x 2" Lumber x 26.5"x 1 2" x 2" Lumber x 23.5"x 2 Wall Siding Installation
1" x 4" Lumber x 20"x 3 1" x 4" Lumber x 28.5"x 6 1" x 4" Lumber x 5.25"x 6 Roof Panel Installation
1" x 10" Lumber x 18.25"x 3 1" x 10" Lumber x 19.25"x 3 Roof Trim Installation
1" x 4" Lumber with 2 cuts at 45° x 9"x 2 1" x 4" Lumber with 2 cuts at 45° x 16.75"x 1 1" x 4" Lumber with 2 cuts at 45° x 25.25"x 2 1" x 4" Lumber with 2 cuts at 45° x 17"x 1
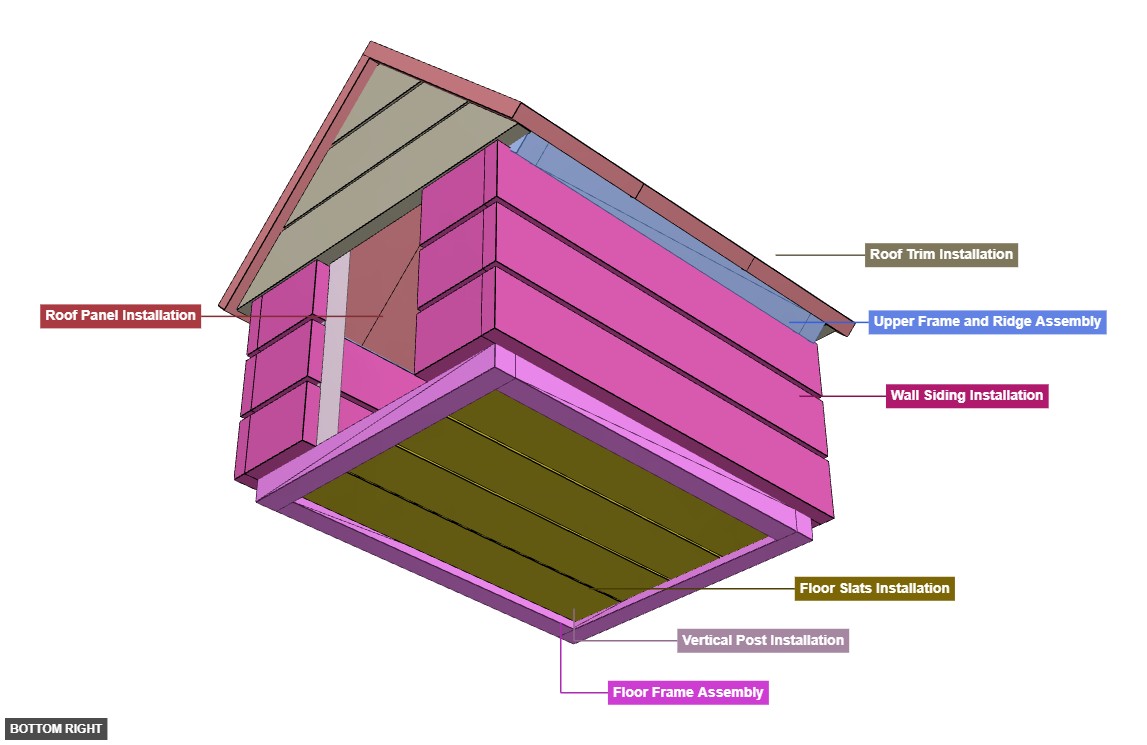
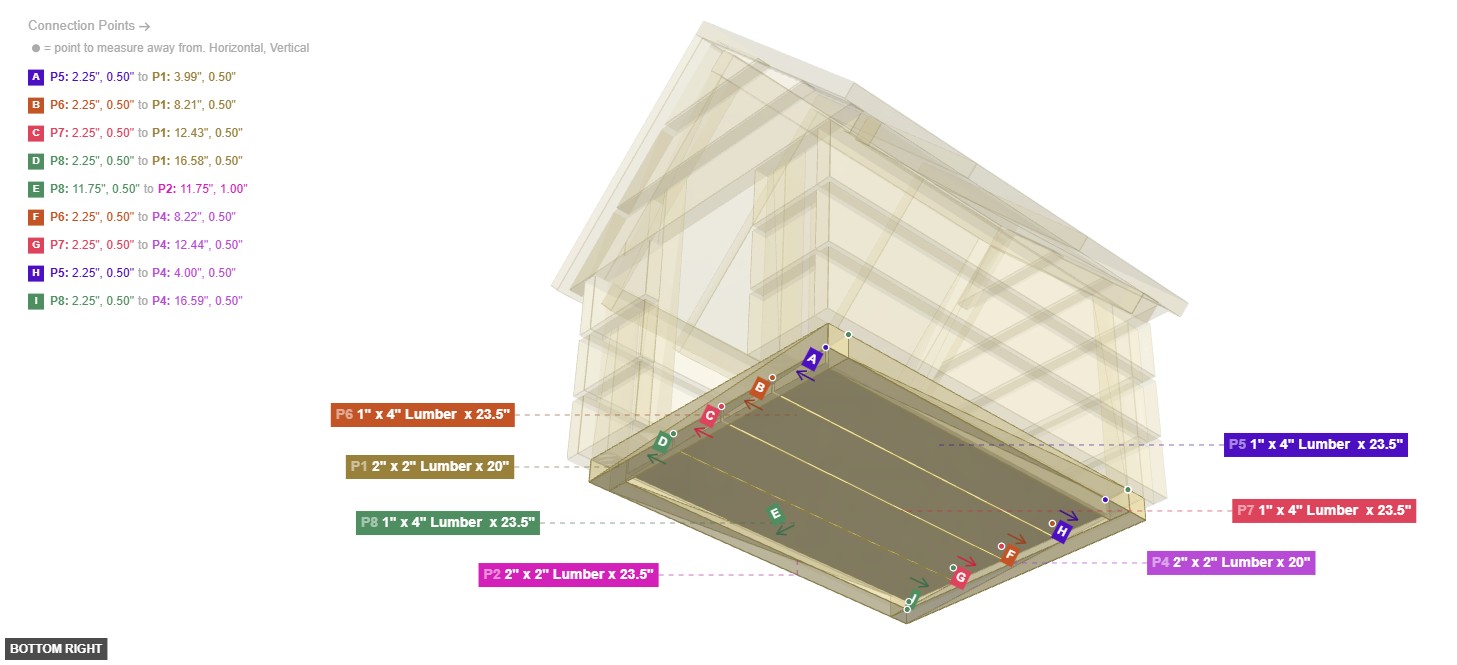
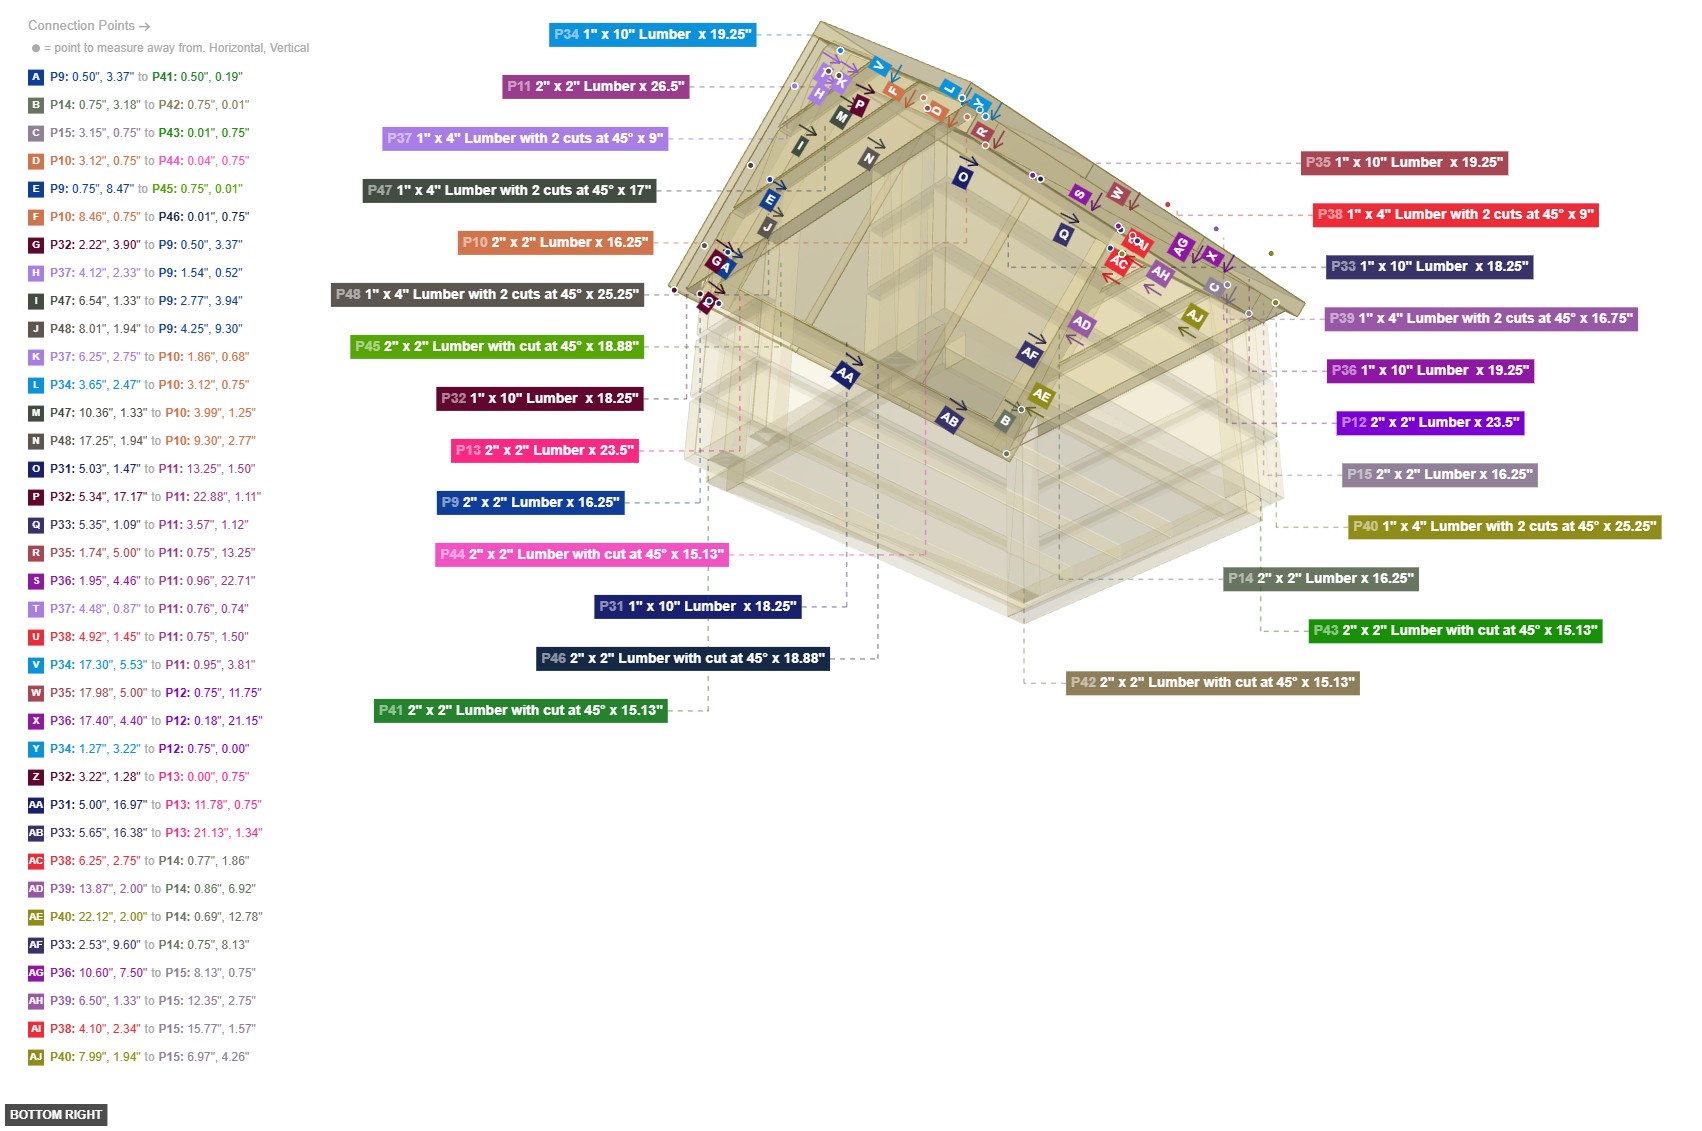
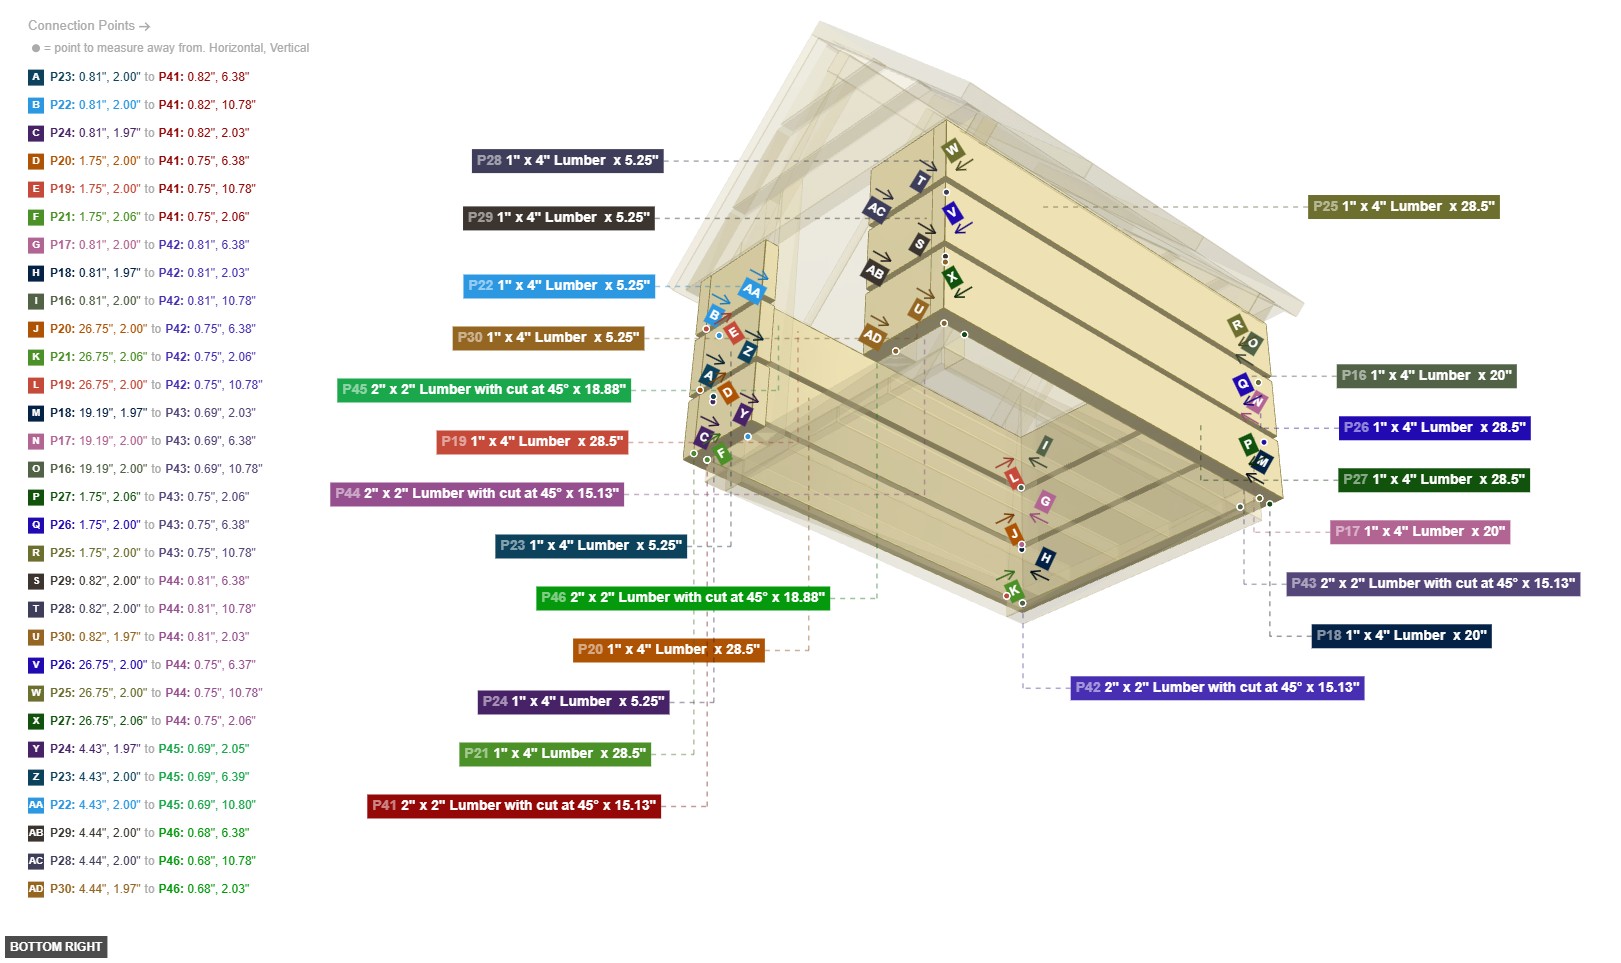
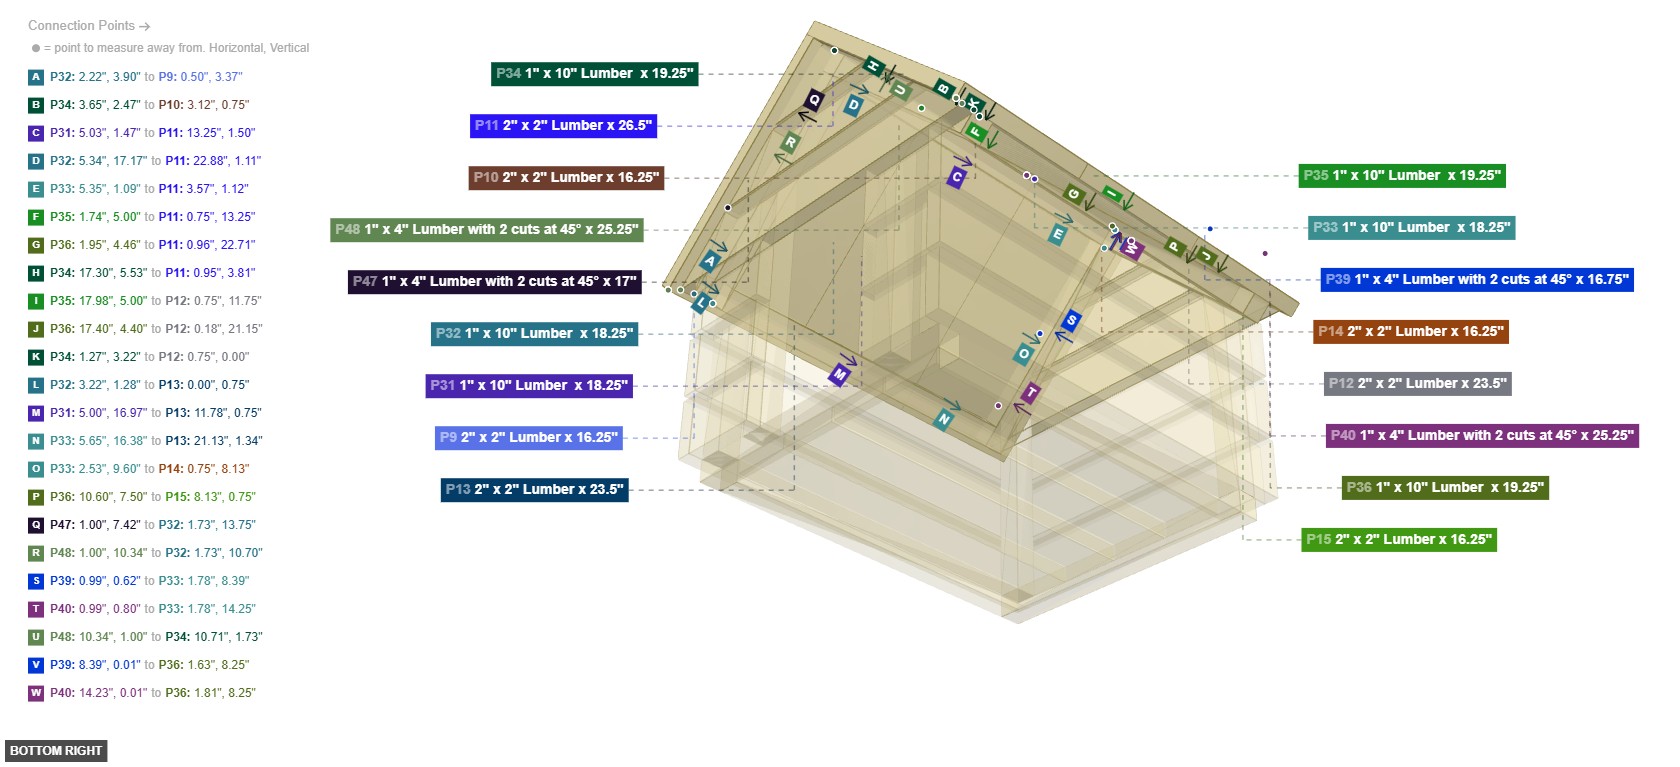
Angle: bottom right
Floor Frame Assembly
2" x 2" Lumber x 20"x 2 2" x 2" Lumber x 23.5"x 2 Floor Slats Installation
1" x 4" Lumber x 23.5"x 4 Vertical Post Installation
2" x 2" Lumber with cut at 45° x 15.13"x 4 2" x 2" Lumber with cut at 45° x 18.88"x 2 Upper Frame and Ridge Assembly
2" x 2" Lumber x 16.25"x 4 2" x 2" Lumber x 26.5"x 1 2" x 2" Lumber x 23.5"x 2 Wall Siding Installation
1" x 4" Lumber x 20"x 3 1" x 4" Lumber x 28.5"x 6 1" x 4" Lumber x 5.25"x 6 Roof Panel Installation
1" x 10" Lumber x 18.25"x 3 1" x 10" Lumber x 19.25"x 3 Roof Trim Installation
1" x 4" Lumber with 2 cuts at 45° x 9"x 2 1" x 4" Lumber with 2 cuts at 45° x 16.75"x 1 1" x 4" Lumber with 2 cuts at 45° x 25.25"x 2 1" x 4" Lumber with 2 cuts at 45° x 17"x 1 Phase 2: Individual Group Assembly
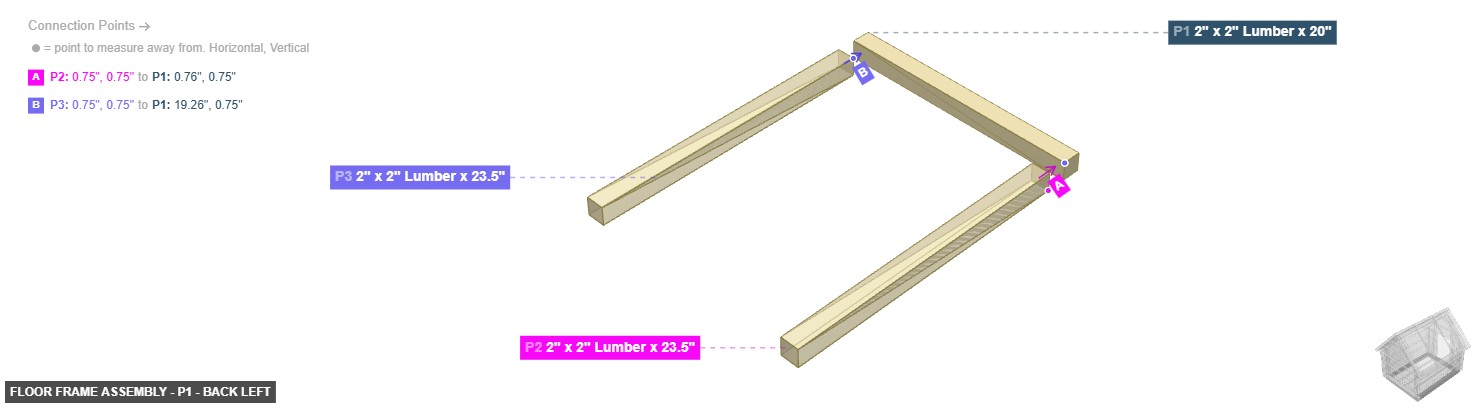
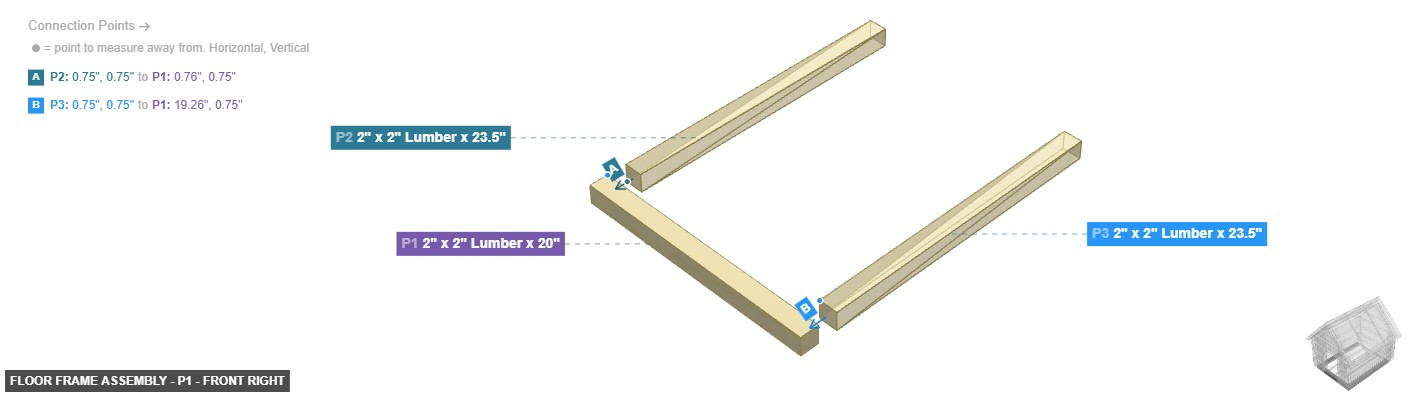
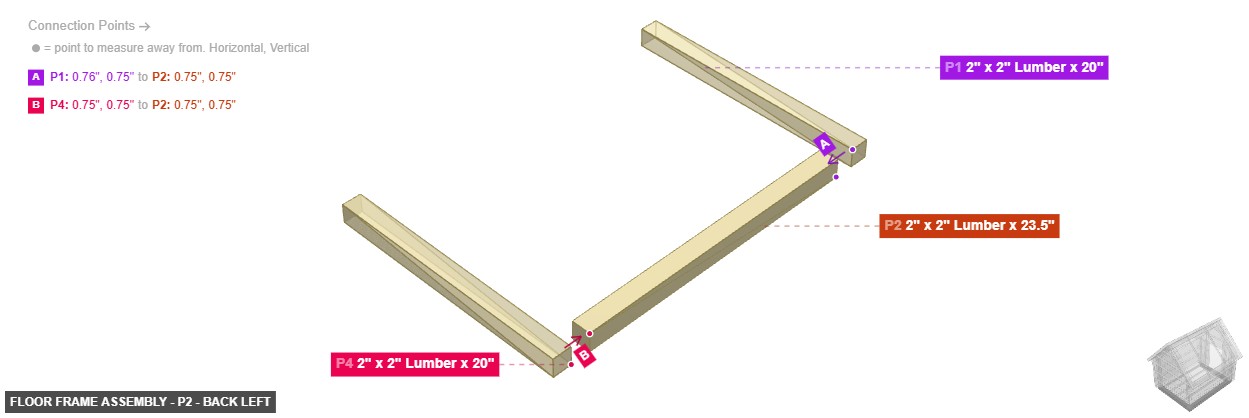
Group: Floor Frame Assembly
To create the rectangular base foundation for the dog house.
Assemble the rectangular floor frame by connecting P1 (front base beam) and P4 (back base beam) with P2 (left side base beam) and P3 (right side base beam).
Group: Floor Slats Installation
To install the flooring surface onto the base frame.
Install floor slats P5, P6, P7, and P8 onto the assembled Floor Frame (Group 1), connecting their ends to P1 (front base beam) and P4 (back base beam).
Part: 1" x 4" Lumber x 23.5" - Angle: back left
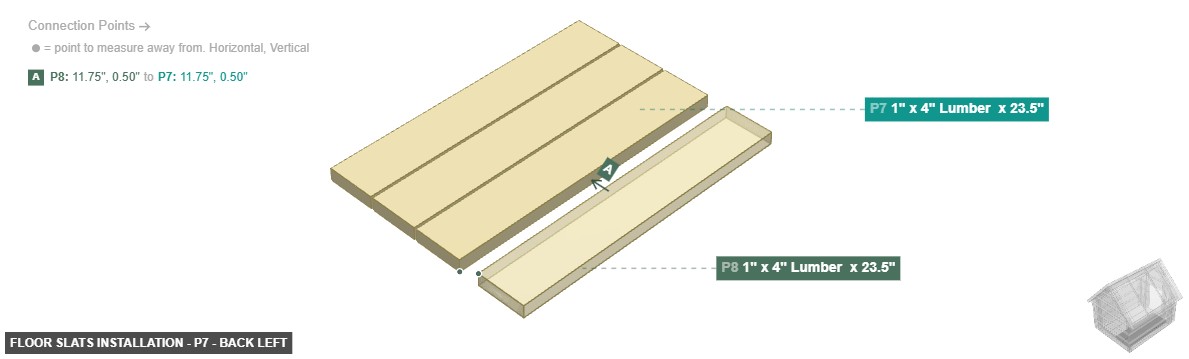
P7 (1" x 4" Lumber 23.5" length) - connect its 1" x 4" Wood Side #3 oriented left links with part 8's 1" x 4" Wood Side #1, then ensure its 1" x 4" Wood Side #1 faces right, and ensure its 1" x 4" Wood Side #2 faces top, and ensure its 1" x 4" Wood Side #4 faces bottom
1" x 4" Lumber x 23.5"x 4
Part: 1" x 4" Lumber x 23.5" - Angle: front right

P7 (1" x 4" Lumber 23.5" length) - connect its 1" x 4" Wood Side #3 oriented left links with part 8's 1" x 4" Wood Side #1, then ensure its 1" x 4" Wood Side #1 faces right, and ensure its 1" x 4" Wood Side #2 faces top, and ensure its 1" x 4" Wood Side #4 faces bottom
1" x 4" Lumber x 23.5"x 4
Part: 1" x 4" Lumber x 23.5" - Angle: bottom right

P7 (1" x 4" Lumber 23.5" length) - connect its 1" x 4" Wood Side #3 oriented left links with part 8's 1" x 4" Wood Side #1, then ensure its 1" x 4" Wood Side #1 faces right, and ensure its 1" x 4" Wood Side #2 faces top, and ensure its 1" x 4" Wood Side #4 faces bottom
1" x 4" Lumber x 23.5"x 4
Part: 1" x 4" Lumber x 23.5" - Angle: back left
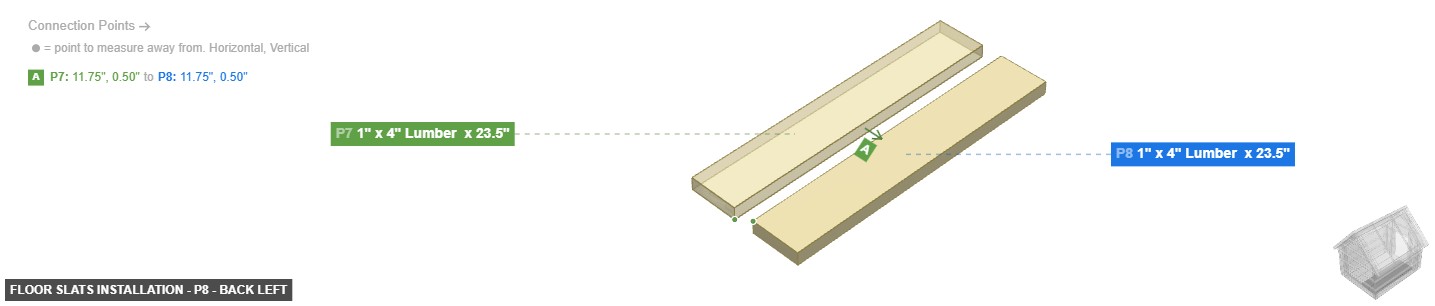
P8 (1" x 4" Lumber 23.5" length) - connect its 1" x 4" Wood Side #1 oriented right links with part 7's 1" x 4" Wood Side #3. Additionally, its 1" x 4" Wood Side #2 should be directed top. After that, its 1" x 4" Wood Side #4 must be oriented bottom
1" x 4" Lumber x 23.5"x 4
Part: 1" x 4" Lumber x 23.5" - Angle: front right

P8 (1" x 4" Lumber 23.5" length) - connect its 1" x 4" Wood Side #1 oriented right links with part 7's 1" x 4" Wood Side #3. Additionally, its 1" x 4" Wood Side #2 should be directed top. After that, its 1" x 4" Wood Side #4 must be oriented bottom
1" x 4" Lumber x 23.5"x 4
Part: 1" x 4" Lumber x 23.5" - Angle: bottom right
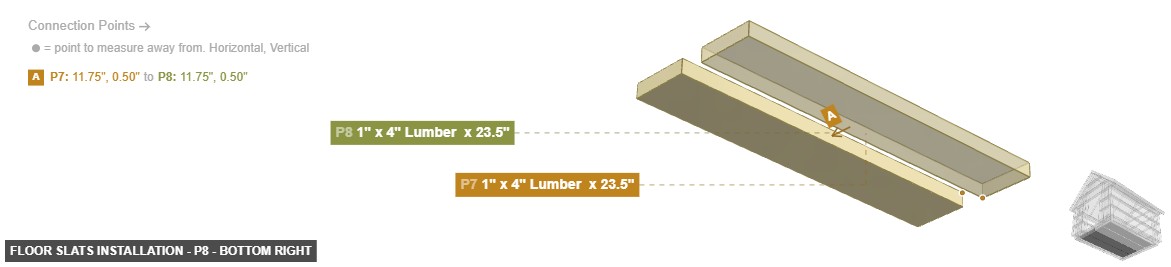
P8 (1" x 4" Lumber 23.5" length) - connect its 1" x 4" Wood Side #1 oriented right links with part 7's 1" x 4" Wood Side #3. Additionally, its 1" x 4" Wood Side #2 should be directed top. After that, its 1" x 4" Wood Side #4 must be oriented bottom
1" x 4" Lumber x 23.5"x 4 Group: Upper Frame and Ridge Assembly
To construct the upper wall supports and the central roof ridge.
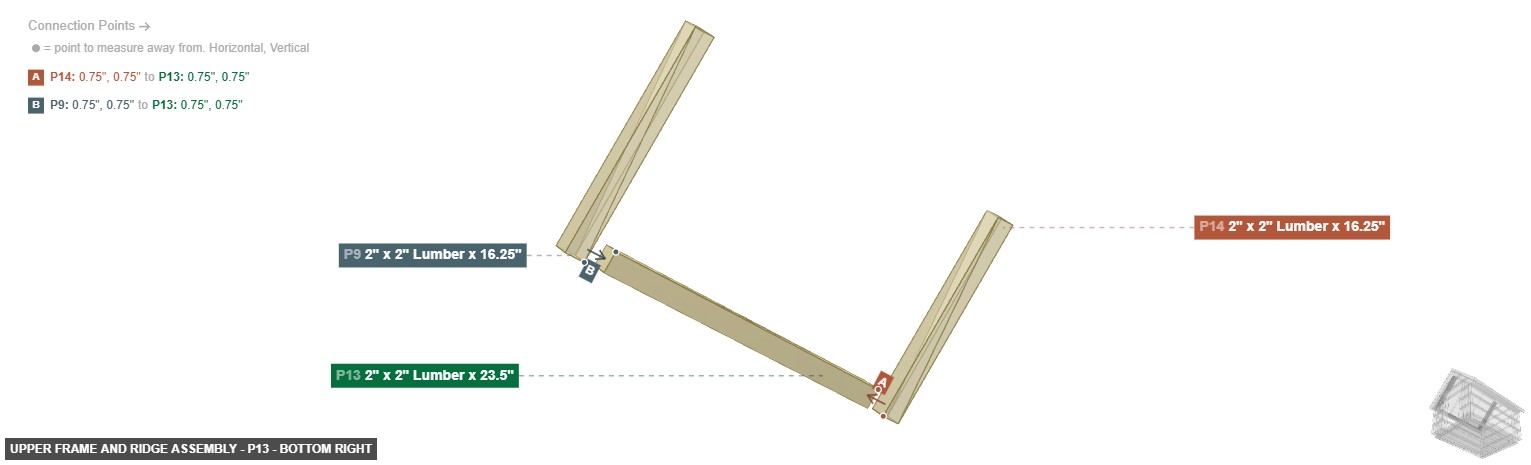
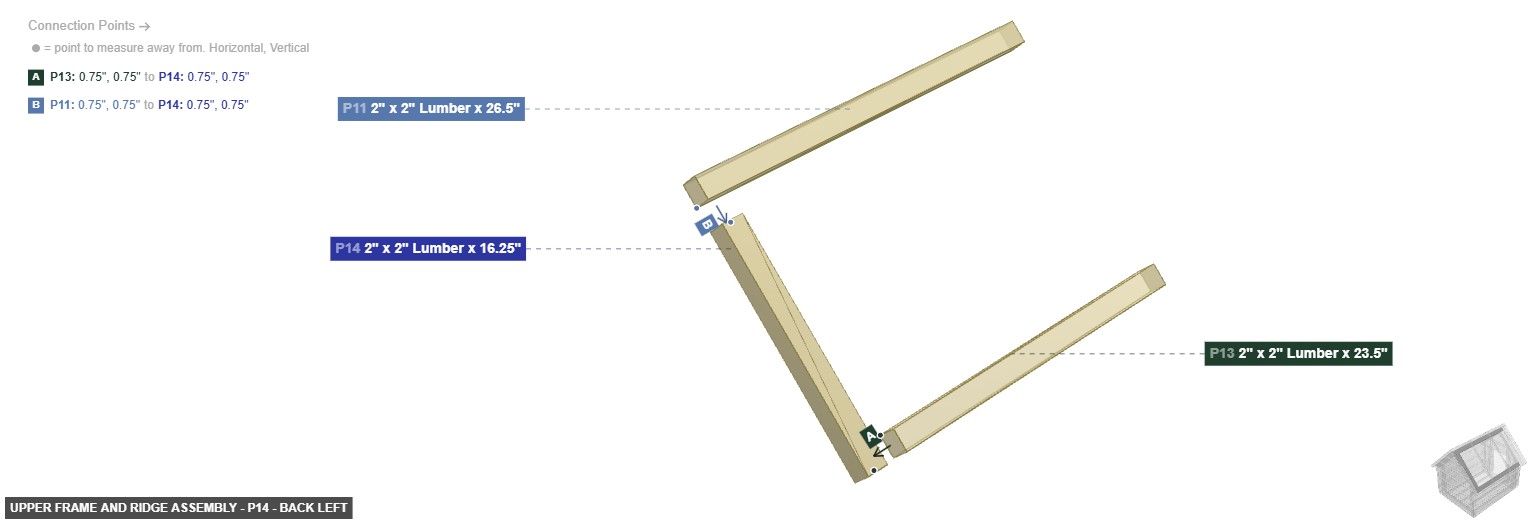
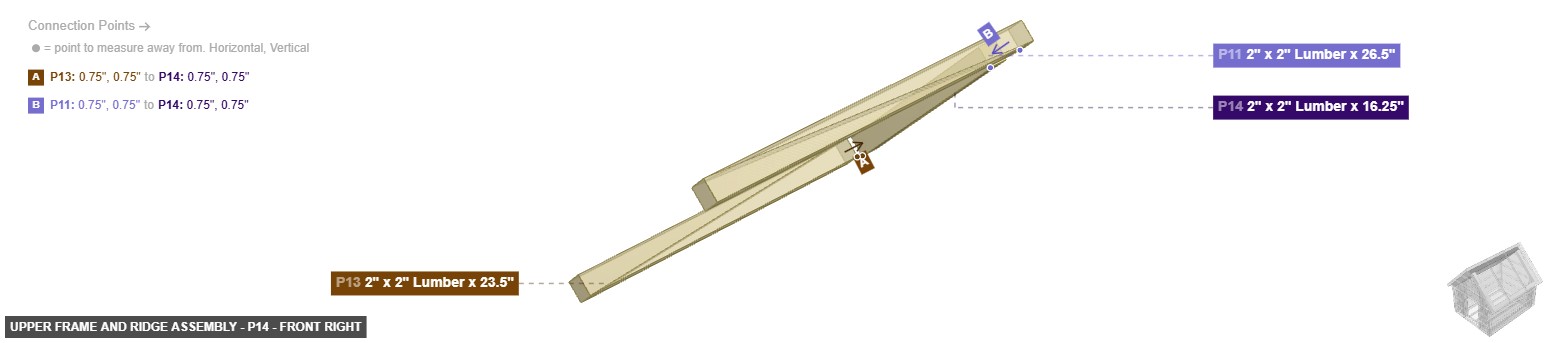
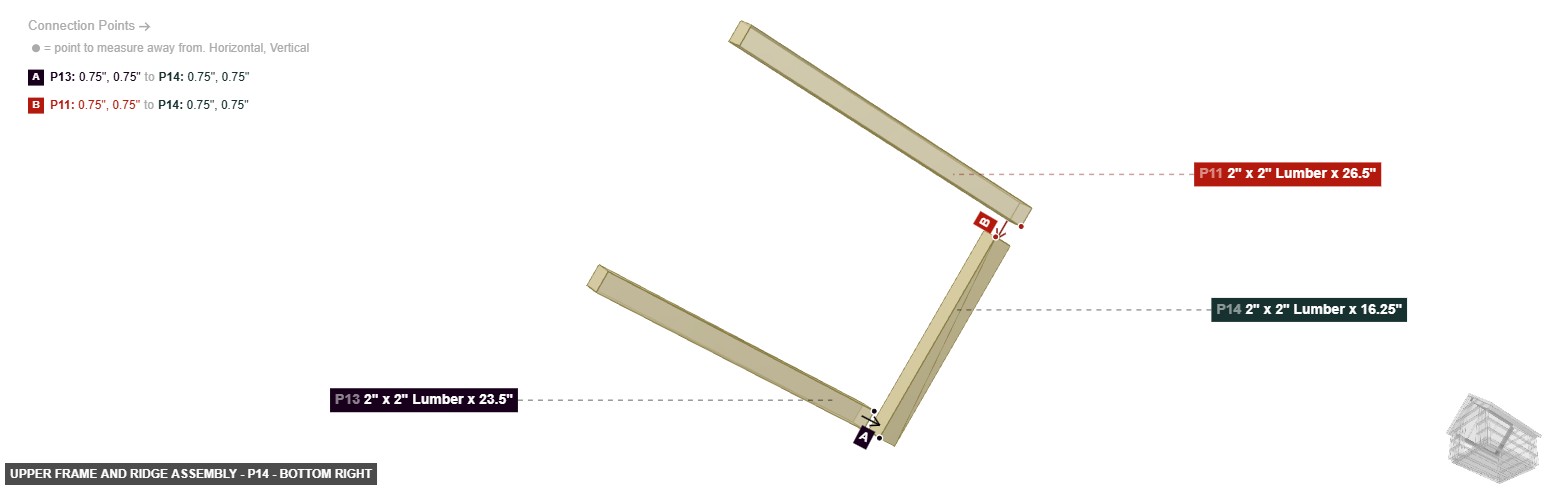
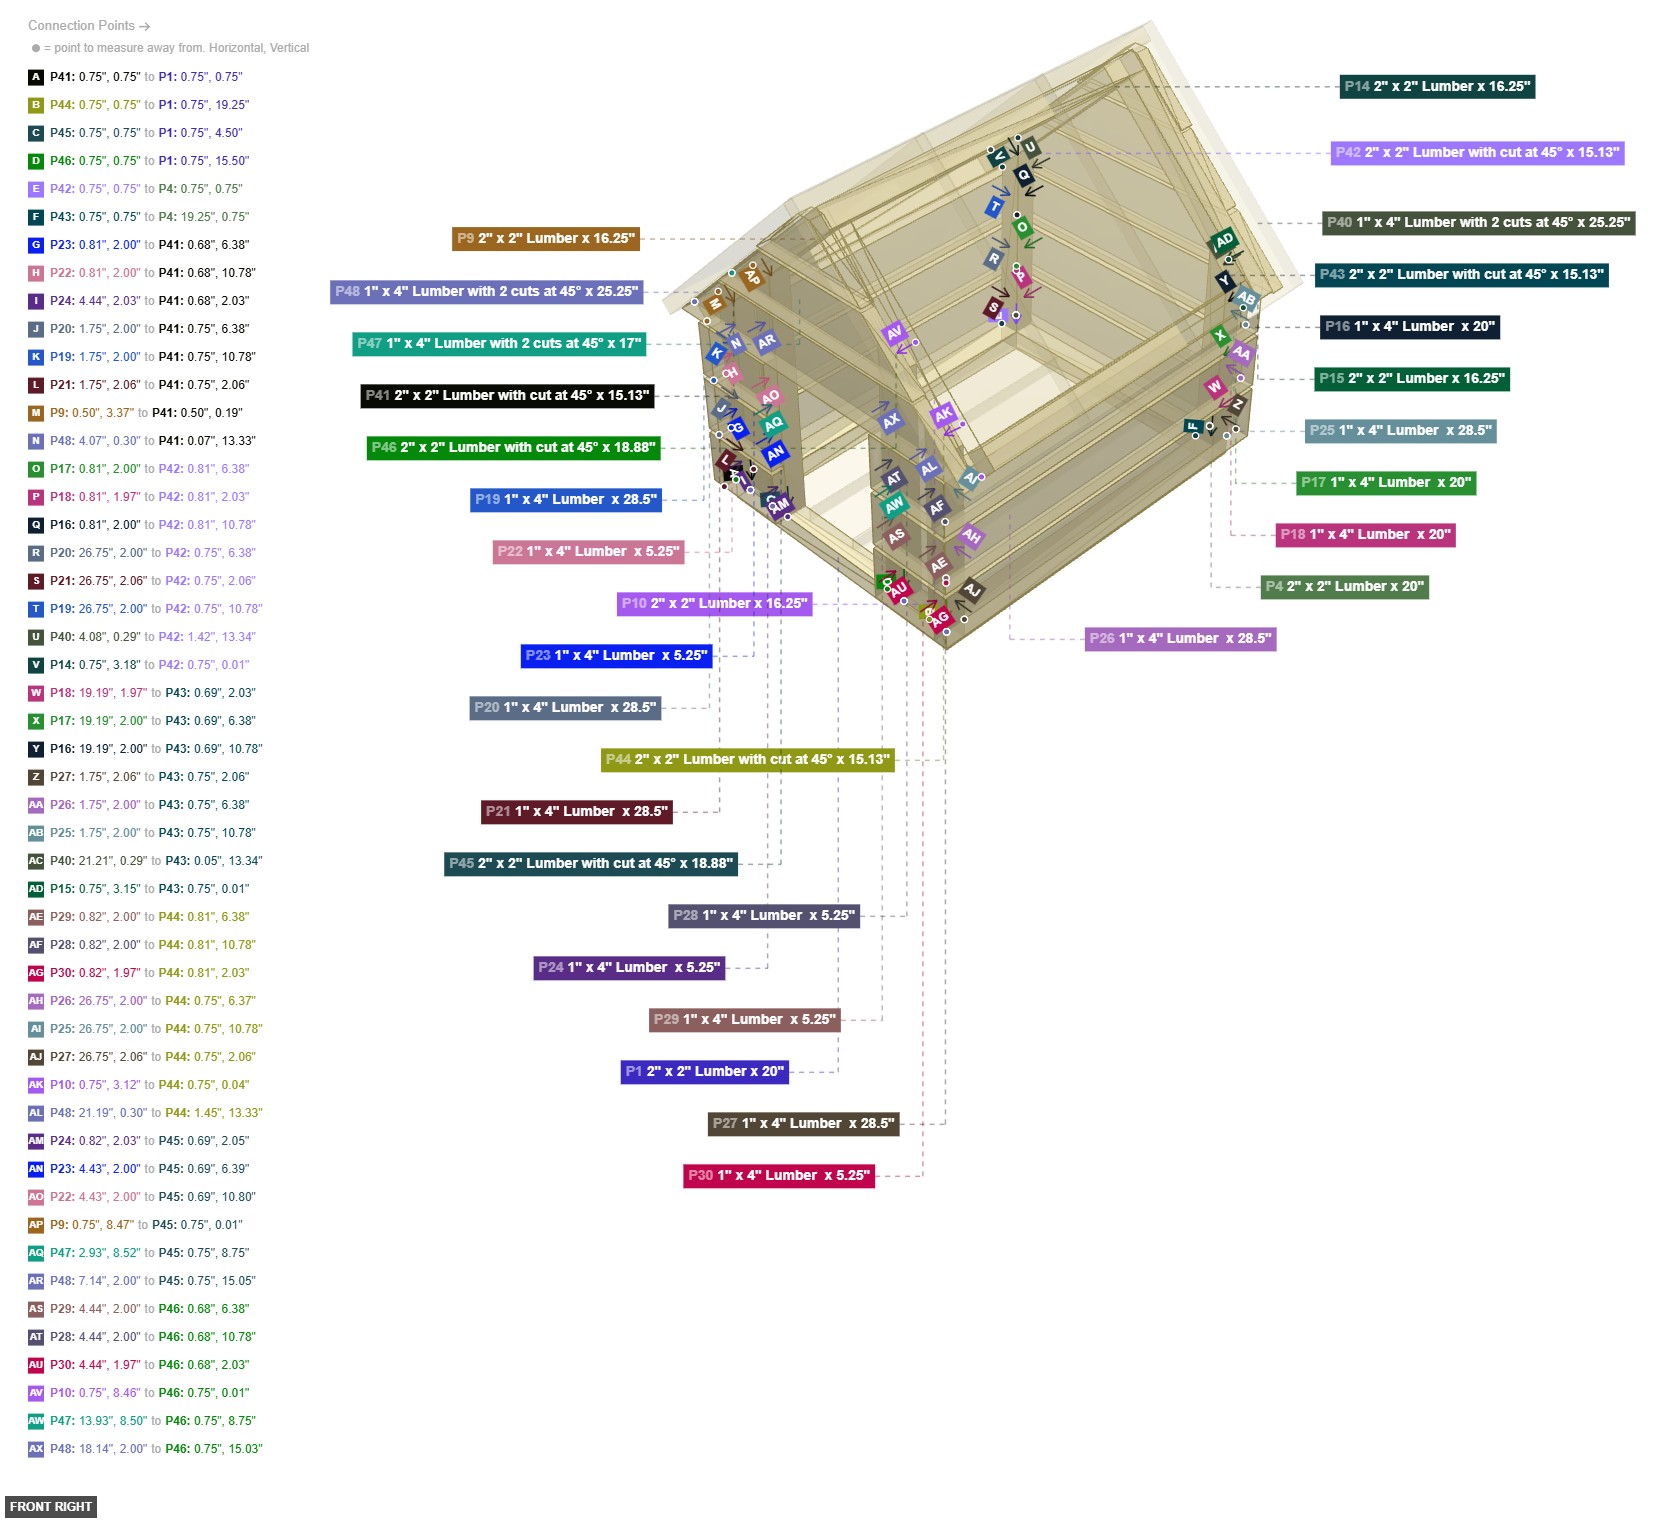
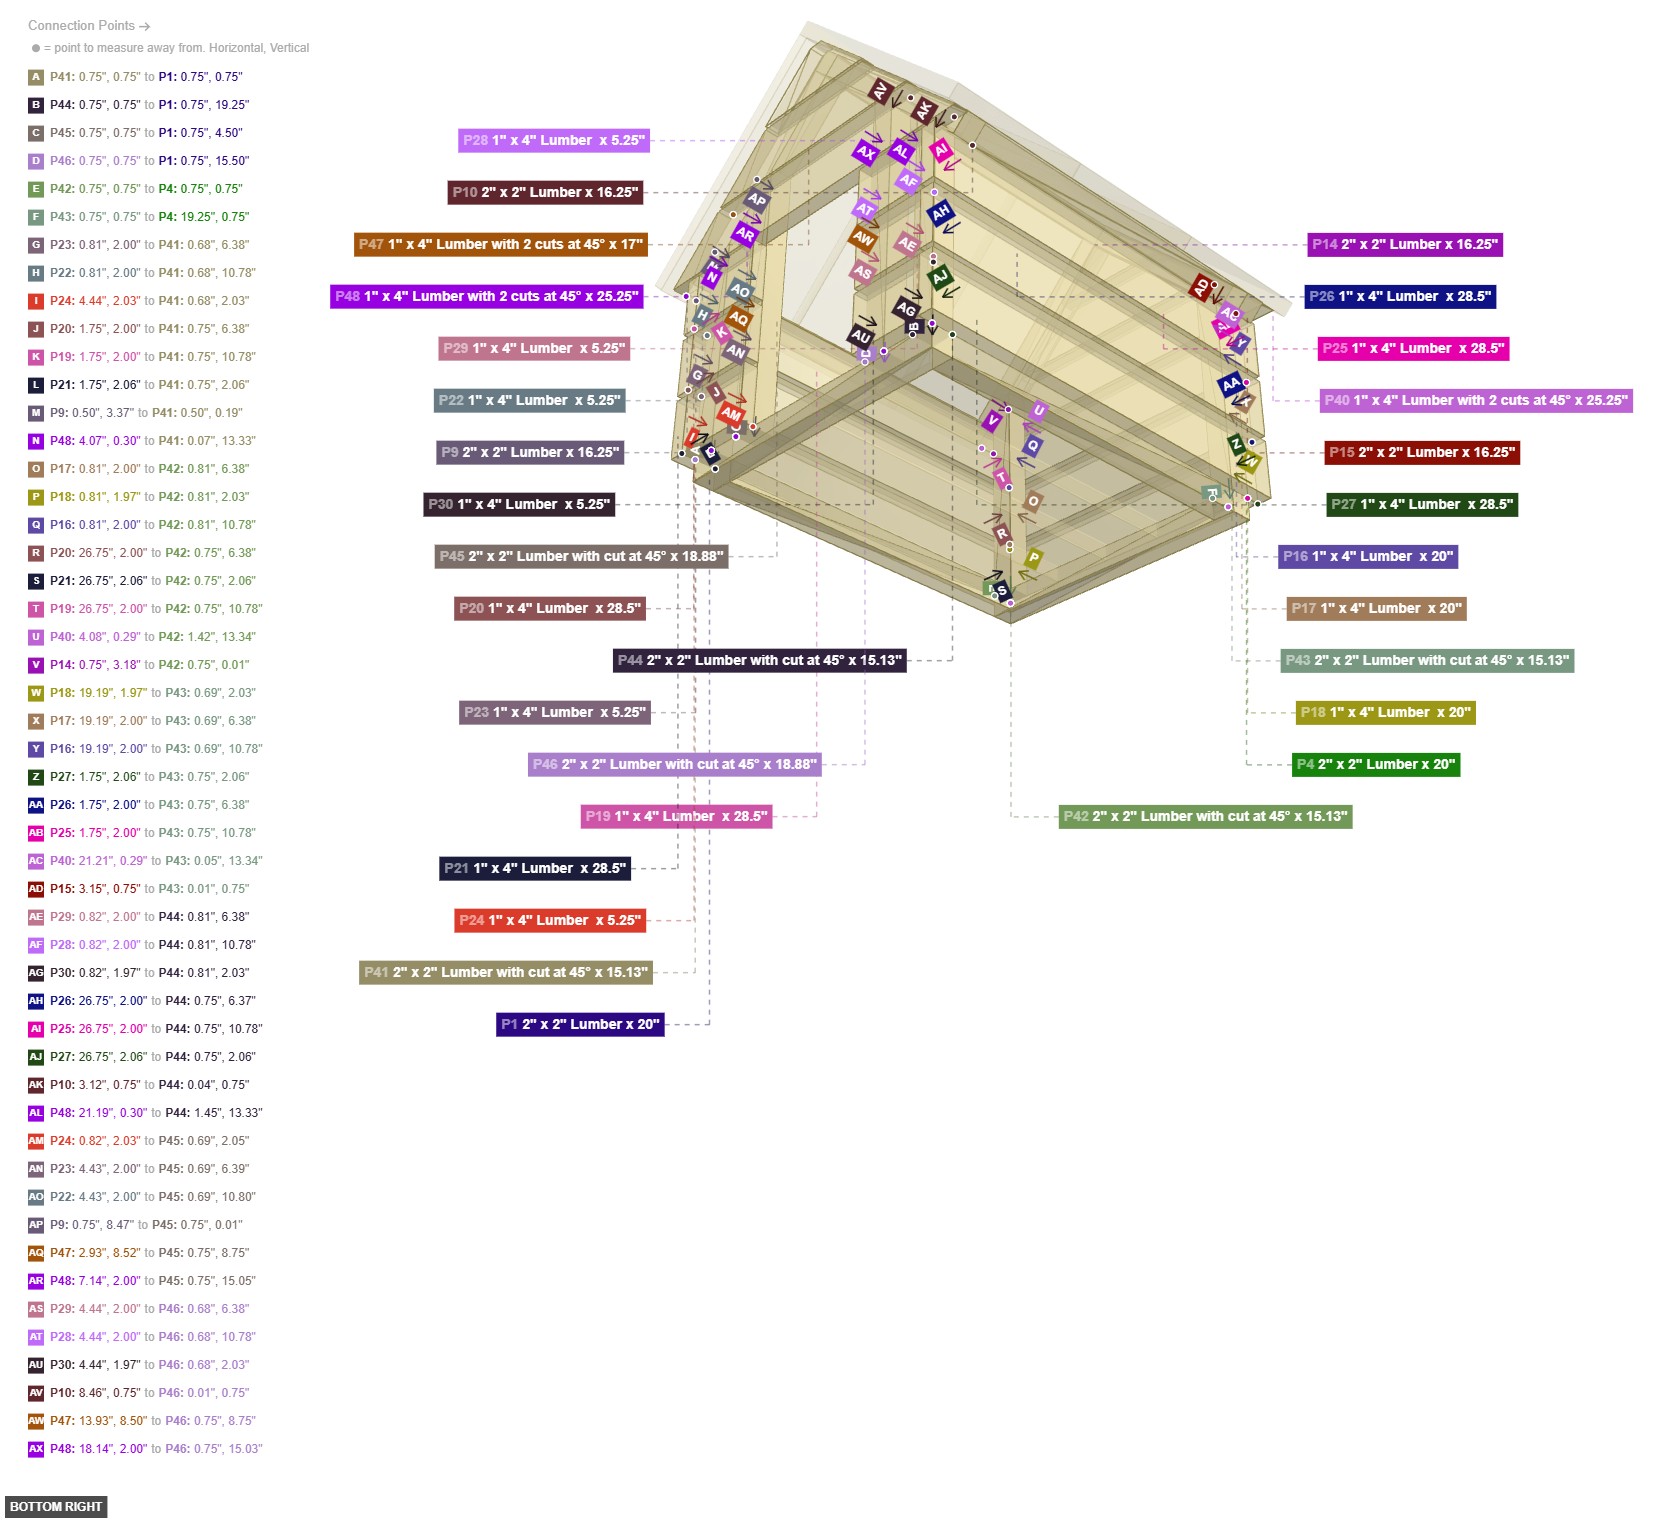
Construct the upper frame structure. Attach horizontal members P9 (front-left), P10 (front-right), P14 (back-left), and P15 (back-right) to the tops of their respective Vertical Posts (Group 3). Install side top beams P12 (right) and P13 (left) connecting the front and back upper horizontal members. Finally, place the ridge beam P11, connecting it to P9, P10, P14, and P15.
Group: Wall Siding Installation
To clad the sides, back, and part of the front of the dog house.
Install the wall siding. Attach vertical slats P19, P20, P21 to the left side frame. Attach vertical slats P25, P26, P27 to the right side frame. Install horizontal slats P16, P17, P18 on the back wall, connecting to the side slats and back posts. Add short horizontal slats P22, P23, P24 to the front-left around the door opening, and P28, P29, P30 to the front-right around the door opening.
Group: Roof Panel Installation
To install the main panels forming the roof surface.
Install the roof panels. Attach left roof panels P31, P32, and P33 to the left slope of the Upper Frame (Group 4). Attach right roof panels P34, P35, and P36 to the right slope of the Upper Frame (Group 4). The panels should meet at the ridge beam (P11) and rest on the upper side supports.
Phase 3: Inter-Group Assembly
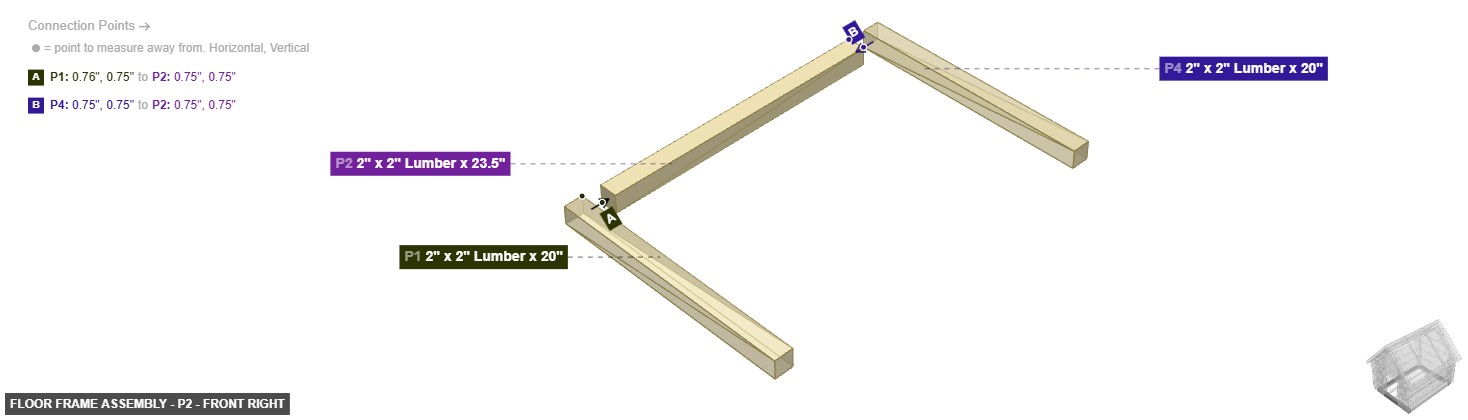
Attaching: Floor Frame Assembly
To create the rectangular base foundation for the dog house.
This floor frame serves as the foundation. Subsequent groups will be built upon it.
Angle: back left
P1 (2" x 2" Lumber 20" length) - connect its 2" x 2" Wood Side #2 oriented top links with part 41's 2" x 2" Wood End #2. Next, connect its 2" x 2" Wood Side #3 oriented back links with part 2's 2" x 2" Wood End #2, then its 2" x 2" Wood End #1 needs to point right. Also, its 2" x 2" Wood Side #1 needs to point front. Also, its 2" x 2" Wood Side #4 needs to point bottom, plus ensure its 2" x 2" Wood End #2 faces left
P2 (2" x 2" Lumber 23.5" length) - its 2" x 2" Wood End #1, which is back-facing, should connect to part 4's 2" x 2" Wood Side #1. Also, attach its 2" x 2" Wood Side #1 facing right to part 8's 1" x 4" Wood Side #3, then its 2" x 2" Wood End #2, which is front-facing, should connect to part 1's 2" x 2" Wood Side #3. Next, its 2" x 2" Wood Side #2 needs to point top. Additionally, its 2" x 2" Wood Side #3 should be directed left, plus its 2" x 2" Wood Side #4 needs to point bottom
P3 (2" x 2" Lumber 23.5" length) - its 2" x 2" Wood End #1, which is back-facing, should connect to part 4's 2" x 2" Wood Side #1, also its 2" x 2" Wood End #2, which is front-facing, should connect to part 1's 2" x 2" Wood Side #3. Also, its 2" x 2" Wood Side #1 should be directed right, plus its 2" x 2" Wood Side #2 must be oriented top. After that, its 2" x 2" Wood Side #3 must be oriented left. Next, its 2" x 2" Wood Side #4 should be directed bottom
P4 (2" x 2" Lumber 20" length) - its 2" x 2" Wood Side #1, which is front-facing, should connect to part 3's 2" x 2" Wood End #1, also connect its 2" x 2" Wood Side #4 oriented top links with part 42's 2" x 2" Wood End #2, and its 2" x 2" Wood End #1 should be directed left. Next, its 2" x 2" Wood Side #2 should be directed bottom, and its 2" x 2" Wood Side #3 should be directed back, plus its 2" x 2" Wood End #2 must be oriented right
2" x 2" Lumber x 20"x 2 2" x 2" Lumber x 23.5"x 2
Angle: front right
P1 (2" x 2" Lumber 20" length) - connect its 2" x 2" Wood Side #2 oriented top links with part 41's 2" x 2" Wood End #2. Next, connect its 2" x 2" Wood Side #3 oriented back links with part 2's 2" x 2" Wood End #2, then its 2" x 2" Wood End #1 needs to point right. Also, its 2" x 2" Wood Side #1 needs to point front. Also, its 2" x 2" Wood Side #4 needs to point bottom, plus ensure its 2" x 2" Wood End #2 faces left
P2 (2" x 2" Lumber 23.5" length) - its 2" x 2" Wood End #1, which is back-facing, should connect to part 4's 2" x 2" Wood Side #1. Also, attach its 2" x 2" Wood Side #1 facing right to part 8's 1" x 4" Wood Side #3, then its 2" x 2" Wood End #2, which is front-facing, should connect to part 1's 2" x 2" Wood Side #3. Next, its 2" x 2" Wood Side #2 needs to point top. Additionally, its 2" x 2" Wood Side #3 should be directed left, plus its 2" x 2" Wood Side #4 needs to point bottom
P3 (2" x 2" Lumber 23.5" length) - its 2" x 2" Wood End #1, which is back-facing, should connect to part 4's 2" x 2" Wood Side #1, also its 2" x 2" Wood End #2, which is front-facing, should connect to part 1's 2" x 2" Wood Side #3. Also, its 2" x 2" Wood Side #1 should be directed right, plus its 2" x 2" Wood Side #2 must be oriented top. After that, its 2" x 2" Wood Side #3 must be oriented left. Next, its 2" x 2" Wood Side #4 should be directed bottom
P4 (2" x 2" Lumber 20" length) - its 2" x 2" Wood Side #1, which is front-facing, should connect to part 3's 2" x 2" Wood End #1, also connect its 2" x 2" Wood Side #4 oriented top links with part 42's 2" x 2" Wood End #2, and its 2" x 2" Wood End #1 should be directed left. Next, its 2" x 2" Wood Side #2 should be directed bottom, and its 2" x 2" Wood Side #3 should be directed back, plus its 2" x 2" Wood End #2 must be oriented right
2" x 2" Lumber x 20"x 2 2" x 2" Lumber x 23.5"x 2
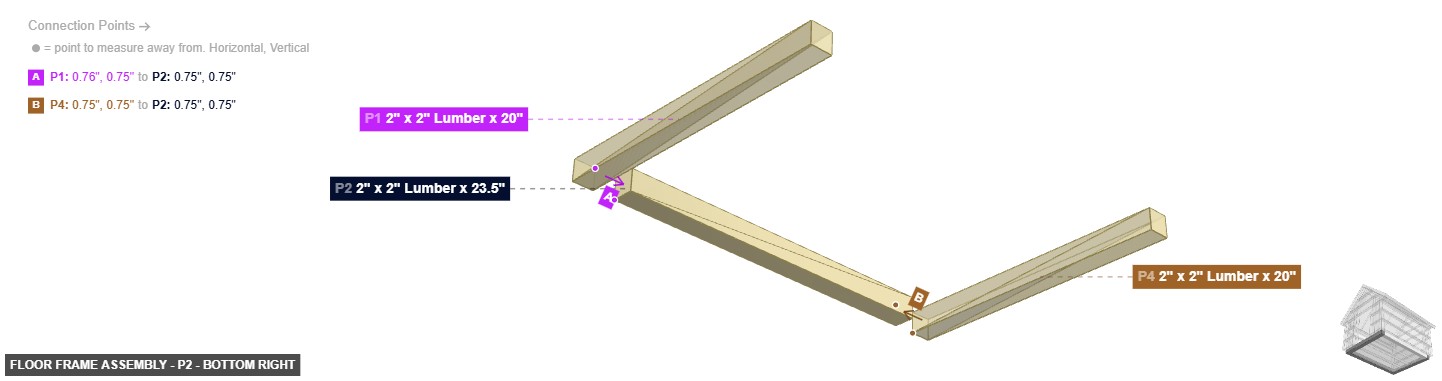
Angle: bottom right
P1 (2" x 2" Lumber 20" length) - connect its 2" x 2" Wood Side #2 oriented top links with part 41's 2" x 2" Wood End #2. Next, connect its 2" x 2" Wood Side #3 oriented back links with part 2's 2" x 2" Wood End #2, then its 2" x 2" Wood End #1 needs to point right. Also, its 2" x 2" Wood Side #1 needs to point front. Also, its 2" x 2" Wood Side #4 needs to point bottom, plus ensure its 2" x 2" Wood End #2 faces left
P2 (2" x 2" Lumber 23.5" length) - its 2" x 2" Wood End #1, which is back-facing, should connect to part 4's 2" x 2" Wood Side #1. Also, attach its 2" x 2" Wood Side #1 facing right to part 8's 1" x 4" Wood Side #3, then its 2" x 2" Wood End #2, which is front-facing, should connect to part 1's 2" x 2" Wood Side #3. Next, its 2" x 2" Wood Side #2 needs to point top. Additionally, its 2" x 2" Wood Side #3 should be directed left, plus its 2" x 2" Wood Side #4 needs to point bottom
P3 (2" x 2" Lumber 23.5" length) - its 2" x 2" Wood End #1, which is back-facing, should connect to part 4's 2" x 2" Wood Side #1, also its 2" x 2" Wood End #2, which is front-facing, should connect to part 1's 2" x 2" Wood Side #3. Also, its 2" x 2" Wood Side #1 should be directed right, plus its 2" x 2" Wood Side #2 must be oriented top. After that, its 2" x 2" Wood Side #3 must be oriented left. Next, its 2" x 2" Wood Side #4 should be directed bottom
P4 (2" x 2" Lumber 20" length) - its 2" x 2" Wood Side #1, which is front-facing, should connect to part 3's 2" x 2" Wood End #1, also connect its 2" x 2" Wood Side #4 oriented top links with part 42's 2" x 2" Wood End #2, and its 2" x 2" Wood End #1 should be directed left. Next, its 2" x 2" Wood Side #2 should be directed bottom, and its 2" x 2" Wood Side #3 should be directed back, plus its 2" x 2" Wood End #2 must be oriented right
2" x 2" Lumber x 20"x 2 2" x 2" Lumber x 23.5"x 2 Attaching: Floor Slats Installation
To install the flooring surface onto the base frame.
These slats complete the floor structure on top of the Floor Frame (Group 1).
Angle: back left
P5 (1" x 4" Lumber 23.5" length) - its 1" x 4" Wood End #1, which is back-facing, should connect to part 4's 2" x 2" Wood Side #1. Next, its 1" x 4" Wood End #2, which is front-facing, should connect to part 1's 2" x 2" Wood Side #3, and its 1" x 4" Wood Side #1 must be oriented right. Next, its 1" x 4" Wood Side #2 must be oriented top. Additionally, its 1" x 4" Wood Side #3 should be directed left. Next, its 1" x 4" Wood Side #4 should be directed bottom
P6 (1" x 4" Lumber 23.5" length) - attach its 1" x 4" Wood End #1 facing back to part 4's 2" x 2" Wood Side #1, also attach its 1" x 4" Wood End #2 facing front to part 1's 2" x 2" Wood Side #3. Additionally, its 1" x 4" Wood Side #1 must be oriented right, and ensure its 1" x 4" Wood Side #2 faces top. Next, ensure its 1" x 4" Wood Side #3 faces left. Next, its 1" x 4" Wood Side #4 should be directed bottom
P7 (1" x 4" Lumber 23.5" length) - attach its 1" x 4" Wood End #1 facing back to part 4's 2" x 2" Wood Side #1. Additionally, attach its 1" x 4" Wood Side #3 facing left to part 8's 1" x 4" Wood Side #1, plus connect its 1" x 4" Wood End #2 oriented front links with part 1's 2" x 2" Wood Side #3. Additionally, its 1" x 4" Wood Side #1 should be directed right, then its 1" x 4" Wood Side #2 should be directed top. After that, its 1" x 4" Wood Side #4 should be directed bottom
P8 (1" x 4" Lumber 23.5" length) - its 1" x 4" Wood End #1, which is back-facing, should connect to part 4's 2" x 2" Wood Side #1, then attach its 1" x 4" Wood Side #1 facing right to part 7's 1" x 4" Wood Side #3. Additionally, attach its 1" x 4" Wood Side #3 facing left to part 2's 2" x 2" Wood Side #1, and its 1" x 4" Wood End #2, which is front-facing, should connect to part 1's 2" x 2" Wood Side #3. Additionally, ensure its 1" x 4" Wood Side #2 faces top, and its 1" x 4" Wood Side #4 should be directed bottom
1" x 4" Lumber x 23.5"x 4
Angle: front right
P5 (1" x 4" Lumber 23.5" length) - its 1" x 4" Wood End #1, which is back-facing, should connect to part 4's 2" x 2" Wood Side #1. Next, its 1" x 4" Wood End #2, which is front-facing, should connect to part 1's 2" x 2" Wood Side #3, and its 1" x 4" Wood Side #1 must be oriented right. Next, its 1" x 4" Wood Side #2 must be oriented top. Additionally, its 1" x 4" Wood Side #3 should be directed left. Next, its 1" x 4" Wood Side #4 should be directed bottom
P6 (1" x 4" Lumber 23.5" length) - attach its 1" x 4" Wood End #1 facing back to part 4's 2" x 2" Wood Side #1, also attach its 1" x 4" Wood End #2 facing front to part 1's 2" x 2" Wood Side #3. Additionally, its 1" x 4" Wood Side #1 must be oriented right, and ensure its 1" x 4" Wood Side #2 faces top. Next, ensure its 1" x 4" Wood Side #3 faces left. Next, its 1" x 4" Wood Side #4 should be directed bottom
P7 (1" x 4" Lumber 23.5" length) - attach its 1" x 4" Wood End #1 facing back to part 4's 2" x 2" Wood Side #1. Additionally, attach its 1" x 4" Wood Side #3 facing left to part 8's 1" x 4" Wood Side #1, plus connect its 1" x 4" Wood End #2 oriented front links with part 1's 2" x 2" Wood Side #3. Additionally, its 1" x 4" Wood Side #1 should be directed right, then its 1" x 4" Wood Side #2 should be directed top. After that, its 1" x 4" Wood Side #4 should be directed bottom
P8 (1" x 4" Lumber 23.5" length) - its 1" x 4" Wood End #1, which is back-facing, should connect to part 4's 2" x 2" Wood Side #1, then attach its 1" x 4" Wood Side #1 facing right to part 7's 1" x 4" Wood Side #3. Additionally, attach its 1" x 4" Wood Side #3 facing left to part 2's 2" x 2" Wood Side #1, and its 1" x 4" Wood End #2, which is front-facing, should connect to part 1's 2" x 2" Wood Side #3. Additionally, ensure its 1" x 4" Wood Side #2 faces top, and its 1" x 4" Wood Side #4 should be directed bottom
1" x 4" Lumber x 23.5"x 4
Angle: bottom right
P5 (1" x 4" Lumber 23.5" length) - its 1" x 4" Wood End #1, which is back-facing, should connect to part 4's 2" x 2" Wood Side #1. Next, its 1" x 4" Wood End #2, which is front-facing, should connect to part 1's 2" x 2" Wood Side #3, and its 1" x 4" Wood Side #1 must be oriented right. Next, its 1" x 4" Wood Side #2 must be oriented top. Additionally, its 1" x 4" Wood Side #3 should be directed left. Next, its 1" x 4" Wood Side #4 should be directed bottom
P6 (1" x 4" Lumber 23.5" length) - attach its 1" x 4" Wood End #1 facing back to part 4's 2" x 2" Wood Side #1, also attach its 1" x 4" Wood End #2 facing front to part 1's 2" x 2" Wood Side #3. Additionally, its 1" x 4" Wood Side #1 must be oriented right, and ensure its 1" x 4" Wood Side #2 faces top. Next, ensure its 1" x 4" Wood Side #3 faces left. Next, its 1" x 4" Wood Side #4 should be directed bottom
P7 (1" x 4" Lumber 23.5" length) - attach its 1" x 4" Wood End #1 facing back to part 4's 2" x 2" Wood Side #1. Additionally, attach its 1" x 4" Wood Side #3 facing left to part 8's 1" x 4" Wood Side #1, plus connect its 1" x 4" Wood End #2 oriented front links with part 1's 2" x 2" Wood Side #3. Additionally, its 1" x 4" Wood Side #1 should be directed right, then its 1" x 4" Wood Side #2 should be directed top. After that, its 1" x 4" Wood Side #4 should be directed bottom
P8 (1" x 4" Lumber 23.5" length) - its 1" x 4" Wood End #1, which is back-facing, should connect to part 4's 2" x 2" Wood Side #1, then attach its 1" x 4" Wood Side #1 facing right to part 7's 1" x 4" Wood Side #3. Additionally, attach its 1" x 4" Wood Side #3 facing left to part 2's 2" x 2" Wood Side #1, and its 1" x 4" Wood End #2, which is front-facing, should connect to part 1's 2" x 2" Wood Side #3. Additionally, ensure its 1" x 4" Wood Side #2 faces top, and its 1" x 4" Wood Side #4 should be directed bottom
1" x 4" Lumber x 23.5"x 4 Attaching: Vertical Post Installation
To erect the main vertical supports for the walls and roof.
These posts attach to the completed Floor Frame (Group 1) and will support the Upper Frame (Group 4).
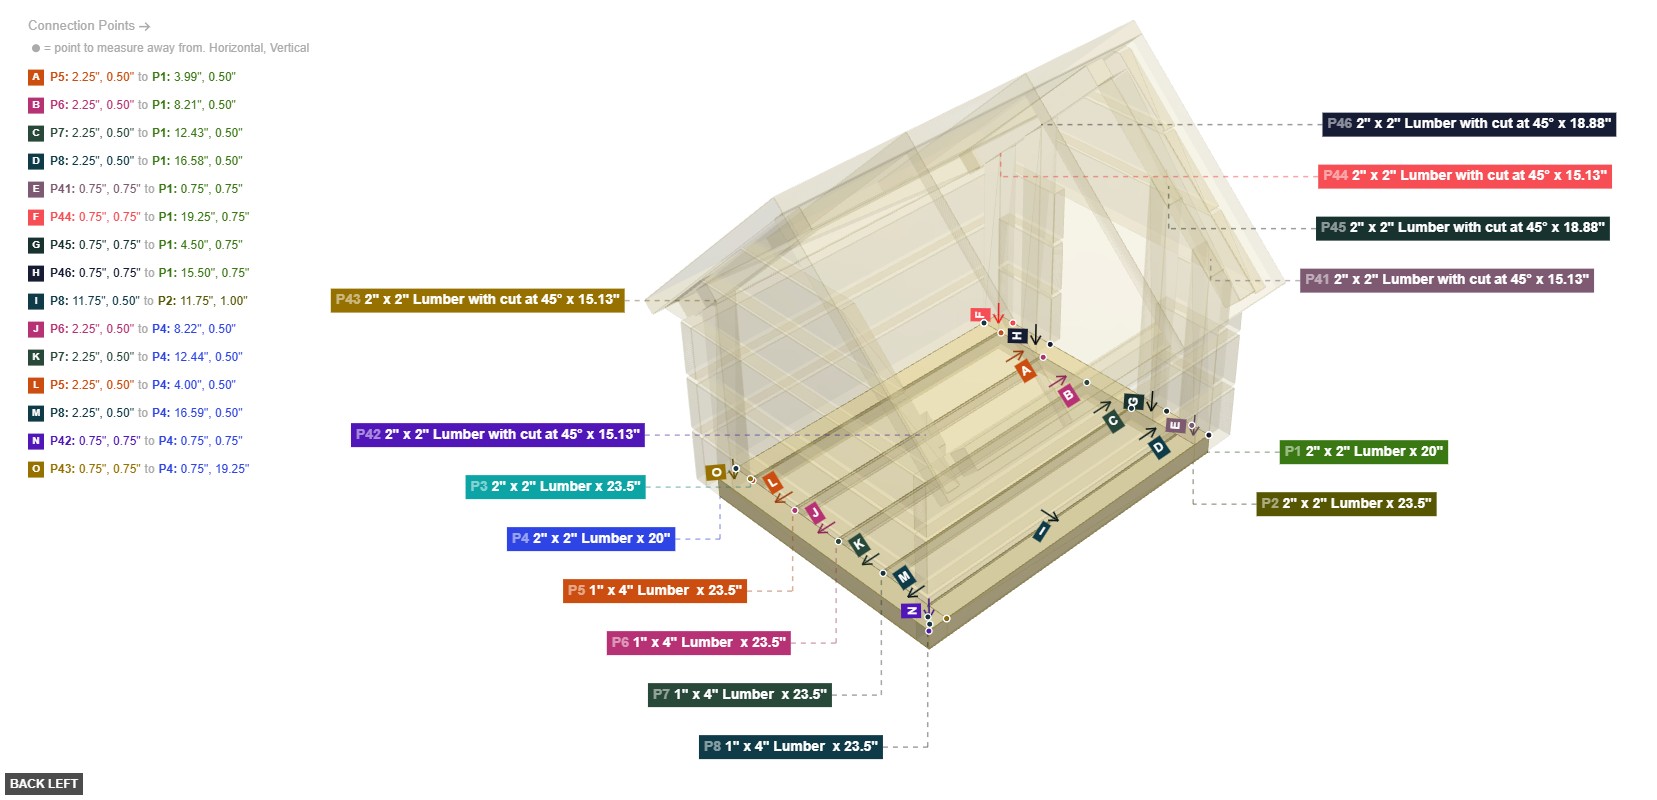
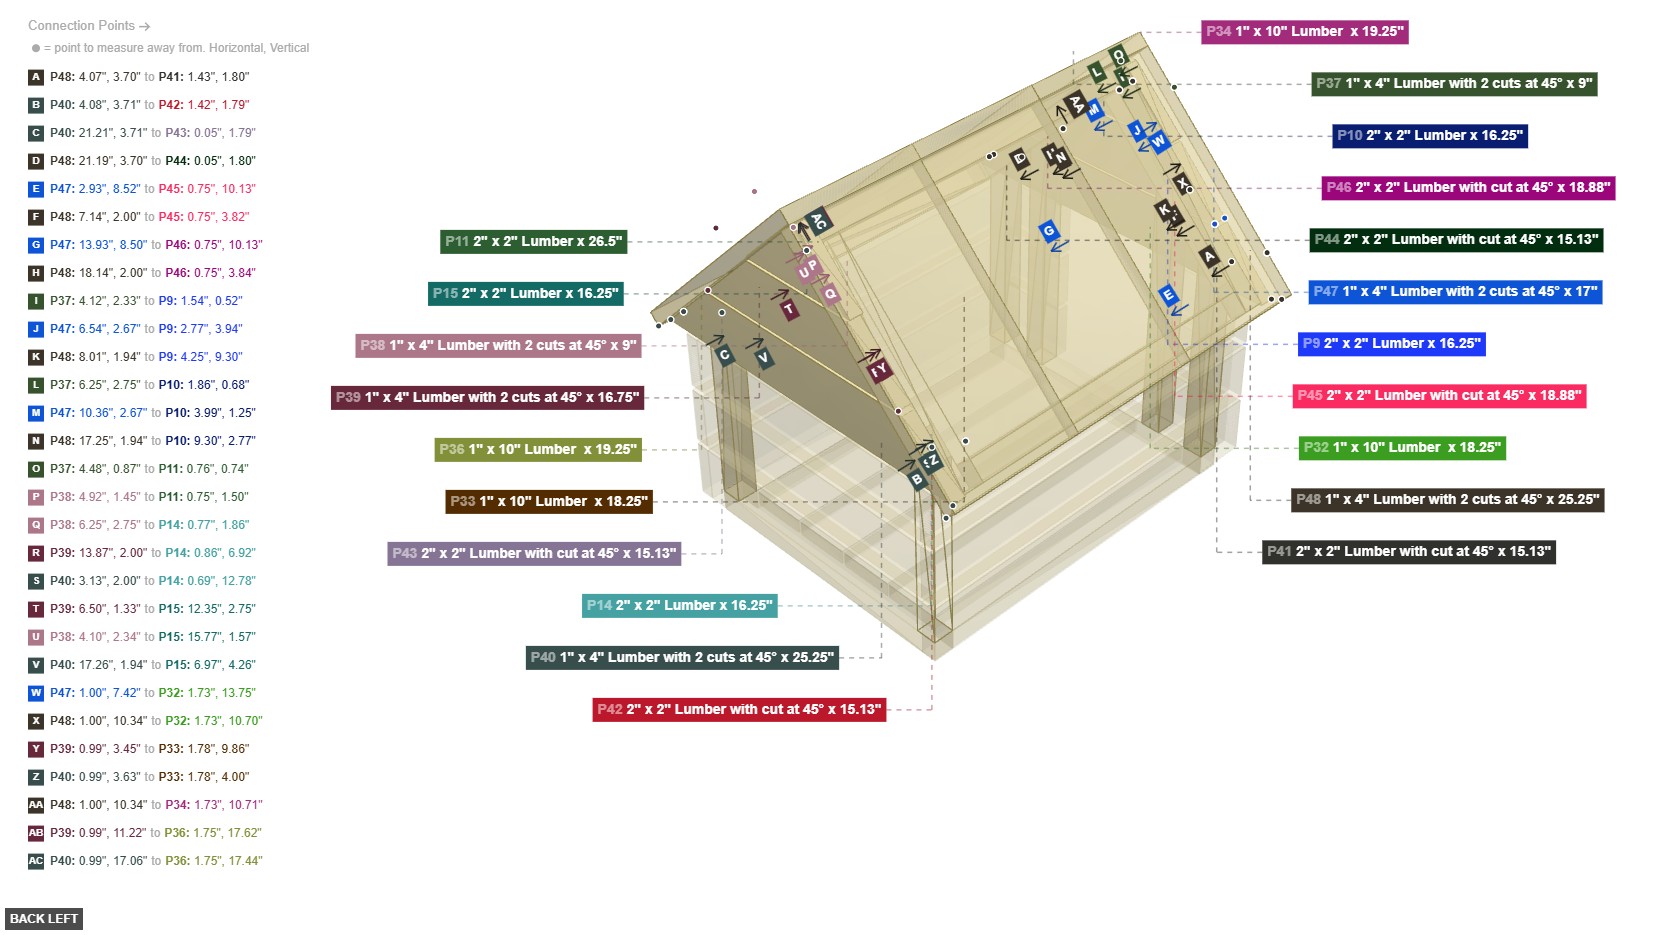
Angle: back left
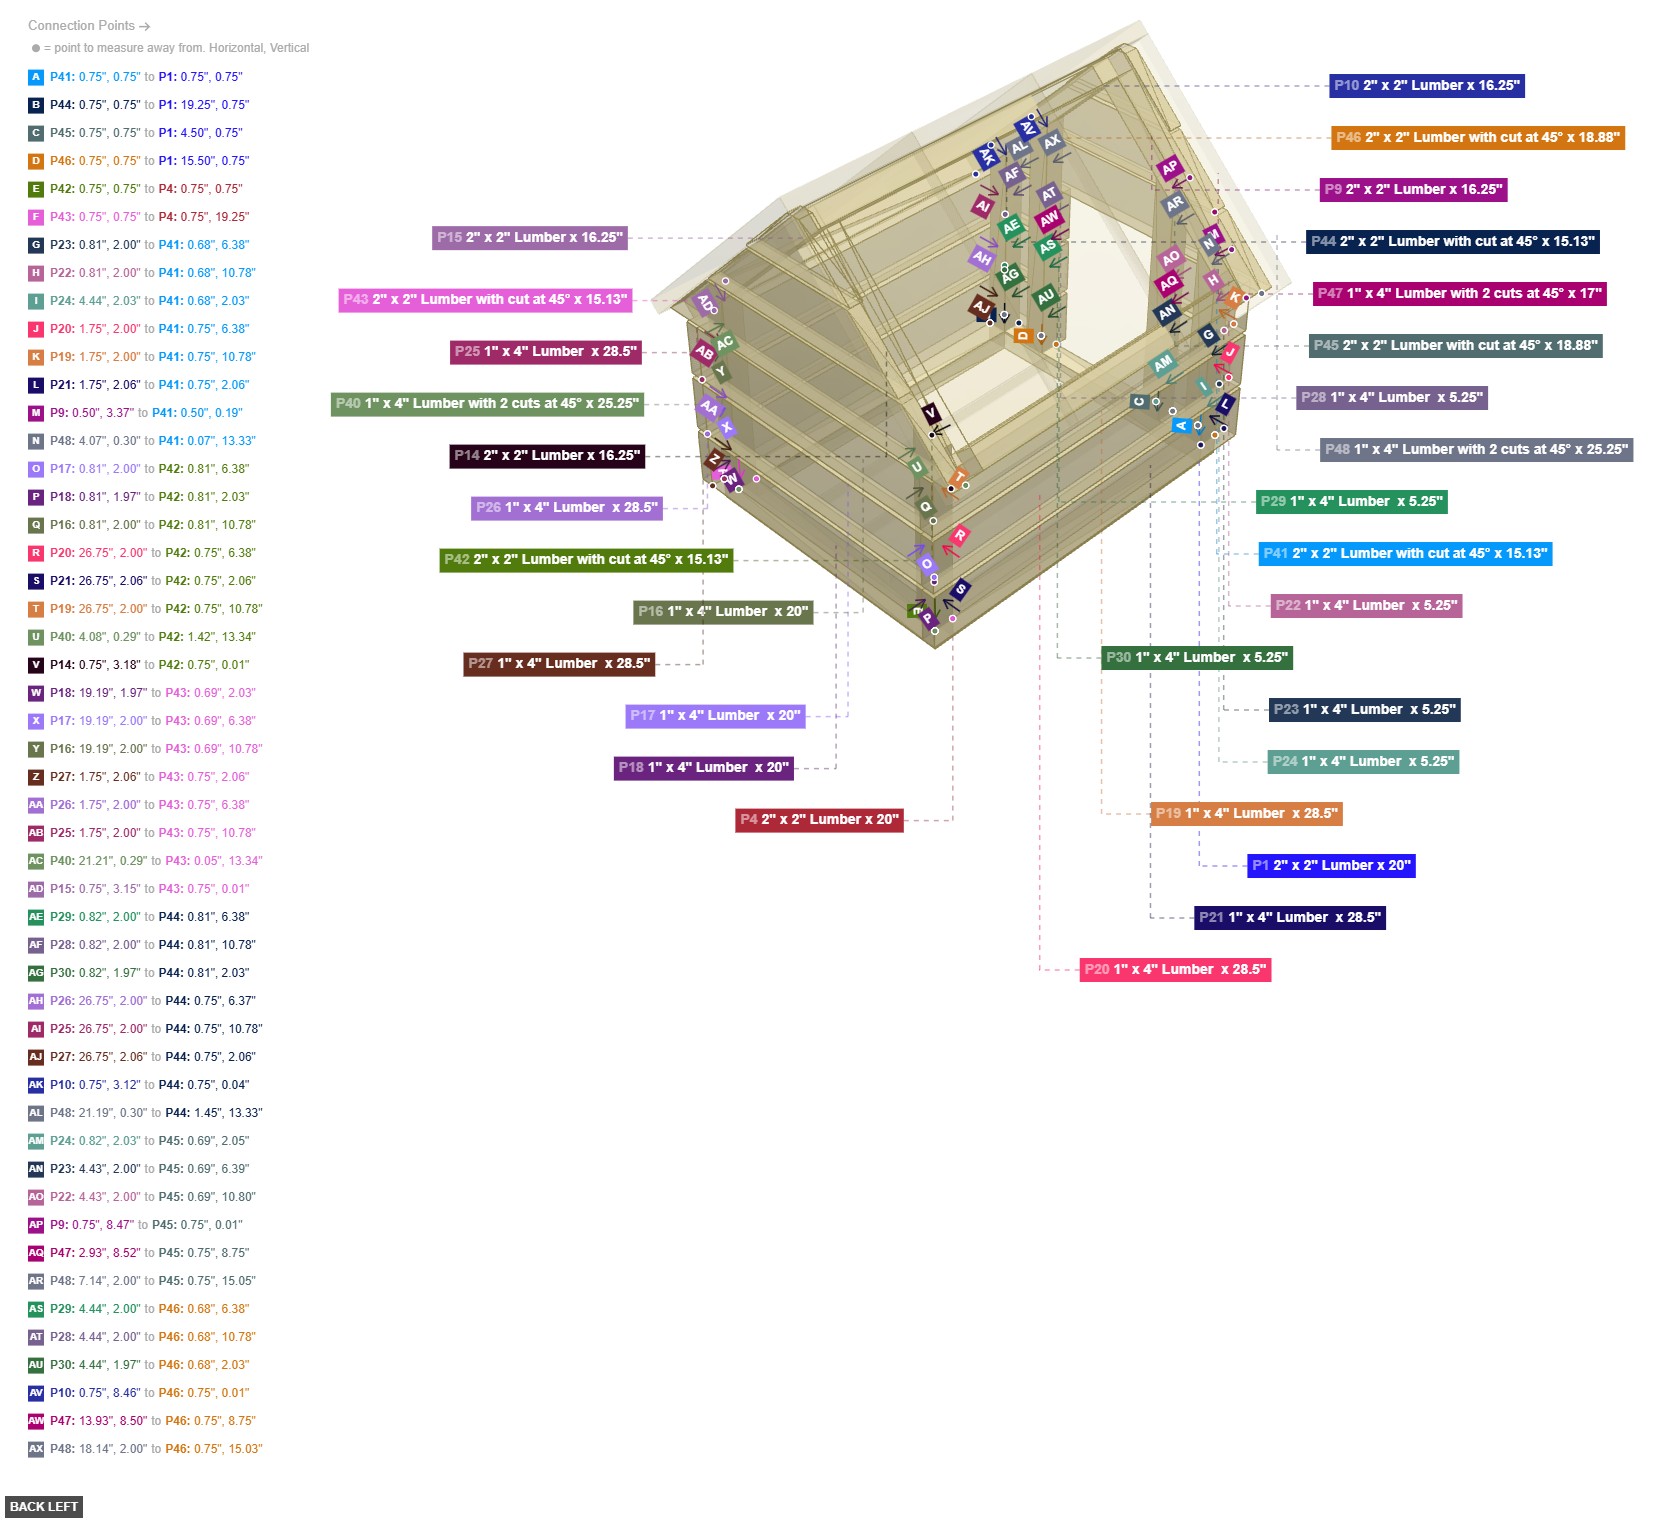
P41 (2" x 2" Lumber with cut at 45° 15.13" length) - its 2" x 2" Wood End #1, which is left-top-facing, should connect to part 9's 2" x 2" Wood Side #1. After that, its 2" x 2" Wood Side #3, which is front-facing, should connect to part 23's 1" x 4" Wood Side #2, plus its 2" x 2" Wood Side #4, which is left-facing, should connect to part 20's 1" x 4" Wood Side #2, also connect its 2" x 2" Wood End #2 oriented bottom links with part 1's 2" x 2" Wood Side #2. After that, its 2" x 2" Wood Side #1 must be oriented back, plus its 2" x 2" Wood Side #2 should be directed right
P42 (2" x 2" Lumber with cut at 45° 15.13" length) - attach its 2" x 2" Wood End #1 facing left-top to part 14's 2" x 2" Wood Side #1, then attach its 2" x 2" Wood Side #1 facing back to part 17's 1" x 4" Wood Side #2, also connect its 2" x 2" Wood Side #4 oriented left links with part 20's 1" x 4" Wood Side #2, then attach its 2" x 2" Wood End #2 facing bottom to part 4's 2" x 2" Wood Side #4. Additionally, its 2" x 2" Wood Side #2 should be directed right. Additionally, its 2" x 2" Wood Side #3 must be oriented front
P43 (2" x 2" Lumber with cut at 45° 15.13" length) - attach its 2" x 2" Wood End #1 facing right-top to part 15's 2" x 2" Wood Side #1. Additionally, connect its 2" x 2" Wood Side #3 oriented back links with part 18's 1" x 4" Wood Side #2. After that, attach its 2" x 2" Wood Side #4 facing right to part 27's 1" x 4" Wood Side #2. Additionally, connect its 2" x 2" Wood End #2 oriented bottom links with part 4's 2" x 2" Wood Side #4, also ensure its 2" x 2" Wood Side #1 faces front, plus its 2" x 2" Wood Side #2 must be oriented left
P44 (2" x 2" Lumber with cut at 45° 15.13" length) - attach its 2" x 2" Wood End #1 facing right-top to part 10's 2" x 2" Wood Side #1. Next, attach its 2" x 2" Wood Side #1 facing front to part 29's 1" x 4" Wood Side #2. Next, connect its 2" x 2" Wood Side #4 oriented right links with part 26's 1" x 4" Wood Side #2. After that, connect its 2" x 2" Wood End #2 oriented bottom links with part 1's 2" x 2" Wood Side #2, plus its 2" x 2" Wood Side #2 must be oriented left. Additionally, its 2" x 2" Wood Side #3 must be oriented back
P45 (2" x 2" Lumber with cut at 45° 18.88" length) - its 2" x 2" Wood End #1, which is left-top-facing, should connect to part 9's 2" x 2" Wood Side #1. After that, its 2" x 2" Wood Side #3, which is front-facing, should connect to part 24's 1" x 4" Wood Side #2, and attach its 2" x 2" Wood End #2 facing bottom to part 1's 2" x 2" Wood Side #2. Next, its 2" x 2" Wood Side #1 needs to point back. Also, its 2" x 2" Wood Side #2 should be directed right, also ensure its 2" x 2" Wood Side #4 faces left
P46 (2" x 2" Lumber with cut at 45° 18.88" length) - its 2" x 2" Wood End #1, which is right-top-facing, should connect to part 10's 2" x 2" Wood Side #1. Also, its 2" x 2" Wood Side #1, which is front-facing, should connect to part 29's 1" x 4" Wood Side #2. Also, its 2" x 2" Wood End #2, which is bottom-facing, should connect to part 1's 2" x 2" Wood Side #2, and ensure its 2" x 2" Wood Side #2 faces left. Additionally, its 2" x 2" Wood Side #3 should be directed back. Next, its 2" x 2" Wood Side #4 must be oriented right
2" x 2" Lumber with cut at 45° x 15.13"x 4 2" x 2" Lumber with cut at 45° x 18.88"x 2
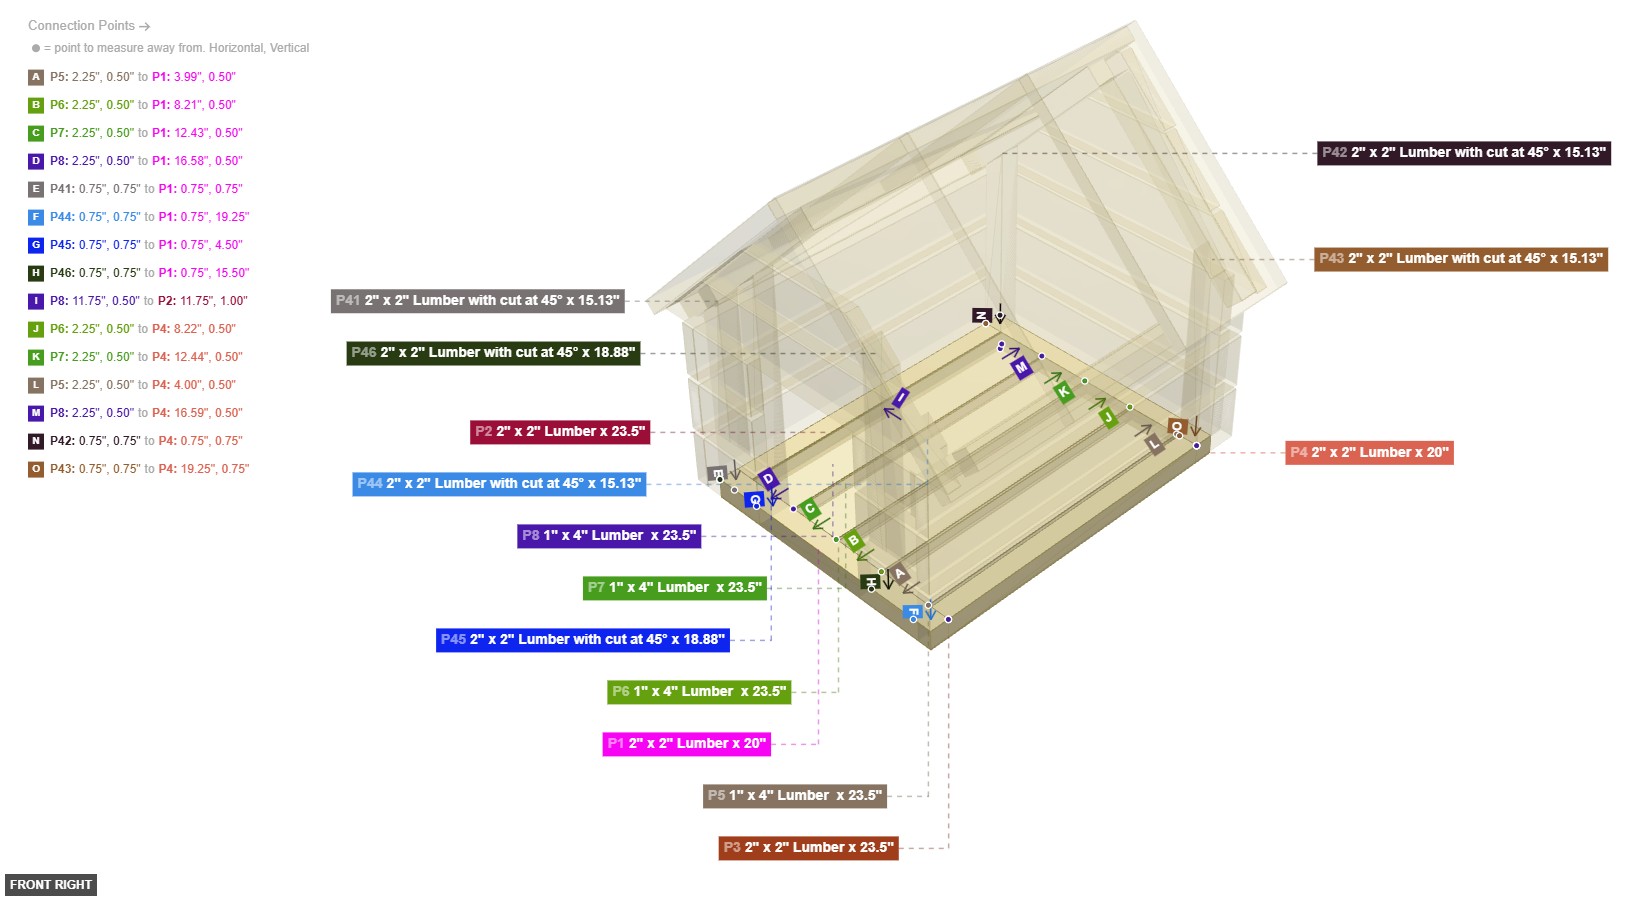
Angle: front right
P41 (2" x 2" Lumber with cut at 45° 15.13" length) - its 2" x 2" Wood End #1, which is left-top-facing, should connect to part 9's 2" x 2" Wood Side #1. After that, its 2" x 2" Wood Side #3, which is front-facing, should connect to part 23's 1" x 4" Wood Side #2, plus its 2" x 2" Wood Side #4, which is left-facing, should connect to part 20's 1" x 4" Wood Side #2, also connect its 2" x 2" Wood End #2 oriented bottom links with part 1's 2" x 2" Wood Side #2. After that, its 2" x 2" Wood Side #1 must be oriented back, plus its 2" x 2" Wood Side #2 should be directed right
P42 (2" x 2" Lumber with cut at 45° 15.13" length) - attach its 2" x 2" Wood End #1 facing left-top to part 14's 2" x 2" Wood Side #1, then attach its 2" x 2" Wood Side #1 facing back to part 17's 1" x 4" Wood Side #2, also connect its 2" x 2" Wood Side #4 oriented left links with part 20's 1" x 4" Wood Side #2, then attach its 2" x 2" Wood End #2 facing bottom to part 4's 2" x 2" Wood Side #4. Additionally, its 2" x 2" Wood Side #2 should be directed right. Additionally, its 2" x 2" Wood Side #3 must be oriented front
P43 (2" x 2" Lumber with cut at 45° 15.13" length) - attach its 2" x 2" Wood End #1 facing right-top to part 15's 2" x 2" Wood Side #1. Additionally, connect its 2" x 2" Wood Side #3 oriented back links with part 18's 1" x 4" Wood Side #2. After that, attach its 2" x 2" Wood Side #4 facing right to part 27's 1" x 4" Wood Side #2. Additionally, connect its 2" x 2" Wood End #2 oriented bottom links with part 4's 2" x 2" Wood Side #4, also ensure its 2" x 2" Wood Side #1 faces front, plus its 2" x 2" Wood Side #2 must be oriented left
P44 (2" x 2" Lumber with cut at 45° 15.13" length) - attach its 2" x 2" Wood End #1 facing right-top to part 10's 2" x 2" Wood Side #1. Next, attach its 2" x 2" Wood Side #1 facing front to part 29's 1" x 4" Wood Side #2. Next, connect its 2" x 2" Wood Side #4 oriented right links with part 26's 1" x 4" Wood Side #2. After that, connect its 2" x 2" Wood End #2 oriented bottom links with part 1's 2" x 2" Wood Side #2, plus its 2" x 2" Wood Side #2 must be oriented left. Additionally, its 2" x 2" Wood Side #3 must be oriented back
P45 (2" x 2" Lumber with cut at 45° 18.88" length) - its 2" x 2" Wood End #1, which is left-top-facing, should connect to part 9's 2" x 2" Wood Side #1. After that, its 2" x 2" Wood Side #3, which is front-facing, should connect to part 24's 1" x 4" Wood Side #2, and attach its 2" x 2" Wood End #2 facing bottom to part 1's 2" x 2" Wood Side #2. Next, its 2" x 2" Wood Side #1 needs to point back. Also, its 2" x 2" Wood Side #2 should be directed right, also ensure its 2" x 2" Wood Side #4 faces left
P46 (2" x 2" Lumber with cut at 45° 18.88" length) - its 2" x 2" Wood End #1, which is right-top-facing, should connect to part 10's 2" x 2" Wood Side #1. Also, its 2" x 2" Wood Side #1, which is front-facing, should connect to part 29's 1" x 4" Wood Side #2. Also, its 2" x 2" Wood End #2, which is bottom-facing, should connect to part 1's 2" x 2" Wood Side #2, and ensure its 2" x 2" Wood Side #2 faces left. Additionally, its 2" x 2" Wood Side #3 should be directed back. Next, its 2" x 2" Wood Side #4 must be oriented right
2" x 2" Lumber with cut at 45° x 15.13"x 4 2" x 2" Lumber with cut at 45° x 18.88"x 2
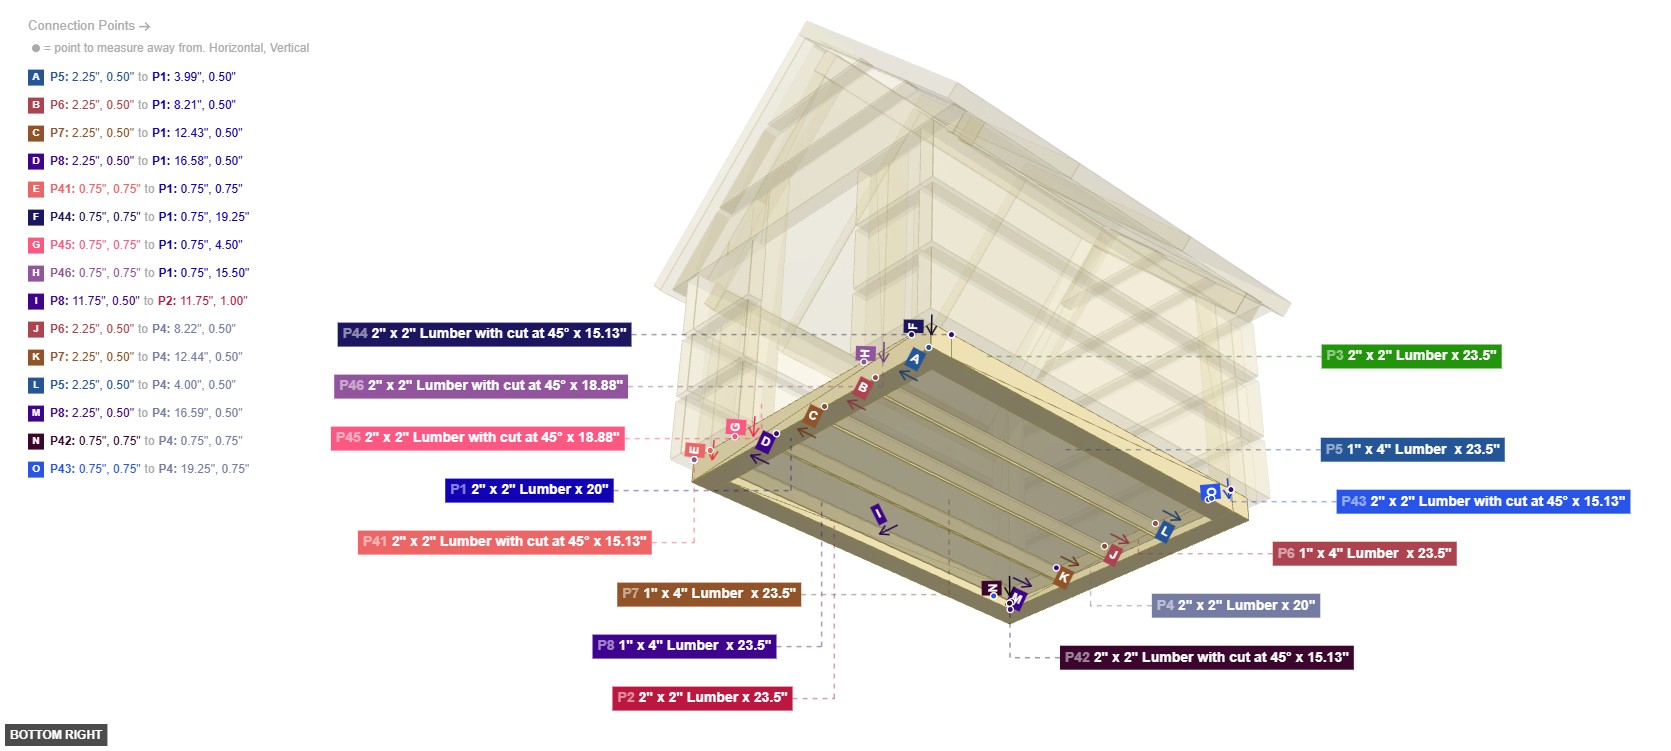
Angle: bottom right
P41 (2" x 2" Lumber with cut at 45° 15.13" length) - its 2" x 2" Wood End #1, which is left-top-facing, should connect to part 9's 2" x 2" Wood Side #1. After that, its 2" x 2" Wood Side #3, which is front-facing, should connect to part 23's 1" x 4" Wood Side #2, plus its 2" x 2" Wood Side #4, which is left-facing, should connect to part 20's 1" x 4" Wood Side #2, also connect its 2" x 2" Wood End #2 oriented bottom links with part 1's 2" x 2" Wood Side #2. After that, its 2" x 2" Wood Side #1 must be oriented back, plus its 2" x 2" Wood Side #2 should be directed right
P42 (2" x 2" Lumber with cut at 45° 15.13" length) - attach its 2" x 2" Wood End #1 facing left-top to part 14's 2" x 2" Wood Side #1, then attach its 2" x 2" Wood Side #1 facing back to part 17's 1" x 4" Wood Side #2, also connect its 2" x 2" Wood Side #4 oriented left links with part 20's 1" x 4" Wood Side #2, then attach its 2" x 2" Wood End #2 facing bottom to part 4's 2" x 2" Wood Side #4. Additionally, its 2" x 2" Wood Side #2 should be directed right. Additionally, its 2" x 2" Wood Side #3 must be oriented front
P43 (2" x 2" Lumber with cut at 45° 15.13" length) - attach its 2" x 2" Wood End #1 facing right-top to part 15's 2" x 2" Wood Side #1. Additionally, connect its 2" x 2" Wood Side #3 oriented back links with part 18's 1" x 4" Wood Side #2. After that, attach its 2" x 2" Wood Side #4 facing right to part 27's 1" x 4" Wood Side #2. Additionally, connect its 2" x 2" Wood End #2 oriented bottom links with part 4's 2" x 2" Wood Side #4, also ensure its 2" x 2" Wood Side #1 faces front, plus its 2" x 2" Wood Side #2 must be oriented left
P44 (2" x 2" Lumber with cut at 45° 15.13" length) - attach its 2" x 2" Wood End #1 facing right-top to part 10's 2" x 2" Wood Side #1. Next, attach its 2" x 2" Wood Side #1 facing front to part 29's 1" x 4" Wood Side #2. Next, connect its 2" x 2" Wood Side #4 oriented right links with part 26's 1" x 4" Wood Side #2. After that, connect its 2" x 2" Wood End #2 oriented bottom links with part 1's 2" x 2" Wood Side #2, plus its 2" x 2" Wood Side #2 must be oriented left. Additionally, its 2" x 2" Wood Side #3 must be oriented back
P45 (2" x 2" Lumber with cut at 45° 18.88" length) - its 2" x 2" Wood End #1, which is left-top-facing, should connect to part 9's 2" x 2" Wood Side #1. After that, its 2" x 2" Wood Side #3, which is front-facing, should connect to part 24's 1" x 4" Wood Side #2, and attach its 2" x 2" Wood End #2 facing bottom to part 1's 2" x 2" Wood Side #2. Next, its 2" x 2" Wood Side #1 needs to point back. Also, its 2" x 2" Wood Side #2 should be directed right, also ensure its 2" x 2" Wood Side #4 faces left
P46 (2" x 2" Lumber with cut at 45° 18.88" length) - its 2" x 2" Wood End #1, which is right-top-facing, should connect to part 10's 2" x 2" Wood Side #1. Also, its 2" x 2" Wood Side #1, which is front-facing, should connect to part 29's 1" x 4" Wood Side #2. Also, its 2" x 2" Wood End #2, which is bottom-facing, should connect to part 1's 2" x 2" Wood Side #2, and ensure its 2" x 2" Wood Side #2 faces left. Additionally, its 2" x 2" Wood Side #3 should be directed back. Next, its 2" x 2" Wood Side #4 must be oriented right
2" x 2" Lumber with cut at 45° x 15.13"x 4 2" x 2" Lumber with cut at 45° x 18.88"x 2 Attaching: Upper Frame and Ridge Assembly
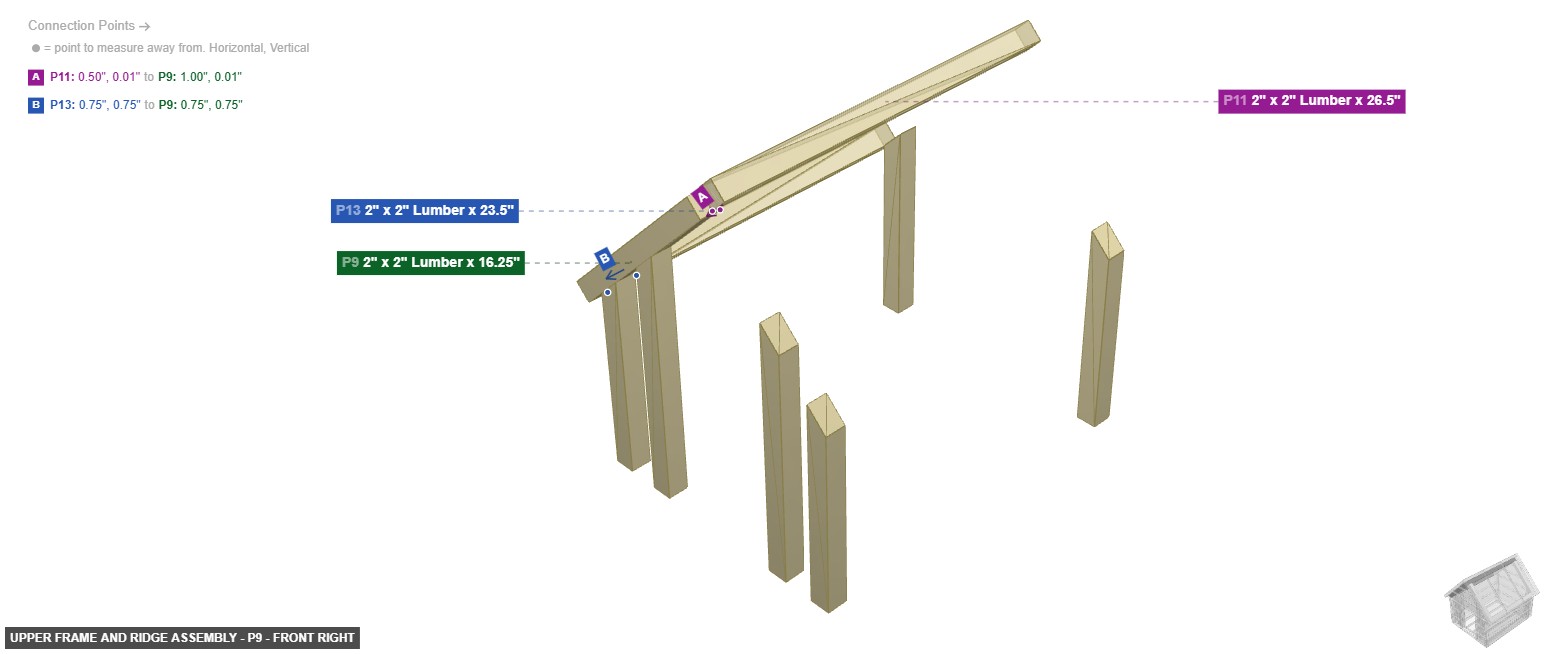
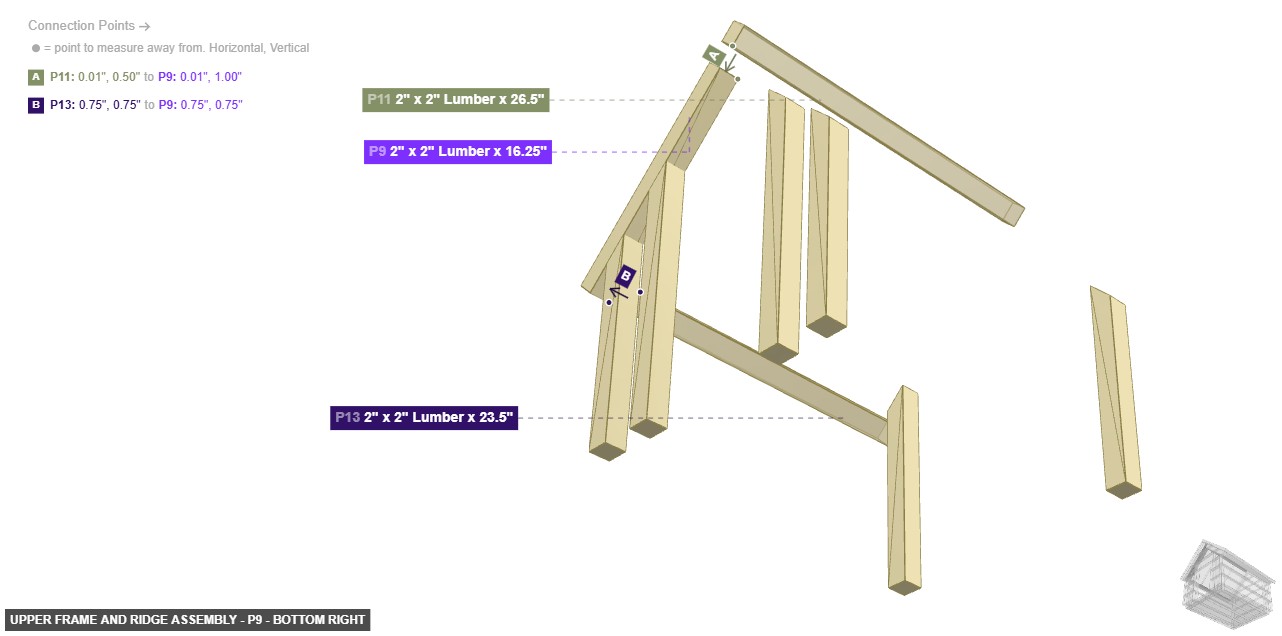
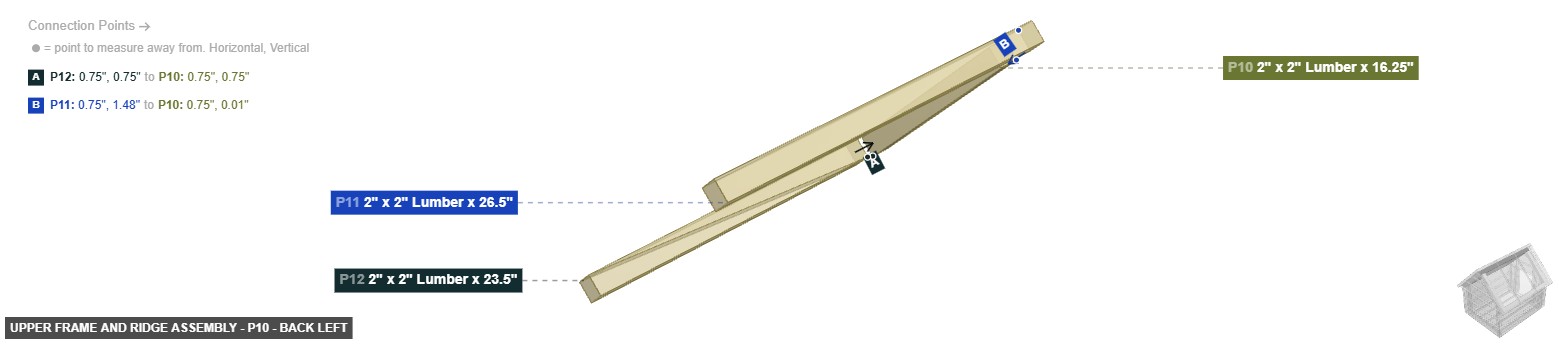
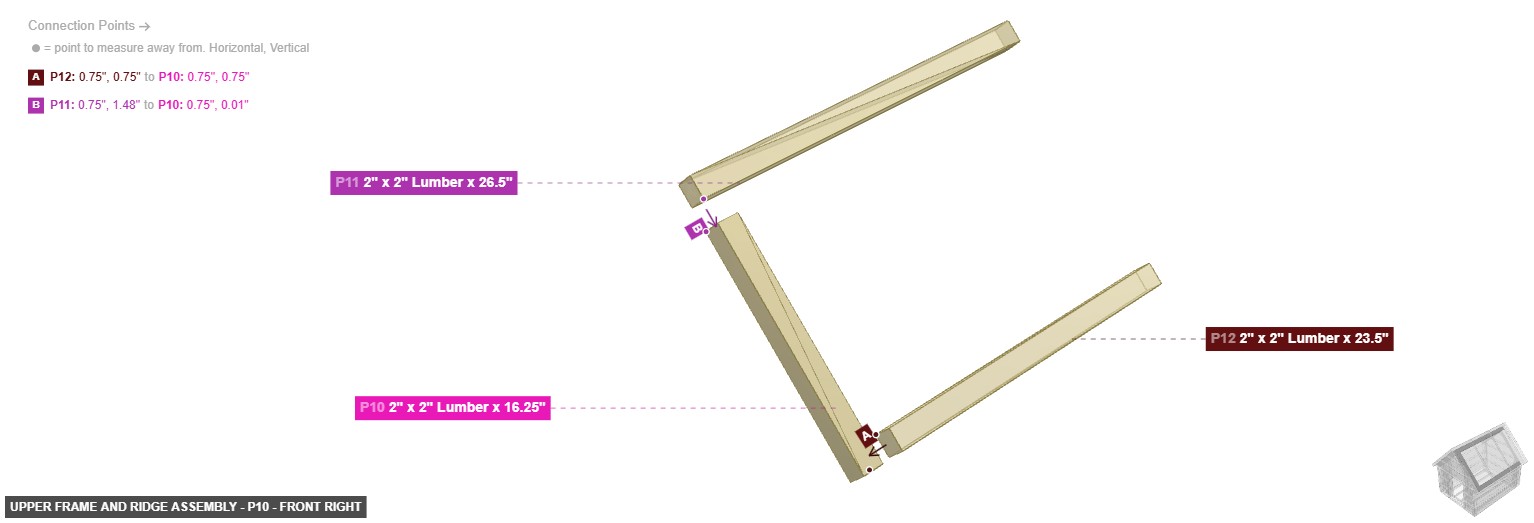
To construct the upper wall supports and the central roof ridge.
This upper frame sits on the Vertical Posts (Group 3) and will support the Roof Panels (Group 6) and Wall Siding (Group 5).
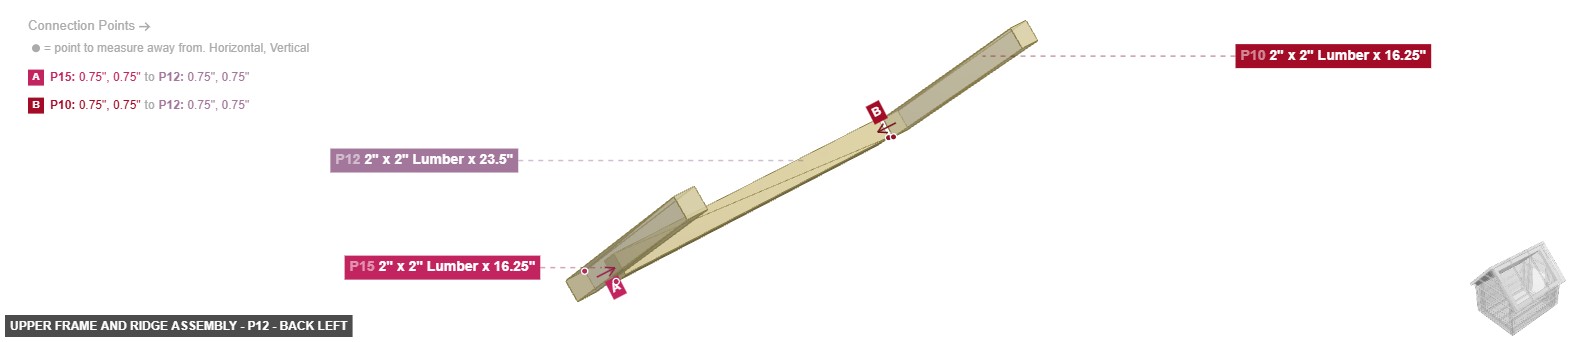
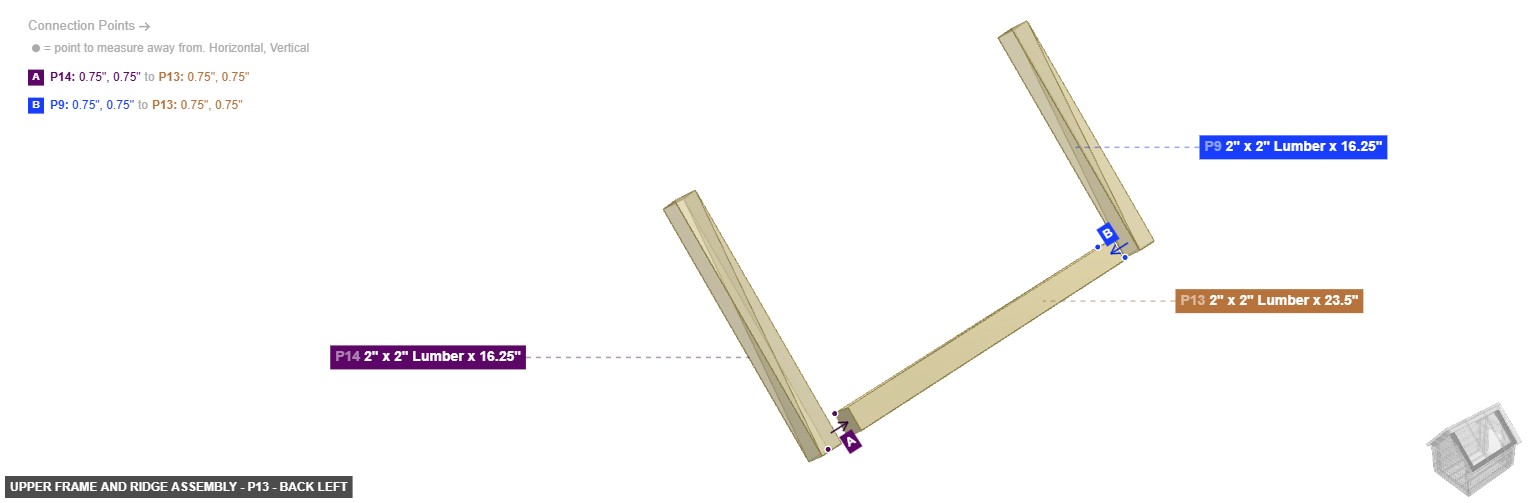
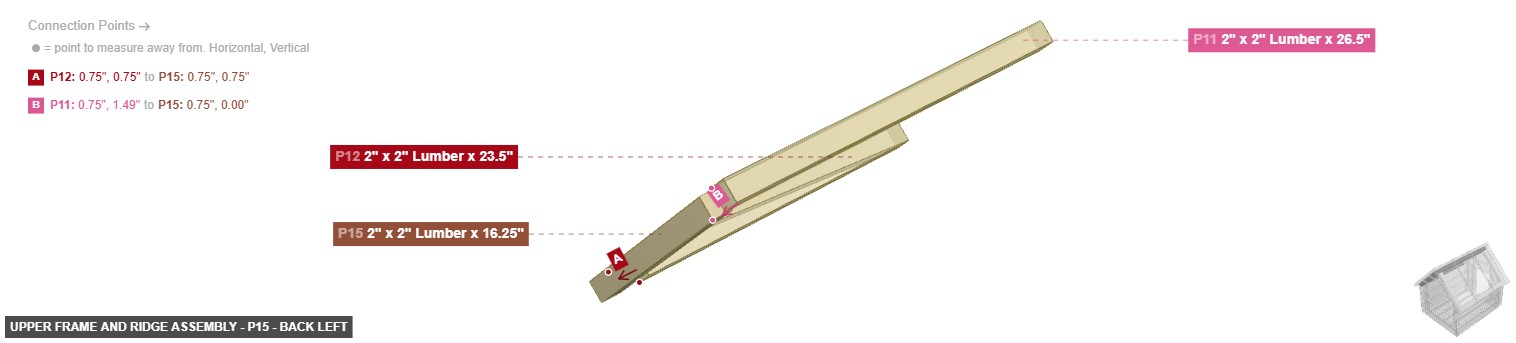
Angle: back left
P9 (2" x 2" Lumber 16.25" length) - its 2" x 2" Wood End #1, which is right-top-facing, should connect to part 11's 2" x 2" Wood Side #1. Additionally, connect its 2" x 2" Wood Side #1 oriented right-bottom links with part 41's 2" x 2" Wood End #1. Additionally, attach its 2" x 2" Wood Side #2 facing front to part 37's 1" x 4" Wood Side #1. Additionally, connect its 2" x 2" Wood Side #3 oriented left-top links with part 32's 1" x 10" Wood Side #2. Also, connect its 2" x 2" Wood Side #4 oriented back links with part 13's 2" x 2" Wood End #2, then its 2" x 2" Wood End #2 should be directed left-bottom
P10 (2" x 2" Lumber 16.25" length) - attach its 2" x 2" Wood End #1 facing left-top to part 11's 2" x 2" Wood Side #2. Next, its 2" x 2" Wood Side #1, which is left-bottom-facing, should connect to part 44's 2" x 2" Wood End #1. Also, its 2" x 2" Wood Side #2, which is back-facing, should connect to part 12's 2" x 2" Wood End #2. Additionally, attach its 2" x 2" Wood Side #3 facing right-top to part 34's 1" x 10" Wood Side #2. Additionally, connect its 2" x 2" Wood Side #4 oriented front links with part 37's 1" x 4" Wood Side #1. Additionally, its 2" x 2" Wood End #2 should be directed right-bottom
P11 (2" x 2" Lumber 26.5" length) - attach its 2" x 2" Wood End #1 facing back to part 38's 1" x 4" Wood Side #1. Next, attach its 2" x 2" Wood Side #1 facing left-bottom to part 9's 2" x 2" Wood End #1. Additionally, its 2" x 2" Wood Side #2, which is right-bottom-facing, should connect to part 10's 2" x 2" Wood End #1, also connect its 2" x 2" Wood Side #3 oriented right-top links with part 35's 1" x 10" Wood Side #2, and attach its 2" x 2" Wood Side #4 facing left-top to part 31's 1" x 10" Wood Side #2. Next, attach its 2" x 2" Wood End #2 facing front to part 37's 1" x 4" Wood Side #1
P12 (2" x 2" Lumber 23.5" length) - attach its 2" x 2" Wood End #1 facing back to part 15's 2" x 2" Wood Side #4, and attach its 2" x 2" Wood Side #2 facing right-top to part 35's 1" x 10" Wood Side #2, plus attach its 2" x 2" Wood End #2 facing front to part 10's 2" x 2" Wood Side #2, also its 2" x 2" Wood Side #1 should be directed right-bottom. Also, its 2" x 2" Wood Side #3 must be oriented left-top. Additionally, its 2" x 2" Wood Side #4 needs to point left-bottom
P13 (2" x 2" Lumber 23.5" length) - attach its 2" x 2" Wood End #1 facing back to part 14's 2" x 2" Wood Side #2. Next, its 2" x 2" Wood Side #2, which is left-top-facing, should connect to part 32's 1" x 10" Wood Side #2, plus attach its 2" x 2" Wood End #2 facing front to part 9's 2" x 2" Wood Side #4, then its 2" x 2" Wood Side #1 should be directed right-top, also ensure its 2" x 2" Wood Side #3 faces left-bottom, then its 2" x 2" Wood Side #4 must be oriented right-bottom
P14 (2" x 2" Lumber 16.25" length) - attach its 2" x 2" Wood End #1 facing right-top to part 11's 2" x 2" Wood Side #1. Also, attach its 2" x 2" Wood Side #1 facing right-bottom to part 42's 2" x 2" Wood End #1, also its 2" x 2" Wood Side #2, which is front-facing, should connect to part 13's 2" x 2" Wood End #1, also its 2" x 2" Wood Side #3, which is left-top-facing, should connect to part 33's 1" x 10" Wood Side #2, plus attach its 2" x 2" Wood Side #4 facing back to part 38's 1" x 4" Wood Side #1. Next, its 2" x 2" Wood End #2 should be directed left-bottom
P15 (2" x 2" Lumber 16.25" length) - connect its 2" x 2" Wood End #1 oriented left-top links with part 11's 2" x 2" Wood Side #2. Next, connect its 2" x 2" Wood Side #1 oriented left-bottom links with part 43's 2" x 2" Wood End #1. Next, connect its 2" x 2" Wood Side #2 oriented back links with part 39's 1" x 4" Wood Side #1. Also, connect its 2" x 2" Wood Side #3 oriented right-top links with part 36's 1" x 10" Wood Side #2, and its 2" x 2" Wood Side #4, which is front-facing, should connect to part 12's 2" x 2" Wood End #1. Also, its 2" x 2" Wood End #2 must be oriented right-bottom
2" x 2" Lumber x 16.25"x 4 2" x 2" Lumber x 26.5"x 1 2" x 2" Lumber x 23.5"x 2
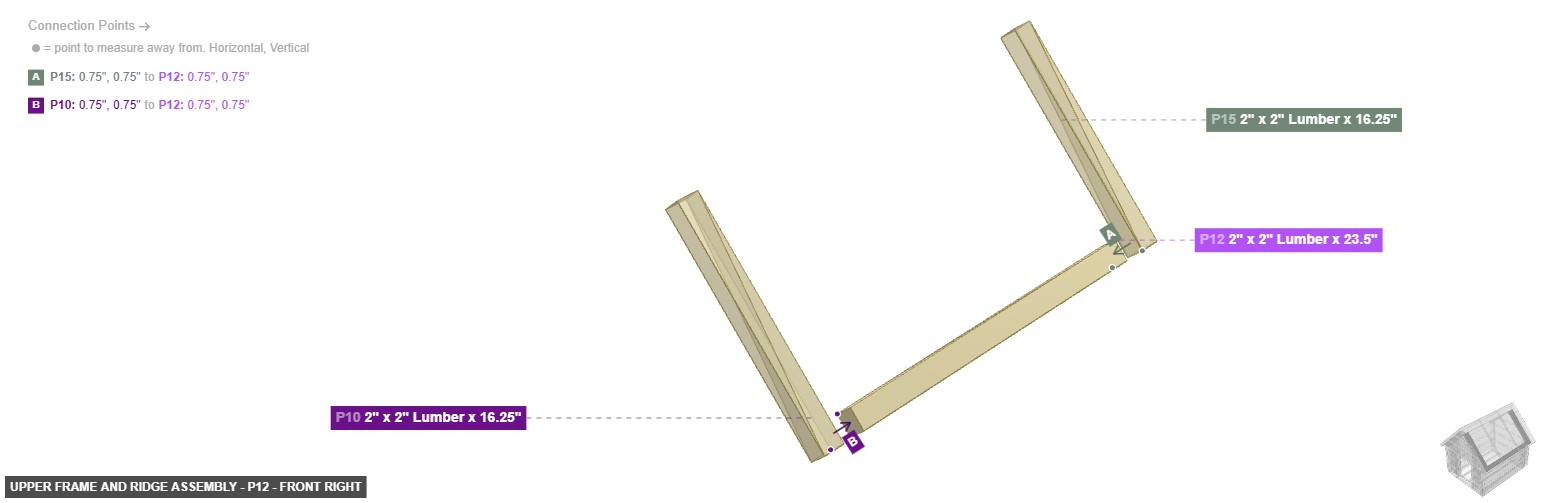
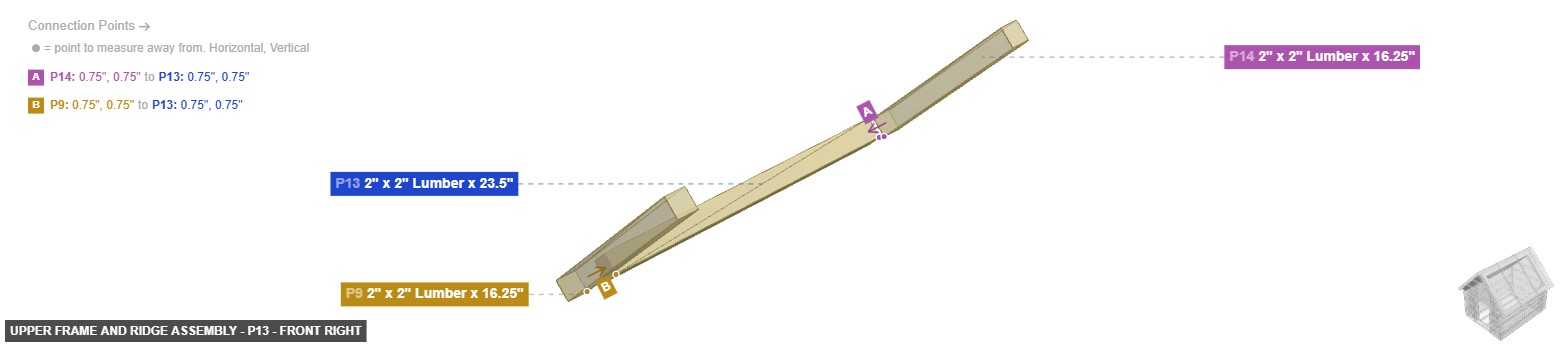
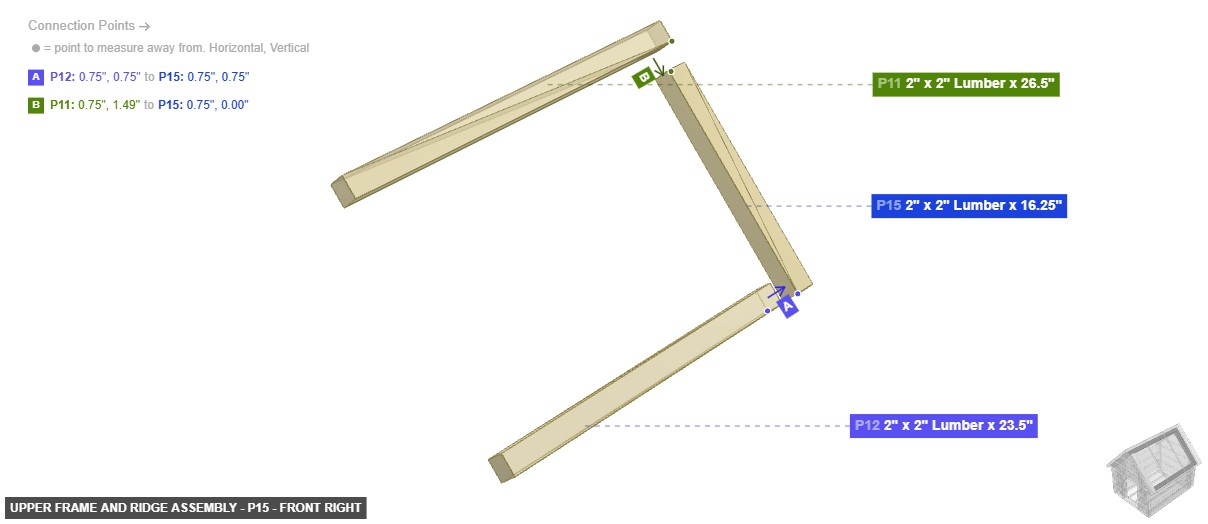
Angle: front right
P9 (2" x 2" Lumber 16.25" length) - its 2" x 2" Wood End #1, which is right-top-facing, should connect to part 11's 2" x 2" Wood Side #1. Additionally, connect its 2" x 2" Wood Side #1 oriented right-bottom links with part 41's 2" x 2" Wood End #1. Additionally, attach its 2" x 2" Wood Side #2 facing front to part 37's 1" x 4" Wood Side #1. Additionally, connect its 2" x 2" Wood Side #3 oriented left-top links with part 32's 1" x 10" Wood Side #2. Also, connect its 2" x 2" Wood Side #4 oriented back links with part 13's 2" x 2" Wood End #2, then its 2" x 2" Wood End #2 should be directed left-bottom
P10 (2" x 2" Lumber 16.25" length) - attach its 2" x 2" Wood End #1 facing left-top to part 11's 2" x 2" Wood Side #2. Next, its 2" x 2" Wood Side #1, which is left-bottom-facing, should connect to part 44's 2" x 2" Wood End #1. Also, its 2" x 2" Wood Side #2, which is back-facing, should connect to part 12's 2" x 2" Wood End #2. Additionally, attach its 2" x 2" Wood Side #3 facing right-top to part 34's 1" x 10" Wood Side #2. Additionally, connect its 2" x 2" Wood Side #4 oriented front links with part 37's 1" x 4" Wood Side #1. Additionally, its 2" x 2" Wood End #2 should be directed right-bottom
P11 (2" x 2" Lumber 26.5" length) - attach its 2" x 2" Wood End #1 facing back to part 38's 1" x 4" Wood Side #1. Next, attach its 2" x 2" Wood Side #1 facing left-bottom to part 9's 2" x 2" Wood End #1. Additionally, its 2" x 2" Wood Side #2, which is right-bottom-facing, should connect to part 10's 2" x 2" Wood End #1, also connect its 2" x 2" Wood Side #3 oriented right-top links with part 35's 1" x 10" Wood Side #2, and attach its 2" x 2" Wood Side #4 facing left-top to part 31's 1" x 10" Wood Side #2. Next, attach its 2" x 2" Wood End #2 facing front to part 37's 1" x 4" Wood Side #1
P12 (2" x 2" Lumber 23.5" length) - attach its 2" x 2" Wood End #1 facing back to part 15's 2" x 2" Wood Side #4, and attach its 2" x 2" Wood Side #2 facing right-top to part 35's 1" x 10" Wood Side #2, plus attach its 2" x 2" Wood End #2 facing front to part 10's 2" x 2" Wood Side #2, also its 2" x 2" Wood Side #1 should be directed right-bottom. Also, its 2" x 2" Wood Side #3 must be oriented left-top. Additionally, its 2" x 2" Wood Side #4 needs to point left-bottom
P13 (2" x 2" Lumber 23.5" length) - attach its 2" x 2" Wood End #1 facing back to part 14's 2" x 2" Wood Side #2. Next, its 2" x 2" Wood Side #2, which is left-top-facing, should connect to part 32's 1" x 10" Wood Side #2, plus attach its 2" x 2" Wood End #2 facing front to part 9's 2" x 2" Wood Side #4, then its 2" x 2" Wood Side #1 should be directed right-top, also ensure its 2" x 2" Wood Side #3 faces left-bottom, then its 2" x 2" Wood Side #4 must be oriented right-bottom
P14 (2" x 2" Lumber 16.25" length) - attach its 2" x 2" Wood End #1 facing right-top to part 11's 2" x 2" Wood Side #1. Also, attach its 2" x 2" Wood Side #1 facing right-bottom to part 42's 2" x 2" Wood End #1, also its 2" x 2" Wood Side #2, which is front-facing, should connect to part 13's 2" x 2" Wood End #1, also its 2" x 2" Wood Side #3, which is left-top-facing, should connect to part 33's 1" x 10" Wood Side #2, plus attach its 2" x 2" Wood Side #4 facing back to part 38's 1" x 4" Wood Side #1. Next, its 2" x 2" Wood End #2 should be directed left-bottom
P15 (2" x 2" Lumber 16.25" length) - connect its 2" x 2" Wood End #1 oriented left-top links with part 11's 2" x 2" Wood Side #2. Next, connect its 2" x 2" Wood Side #1 oriented left-bottom links with part 43's 2" x 2" Wood End #1. Next, connect its 2" x 2" Wood Side #2 oriented back links with part 39's 1" x 4" Wood Side #1. Also, connect its 2" x 2" Wood Side #3 oriented right-top links with part 36's 1" x 10" Wood Side #2, and its 2" x 2" Wood Side #4, which is front-facing, should connect to part 12's 2" x 2" Wood End #1. Also, its 2" x 2" Wood End #2 must be oriented right-bottom
2" x 2" Lumber x 16.25"x 4 2" x 2" Lumber x 26.5"x 1 2" x 2" Lumber x 23.5"x 2
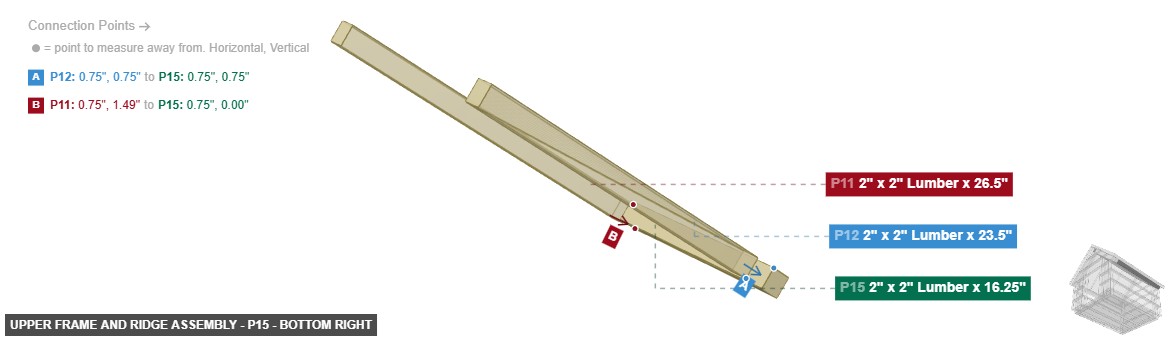
Angle: bottom right
P9 (2" x 2" Lumber 16.25" length) - its 2" x 2" Wood End #1, which is right-top-facing, should connect to part 11's 2" x 2" Wood Side #1. Additionally, connect its 2" x 2" Wood Side #1 oriented right-bottom links with part 41's 2" x 2" Wood End #1. Additionally, attach its 2" x 2" Wood Side #2 facing front to part 37's 1" x 4" Wood Side #1. Additionally, connect its 2" x 2" Wood Side #3 oriented left-top links with part 32's 1" x 10" Wood Side #2. Also, connect its 2" x 2" Wood Side #4 oriented back links with part 13's 2" x 2" Wood End #2, then its 2" x 2" Wood End #2 should be directed left-bottom
P10 (2" x 2" Lumber 16.25" length) - attach its 2" x 2" Wood End #1 facing left-top to part 11's 2" x 2" Wood Side #2. Next, its 2" x 2" Wood Side #1, which is left-bottom-facing, should connect to part 44's 2" x 2" Wood End #1. Also, its 2" x 2" Wood Side #2, which is back-facing, should connect to part 12's 2" x 2" Wood End #2. Additionally, attach its 2" x 2" Wood Side #3 facing right-top to part 34's 1" x 10" Wood Side #2. Additionally, connect its 2" x 2" Wood Side #4 oriented front links with part 37's 1" x 4" Wood Side #1. Additionally, its 2" x 2" Wood End #2 should be directed right-bottom
P11 (2" x 2" Lumber 26.5" length) - attach its 2" x 2" Wood End #1 facing back to part 38's 1" x 4" Wood Side #1. Next, attach its 2" x 2" Wood Side #1 facing left-bottom to part 9's 2" x 2" Wood End #1. Additionally, its 2" x 2" Wood Side #2, which is right-bottom-facing, should connect to part 10's 2" x 2" Wood End #1, also connect its 2" x 2" Wood Side #3 oriented right-top links with part 35's 1" x 10" Wood Side #2, and attach its 2" x 2" Wood Side #4 facing left-top to part 31's 1" x 10" Wood Side #2. Next, attach its 2" x 2" Wood End #2 facing front to part 37's 1" x 4" Wood Side #1
P12 (2" x 2" Lumber 23.5" length) - attach its 2" x 2" Wood End #1 facing back to part 15's 2" x 2" Wood Side #4, and attach its 2" x 2" Wood Side #2 facing right-top to part 35's 1" x 10" Wood Side #2, plus attach its 2" x 2" Wood End #2 facing front to part 10's 2" x 2" Wood Side #2, also its 2" x 2" Wood Side #1 should be directed right-bottom. Also, its 2" x 2" Wood Side #3 must be oriented left-top. Additionally, its 2" x 2" Wood Side #4 needs to point left-bottom
P13 (2" x 2" Lumber 23.5" length) - attach its 2" x 2" Wood End #1 facing back to part 14's 2" x 2" Wood Side #2. Next, its 2" x 2" Wood Side #2, which is left-top-facing, should connect to part 32's 1" x 10" Wood Side #2, plus attach its 2" x 2" Wood End #2 facing front to part 9's 2" x 2" Wood Side #4, then its 2" x 2" Wood Side #1 should be directed right-top, also ensure its 2" x 2" Wood Side #3 faces left-bottom, then its 2" x 2" Wood Side #4 must be oriented right-bottom
P14 (2" x 2" Lumber 16.25" length) - attach its 2" x 2" Wood End #1 facing right-top to part 11's 2" x 2" Wood Side #1. Also, attach its 2" x 2" Wood Side #1 facing right-bottom to part 42's 2" x 2" Wood End #1, also its 2" x 2" Wood Side #2, which is front-facing, should connect to part 13's 2" x 2" Wood End #1, also its 2" x 2" Wood Side #3, which is left-top-facing, should connect to part 33's 1" x 10" Wood Side #2, plus attach its 2" x 2" Wood Side #4 facing back to part 38's 1" x 4" Wood Side #1. Next, its 2" x 2" Wood End #2 should be directed left-bottom
P15 (2" x 2" Lumber 16.25" length) - connect its 2" x 2" Wood End #1 oriented left-top links with part 11's 2" x 2" Wood Side #2. Next, connect its 2" x 2" Wood Side #1 oriented left-bottom links with part 43's 2" x 2" Wood End #1. Next, connect its 2" x 2" Wood Side #2 oriented back links with part 39's 1" x 4" Wood Side #1. Also, connect its 2" x 2" Wood Side #3 oriented right-top links with part 36's 1" x 10" Wood Side #2, and its 2" x 2" Wood Side #4, which is front-facing, should connect to part 12's 2" x 2" Wood End #1. Also, its 2" x 2" Wood End #2 must be oriented right-bottom
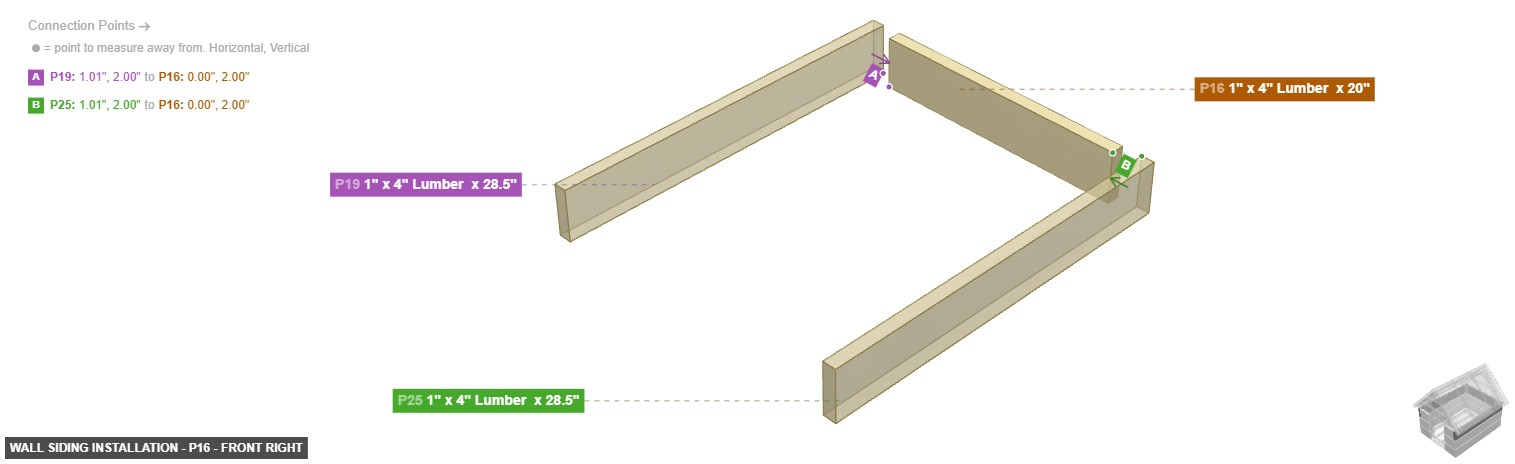
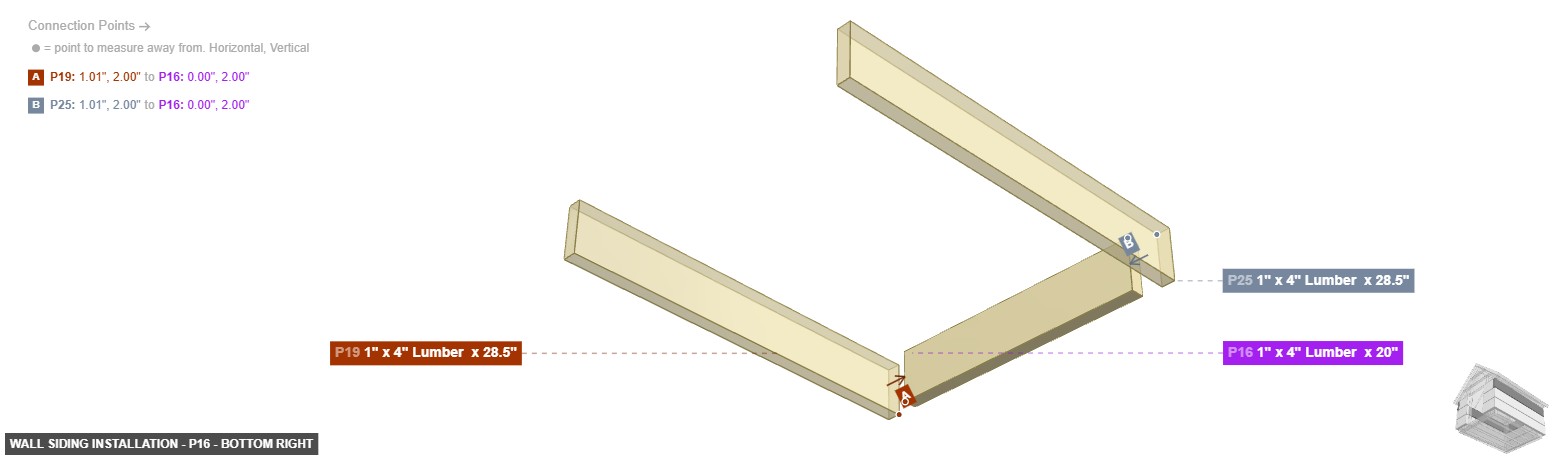
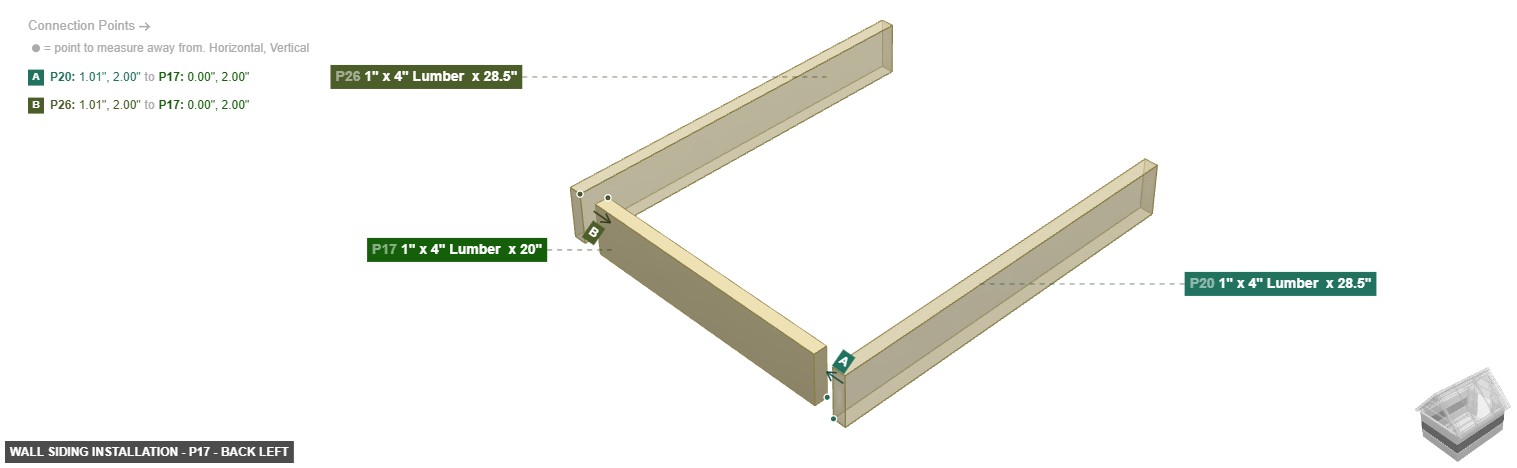
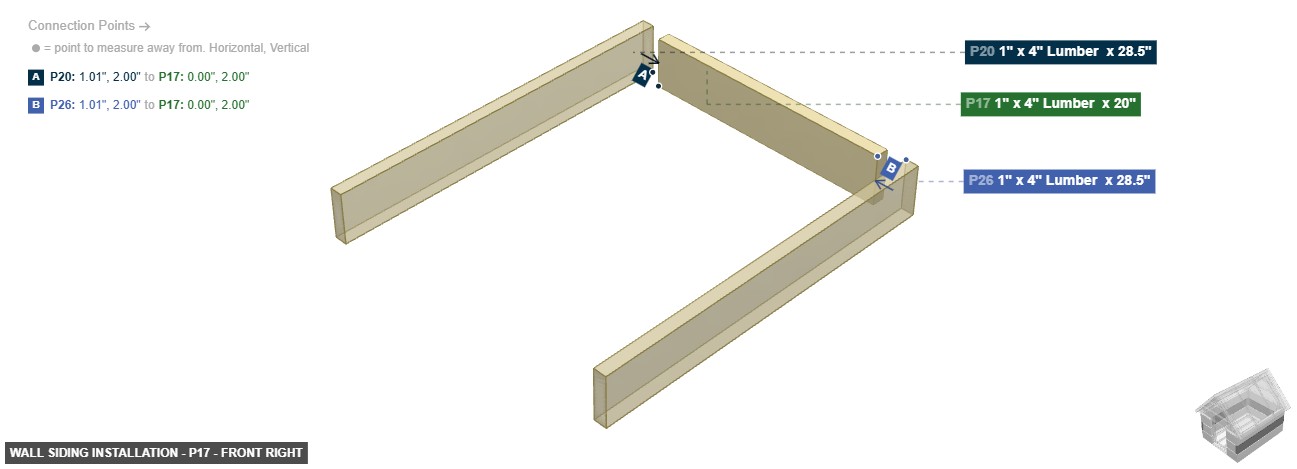
2" x 2" Lumber x 16.25"x 4 2" x 2" Lumber x 26.5"x 1 2" x 2" Lumber x 23.5"x 2 Attaching: Wall Siding Installation
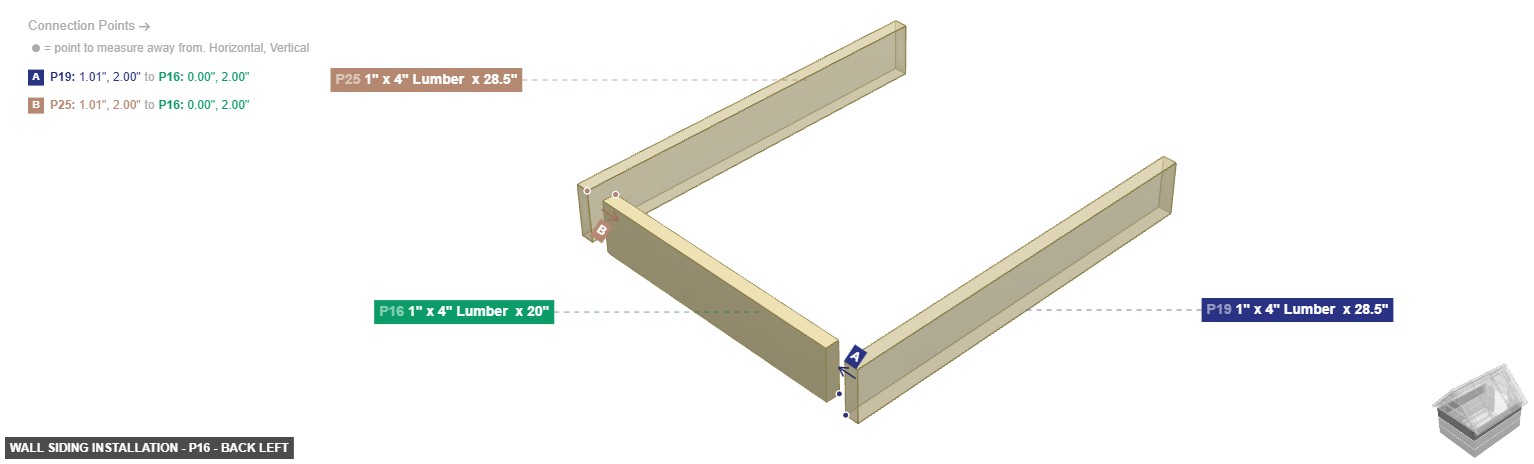
To clad the sides, back, and part of the front of the dog house.
The wall siding attaches to the structural frame formed by the Vertical Posts (Group 3) and Upper Frame (Group 4).
Angle: back left
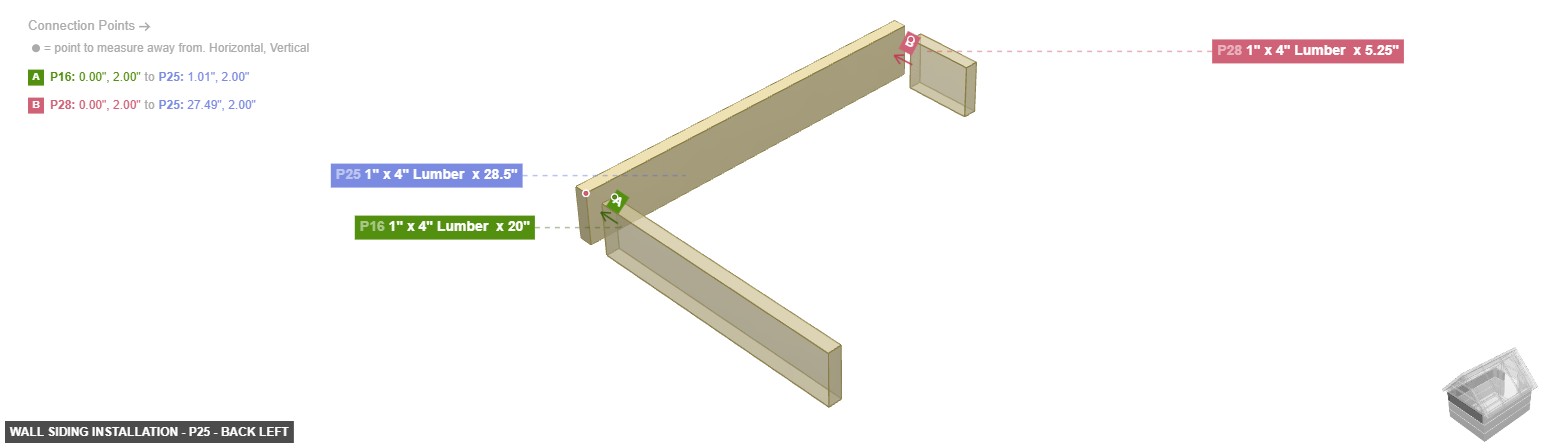
P16 (1" x 4" Lumber 20" length) - attach its 1" x 4" Wood End #1 facing left to part 19's 1" x 4" Wood Side #2. After that, attach its 1" x 4" Wood Side #2 facing front to part 42's 2" x 2" Wood Side #1, also its 1" x 4" Wood End #2, which is right-facing, should connect to part 25's 1" x 4" Wood Side #2. After that, ensure its 1" x 4" Wood Side #1 faces top. Next, its 1" x 4" Wood Side #3 should be directed bottom, also ensure its 1" x 4" Wood Side #4 faces back
P17 (1" x 4" Lumber 20" length) - its 1" x 4" Wood End #1, which is left-facing, should connect to part 20's 1" x 4" Wood Side #2, also attach its 1" x 4" Wood Side #2 facing front to part 42's 2" x 2" Wood Side #1. Also, connect its 1" x 4" Wood End #2 oriented right links with part 26's 1" x 4" Wood Side #2, then its 1" x 4" Wood Side #1 must be oriented top, plus its 1" x 4" Wood Side #3 must be oriented bottom. After that, ensure its 1" x 4" Wood Side #4 faces back
P18 (1" x 4" Lumber 20" length) - connect its 1" x 4" Wood End #1 oriented left links with part 21's 1" x 4" Wood Side #2, then connect its 1" x 4" Wood Side #2 oriented front links with part 42's 2" x 2" Wood Side #1, plus its 1" x 4" Wood End #2, which is right-facing, should connect to part 27's 1" x 4" Wood Side #2, plus ensure its 1" x 4" Wood Side #1 faces top. Also, ensure its 1" x 4" Wood Side #3 faces bottom, then ensure its 1" x 4" Wood Side #4 faces back
P19 (1" x 4" Lumber 28.5" length) - connect its 1" x 4" Wood Side #2 oriented right links with part 16's 1" x 4" Wood End #1. Also, its 1" x 4" Wood End #1 needs to point front. Additionally, ensure its 1" x 4" Wood Side #1 faces top, plus its 1" x 4" Wood Side #3 must be oriented bottom. Next, its 1" x 4" Wood Side #4 should be directed left. After that, its 1" x 4" Wood End #2 needs to point back
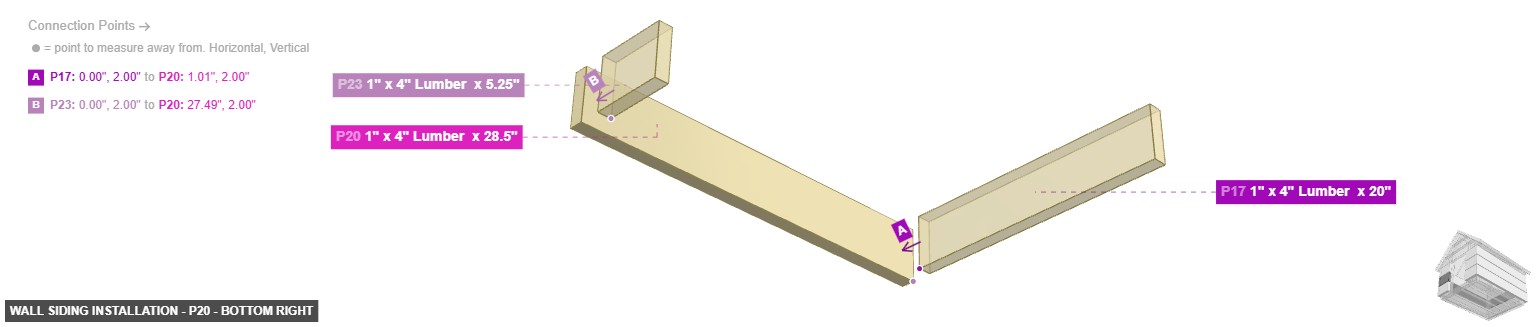
P20 (1" x 4" Lumber 28.5" length) - attach its 1" x 4" Wood Side #2 facing right to part 17's 1" x 4" Wood End #1. Additionally, its 1" x 4" Wood End #1 must be oriented front. Next, its 1" x 4" Wood Side #1 should be directed top, then its 1" x 4" Wood Side #3 should be directed bottom, then its 1" x 4" Wood Side #4 should be directed left. After that, its 1" x 4" Wood End #2 should be directed back
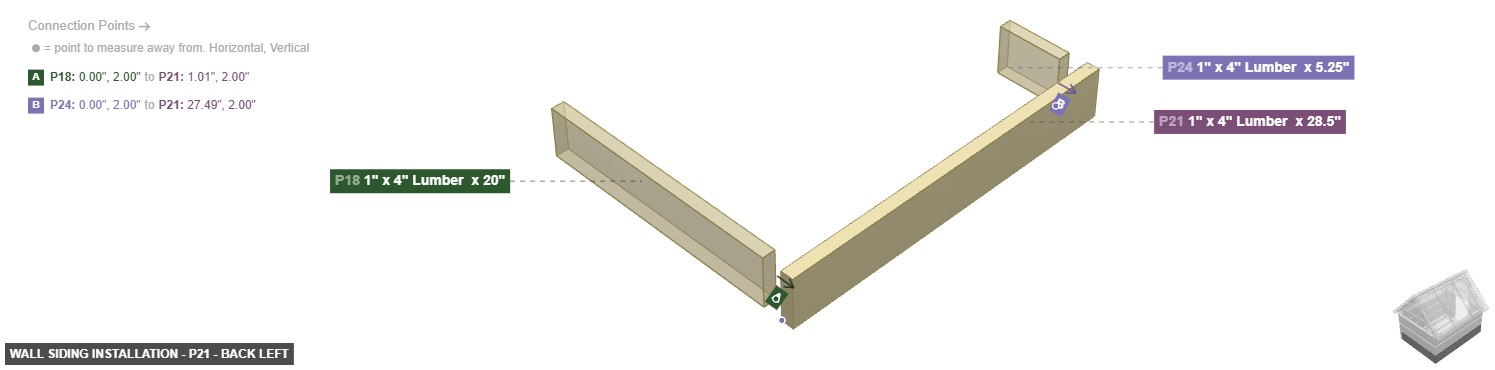
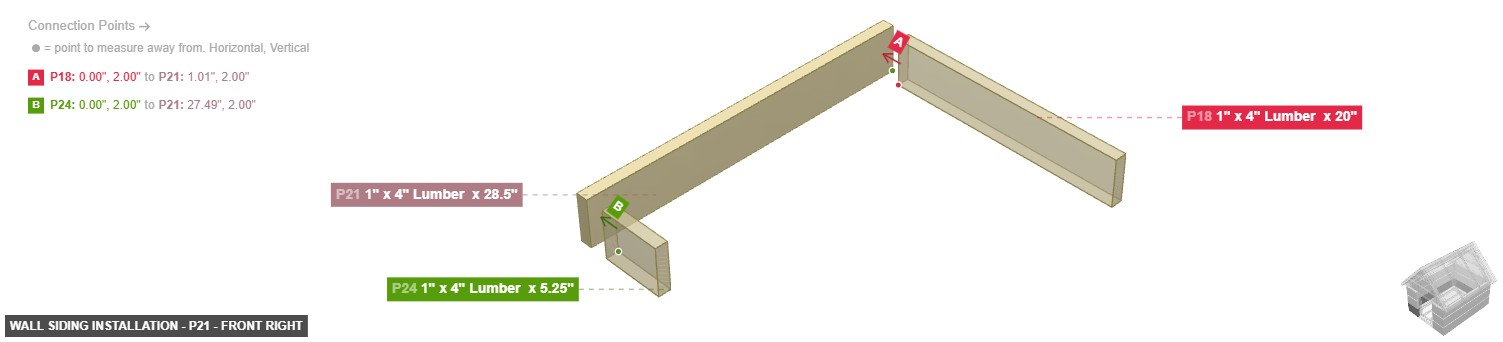
P21 (1" x 4" Lumber 28.5" length) - attach its 1" x 4" Wood Side #2 facing right to part 18's 1" x 4" Wood End #1. Next, ensure its 1" x 4" Wood End #1 faces front, plus its 1" x 4" Wood Side #1 needs to point top. Also, its 1" x 4" Wood Side #3 needs to point bottom. Next, its 1" x 4" Wood Side #4 needs to point left, plus its 1" x 4" Wood End #2 should be directed back
P22 (1" x 4" Lumber 5.25" length) - attach its 1" x 4" Wood Side #2 facing back to part 41's 2" x 2" Wood Side #3, plus connect its 1" x 4" Wood End #2 oriented left links with part 19's 1" x 4" Wood Side #2. Also, its 1" x 4" Wood End #1 should be directed right, also its 1" x 4" Wood Side #1 should be directed top, then its 1" x 4" Wood Side #3 must be oriented bottom. Additionally, its 1" x 4" Wood Side #4 must be oriented front
P23 (1" x 4" Lumber 5.25" length) - attach its 1" x 4" Wood Side #2 facing back to part 41's 2" x 2" Wood Side #3, also connect its 1" x 4" Wood End #2 oriented left links with part 20's 1" x 4" Wood Side #2. Also, ensure its 1" x 4" Wood End #1 faces right, plus ensure its 1" x 4" Wood Side #1 faces top, then its 1" x 4" Wood Side #3 should be directed bottom. Next, its 1" x 4" Wood Side #4 needs to point front
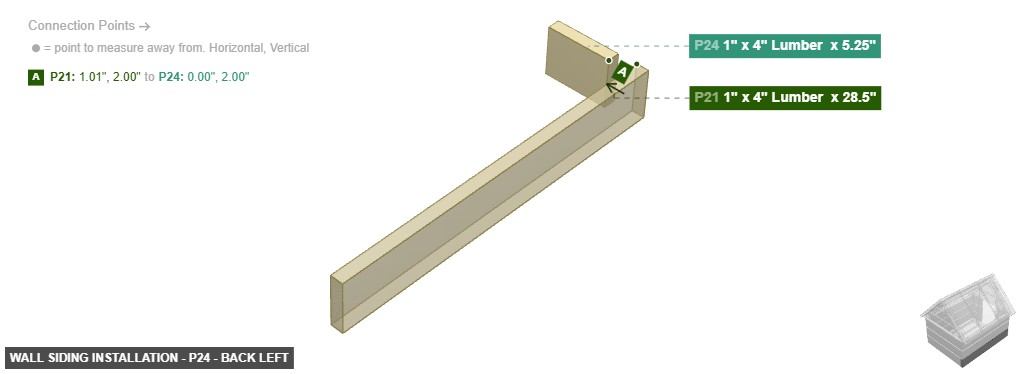
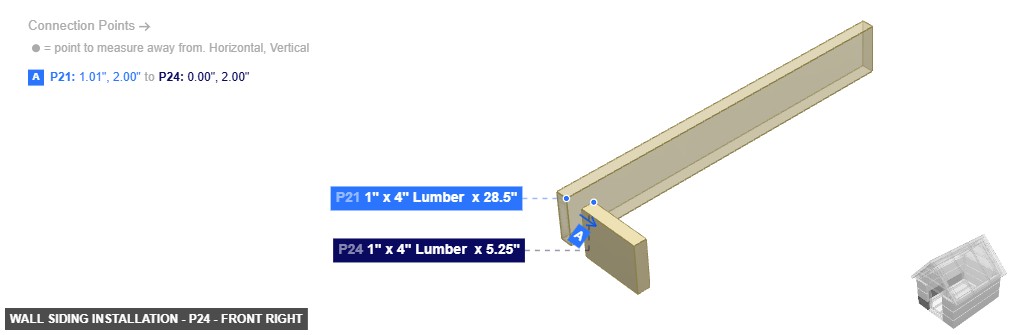
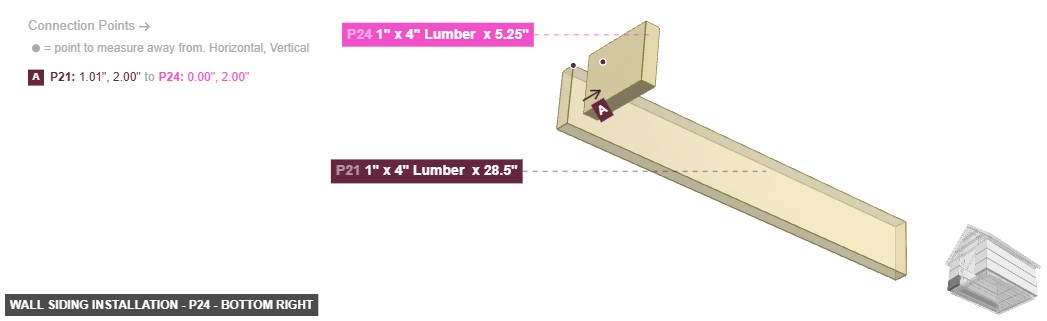
P24 (1" x 4" Lumber 5.25" length) - attach its 1" x 4" Wood Side #2 facing back to part 41's 2" x 2" Wood Side #3. Also, its 1" x 4" Wood End #2, which is left-facing, should connect to part 21's 1" x 4" Wood Side #2, then ensure its 1" x 4" Wood End #1 faces right. After that, ensure its 1" x 4" Wood Side #1 faces top, plus its 1" x 4" Wood Side #3 should be directed bottom, plus its 1" x 4" Wood Side #4 must be oriented front
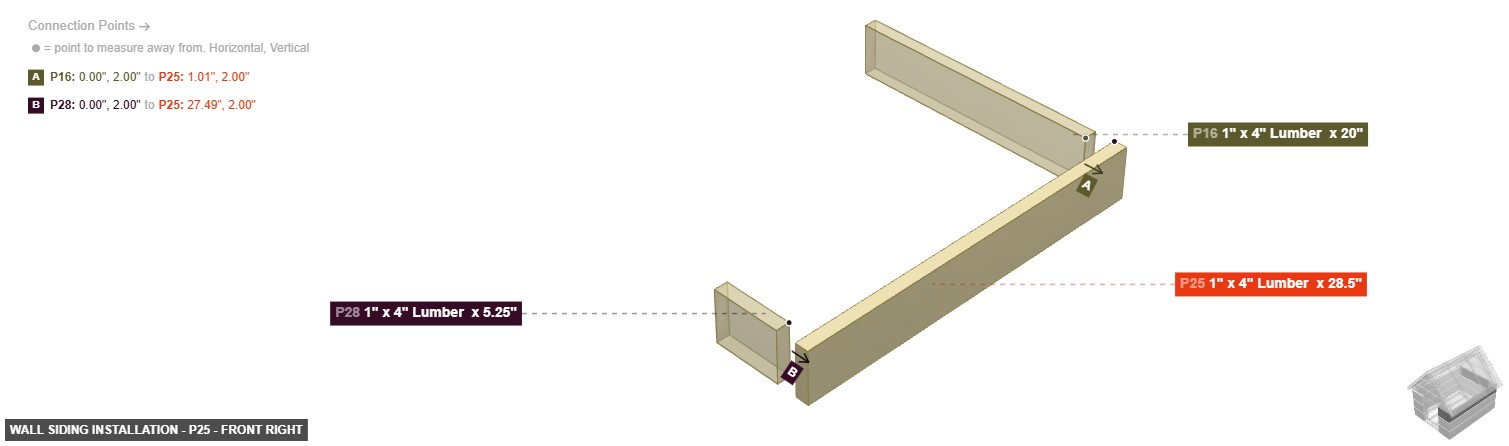
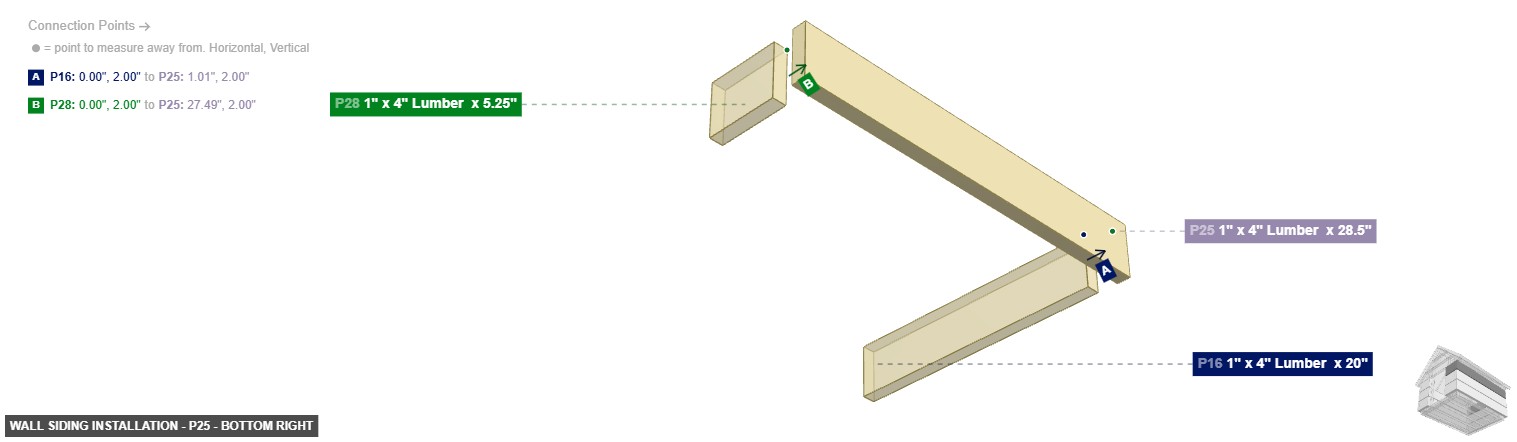
P25 (1" x 4" Lumber 28.5" length) - its 1" x 4" Wood Side #2, which is left-facing, should connect to part 16's 1" x 4" Wood End #2. Additionally, its 1" x 4" Wood End #1 must be oriented front. Additionally, its 1" x 4" Wood Side #1 should be directed bottom, then its 1" x 4" Wood Side #3 should be directed top. After that, its 1" x 4" Wood Side #4 needs to point right, then its 1" x 4" Wood End #2 should be directed back
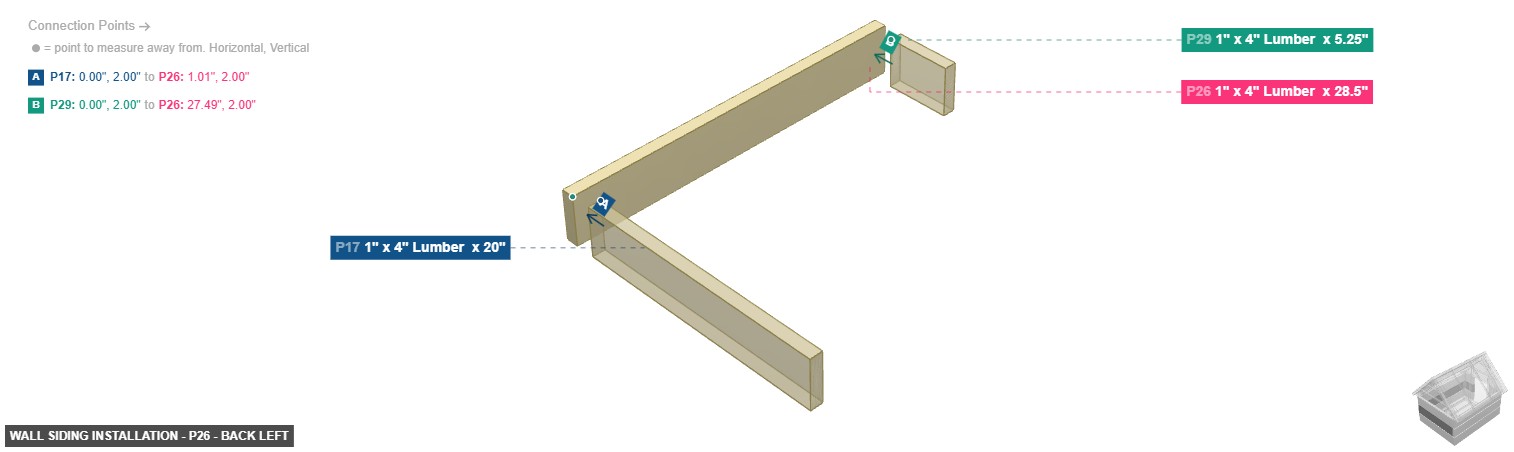
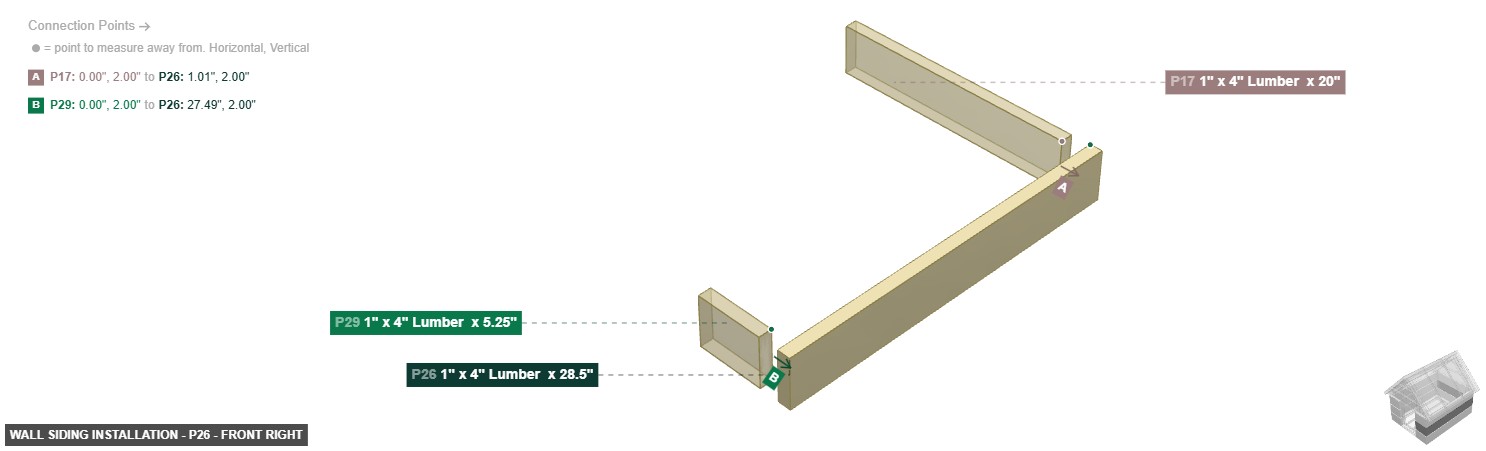
P26 (1" x 4" Lumber 28.5" length) - its 1" x 4" Wood Side #2, which is left-facing, should connect to part 17's 1" x 4" Wood End #2. Next, its 1" x 4" Wood End #1 should be directed front. After that, ensure its 1" x 4" Wood Side #1 faces bottom, and its 1" x 4" Wood Side #3 needs to point top, then ensure its 1" x 4" Wood Side #4 faces right. Additionally, its 1" x 4" Wood End #2 must be oriented back
P27 (1" x 4" Lumber 28.5" length) - attach its 1" x 4" Wood Side #2 facing left to part 18's 1" x 4" Wood End #2, also its 1" x 4" Wood End #1 must be oriented front. After that, its 1" x 4" Wood Side #1 should be directed bottom, and its 1" x 4" Wood Side #3 needs to point top, and ensure its 1" x 4" Wood Side #4 faces right. After that, its 1" x 4" Wood End #2 should be directed back
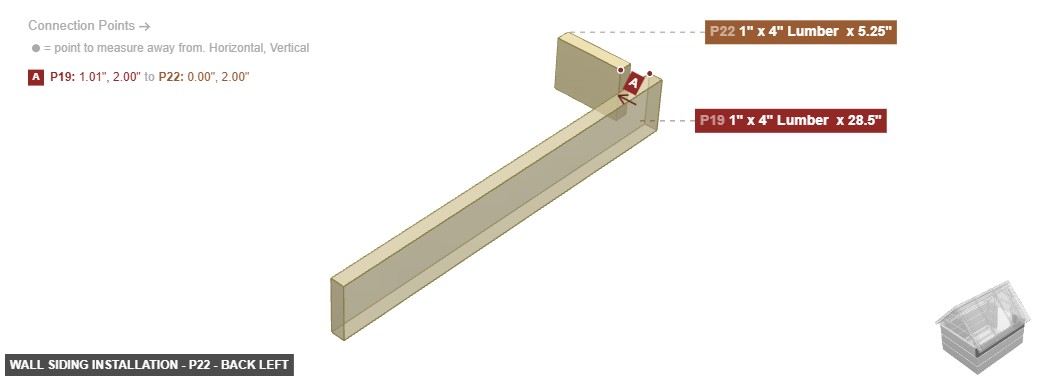
P28 (1" x 4" Lumber 5.25" length) - attach its 1" x 4" Wood Side #2 facing back to part 44's 2" x 2" Wood Side #1. After that, attach its 1" x 4" Wood End #2 facing right to part 25's 1" x 4" Wood Side #2, then its 1" x 4" Wood End #1 needs to point left, plus its 1" x 4" Wood Side #1 should be directed bottom. Also, its 1" x 4" Wood Side #3 must be oriented top, also its 1" x 4" Wood Side #4 needs to point front
P29 (1" x 4" Lumber 5.25" length) - attach its 1" x 4" Wood Side #2 facing back to part 44's 2" x 2" Wood Side #1, plus attach its 1" x 4" Wood End #2 facing right to part 26's 1" x 4" Wood Side #2. Next, its 1" x 4" Wood End #1 needs to point left. Additionally, its 1" x 4" Wood Side #1 needs to point bottom. After that, its 1" x 4" Wood Side #3 should be directed top. Next, its 1" x 4" Wood Side #4 needs to point front
P30 (1" x 4" Lumber 5.25" length) - attach its 1" x 4" Wood Side #2 facing back to part 44's 2" x 2" Wood Side #1. Next, connect its 1" x 4" Wood End #2 oriented right links with part 27's 1" x 4" Wood Side #2, plus ensure its 1" x 4" Wood End #1 faces left, and its 1" x 4" Wood Side #1 must be oriented bottom. Next, ensure its 1" x 4" Wood Side #3 faces top, and its 1" x 4" Wood Side #4 must be oriented front
1" x 4" Lumber x 20"x 3 1" x 4" Lumber x 28.5"x 6 1" x 4" Lumber x 5.25"x 6
Angle: front right
P16 (1" x 4" Lumber 20" length) - attach its 1" x 4" Wood End #1 facing left to part 19's 1" x 4" Wood Side #2. After that, attach its 1" x 4" Wood Side #2 facing front to part 42's 2" x 2" Wood Side #1, also its 1" x 4" Wood End #2, which is right-facing, should connect to part 25's 1" x 4" Wood Side #2. After that, ensure its 1" x 4" Wood Side #1 faces top. Next, its 1" x 4" Wood Side #3 should be directed bottom, also ensure its 1" x 4" Wood Side #4 faces back
P17 (1" x 4" Lumber 20" length) - its 1" x 4" Wood End #1, which is left-facing, should connect to part 20's 1" x 4" Wood Side #2, also attach its 1" x 4" Wood Side #2 facing front to part 42's 2" x 2" Wood Side #1. Also, connect its 1" x 4" Wood End #2 oriented right links with part 26's 1" x 4" Wood Side #2, then its 1" x 4" Wood Side #1 must be oriented top, plus its 1" x 4" Wood Side #3 must be oriented bottom. After that, ensure its 1" x 4" Wood Side #4 faces back
P18 (1" x 4" Lumber 20" length) - connect its 1" x 4" Wood End #1 oriented left links with part 21's 1" x 4" Wood Side #2, then connect its 1" x 4" Wood Side #2 oriented front links with part 42's 2" x 2" Wood Side #1, plus its 1" x 4" Wood End #2, which is right-facing, should connect to part 27's 1" x 4" Wood Side #2, plus ensure its 1" x 4" Wood Side #1 faces top. Also, ensure its 1" x 4" Wood Side #3 faces bottom, then ensure its 1" x 4" Wood Side #4 faces back
P19 (1" x 4" Lumber 28.5" length) - connect its 1" x 4" Wood Side #2 oriented right links with part 16's 1" x 4" Wood End #1. Also, its 1" x 4" Wood End #1 needs to point front. Additionally, ensure its 1" x 4" Wood Side #1 faces top, plus its 1" x 4" Wood Side #3 must be oriented bottom. Next, its 1" x 4" Wood Side #4 should be directed left. After that, its 1" x 4" Wood End #2 needs to point back
P20 (1" x 4" Lumber 28.5" length) - attach its 1" x 4" Wood Side #2 facing right to part 17's 1" x 4" Wood End #1. Additionally, its 1" x 4" Wood End #1 must be oriented front. Next, its 1" x 4" Wood Side #1 should be directed top, then its 1" x 4" Wood Side #3 should be directed bottom, then its 1" x 4" Wood Side #4 should be directed left. After that, its 1" x 4" Wood End #2 should be directed back
P21 (1" x 4" Lumber 28.5" length) - attach its 1" x 4" Wood Side #2 facing right to part 18's 1" x 4" Wood End #1. Next, ensure its 1" x 4" Wood End #1 faces front, plus its 1" x 4" Wood Side #1 needs to point top. Also, its 1" x 4" Wood Side #3 needs to point bottom. Next, its 1" x 4" Wood Side #4 needs to point left, plus its 1" x 4" Wood End #2 should be directed back
P22 (1" x 4" Lumber 5.25" length) - attach its 1" x 4" Wood Side #2 facing back to part 41's 2" x 2" Wood Side #3, plus connect its 1" x 4" Wood End #2 oriented left links with part 19's 1" x 4" Wood Side #2. Also, its 1" x 4" Wood End #1 should be directed right, also its 1" x 4" Wood Side #1 should be directed top, then its 1" x 4" Wood Side #3 must be oriented bottom. Additionally, its 1" x 4" Wood Side #4 must be oriented front
P23 (1" x 4" Lumber 5.25" length) - attach its 1" x 4" Wood Side #2 facing back to part 41's 2" x 2" Wood Side #3, also connect its 1" x 4" Wood End #2 oriented left links with part 20's 1" x 4" Wood Side #2. Also, ensure its 1" x 4" Wood End #1 faces right, plus ensure its 1" x 4" Wood Side #1 faces top, then its 1" x 4" Wood Side #3 should be directed bottom. Next, its 1" x 4" Wood Side #4 needs to point front
P24 (1" x 4" Lumber 5.25" length) - attach its 1" x 4" Wood Side #2 facing back to part 41's 2" x 2" Wood Side #3. Also, its 1" x 4" Wood End #2, which is left-facing, should connect to part 21's 1" x 4" Wood Side #2, then ensure its 1" x 4" Wood End #1 faces right. After that, ensure its 1" x 4" Wood Side #1 faces top, plus its 1" x 4" Wood Side #3 should be directed bottom, plus its 1" x 4" Wood Side #4 must be oriented front
P25 (1" x 4" Lumber 28.5" length) - its 1" x 4" Wood Side #2, which is left-facing, should connect to part 16's 1" x 4" Wood End #2. Additionally, its 1" x 4" Wood End #1 must be oriented front. Additionally, its 1" x 4" Wood Side #1 should be directed bottom, then its 1" x 4" Wood Side #3 should be directed top. After that, its 1" x 4" Wood Side #4 needs to point right, then its 1" x 4" Wood End #2 should be directed back
P26 (1" x 4" Lumber 28.5" length) - its 1" x 4" Wood Side #2, which is left-facing, should connect to part 17's 1" x 4" Wood End #2. Next, its 1" x 4" Wood End #1 should be directed front. After that, ensure its 1" x 4" Wood Side #1 faces bottom, and its 1" x 4" Wood Side #3 needs to point top, then ensure its 1" x 4" Wood Side #4 faces right. Additionally, its 1" x 4" Wood End #2 must be oriented back
P27 (1" x 4" Lumber 28.5" length) - attach its 1" x 4" Wood Side #2 facing left to part 18's 1" x 4" Wood End #2, also its 1" x 4" Wood End #1 must be oriented front. After that, its 1" x 4" Wood Side #1 should be directed bottom, and its 1" x 4" Wood Side #3 needs to point top, and ensure its 1" x 4" Wood Side #4 faces right. After that, its 1" x 4" Wood End #2 should be directed back
P28 (1" x 4" Lumber 5.25" length) - attach its 1" x 4" Wood Side #2 facing back to part 44's 2" x 2" Wood Side #1. After that, attach its 1" x 4" Wood End #2 facing right to part 25's 1" x 4" Wood Side #2, then its 1" x 4" Wood End #1 needs to point left, plus its 1" x 4" Wood Side #1 should be directed bottom. Also, its 1" x 4" Wood Side #3 must be oriented top, also its 1" x 4" Wood Side #4 needs to point front
P29 (1" x 4" Lumber 5.25" length) - attach its 1" x 4" Wood Side #2 facing back to part 44's 2" x 2" Wood Side #1, plus attach its 1" x 4" Wood End #2 facing right to part 26's 1" x 4" Wood Side #2. Next, its 1" x 4" Wood End #1 needs to point left. Additionally, its 1" x 4" Wood Side #1 needs to point bottom. After that, its 1" x 4" Wood Side #3 should be directed top. Next, its 1" x 4" Wood Side #4 needs to point front
P30 (1" x 4" Lumber 5.25" length) - attach its 1" x 4" Wood Side #2 facing back to part 44's 2" x 2" Wood Side #1. Next, connect its 1" x 4" Wood End #2 oriented right links with part 27's 1" x 4" Wood Side #2, plus ensure its 1" x 4" Wood End #1 faces left, and its 1" x 4" Wood Side #1 must be oriented bottom. Next, ensure its 1" x 4" Wood Side #3 faces top, and its 1" x 4" Wood Side #4 must be oriented front
1" x 4" Lumber x 20"x 3 1" x 4" Lumber x 28.5"x 6 1" x 4" Lumber x 5.25"x 6
Angle: bottom right
P16 (1" x 4" Lumber 20" length) - attach its 1" x 4" Wood End #1 facing left to part 19's 1" x 4" Wood Side #2. After that, attach its 1" x 4" Wood Side #2 facing front to part 42's 2" x 2" Wood Side #1, also its 1" x 4" Wood End #2, which is right-facing, should connect to part 25's 1" x 4" Wood Side #2. After that, ensure its 1" x 4" Wood Side #1 faces top. Next, its 1" x 4" Wood Side #3 should be directed bottom, also ensure its 1" x 4" Wood Side #4 faces back
P17 (1" x 4" Lumber 20" length) - its 1" x 4" Wood End #1, which is left-facing, should connect to part 20's 1" x 4" Wood Side #2, also attach its 1" x 4" Wood Side #2 facing front to part 42's 2" x 2" Wood Side #1. Also, connect its 1" x 4" Wood End #2 oriented right links with part 26's 1" x 4" Wood Side #2, then its 1" x 4" Wood Side #1 must be oriented top, plus its 1" x 4" Wood Side #3 must be oriented bottom. After that, ensure its 1" x 4" Wood Side #4 faces back
P18 (1" x 4" Lumber 20" length) - connect its 1" x 4" Wood End #1 oriented left links with part 21's 1" x 4" Wood Side #2, then connect its 1" x 4" Wood Side #2 oriented front links with part 42's 2" x 2" Wood Side #1, plus its 1" x 4" Wood End #2, which is right-facing, should connect to part 27's 1" x 4" Wood Side #2, plus ensure its 1" x 4" Wood Side #1 faces top. Also, ensure its 1" x 4" Wood Side #3 faces bottom, then ensure its 1" x 4" Wood Side #4 faces back
P19 (1" x 4" Lumber 28.5" length) - connect its 1" x 4" Wood Side #2 oriented right links with part 16's 1" x 4" Wood End #1. Also, its 1" x 4" Wood End #1 needs to point front. Additionally, ensure its 1" x 4" Wood Side #1 faces top, plus its 1" x 4" Wood Side #3 must be oriented bottom. Next, its 1" x 4" Wood Side #4 should be directed left. After that, its 1" x 4" Wood End #2 needs to point back
P20 (1" x 4" Lumber 28.5" length) - attach its 1" x 4" Wood Side #2 facing right to part 17's 1" x 4" Wood End #1. Additionally, its 1" x 4" Wood End #1 must be oriented front. Next, its 1" x 4" Wood Side #1 should be directed top, then its 1" x 4" Wood Side #3 should be directed bottom, then its 1" x 4" Wood Side #4 should be directed left. After that, its 1" x 4" Wood End #2 should be directed back
P21 (1" x 4" Lumber 28.5" length) - attach its 1" x 4" Wood Side #2 facing right to part 18's 1" x 4" Wood End #1. Next, ensure its 1" x 4" Wood End #1 faces front, plus its 1" x 4" Wood Side #1 needs to point top. Also, its 1" x 4" Wood Side #3 needs to point bottom. Next, its 1" x 4" Wood Side #4 needs to point left, plus its 1" x 4" Wood End #2 should be directed back
P22 (1" x 4" Lumber 5.25" length) - attach its 1" x 4" Wood Side #2 facing back to part 41's 2" x 2" Wood Side #3, plus connect its 1" x 4" Wood End #2 oriented left links with part 19's 1" x 4" Wood Side #2. Also, its 1" x 4" Wood End #1 should be directed right, also its 1" x 4" Wood Side #1 should be directed top, then its 1" x 4" Wood Side #3 must be oriented bottom. Additionally, its 1" x 4" Wood Side #4 must be oriented front
P23 (1" x 4" Lumber 5.25" length) - attach its 1" x 4" Wood Side #2 facing back to part 41's 2" x 2" Wood Side #3, also connect its 1" x 4" Wood End #2 oriented left links with part 20's 1" x 4" Wood Side #2. Also, ensure its 1" x 4" Wood End #1 faces right, plus ensure its 1" x 4" Wood Side #1 faces top, then its 1" x 4" Wood Side #3 should be directed bottom. Next, its 1" x 4" Wood Side #4 needs to point front
P24 (1" x 4" Lumber 5.25" length) - attach its 1" x 4" Wood Side #2 facing back to part 41's 2" x 2" Wood Side #3. Also, its 1" x 4" Wood End #2, which is left-facing, should connect to part 21's 1" x 4" Wood Side #2, then ensure its 1" x 4" Wood End #1 faces right. After that, ensure its 1" x 4" Wood Side #1 faces top, plus its 1" x 4" Wood Side #3 should be directed bottom, plus its 1" x 4" Wood Side #4 must be oriented front
P25 (1" x 4" Lumber 28.5" length) - its 1" x 4" Wood Side #2, which is left-facing, should connect to part 16's 1" x 4" Wood End #2. Additionally, its 1" x 4" Wood End #1 must be oriented front. Additionally, its 1" x 4" Wood Side #1 should be directed bottom, then its 1" x 4" Wood Side #3 should be directed top. After that, its 1" x 4" Wood Side #4 needs to point right, then its 1" x 4" Wood End #2 should be directed back
P26 (1" x 4" Lumber 28.5" length) - its 1" x 4" Wood Side #2, which is left-facing, should connect to part 17's 1" x 4" Wood End #2. Next, its 1" x 4" Wood End #1 should be directed front. After that, ensure its 1" x 4" Wood Side #1 faces bottom, and its 1" x 4" Wood Side #3 needs to point top, then ensure its 1" x 4" Wood Side #4 faces right. Additionally, its 1" x 4" Wood End #2 must be oriented back
P27 (1" x 4" Lumber 28.5" length) - attach its 1" x 4" Wood Side #2 facing left to part 18's 1" x 4" Wood End #2, also its 1" x 4" Wood End #1 must be oriented front. After that, its 1" x 4" Wood Side #1 should be directed bottom, and its 1" x 4" Wood Side #3 needs to point top, and ensure its 1" x 4" Wood Side #4 faces right. After that, its 1" x 4" Wood End #2 should be directed back
P28 (1" x 4" Lumber 5.25" length) - attach its 1" x 4" Wood Side #2 facing back to part 44's 2" x 2" Wood Side #1. After that, attach its 1" x 4" Wood End #2 facing right to part 25's 1" x 4" Wood Side #2, then its 1" x 4" Wood End #1 needs to point left, plus its 1" x 4" Wood Side #1 should be directed bottom. Also, its 1" x 4" Wood Side #3 must be oriented top, also its 1" x 4" Wood Side #4 needs to point front
P29 (1" x 4" Lumber 5.25" length) - attach its 1" x 4" Wood Side #2 facing back to part 44's 2" x 2" Wood Side #1, plus attach its 1" x 4" Wood End #2 facing right to part 26's 1" x 4" Wood Side #2. Next, its 1" x 4" Wood End #1 needs to point left. Additionally, its 1" x 4" Wood Side #1 needs to point bottom. After that, its 1" x 4" Wood Side #3 should be directed top. Next, its 1" x 4" Wood Side #4 needs to point front
P30 (1" x 4" Lumber 5.25" length) - attach its 1" x 4" Wood Side #2 facing back to part 44's 2" x 2" Wood Side #1. Next, connect its 1" x 4" Wood End #2 oriented right links with part 27's 1" x 4" Wood Side #2, plus ensure its 1" x 4" Wood End #1 faces left, and its 1" x 4" Wood Side #1 must be oriented bottom. Next, ensure its 1" x 4" Wood Side #3 faces top, and its 1" x 4" Wood Side #4 must be oriented front
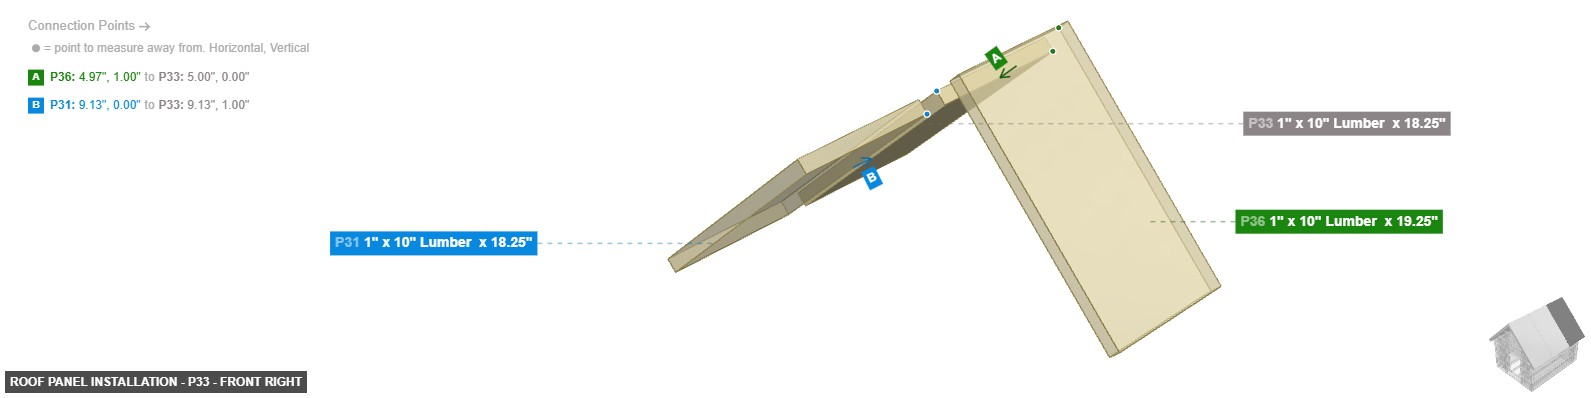
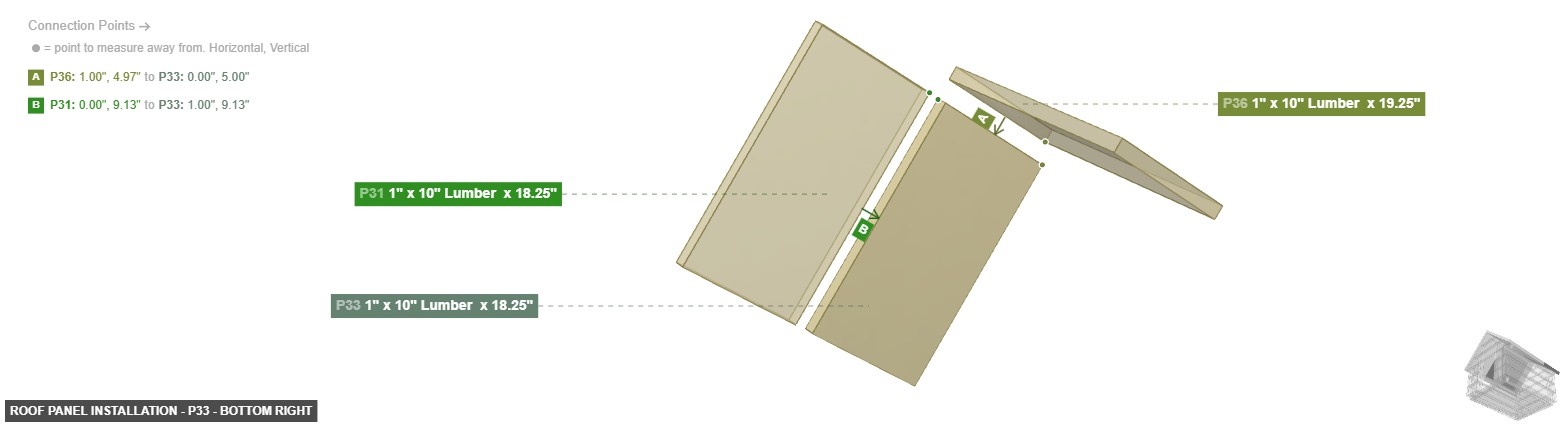
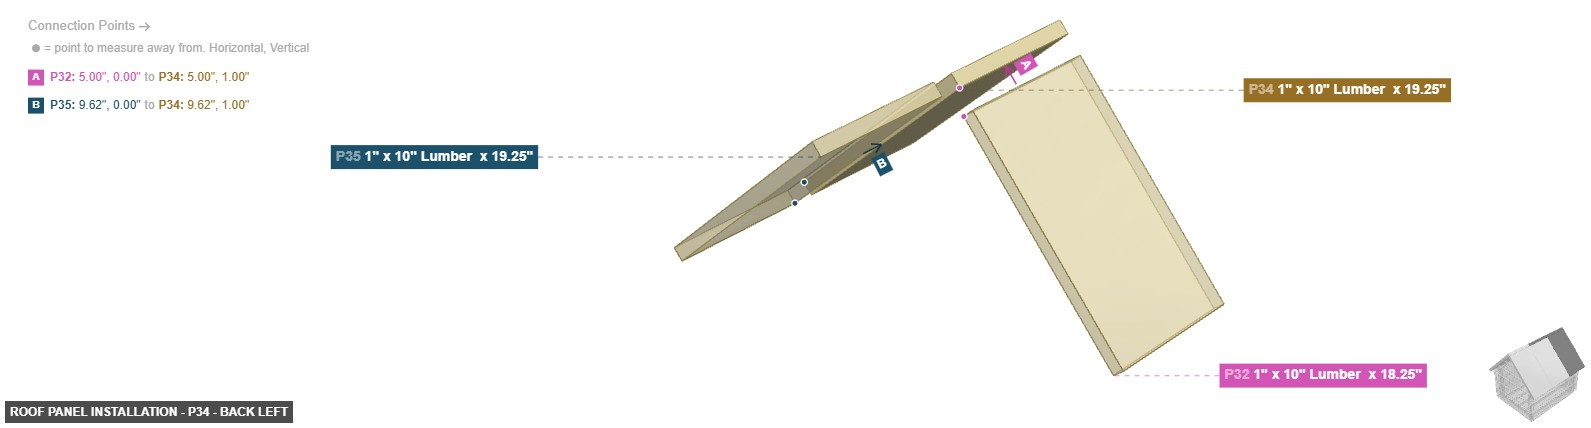
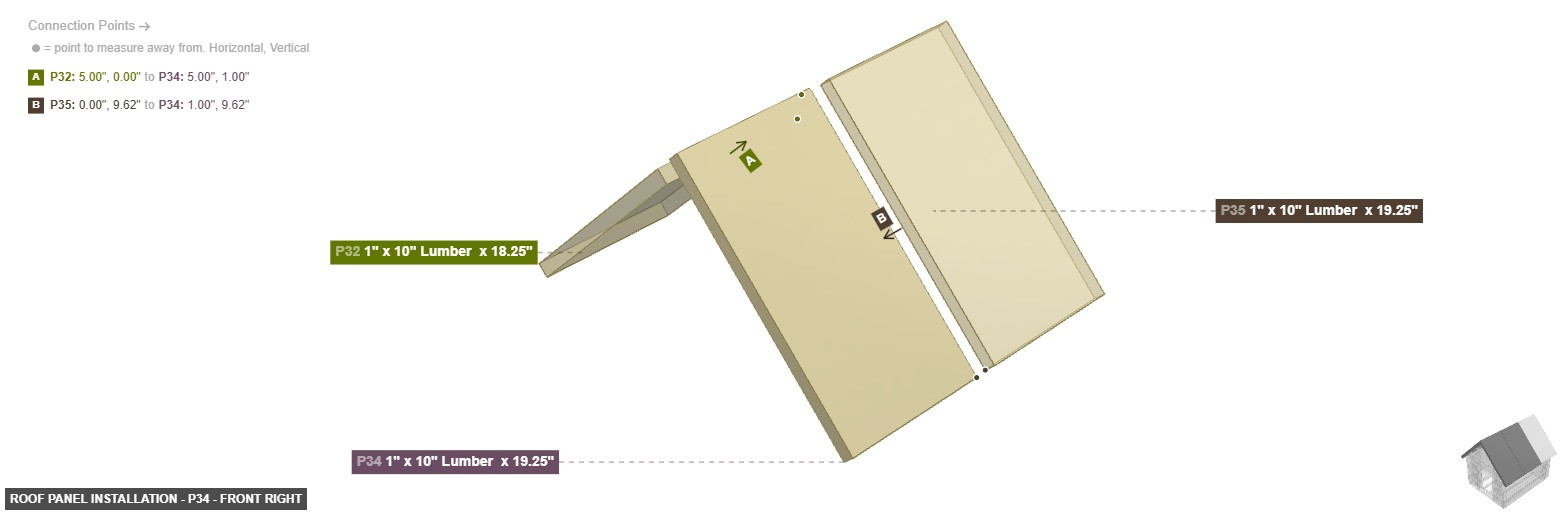
1" x 4" Lumber x 20"x 3 1" x 4" Lumber x 28.5"x 6 1" x 4" Lumber x 5.25"x 6 Attaching: Roof Panel Installation
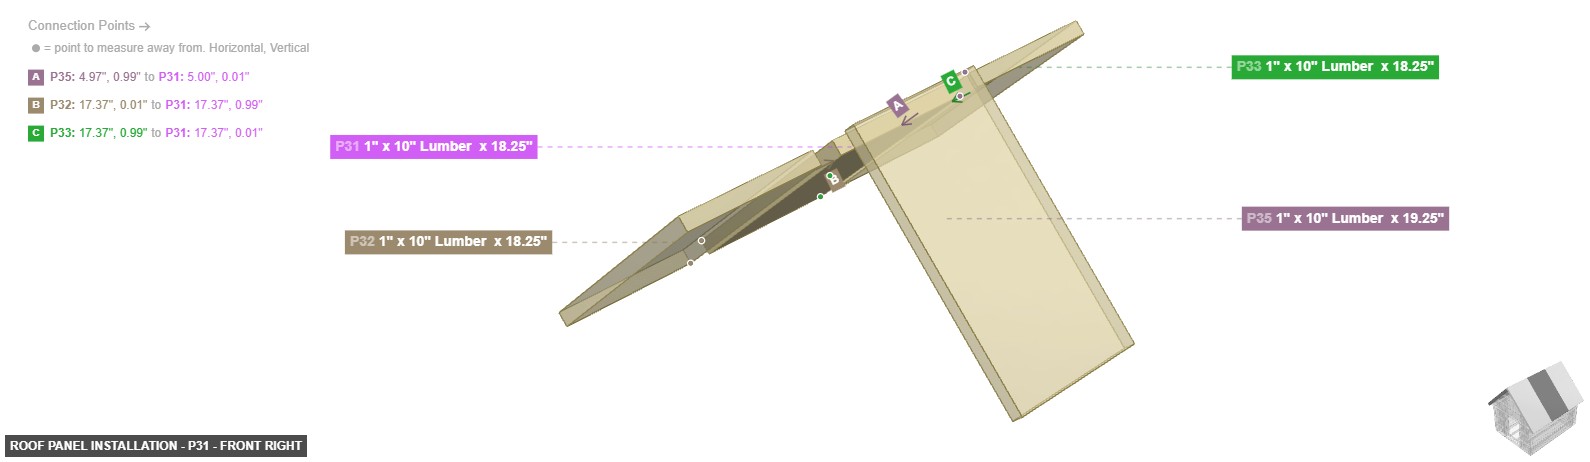
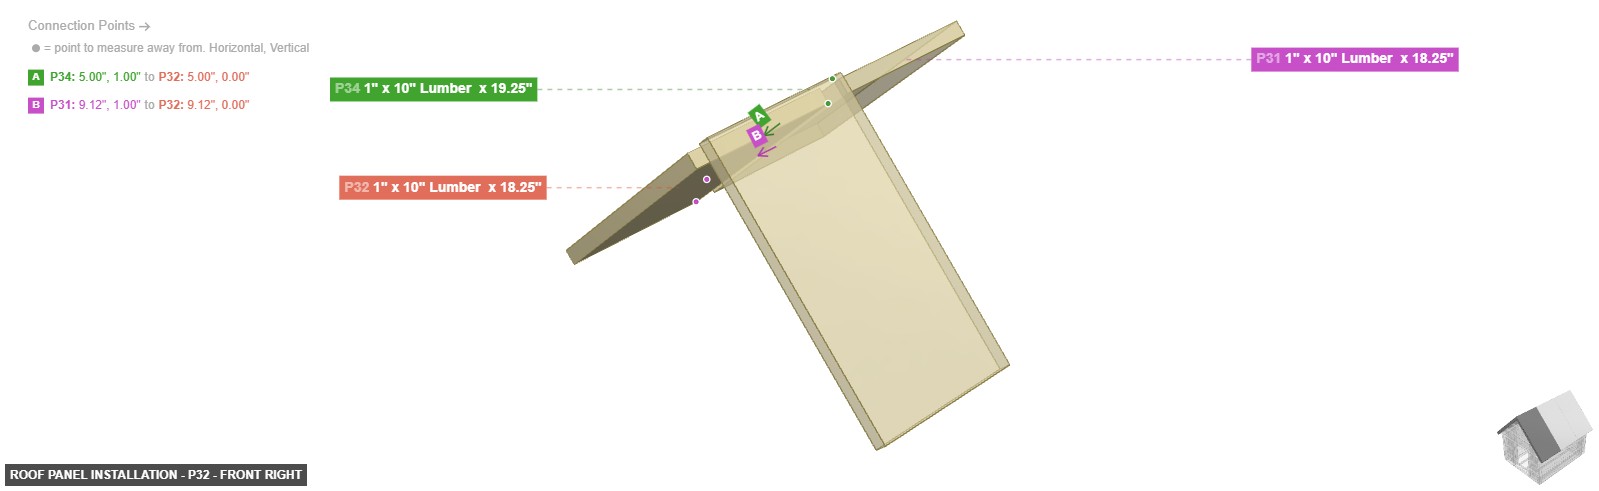
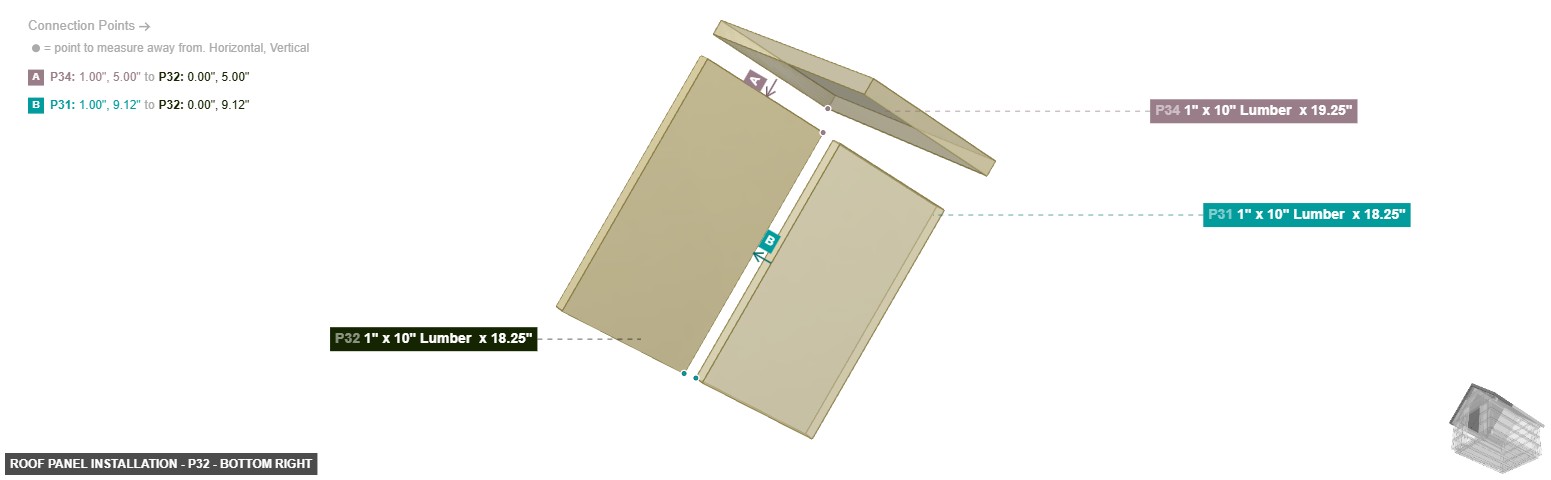
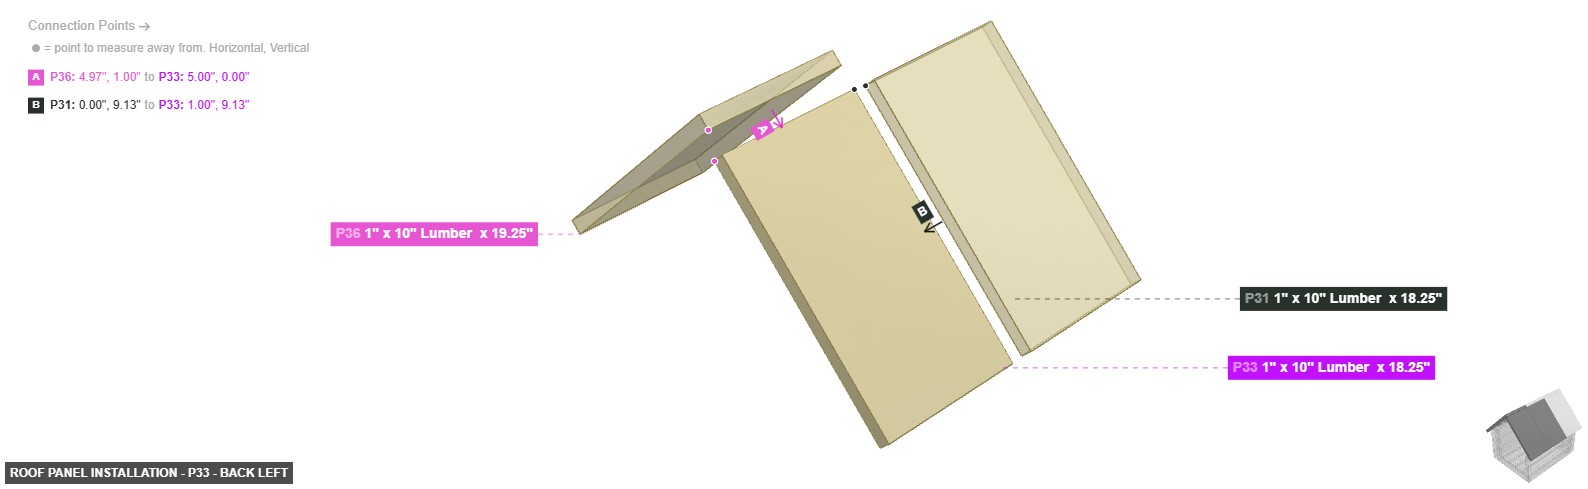
To install the main panels forming the roof surface.
The roof panels are installed onto the Upper Frame (Group 4), enclosing the top of the dog house.
Angle: back left
P31 (1" x 10" Lumber 18.25" length) - its 1" x 10" Wood Side #1, which is front-facing, should connect to part 32's 1" x 10" Wood Side #3, then its 1" x 10" Wood Side #2, which is right-bottom-facing, should connect to part 11's 2" x 2" Wood Side #4, then attach its 1" x 10" Wood Side #3 facing back to part 33's 1" x 10" Wood Side #1. Next, its 1" x 10" Wood End #2, which is right-top-facing, should connect to part 35's 1" x 10" Wood Side #2. Additionally, its 1" x 10" Wood End #1 needs to point left-bottom. After that, its 1" x 10" Wood Side #4 needs to point left-top
P32 (1" x 10" Lumber 18.25" length) - attach its 1" x 10" Wood Side #2 facing right-bottom to part 11's 2" x 2" Wood Side #4, and its 1" x 10" Wood Side #3, which is back-facing, should connect to part 31's 1" x 10" Wood Side #1, plus attach its 1" x 10" Wood End #2 facing right-top to part 34's 1" x 10" Wood Side #2. Additionally, ensure its 1" x 10" Wood End #1 faces left-bottom, also its 1" x 10" Wood Side #1 should be directed front, also its 1" x 10" Wood Side #4 needs to point left-top
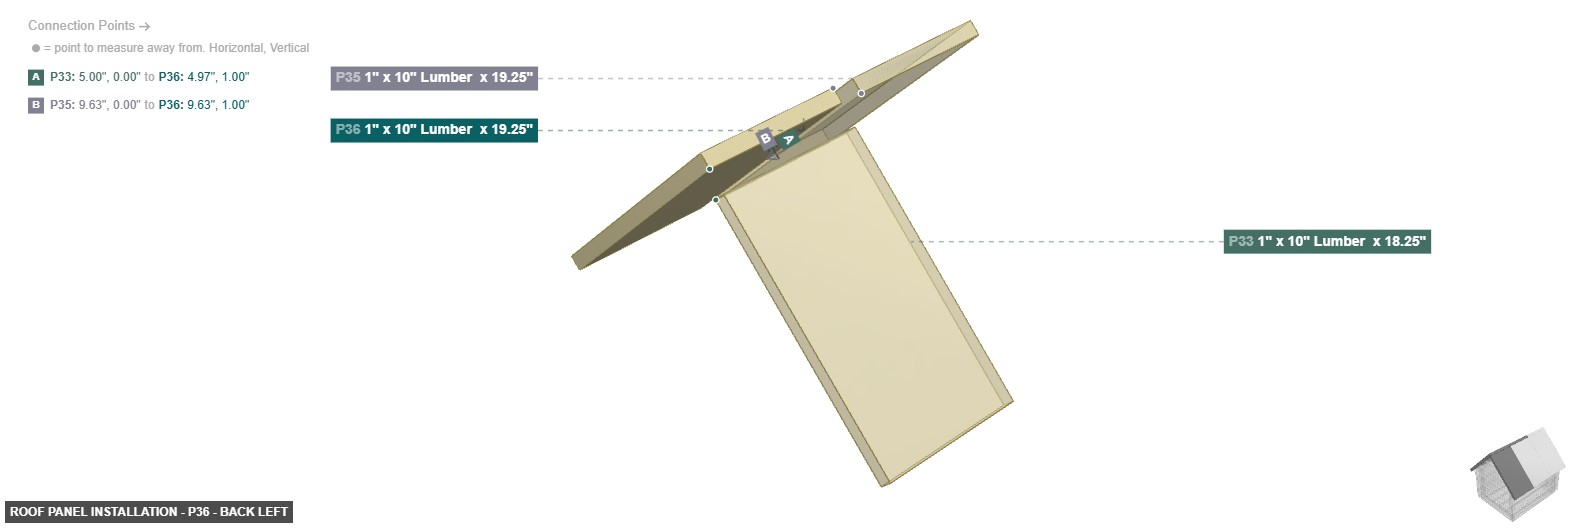
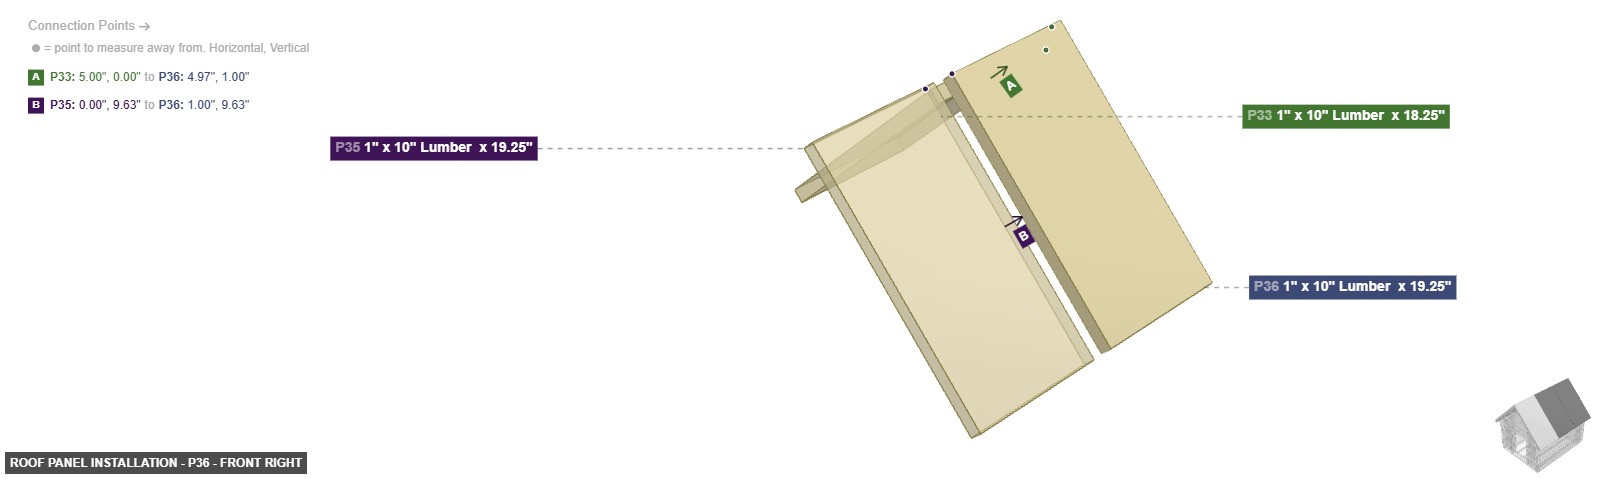
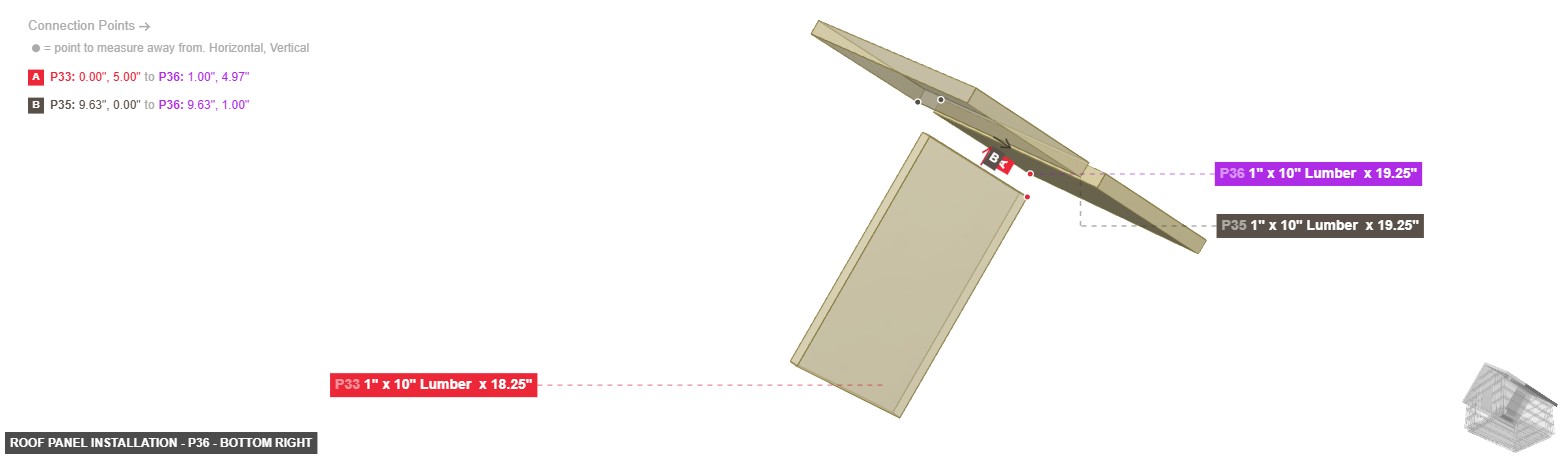
P33 (1" x 10" Lumber 18.25" length) - its 1" x 10" Wood Side #1, which is front-facing, should connect to part 31's 1" x 10" Wood Side #3, and attach its 1" x 10" Wood Side #2 facing right-bottom to part 11's 2" x 2" Wood Side #4, plus connect its 1" x 10" Wood End #2 oriented right-top links with part 36's 1" x 10" Wood Side #2, plus ensure its 1" x 10" Wood End #1 faces left-bottom, then its 1" x 10" Wood Side #3 needs to point back, and its 1" x 10" Wood Side #4 should be directed left-top
P34 (1" x 10" Lumber 19.25" length) - attach its 1" x 10" Wood Side #1 facing back to part 35's 1" x 10" Wood Side #3, plus attach its 1" x 10" Wood Side #2 facing left-bottom to part 32's 1" x 10" Wood End #2, also its 1" x 10" Wood End #1 should be directed right-bottom, also its 1" x 10" Wood Side #3 should be directed front, and its 1" x 10" Wood Side #4 should be directed right-top. Also, its 1" x 10" Wood End #2 needs to point left-top
P35 (1" x 10" Lumber 19.25" length) - attach its 1" x 10" Wood Side #1 facing back to part 36's 1" x 10" Wood Side #3. Next, its 1" x 10" Wood Side #2, which is left-bottom-facing, should connect to part 31's 1" x 10" Wood End #2. Additionally, connect its 1" x 10" Wood Side #3 oriented front links with part 34's 1" x 10" Wood Side #1, plus its 1" x 10" Wood End #1 should be directed right-bottom, also its 1" x 10" Wood Side #4 needs to point right-top, plus its 1" x 10" Wood End #2 needs to point left-top
P36 (1" x 10" Lumber 19.25" length) - its 1" x 10" Wood Side #2, which is left-bottom-facing, should connect to part 33's 1" x 10" Wood End #2. Additionally, attach its 1" x 10" Wood Side #3 facing front to part 35's 1" x 10" Wood Side #1. Additionally, its 1" x 10" Wood End #1 needs to point right-bottom. Next, its 1" x 10" Wood Side #1 should be directed back, plus its 1" x 10" Wood Side #4 should be directed right-top. Also, ensure its 1" x 10" Wood End #2 faces left-top
1" x 10" Lumber x 18.25"x 3 1" x 10" Lumber x 19.25"x 3
Angle: front right
P31 (1" x 10" Lumber 18.25" length) - its 1" x 10" Wood Side #1, which is front-facing, should connect to part 32's 1" x 10" Wood Side #3, then its 1" x 10" Wood Side #2, which is right-bottom-facing, should connect to part 11's 2" x 2" Wood Side #4, then attach its 1" x 10" Wood Side #3 facing back to part 33's 1" x 10" Wood Side #1. Next, its 1" x 10" Wood End #2, which is right-top-facing, should connect to part 35's 1" x 10" Wood Side #2. Additionally, its 1" x 10" Wood End #1 needs to point left-bottom. After that, its 1" x 10" Wood Side #4 needs to point left-top
P32 (1" x 10" Lumber 18.25" length) - attach its 1" x 10" Wood Side #2 facing right-bottom to part 11's 2" x 2" Wood Side #4, and its 1" x 10" Wood Side #3, which is back-facing, should connect to part 31's 1" x 10" Wood Side #1, plus attach its 1" x 10" Wood End #2 facing right-top to part 34's 1" x 10" Wood Side #2. Additionally, ensure its 1" x 10" Wood End #1 faces left-bottom, also its 1" x 10" Wood Side #1 should be directed front, also its 1" x 10" Wood Side #4 needs to point left-top
P33 (1" x 10" Lumber 18.25" length) - its 1" x 10" Wood Side #1, which is front-facing, should connect to part 31's 1" x 10" Wood Side #3, and attach its 1" x 10" Wood Side #2 facing right-bottom to part 11's 2" x 2" Wood Side #4, plus connect its 1" x 10" Wood End #2 oriented right-top links with part 36's 1" x 10" Wood Side #2, plus ensure its 1" x 10" Wood End #1 faces left-bottom, then its 1" x 10" Wood Side #3 needs to point back, and its 1" x 10" Wood Side #4 should be directed left-top
P34 (1" x 10" Lumber 19.25" length) - attach its 1" x 10" Wood Side #1 facing back to part 35's 1" x 10" Wood Side #3, plus attach its 1" x 10" Wood Side #2 facing left-bottom to part 32's 1" x 10" Wood End #2, also its 1" x 10" Wood End #1 should be directed right-bottom, also its 1" x 10" Wood Side #3 should be directed front, and its 1" x 10" Wood Side #4 should be directed right-top. Also, its 1" x 10" Wood End #2 needs to point left-top
P35 (1" x 10" Lumber 19.25" length) - attach its 1" x 10" Wood Side #1 facing back to part 36's 1" x 10" Wood Side #3. Next, its 1" x 10" Wood Side #2, which is left-bottom-facing, should connect to part 31's 1" x 10" Wood End #2. Additionally, connect its 1" x 10" Wood Side #3 oriented front links with part 34's 1" x 10" Wood Side #1, plus its 1" x 10" Wood End #1 should be directed right-bottom, also its 1" x 10" Wood Side #4 needs to point right-top, plus its 1" x 10" Wood End #2 needs to point left-top
P36 (1" x 10" Lumber 19.25" length) - its 1" x 10" Wood Side #2, which is left-bottom-facing, should connect to part 33's 1" x 10" Wood End #2. Additionally, attach its 1" x 10" Wood Side #3 facing front to part 35's 1" x 10" Wood Side #1. Additionally, its 1" x 10" Wood End #1 needs to point right-bottom. Next, its 1" x 10" Wood Side #1 should be directed back, plus its 1" x 10" Wood Side #4 should be directed right-top. Also, ensure its 1" x 10" Wood End #2 faces left-top
1" x 10" Lumber x 18.25"x 3 1" x 10" Lumber x 19.25"x 3
Angle: bottom right
P31 (1" x 10" Lumber 18.25" length) - its 1" x 10" Wood Side #1, which is front-facing, should connect to part 32's 1" x 10" Wood Side #3, then its 1" x 10" Wood Side #2, which is right-bottom-facing, should connect to part 11's 2" x 2" Wood Side #4, then attach its 1" x 10" Wood Side #3 facing back to part 33's 1" x 10" Wood Side #1. Next, its 1" x 10" Wood End #2, which is right-top-facing, should connect to part 35's 1" x 10" Wood Side #2. Additionally, its 1" x 10" Wood End #1 needs to point left-bottom. After that, its 1" x 10" Wood Side #4 needs to point left-top
P32 (1" x 10" Lumber 18.25" length) - attach its 1" x 10" Wood Side #2 facing right-bottom to part 11's 2" x 2" Wood Side #4, and its 1" x 10" Wood Side #3, which is back-facing, should connect to part 31's 1" x 10" Wood Side #1, plus attach its 1" x 10" Wood End #2 facing right-top to part 34's 1" x 10" Wood Side #2. Additionally, ensure its 1" x 10" Wood End #1 faces left-bottom, also its 1" x 10" Wood Side #1 should be directed front, also its 1" x 10" Wood Side #4 needs to point left-top
P33 (1" x 10" Lumber 18.25" length) - its 1" x 10" Wood Side #1, which is front-facing, should connect to part 31's 1" x 10" Wood Side #3, and attach its 1" x 10" Wood Side #2 facing right-bottom to part 11's 2" x 2" Wood Side #4, plus connect its 1" x 10" Wood End #2 oriented right-top links with part 36's 1" x 10" Wood Side #2, plus ensure its 1" x 10" Wood End #1 faces left-bottom, then its 1" x 10" Wood Side #3 needs to point back, and its 1" x 10" Wood Side #4 should be directed left-top
P34 (1" x 10" Lumber 19.25" length) - attach its 1" x 10" Wood Side #1 facing back to part 35's 1" x 10" Wood Side #3, plus attach its 1" x 10" Wood Side #2 facing left-bottom to part 32's 1" x 10" Wood End #2, also its 1" x 10" Wood End #1 should be directed right-bottom, also its 1" x 10" Wood Side #3 should be directed front, and its 1" x 10" Wood Side #4 should be directed right-top. Also, its 1" x 10" Wood End #2 needs to point left-top
P35 (1" x 10" Lumber 19.25" length) - attach its 1" x 10" Wood Side #1 facing back to part 36's 1" x 10" Wood Side #3. Next, its 1" x 10" Wood Side #2, which is left-bottom-facing, should connect to part 31's 1" x 10" Wood End #2. Additionally, connect its 1" x 10" Wood Side #3 oriented front links with part 34's 1" x 10" Wood Side #1, plus its 1" x 10" Wood End #1 should be directed right-bottom, also its 1" x 10" Wood Side #4 needs to point right-top, plus its 1" x 10" Wood End #2 needs to point left-top
P36 (1" x 10" Lumber 19.25" length) - its 1" x 10" Wood Side #2, which is left-bottom-facing, should connect to part 33's 1" x 10" Wood End #2. Additionally, attach its 1" x 10" Wood Side #3 facing front to part 35's 1" x 10" Wood Side #1. Additionally, its 1" x 10" Wood End #1 needs to point right-bottom. Next, its 1" x 10" Wood Side #1 should be directed back, plus its 1" x 10" Wood Side #4 should be directed right-top. Also, ensure its 1" x 10" Wood End #2 faces left-top
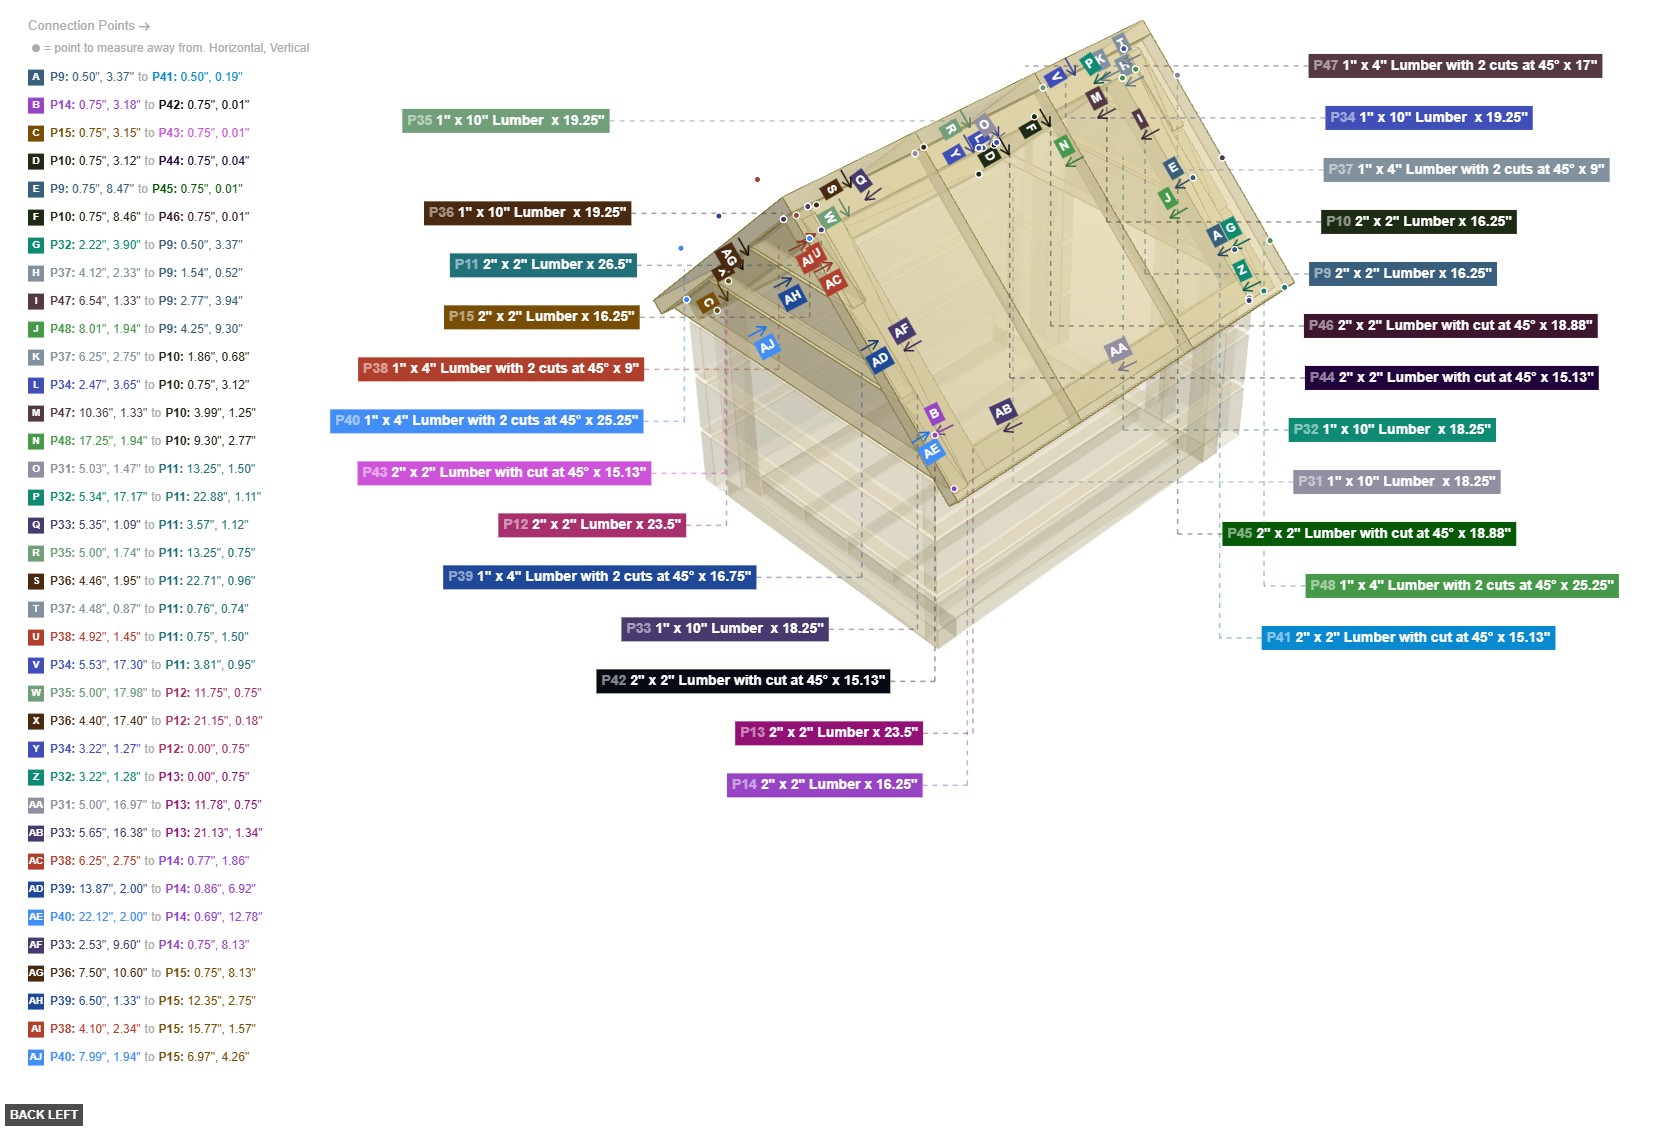
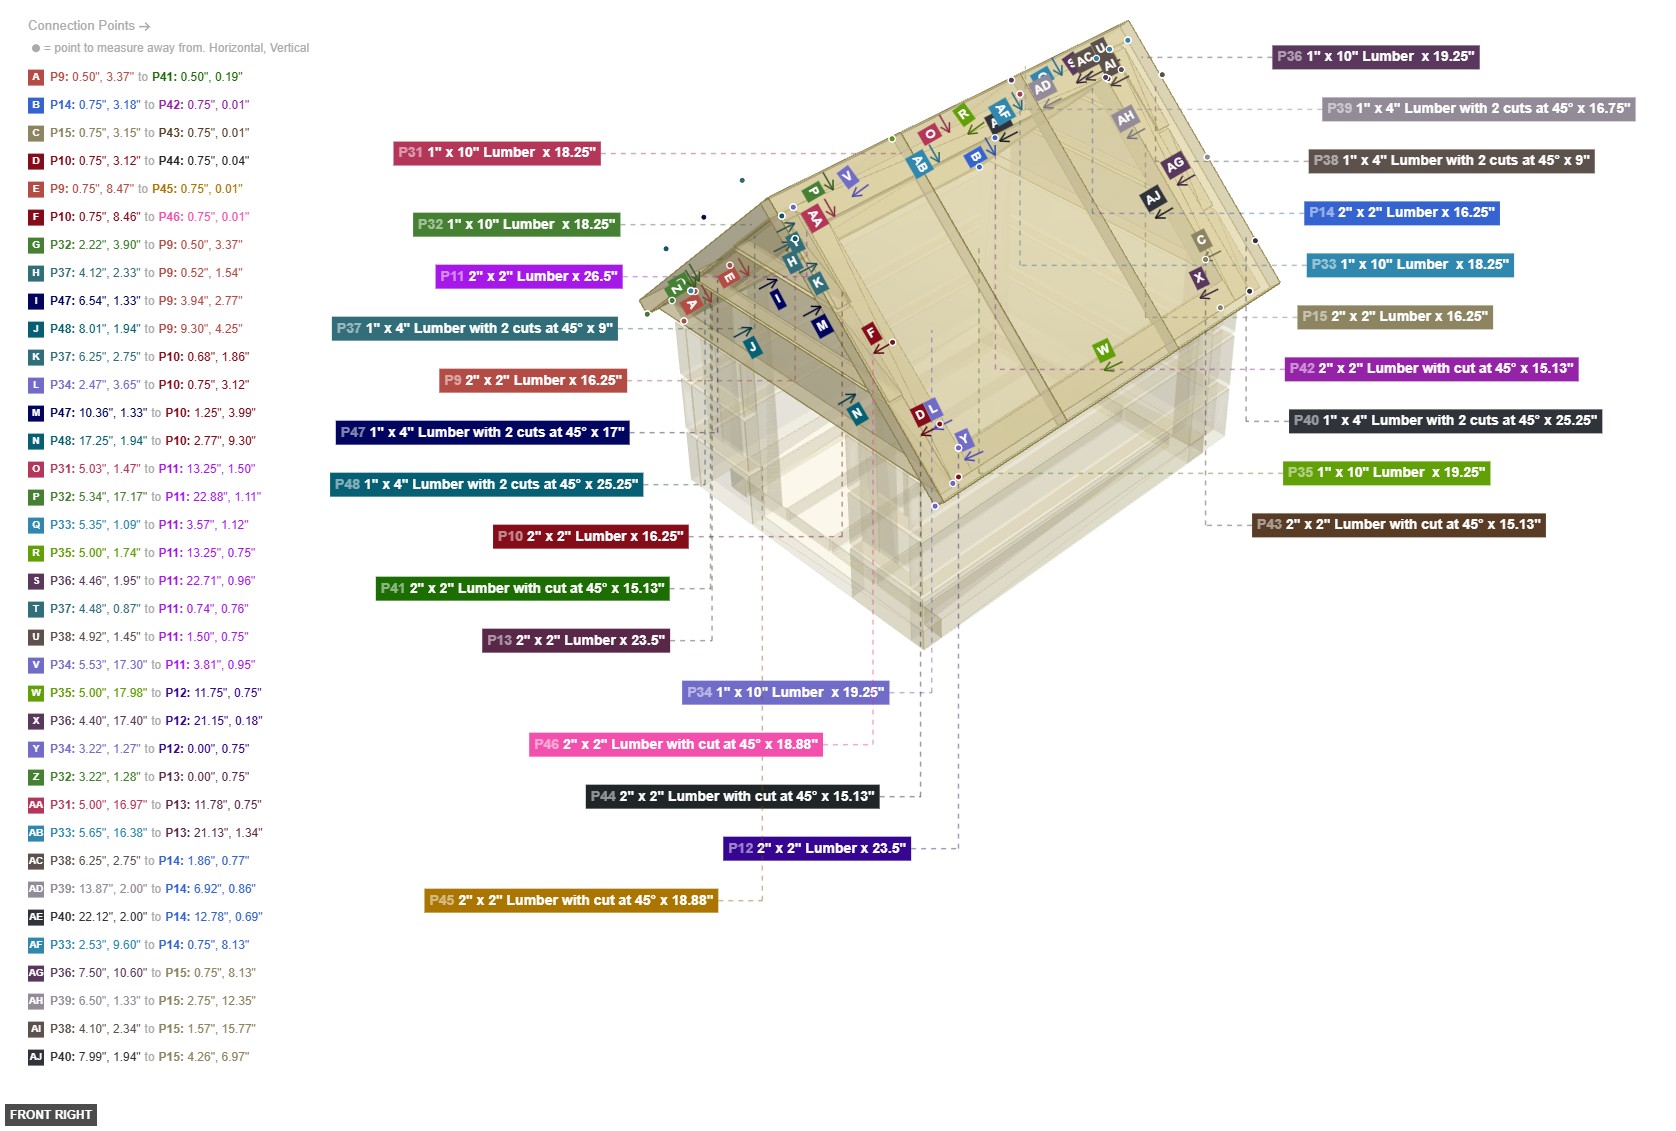
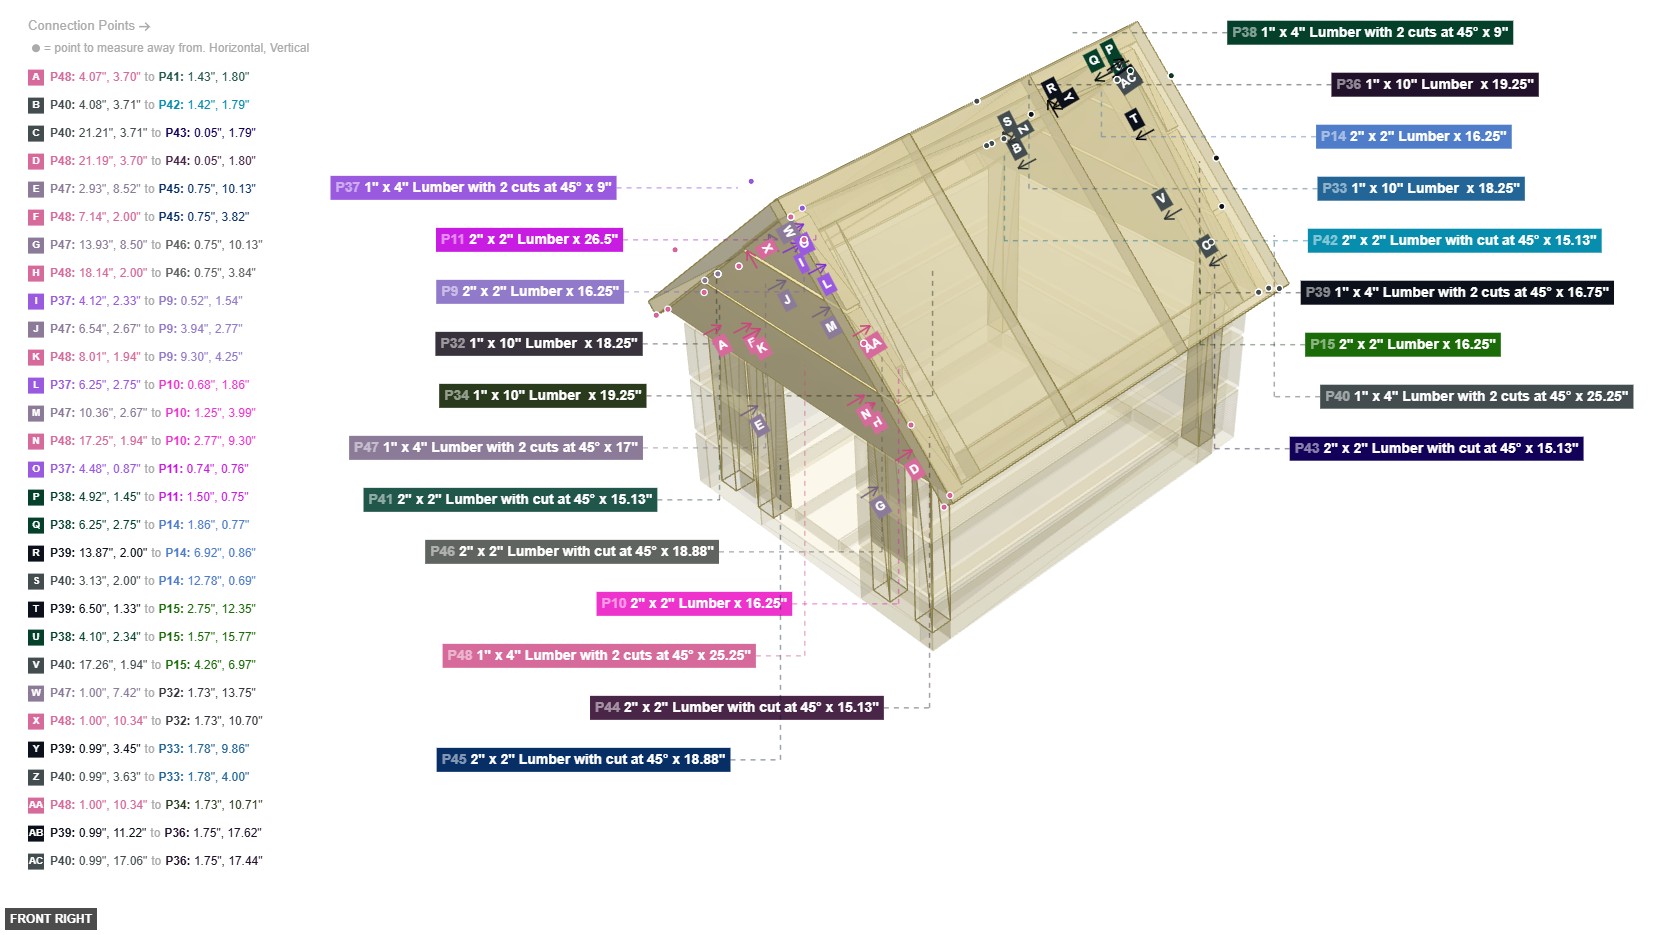
1" x 10" Lumber x 18.25"x 3 1" x 10" Lumber x 19.25"x 3 Attaching: Roof Trim Installation
To add finishing trim pieces to the roof edges and gables.
These trim pieces attach to the installed Roof Panels (Group 6) and the Upper Frame (Group 4) to complete the exterior look.
Angle: back left
P37 (1" x 4" Lumber with 2 cuts at 45° 9" length) - connect its 1" x 4" Wood Side #1 oriented back links with part 10's 2" x 2" Wood Side #4. Additionally, its 1" x 4" Wood End #1 needs to point right-top. After that, its 1" x 4" Wood Side #2 needs to point bottom. Also, its 1" x 4" Wood Side #3 needs to point front. Additionally, its 1" x 4" Wood Side #4 needs to point top, also ensure its 1" x 4" Wood End #2 faces left-top
P38 (1" x 4" Lumber with 2 cuts at 45° 9" length) - its 1" x 4" Wood Side #1, which is front-facing, should connect to part 14's 2" x 2" Wood Side #4. After that, its 1" x 4" Wood End #1 should be directed left-top, then ensure its 1" x 4" Wood Side #2 faces bottom. Also, its 1" x 4" Wood Side #3 must be oriented back. Also, its 1" x 4" Wood Side #4 should be directed top. Also, ensure its 1" x 4" Wood End #2 faces right-top
P39 (1" x 4" Lumber with 2 cuts at 45° 16.75" length) - its 1" x 4" Wood End #1, which is left-top-facing, should connect to part 33's 1" x 10" Wood Side #2, plus attach its 1" x 4" Wood Side #1 facing front to part 14's 2" x 2" Wood Side #4. Next, connect its 1" x 4" Wood End #2 oriented right-top links with part 36's 1" x 10" Wood Side #2. Additionally, ensure its 1" x 4" Wood Side #2 faces bottom. Also, its 1" x 4" Wood Side #3 should be directed back, and its 1" x 4" Wood Side #4 needs to point top
P40 (1" x 4" Lumber with 2 cuts at 45° 25.25" length) - attach its 1" x 4" Wood End #1 facing left-top to part 33's 1" x 10" Wood Side #2, then its 1" x 4" Wood Side #1, which is front-facing, should connect to part 14's 2" x 2" Wood Side #4, then connect its 1" x 4" Wood End #2 oriented right-top links with part 36's 1" x 10" Wood Side #2, also its 1" x 4" Wood Side #2 should be directed bottom. Additionally, its 1" x 4" Wood Side #3 should be directed back. After that, its 1" x 4" Wood Side #4 must be oriented top
P47 (1" x 4" Lumber with 2 cuts at 45° 17" length) - attach its 1" x 4" Wood Side #1 facing back to part 9's 2" x 2" Wood Side #2. Also, connect its 1" x 4" Wood End #2 oriented left-top links with part 32's 1" x 10" Wood Side #2, and its 1" x 4" Wood End #1 needs to point right-top. Additionally, its 1" x 4" Wood Side #2 should be directed bottom. Additionally, its 1" x 4" Wood Side #3 should be directed front, plus its 1" x 4" Wood Side #4 needs to point top
P48 (1" x 4" Lumber with 2 cuts at 45° 25.25" length) - connect its 1" x 4" Wood End #1 oriented right-top links with part 34's 1" x 10" Wood Side #2, and connect its 1" x 4" Wood Side #1 oriented back links with part 9's 2" x 2" Wood Side #2, plus its 1" x 4" Wood End #2, which is left-top-facing, should connect to part 32's 1" x 10" Wood Side #2. After that, its 1" x 4" Wood Side #2 must be oriented bottom, plus its 1" x 4" Wood Side #3 must be oriented front. Next, its 1" x 4" Wood Side #4 must be oriented top
1" x 4" Lumber with 2 cuts at 45° x 9"x 2 1" x 4" Lumber with 2 cuts at 45° x 16.75"x 1 1" x 4" Lumber with 2 cuts at 45° x 25.25"x 2 1" x 4" Lumber with 2 cuts at 45° x 17"x 1
Angle: front right
P37 (1" x 4" Lumber with 2 cuts at 45° 9" length) - connect its 1" x 4" Wood Side #1 oriented back links with part 10's 2" x 2" Wood Side #4. Additionally, its 1" x 4" Wood End #1 needs to point right-top. After that, its 1" x 4" Wood Side #2 needs to point bottom. Also, its 1" x 4" Wood Side #3 needs to point front. Additionally, its 1" x 4" Wood Side #4 needs to point top, also ensure its 1" x 4" Wood End #2 faces left-top
P38 (1" x 4" Lumber with 2 cuts at 45° 9" length) - its 1" x 4" Wood Side #1, which is front-facing, should connect to part 14's 2" x 2" Wood Side #4. After that, its 1" x 4" Wood End #1 should be directed left-top, then ensure its 1" x 4" Wood Side #2 faces bottom. Also, its 1" x 4" Wood Side #3 must be oriented back. Also, its 1" x 4" Wood Side #4 should be directed top. Also, ensure its 1" x 4" Wood End #2 faces right-top
P39 (1" x 4" Lumber with 2 cuts at 45° 16.75" length) - its 1" x 4" Wood End #1, which is left-top-facing, should connect to part 33's 1" x 10" Wood Side #2, plus attach its 1" x 4" Wood Side #1 facing front to part 14's 2" x 2" Wood Side #4. Next, connect its 1" x 4" Wood End #2 oriented right-top links with part 36's 1" x 10" Wood Side #2. Additionally, ensure its 1" x 4" Wood Side #2 faces bottom. Also, its 1" x 4" Wood Side #3 should be directed back, and its 1" x 4" Wood Side #4 needs to point top
P40 (1" x 4" Lumber with 2 cuts at 45° 25.25" length) - attach its 1" x 4" Wood End #1 facing left-top to part 33's 1" x 10" Wood Side #2, then its 1" x 4" Wood Side #1, which is front-facing, should connect to part 14's 2" x 2" Wood Side #4, then connect its 1" x 4" Wood End #2 oriented right-top links with part 36's 1" x 10" Wood Side #2, also its 1" x 4" Wood Side #2 should be directed bottom. Additionally, its 1" x 4" Wood Side #3 should be directed back. After that, its 1" x 4" Wood Side #4 must be oriented top
P47 (1" x 4" Lumber with 2 cuts at 45° 17" length) - attach its 1" x 4" Wood Side #1 facing back to part 9's 2" x 2" Wood Side #2. Also, connect its 1" x 4" Wood End #2 oriented left-top links with part 32's 1" x 10" Wood Side #2, and its 1" x 4" Wood End #1 needs to point right-top. Additionally, its 1" x 4" Wood Side #2 should be directed bottom. Additionally, its 1" x 4" Wood Side #3 should be directed front, plus its 1" x 4" Wood Side #4 needs to point top
P48 (1" x 4" Lumber with 2 cuts at 45° 25.25" length) - connect its 1" x 4" Wood End #1 oriented right-top links with part 34's 1" x 10" Wood Side #2, and connect its 1" x 4" Wood Side #1 oriented back links with part 9's 2" x 2" Wood Side #2, plus its 1" x 4" Wood End #2, which is left-top-facing, should connect to part 32's 1" x 10" Wood Side #2. After that, its 1" x 4" Wood Side #2 must be oriented bottom, plus its 1" x 4" Wood Side #3 must be oriented front. Next, its 1" x 4" Wood Side #4 must be oriented top
1" x 4" Lumber with 2 cuts at 45° x 9"x 2 1" x 4" Lumber with 2 cuts at 45° x 16.75"x 1 1" x 4" Lumber with 2 cuts at 45° x 25.25"x 2 1" x 4" Lumber with 2 cuts at 45° x 17"x 1
Angle: bottom right
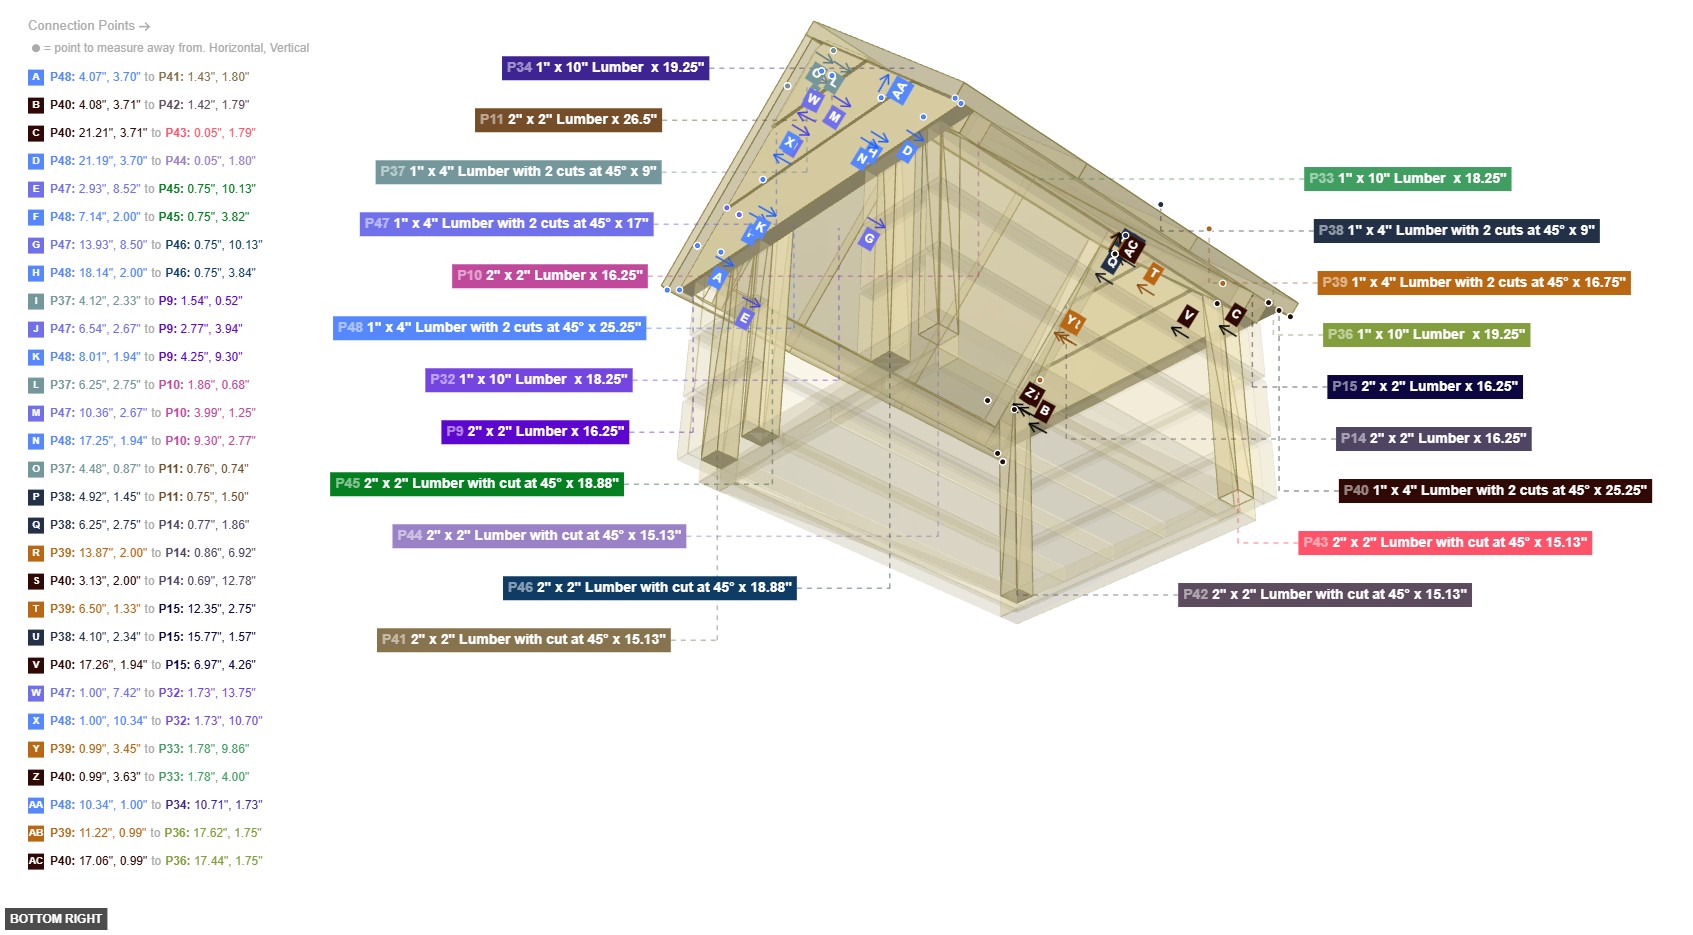
P37 (1" x 4" Lumber with 2 cuts at 45° 9" length) - connect its 1" x 4" Wood Side #1 oriented back links with part 10's 2" x 2" Wood Side #4. Additionally, its 1" x 4" Wood End #1 needs to point right-top. After that, its 1" x 4" Wood Side #2 needs to point bottom. Also, its 1" x 4" Wood Side #3 needs to point front. Additionally, its 1" x 4" Wood Side #4 needs to point top, also ensure its 1" x 4" Wood End #2 faces left-top
P38 (1" x 4" Lumber with 2 cuts at 45° 9" length) - its 1" x 4" Wood Side #1, which is front-facing, should connect to part 14's 2" x 2" Wood Side #4. After that, its 1" x 4" Wood End #1 should be directed left-top, then ensure its 1" x 4" Wood Side #2 faces bottom. Also, its 1" x 4" Wood Side #3 must be oriented back. Also, its 1" x 4" Wood Side #4 should be directed top. Also, ensure its 1" x 4" Wood End #2 faces right-top
P39 (1" x 4" Lumber with 2 cuts at 45° 16.75" length) - its 1" x 4" Wood End #1, which is left-top-facing, should connect to part 33's 1" x 10" Wood Side #2, plus attach its 1" x 4" Wood Side #1 facing front to part 14's 2" x 2" Wood Side #4. Next, connect its 1" x 4" Wood End #2 oriented right-top links with part 36's 1" x 10" Wood Side #2. Additionally, ensure its 1" x 4" Wood Side #2 faces bottom. Also, its 1" x 4" Wood Side #3 should be directed back, and its 1" x 4" Wood Side #4 needs to point top
P40 (1" x 4" Lumber with 2 cuts at 45° 25.25" length) - attach its 1" x 4" Wood End #1 facing left-top to part 33's 1" x 10" Wood Side #2, then its 1" x 4" Wood Side #1, which is front-facing, should connect to part 14's 2" x 2" Wood Side #4, then connect its 1" x 4" Wood End #2 oriented right-top links with part 36's 1" x 10" Wood Side #2, also its 1" x 4" Wood Side #2 should be directed bottom. Additionally, its 1" x 4" Wood Side #3 should be directed back. After that, its 1" x 4" Wood Side #4 must be oriented top
P47 (1" x 4" Lumber with 2 cuts at 45° 17" length) - attach its 1" x 4" Wood Side #1 facing back to part 9's 2" x 2" Wood Side #2. Also, connect its 1" x 4" Wood End #2 oriented left-top links with part 32's 1" x 10" Wood Side #2, and its 1" x 4" Wood End #1 needs to point right-top. Additionally, its 1" x 4" Wood Side #2 should be directed bottom. Additionally, its 1" x 4" Wood Side #3 should be directed front, plus its 1" x 4" Wood Side #4 needs to point top
P48 (1" x 4" Lumber with 2 cuts at 45° 25.25" length) - connect its 1" x 4" Wood End #1 oriented right-top links with part 34's 1" x 10" Wood Side #2, and connect its 1" x 4" Wood Side #1 oriented back links with part 9's 2" x 2" Wood Side #2, plus its 1" x 4" Wood End #2, which is left-top-facing, should connect to part 32's 1" x 10" Wood Side #2. After that, its 1" x 4" Wood Side #2 must be oriented bottom, plus its 1" x 4" Wood Side #3 must be oriented front. Next, its 1" x 4" Wood Side #4 must be oriented top
1" x 4" Lumber with 2 cuts at 45° x 9"x 2 1" x 4" Lumber with 2 cuts at 45° x 16.75"x 1 1" x 4" Lumber with 2 cuts at 45° x 25.25"x 2 1" x 4" Lumber with 2 cuts at 45° x 17"x 1