Laptop Stand - Comprehensive Assembly Plan And Visual Guide
A stand constructed from PVC pipes and 90-degree elbow connectors, forming two symmetrical side supports connected by a single horizontal pipe. It appears designed to elevate a laptop. - Laptop Stand
Phase 1: Group Overview
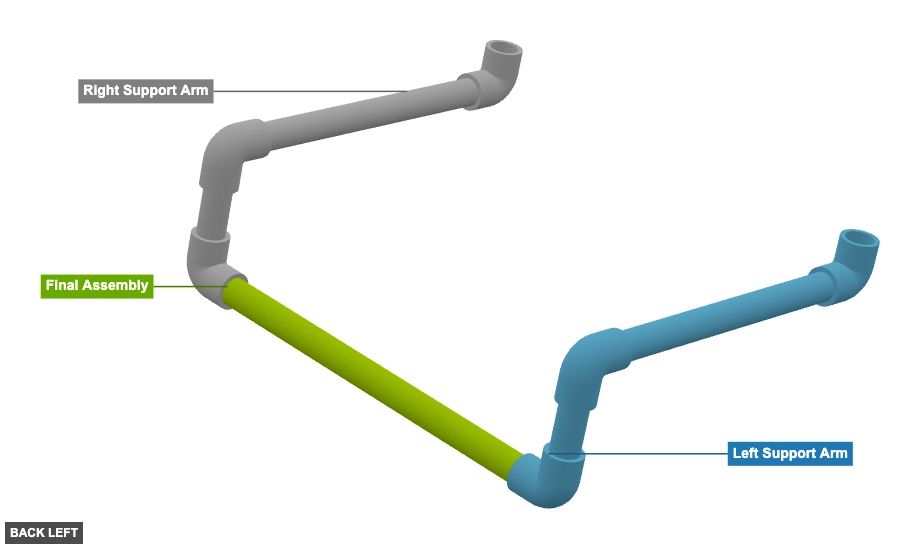
Angle: back left
Left Support Arm
 1/2" 90° Elbow Slip PVC x 3
 1/2" Tube x 3"x 1
1/2" Tube x 10"x 1 Right Support Arm
1/2" Tube x 3"x 1 1/2" 90° Elbow Slip PVC x 3 1/2" Tube x 10"x 1 Final Assembly
1/2" Tube x 13"x 1
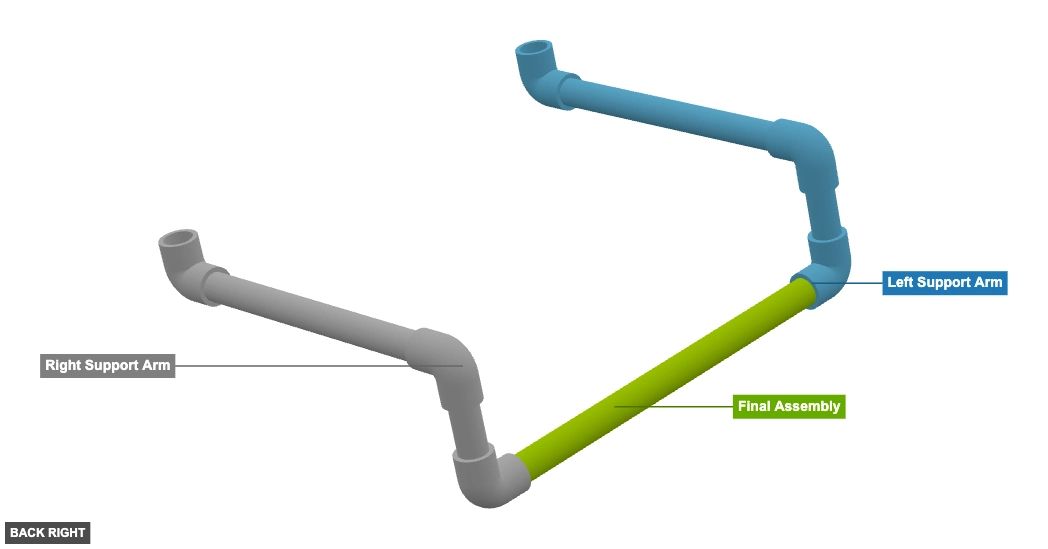
Angle: back right
Left Support Arm
1/2" 90° Elbow Slip PVC x 3 1/2" Tube x 3"x 1 1/2" Tube x 10"x 1 Right Support Arm
1/2" Tube x 3"x 1 1/2" 90° Elbow Slip PVC x 3 1/2" Tube x 10"x 1 Final Assembly
1/2" Tube x 13"x 1
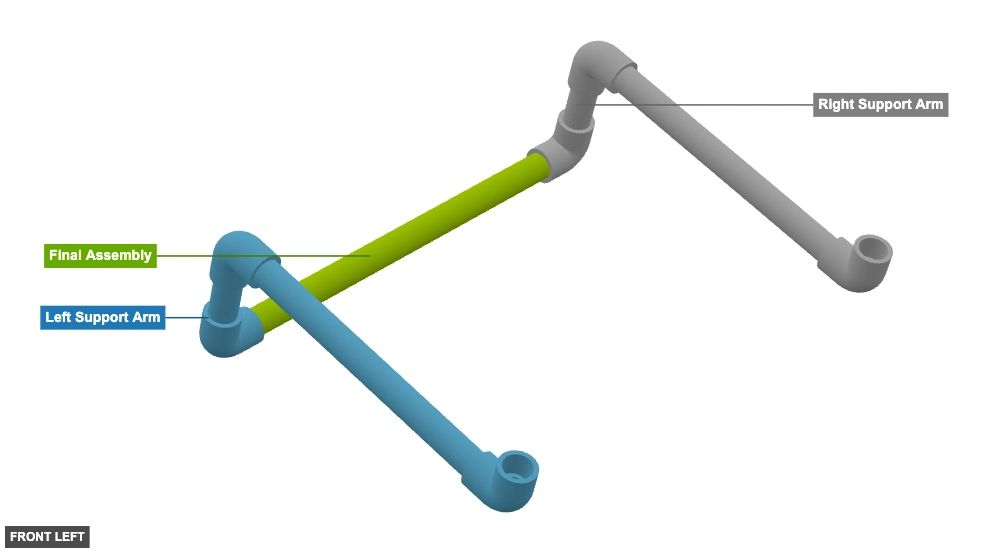
Angle: front left
Left Support Arm
1/2" 90° Elbow Slip PVC x 3 1/2" Tube x 3"x 1 1/2" Tube x 10"x 1 Right Support Arm
1/2" Tube x 3"x 1 1/2" 90° Elbow Slip PVC x 3 1/2" Tube x 10"x 1 Final Assembly
1/2" Tube x 13"x 1
Angle: front right
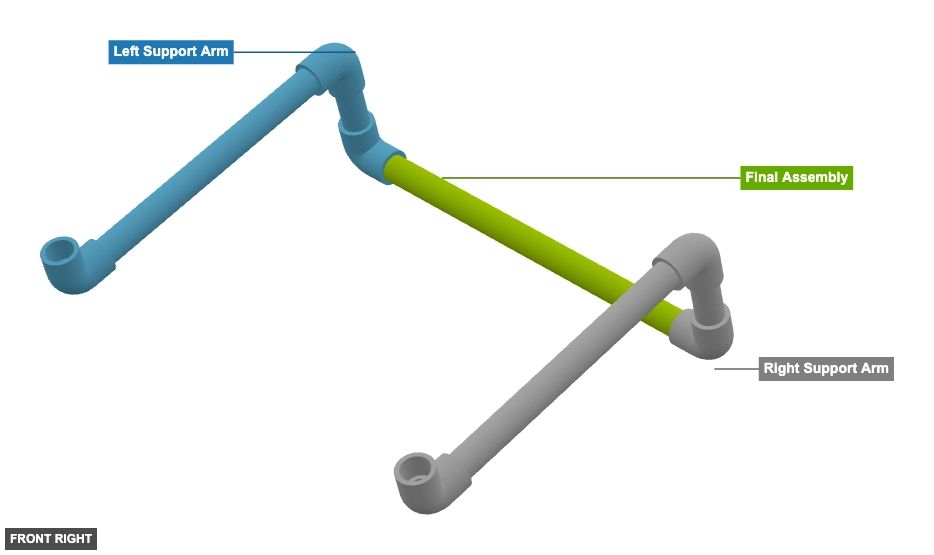
Left Support Arm
1/2" 90° Elbow Slip PVC x 3 1/2" Tube x 3"x 1 1/2" Tube x 10"x 1 Right Support Arm
1/2" Tube x 3"x 1 1/2" 90° Elbow Slip PVC x 3 1/2" Tube x 10"x 1 Final Assembly
1/2" Tube x 13"x 1
Angle: bottom left
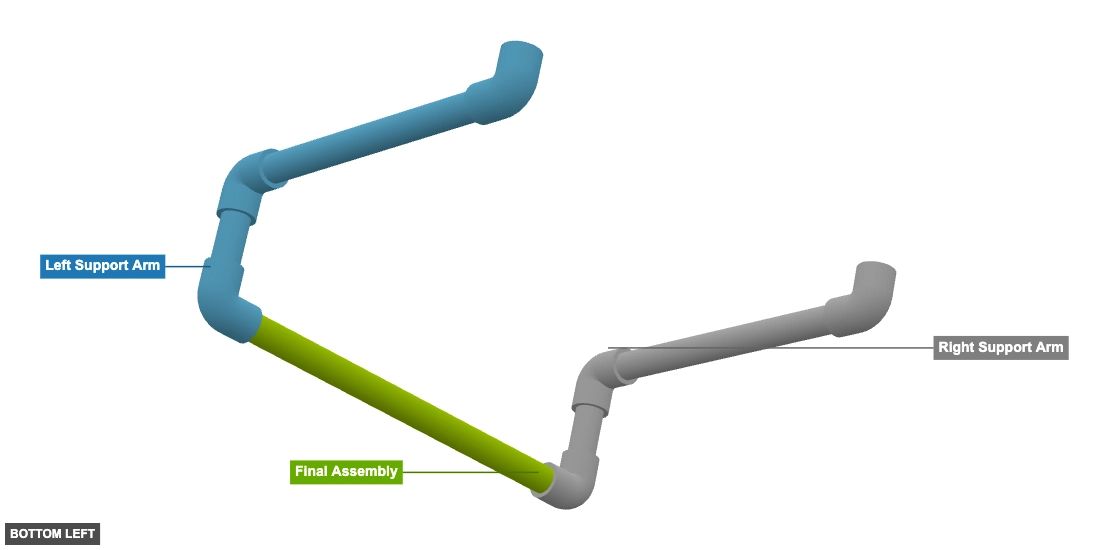
Left Support Arm
1/2" 90° Elbow Slip PVC x 3 1/2" Tube x 3"x 1 1/2" Tube x 10"x 1 Right Support Arm
1/2" Tube x 3"x 1 1/2" 90° Elbow Slip PVC x 3 1/2" Tube x 10"x 1 Final Assembly
1/2" Tube x 13"x 1
Angle: bottom right
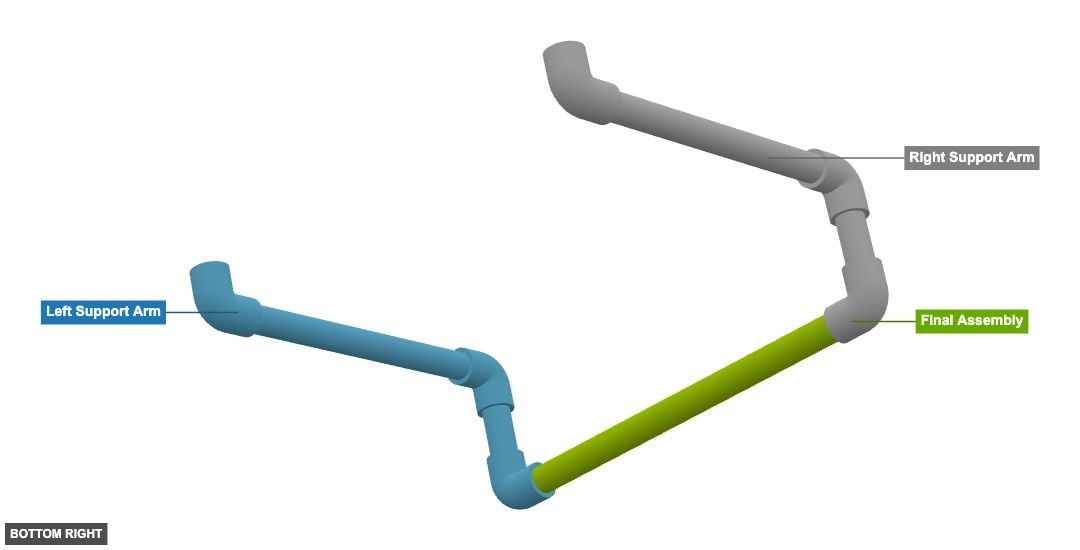
Left Support Arm
1/2" 90° Elbow Slip PVC x 3 1/2" Tube x 3"x 1 1/2" Tube x 10"x 1 Right Support Arm
1/2" Tube x 3"x 1 1/2" 90° Elbow Slip PVC x 3 1/2" Tube x 10"x 1 Final Assembly
1/2" Tube x 13"x 1 Phase 2: Individual Group Assembly
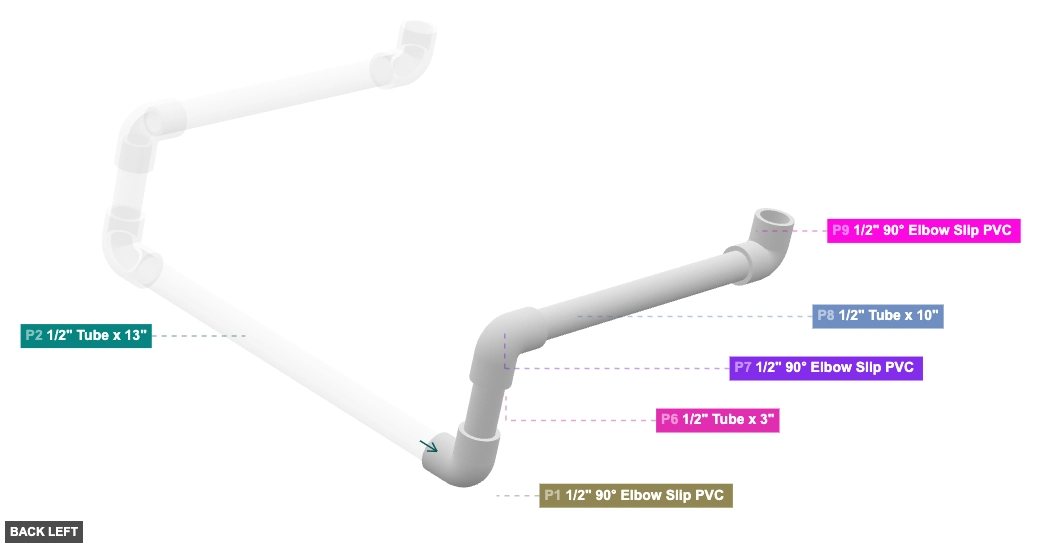
Group: Left Support Arm
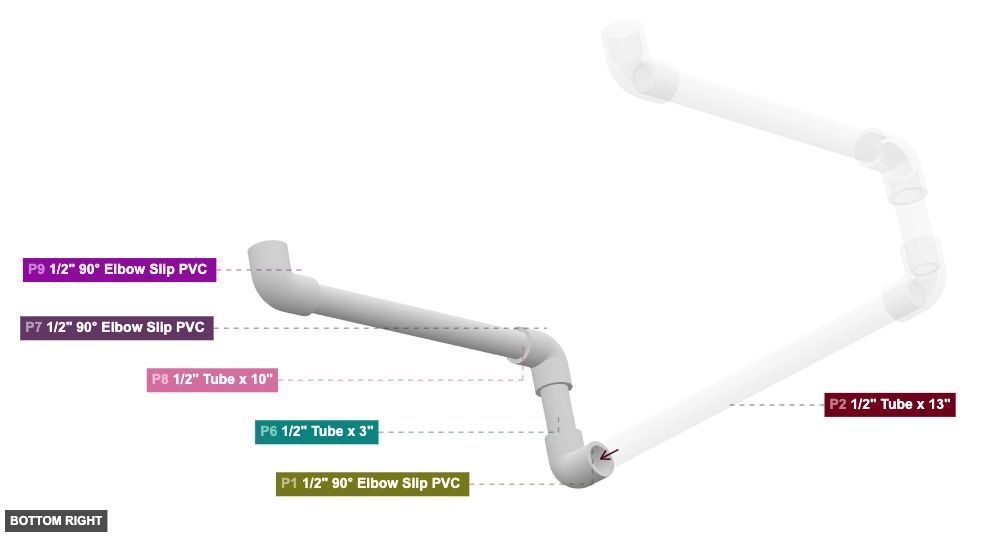
Forms the left vertical support structure and the left top resting bar for the laptop.
1. Connect P6 (Tube 3") Male SLIP 1/2" (facing bottom) into P1 (Elbow) Female SLIP 1/2" (facing top). 2. Connect P7 (Elbow) Female SLIP 1/2" (facing bottom) onto P6 Male SLIP 1/2" (facing top). 3. Connect P8 (Tube 10") Male SLIP 1/2" (facing back) into P7 Female SLIP 1/2" (facing front). 4. Connect P9 (Elbow) Female SLIP 1/2" (facing back) onto P8 Male SLIP 1/2" (facing front). Ensure P9's other Female SLIP 1/2" faces top.
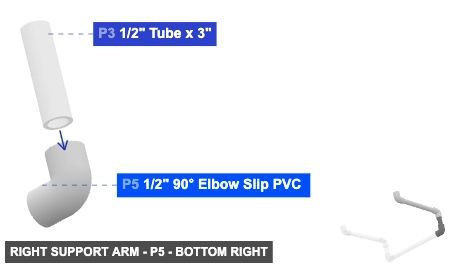
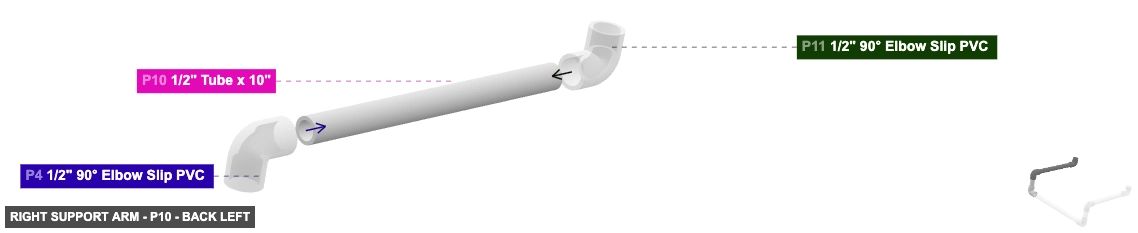
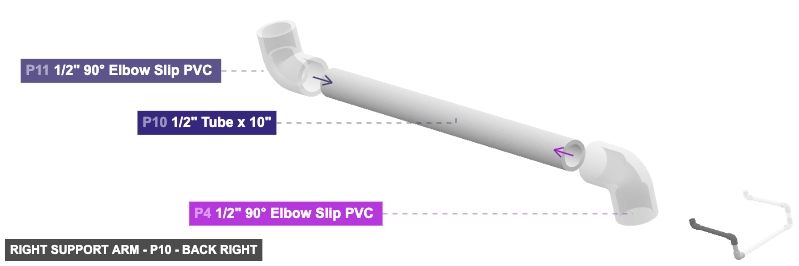
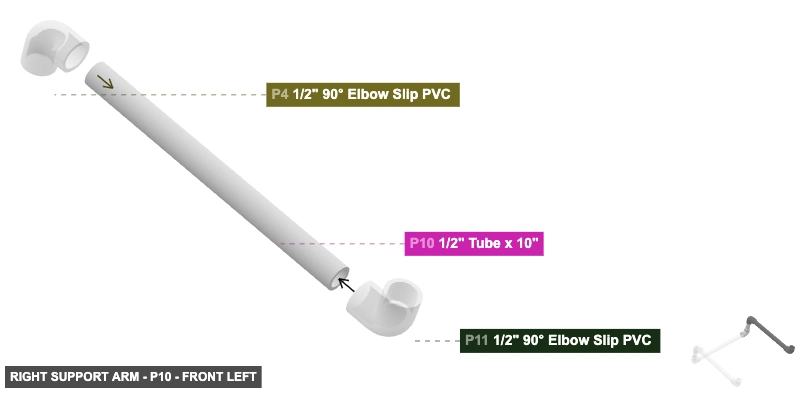
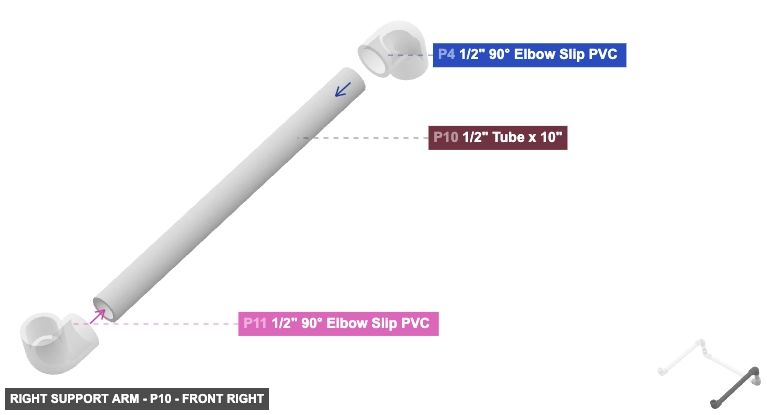
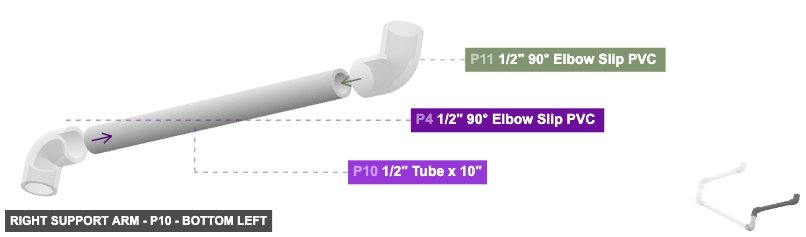
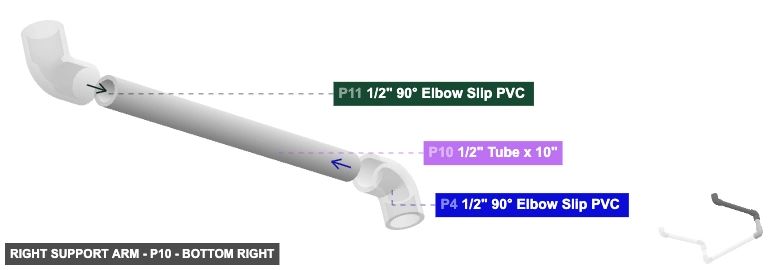
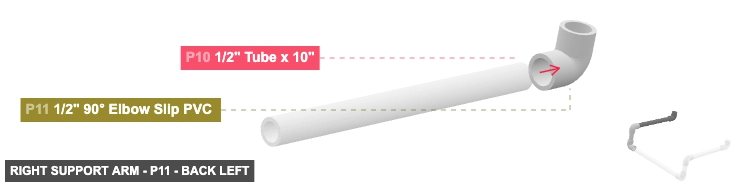
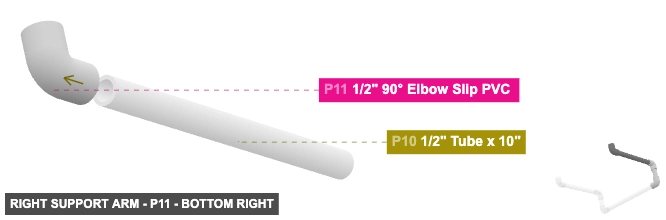
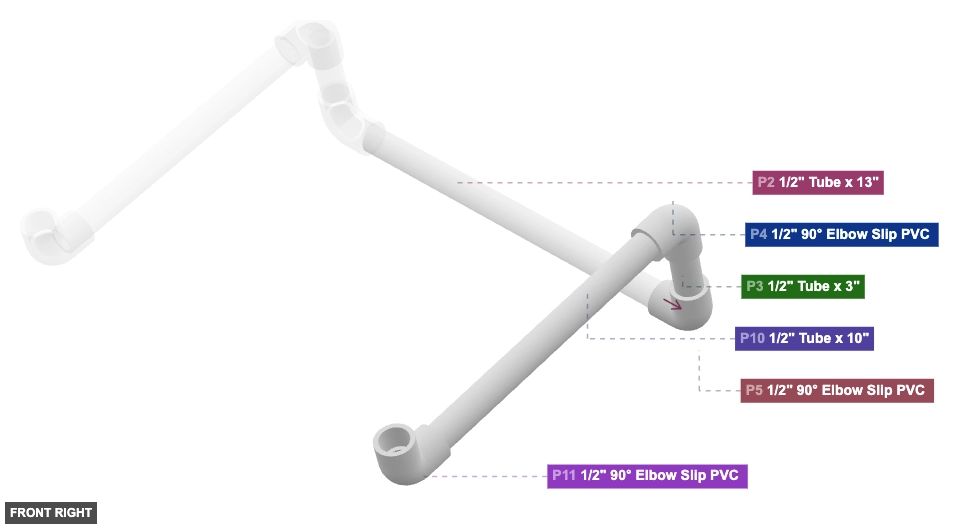
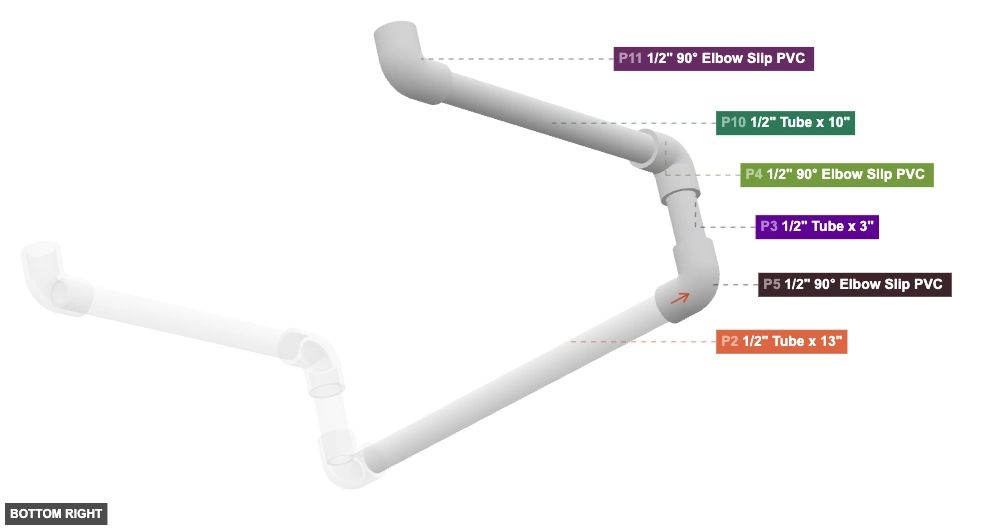
Group: Right Support Arm
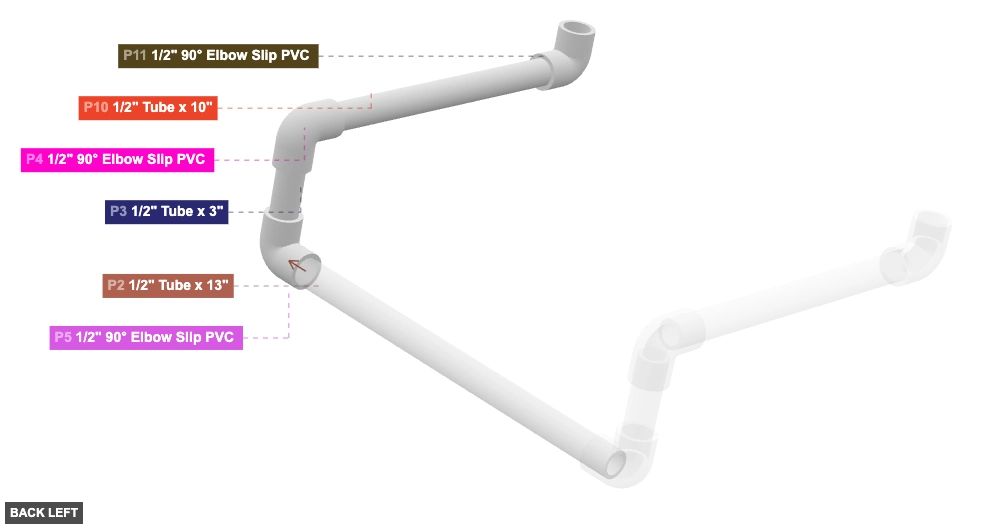
Forms the right vertical support structure and the right top resting bar for the laptop.
1. Connect P3 (Tube 3") Male SLIP 1/2" (facing top) into P5 (Elbow) Female SLIP 1/2" (facing top). 2. Connect P4 (Elbow) Female SLIP 1/2" (facing bottom) onto P3 Male SLIP 1/2" (facing bottom). 3. Connect P10 (Tube 10") Male SLIP 1/2" (facing back) into P4 Female SLIP 1/2" (facing front). 4. Connect P11 (Elbow) Female SLIP 1/2" (facing back) onto P10 Male SLIP 1/2" (facing front). Ensure P11's other Female SLIP 1/2" faces top.
Phase 3: Inter-Group Assembly
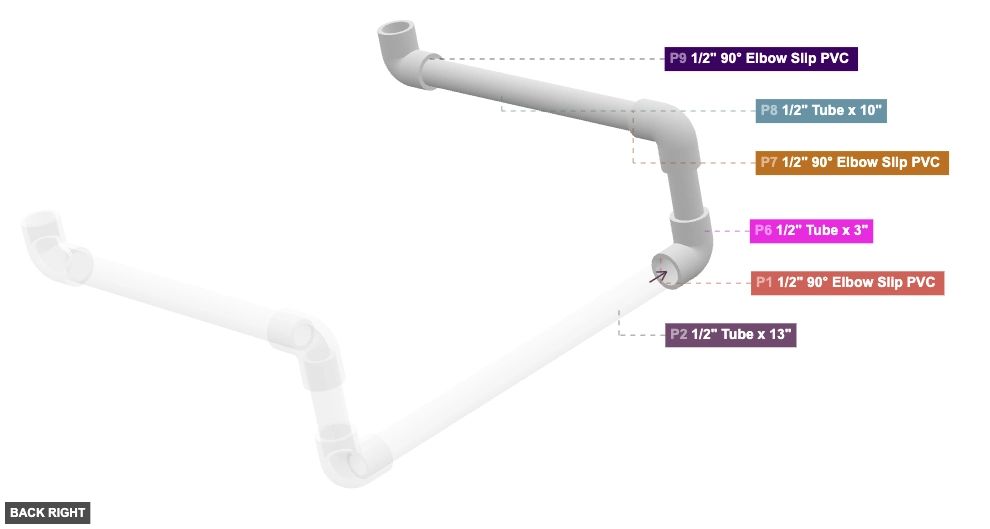
Attaching: Left Support Arm
Forms the left vertical support structure and the left top resting bar for the laptop.
The P1 Elbow's Female SLIP 1/2" (facing right) will connect to the central connecting tube (P2) in the Final Assembly step.
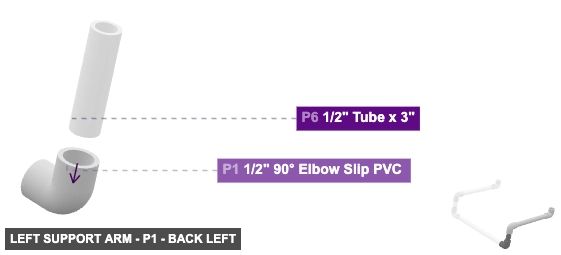
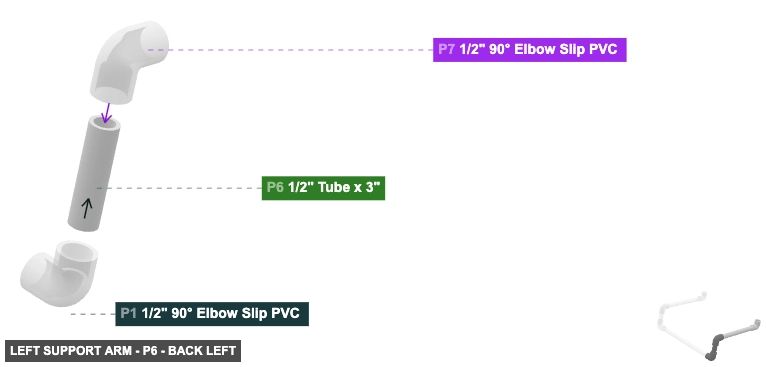
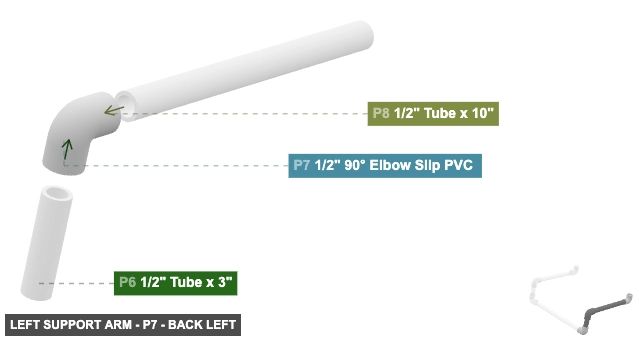
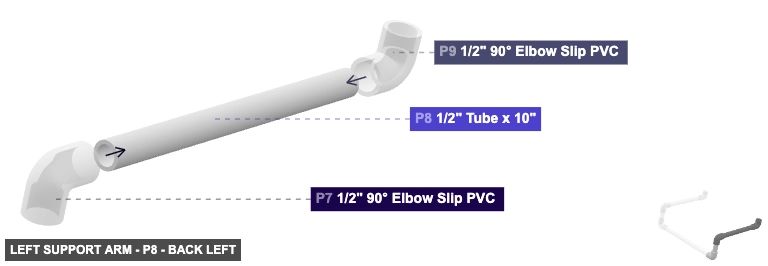
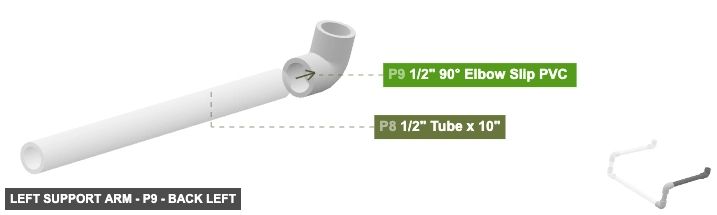
Angle: back left
P1 (0.5" 90° Elbow Slip PVC ) - attach its 0.5" F SLIP #1 facing top to part 6's 0.5" M SLIP #2. Next, connect its 0.5" F SLIP #2 oriented right links with part 2's 0.5" M SLIP #2
P6 (0.5" Tube 3" length) - connect its 0.5" M SLIP #1 oriented top links with part 7's 0.5" F SLIP #1, then its 0.5" M SLIP #2, which is bottom-facing, should connect to part 1's 0.5" F SLIP #1
P7 (0.5" 90° Elbow Slip PVC ) - attach its 0.5" F SLIP #1 facing bottom to part 6's 0.5" M SLIP #1. After that, connect its 0.5" F SLIP #2 oriented front links with part 8's 0.5" M SLIP #2
P8 (0.5" Tube 10" length) - connect its 0.5" M SLIP #1 oriented front links with part 9's 0.5" F SLIP #1, plus its 0.5" M SLIP #2, which is back-facing, should connect to part 7's 0.5" F SLIP #2
P9 (0.5" 90° Elbow Slip PVC ) - its 0.5" F SLIP #1, which is back-facing, should connect to part 8's 0.5" M SLIP #1. Next, its 0.5" F SLIP #2 needs to point top
1/2" 90° Elbow Slip PVC x 3 1/2" Tube x 3"x 1 1/2" Tube x 10"x 1
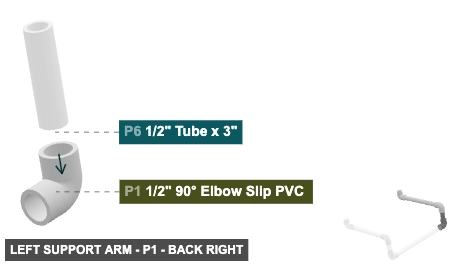
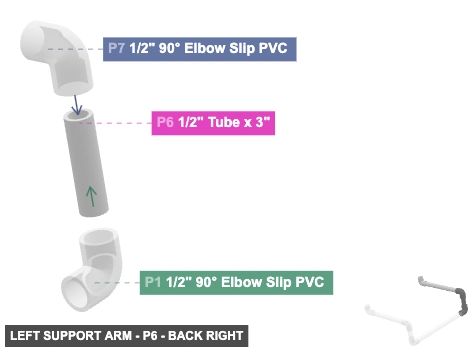
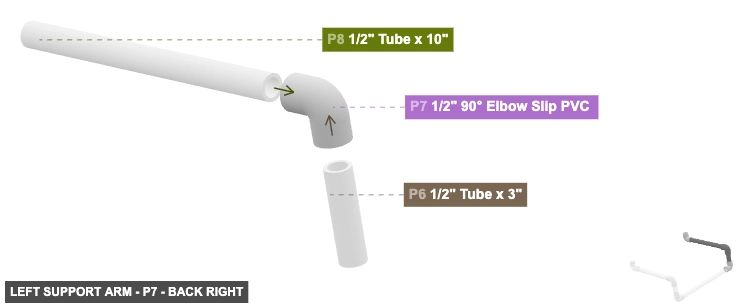
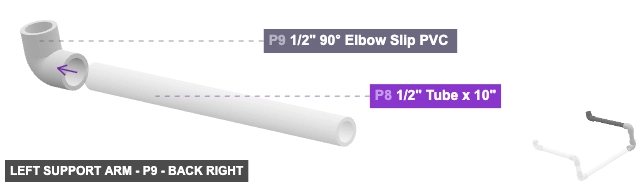
Angle: back right
P1 (0.5" 90° Elbow Slip PVC ) - attach its 0.5" F SLIP #1 facing top to part 6's 0.5" M SLIP #2. Next, connect its 0.5" F SLIP #2 oriented right links with part 2's 0.5" M SLIP #2
P6 (0.5" Tube 3" length) - connect its 0.5" M SLIP #1 oriented top links with part 7's 0.5" F SLIP #1, then its 0.5" M SLIP #2, which is bottom-facing, should connect to part 1's 0.5" F SLIP #1
P7 (0.5" 90° Elbow Slip PVC ) - attach its 0.5" F SLIP #1 facing bottom to part 6's 0.5" M SLIP #1. After that, connect its 0.5" F SLIP #2 oriented front links with part 8's 0.5" M SLIP #2
P8 (0.5" Tube 10" length) - connect its 0.5" M SLIP #1 oriented front links with part 9's 0.5" F SLIP #1, plus its 0.5" M SLIP #2, which is back-facing, should connect to part 7's 0.5" F SLIP #2
P9 (0.5" 90° Elbow Slip PVC ) - its 0.5" F SLIP #1, which is back-facing, should connect to part 8's 0.5" M SLIP #1. Next, its 0.5" F SLIP #2 needs to point top
1/2" 90° Elbow Slip PVC x 3 1/2" Tube x 3"x 1 1/2" Tube x 10"x 1
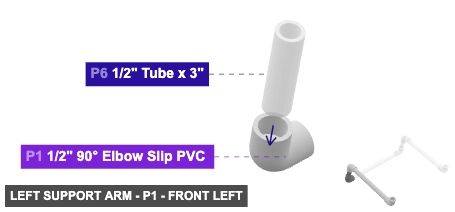
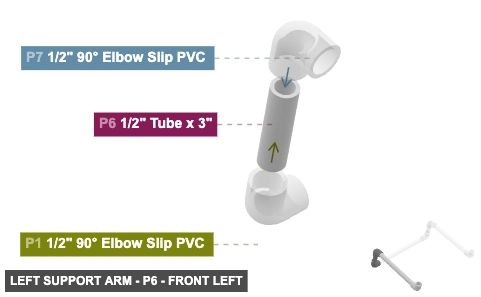
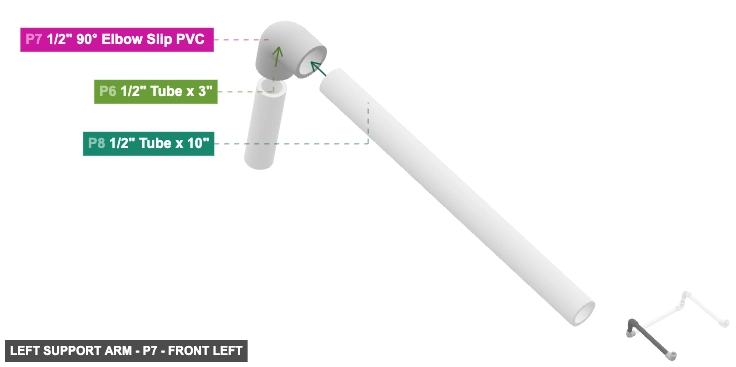
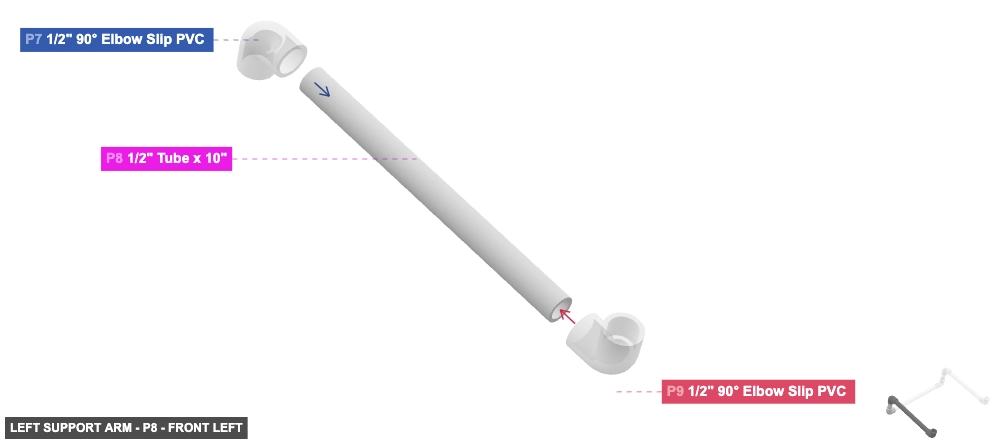
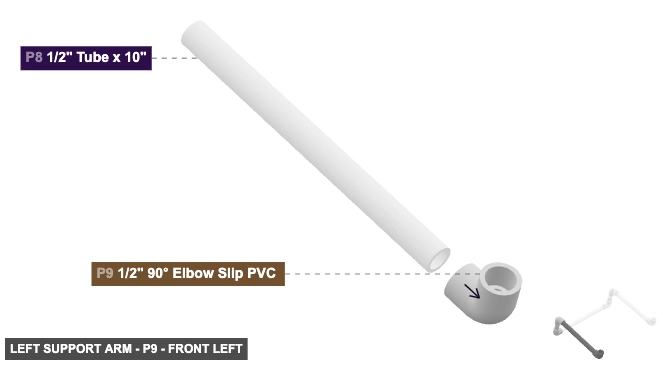
Angle: front left
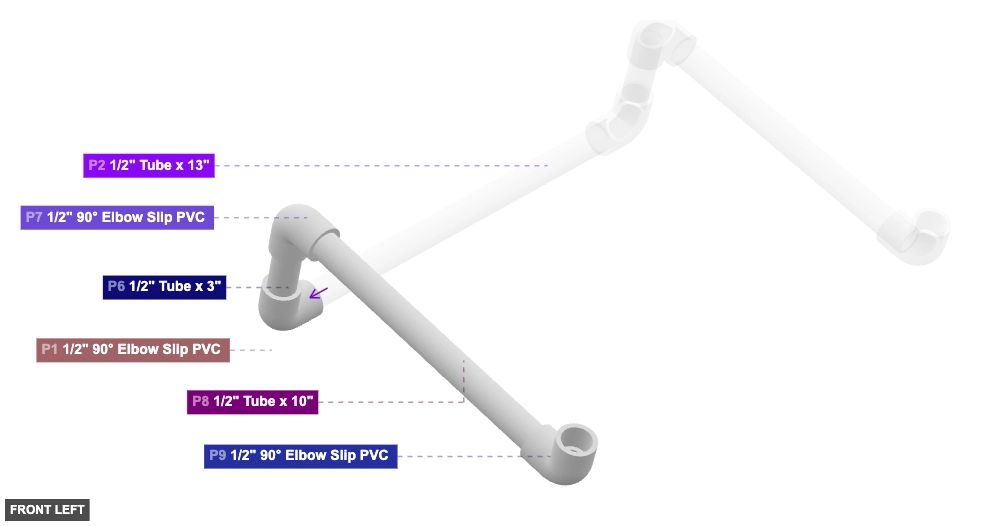
P1 (0.5" 90° Elbow Slip PVC ) - attach its 0.5" F SLIP #1 facing top to part 6's 0.5" M SLIP #2. Next, connect its 0.5" F SLIP #2 oriented right links with part 2's 0.5" M SLIP #2
P6 (0.5" Tube 3" length) - connect its 0.5" M SLIP #1 oriented top links with part 7's 0.5" F SLIP #1, then its 0.5" M SLIP #2, which is bottom-facing, should connect to part 1's 0.5" F SLIP #1
P7 (0.5" 90° Elbow Slip PVC ) - attach its 0.5" F SLIP #1 facing bottom to part 6's 0.5" M SLIP #1. After that, connect its 0.5" F SLIP #2 oriented front links with part 8's 0.5" M SLIP #2
P8 (0.5" Tube 10" length) - connect its 0.5" M SLIP #1 oriented front links with part 9's 0.5" F SLIP #1, plus its 0.5" M SLIP #2, which is back-facing, should connect to part 7's 0.5" F SLIP #2
P9 (0.5" 90° Elbow Slip PVC ) - its 0.5" F SLIP #1, which is back-facing, should connect to part 8's 0.5" M SLIP #1. Next, its 0.5" F SLIP #2 needs to point top
1/2" 90° Elbow Slip PVC x 3 1/2" Tube x 3"x 1 1/2" Tube x 10"x 1
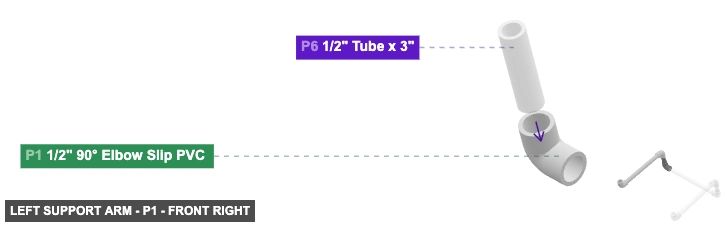
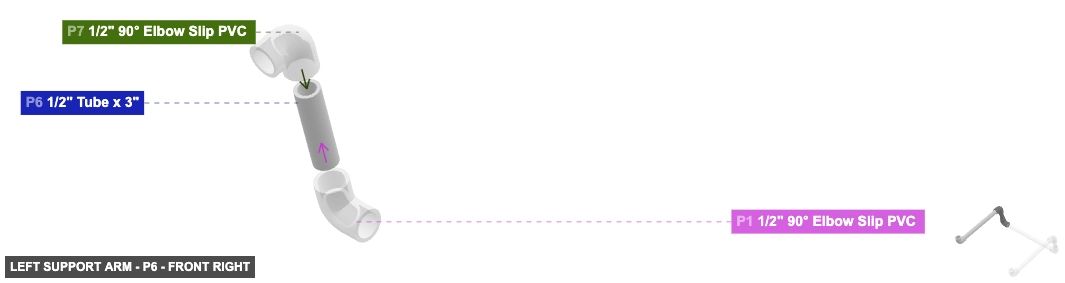
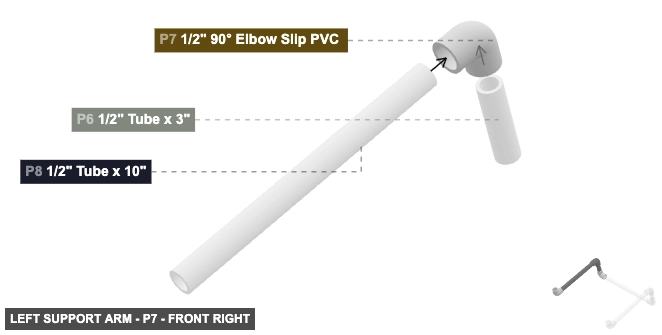
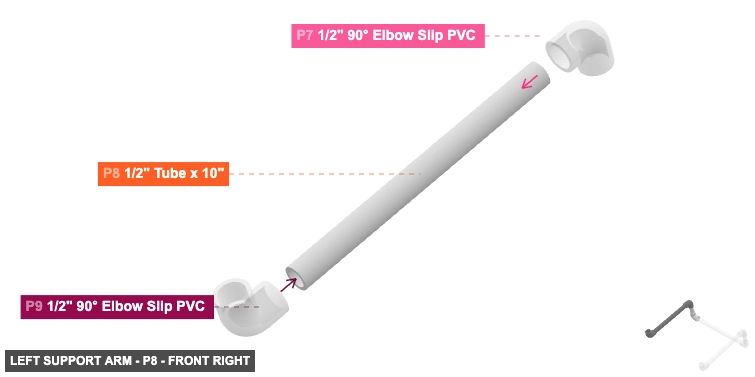
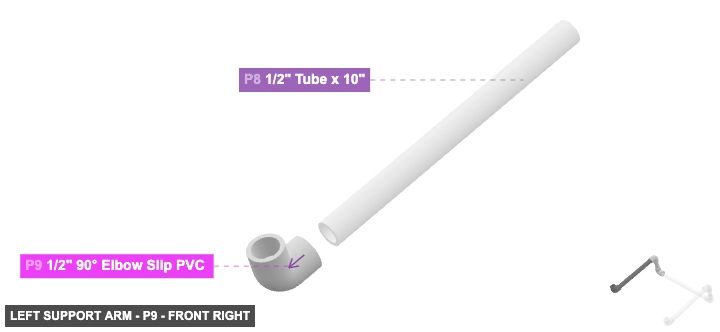
Angle: front right
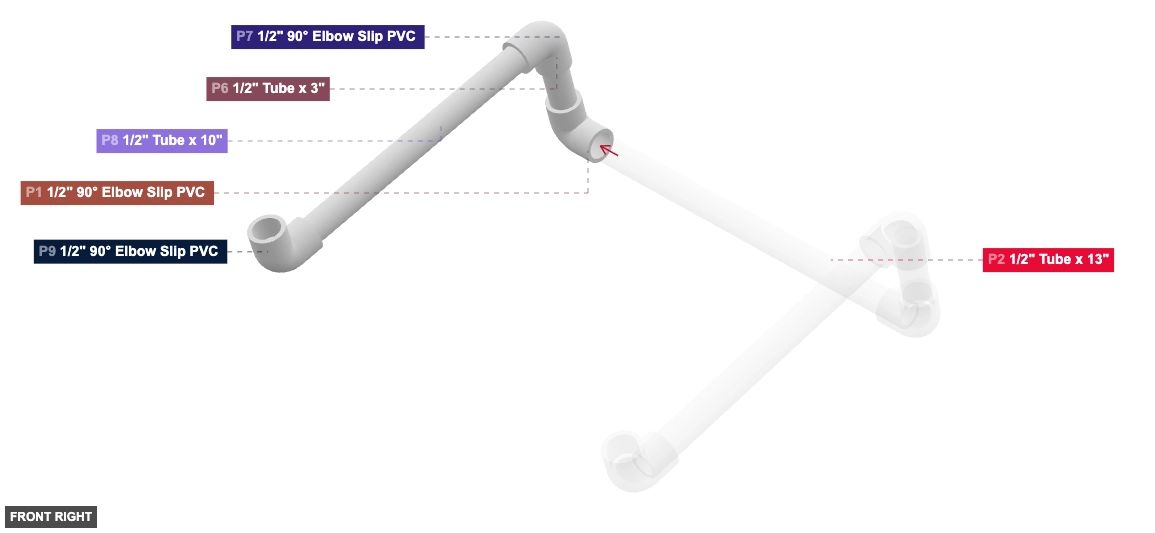
P1 (0.5" 90° Elbow Slip PVC ) - attach its 0.5" F SLIP #1 facing top to part 6's 0.5" M SLIP #2. Next, connect its 0.5" F SLIP #2 oriented right links with part 2's 0.5" M SLIP #2
P6 (0.5" Tube 3" length) - connect its 0.5" M SLIP #1 oriented top links with part 7's 0.5" F SLIP #1, then its 0.5" M SLIP #2, which is bottom-facing, should connect to part 1's 0.5" F SLIP #1
P7 (0.5" 90° Elbow Slip PVC ) - attach its 0.5" F SLIP #1 facing bottom to part 6's 0.5" M SLIP #1. After that, connect its 0.5" F SLIP #2 oriented front links with part 8's 0.5" M SLIP #2
P8 (0.5" Tube 10" length) - connect its 0.5" M SLIP #1 oriented front links with part 9's 0.5" F SLIP #1, plus its 0.5" M SLIP #2, which is back-facing, should connect to part 7's 0.5" F SLIP #2
P9 (0.5" 90° Elbow Slip PVC ) - its 0.5" F SLIP #1, which is back-facing, should connect to part 8's 0.5" M SLIP #1. Next, its 0.5" F SLIP #2 needs to point top
1/2" 90° Elbow Slip PVC x 3 1/2" Tube x 3"x 1 1/2" Tube x 10"x 1
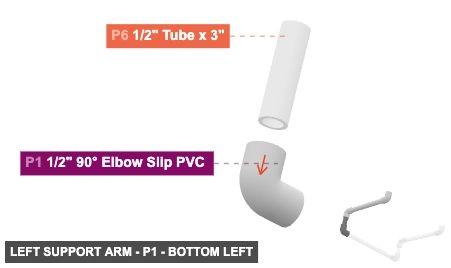
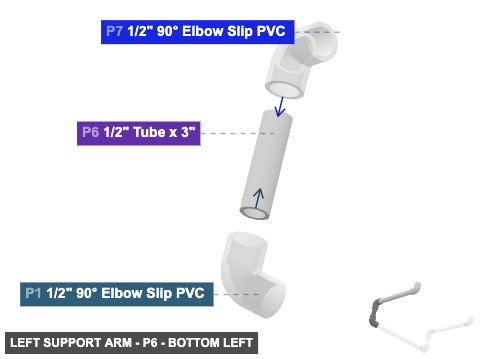
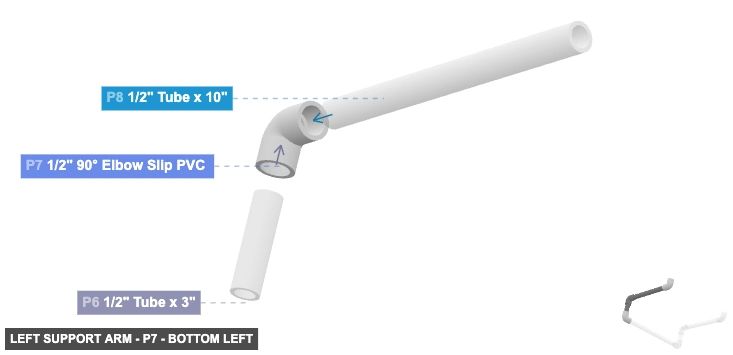
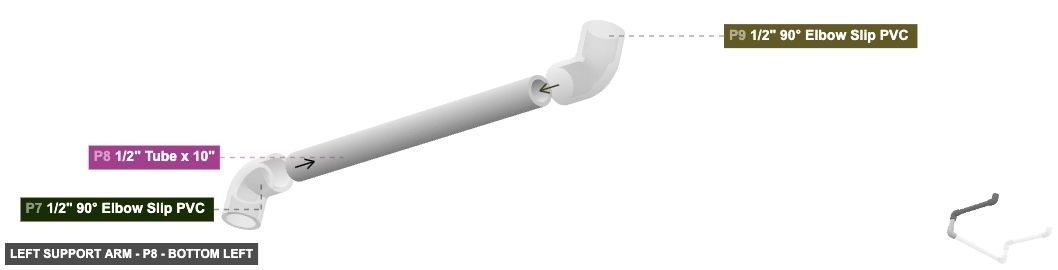
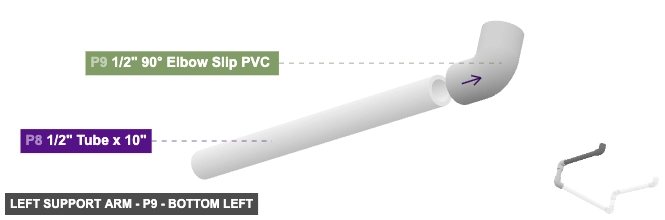
Angle: bottom left
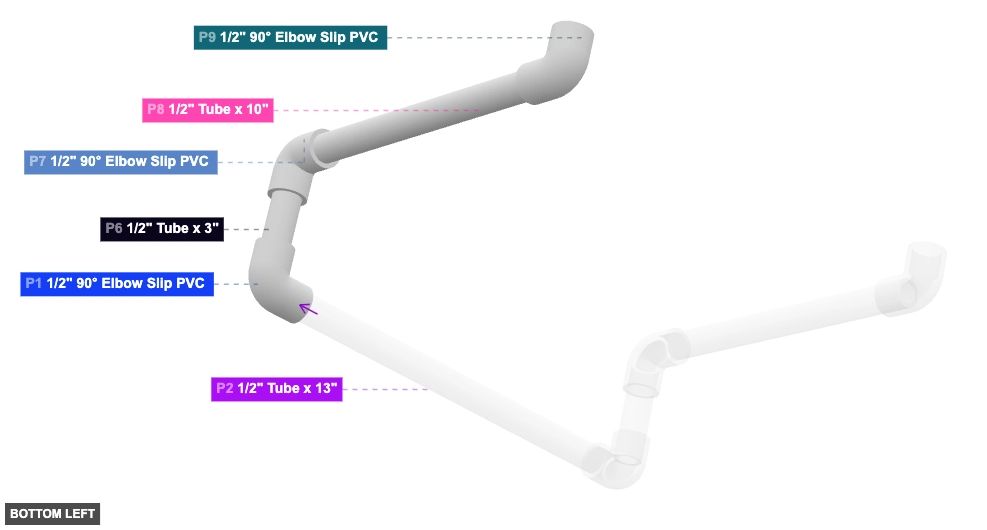
P1 (0.5" 90° Elbow Slip PVC ) - attach its 0.5" F SLIP #1 facing top to part 6's 0.5" M SLIP #2. Next, connect its 0.5" F SLIP #2 oriented right links with part 2's 0.5" M SLIP #2
P6 (0.5" Tube 3" length) - connect its 0.5" M SLIP #1 oriented top links with part 7's 0.5" F SLIP #1, then its 0.5" M SLIP #2, which is bottom-facing, should connect to part 1's 0.5" F SLIP #1
P7 (0.5" 90° Elbow Slip PVC ) - attach its 0.5" F SLIP #1 facing bottom to part 6's 0.5" M SLIP #1. After that, connect its 0.5" F SLIP #2 oriented front links with part 8's 0.5" M SLIP #2
P8 (0.5" Tube 10" length) - connect its 0.5" M SLIP #1 oriented front links with part 9's 0.5" F SLIP #1, plus its 0.5" M SLIP #2, which is back-facing, should connect to part 7's 0.5" F SLIP #2
P9 (0.5" 90° Elbow Slip PVC ) - its 0.5" F SLIP #1, which is back-facing, should connect to part 8's 0.5" M SLIP #1. Next, its 0.5" F SLIP #2 needs to point top
1/2" 90° Elbow Slip PVC x 3 1/2" Tube x 3"x 1 1/2" Tube x 10"x 1
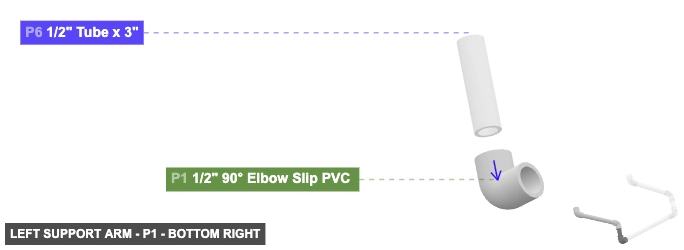
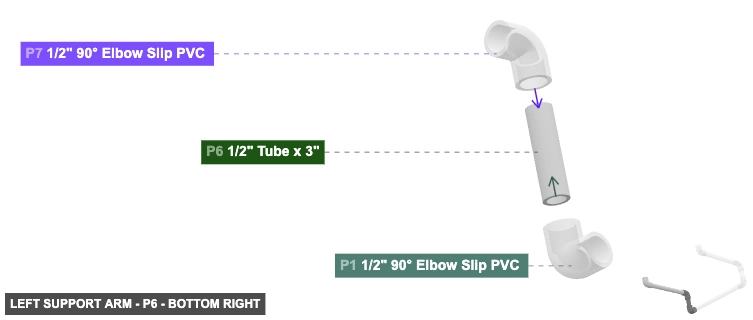
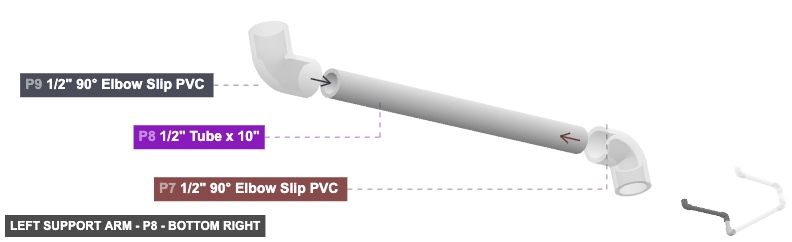
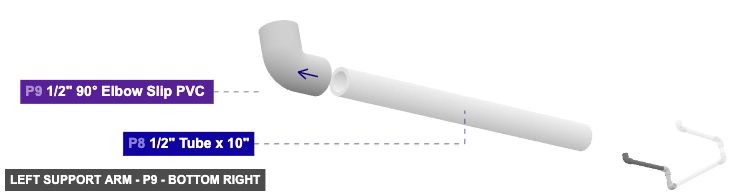
Angle: bottom right
P1 (0.5" 90° Elbow Slip PVC ) - attach its 0.5" F SLIP #1 facing top to part 6's 0.5" M SLIP #2. Next, connect its 0.5" F SLIP #2 oriented right links with part 2's 0.5" M SLIP #2
P6 (0.5" Tube 3" length) - connect its 0.5" M SLIP #1 oriented top links with part 7's 0.5" F SLIP #1, then its 0.5" M SLIP #2, which is bottom-facing, should connect to part 1's 0.5" F SLIP #1
P7 (0.5" 90° Elbow Slip PVC ) - attach its 0.5" F SLIP #1 facing bottom to part 6's 0.5" M SLIP #1. After that, connect its 0.5" F SLIP #2 oriented front links with part 8's 0.5" M SLIP #2
P8 (0.5" Tube 10" length) - connect its 0.5" M SLIP #1 oriented front links with part 9's 0.5" F SLIP #1, plus its 0.5" M SLIP #2, which is back-facing, should connect to part 7's 0.5" F SLIP #2
P9 (0.5" 90° Elbow Slip PVC ) - its 0.5" F SLIP #1, which is back-facing, should connect to part 8's 0.5" M SLIP #1. Next, its 0.5" F SLIP #2 needs to point top
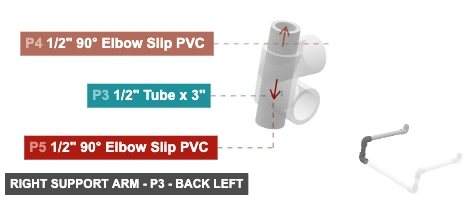
1/2" 90° Elbow Slip PVC x 3 1/2" Tube x 3"x 1 1/2" Tube x 10"x 1 Attaching: Right Support Arm
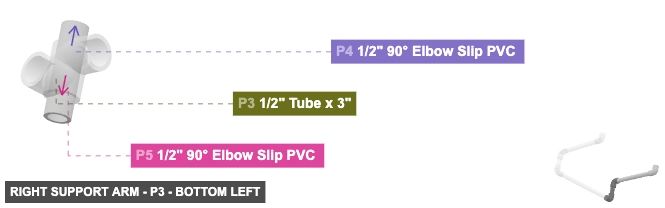
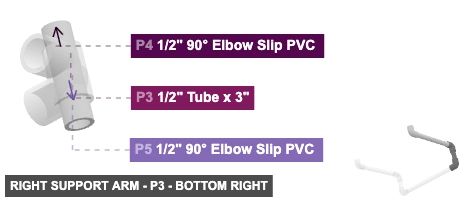
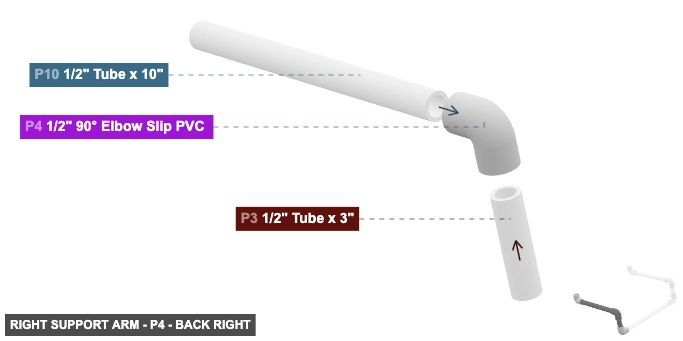
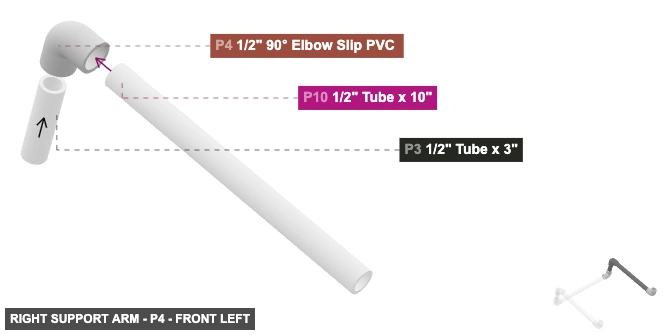
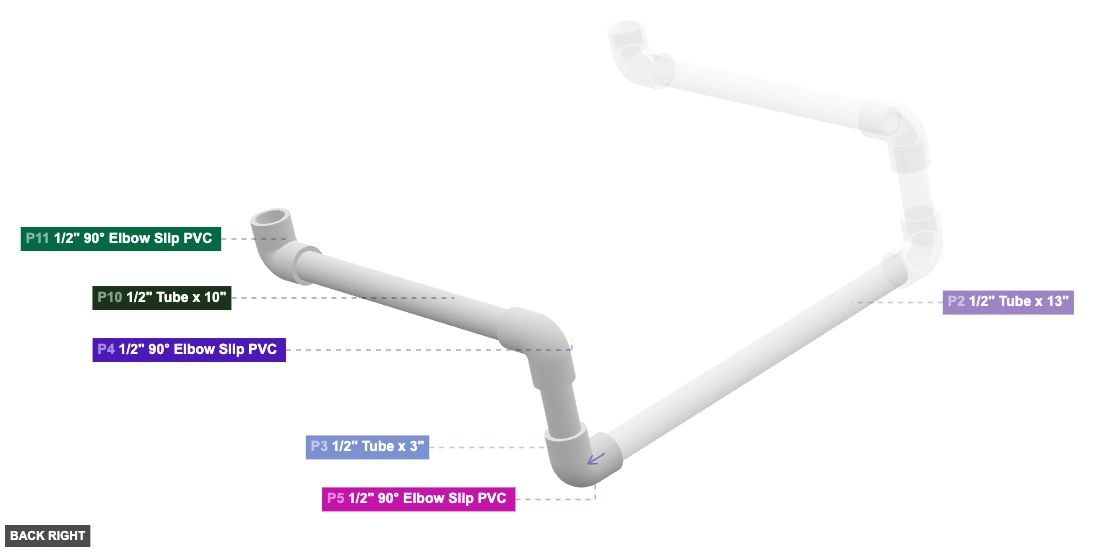
Forms the right vertical support structure and the right top resting bar for the laptop.
The P5 Elbow's Female SLIP 1/2" (facing left) will connect to the central connecting tube (P2) in the Final Assembly step.
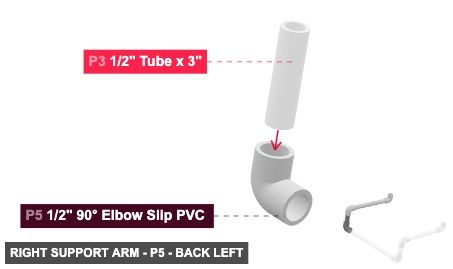
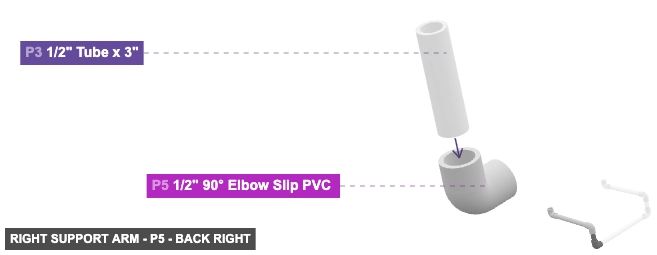
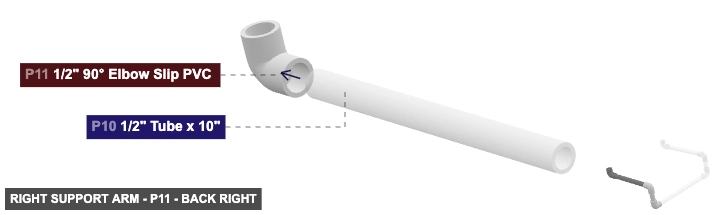
Angle: back left
P3 (0.5" Tube 3" length) - attach its 0.5" M SLIP #1 facing bottom to part 4's 0.5" F SLIP #1, plus its 0.5" M SLIP #2, which is top-facing, should connect to part 5's 0.5" F SLIP #2
P4 (0.5" 90° Elbow Slip PVC ) - its 0.5" F SLIP #1, which is bottom-facing, should connect to part 3's 0.5" M SLIP #1, plus attach its 0.5" F SLIP #2 facing front to part 10's 0.5" M SLIP #2
P5 (0.5" 90° Elbow Slip PVC ) - connect its 0.5" F SLIP #1 oriented left links with part 2's 0.5" M SLIP #1. Next, connect its 0.5" F SLIP #2 oriented top links with part 3's 0.5" M SLIP #2
P10 (0.5" Tube 10" length) - connect its 0.5" M SLIP #1 oriented front links with part 11's 0.5" F SLIP #1, also its 0.5" M SLIP #2, which is back-facing, should connect to part 4's 0.5" F SLIP #2
P11 (0.5" 90° Elbow Slip PVC ) - its 0.5" F SLIP #1, which is back-facing, should connect to part 10's 0.5" M SLIP #1, also its 0.5" F SLIP #2 must be oriented top
1/2" Tube x 3"x 1 1/2" 90° Elbow Slip PVC x 3 1/2" Tube x 10"x 1
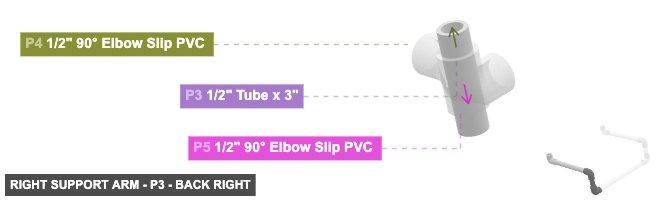
Angle: back right
P3 (0.5" Tube 3" length) - attach its 0.5" M SLIP #1 facing bottom to part 4's 0.5" F SLIP #1, plus its 0.5" M SLIP #2, which is top-facing, should connect to part 5's 0.5" F SLIP #2
P4 (0.5" 90° Elbow Slip PVC ) - its 0.5" F SLIP #1, which is bottom-facing, should connect to part 3's 0.5" M SLIP #1, plus attach its 0.5" F SLIP #2 facing front to part 10's 0.5" M SLIP #2
P5 (0.5" 90° Elbow Slip PVC ) - connect its 0.5" F SLIP #1 oriented left links with part 2's 0.5" M SLIP #1. Next, connect its 0.5" F SLIP #2 oriented top links with part 3's 0.5" M SLIP #2
P10 (0.5" Tube 10" length) - connect its 0.5" M SLIP #1 oriented front links with part 11's 0.5" F SLIP #1, also its 0.5" M SLIP #2, which is back-facing, should connect to part 4's 0.5" F SLIP #2
P11 (0.5" 90° Elbow Slip PVC ) - its 0.5" F SLIP #1, which is back-facing, should connect to part 10's 0.5" M SLIP #1, also its 0.5" F SLIP #2 must be oriented top
1/2" Tube x 3"x 1 1/2" 90° Elbow Slip PVC x 3 1/2" Tube x 10"x 1
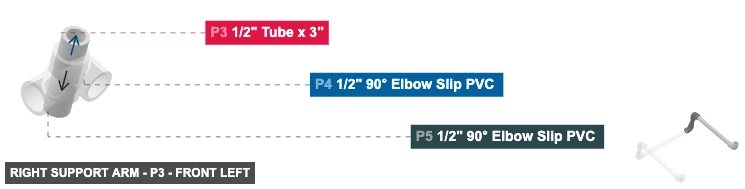
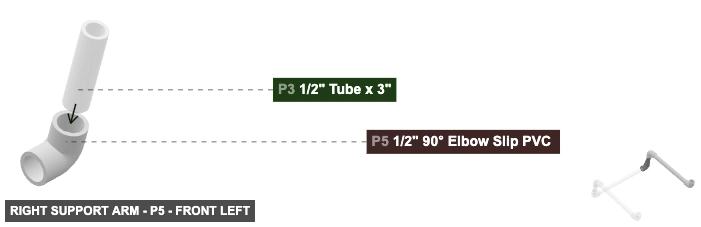
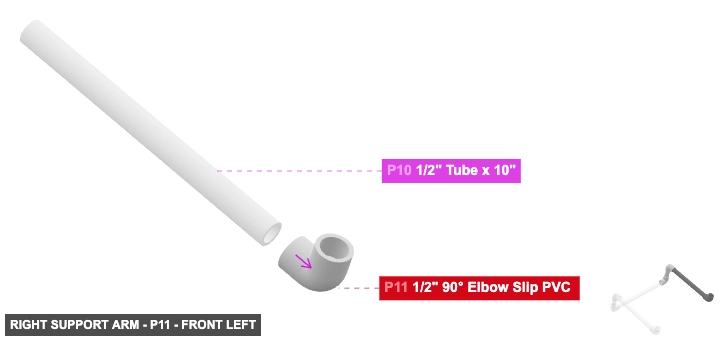
Angle: front left
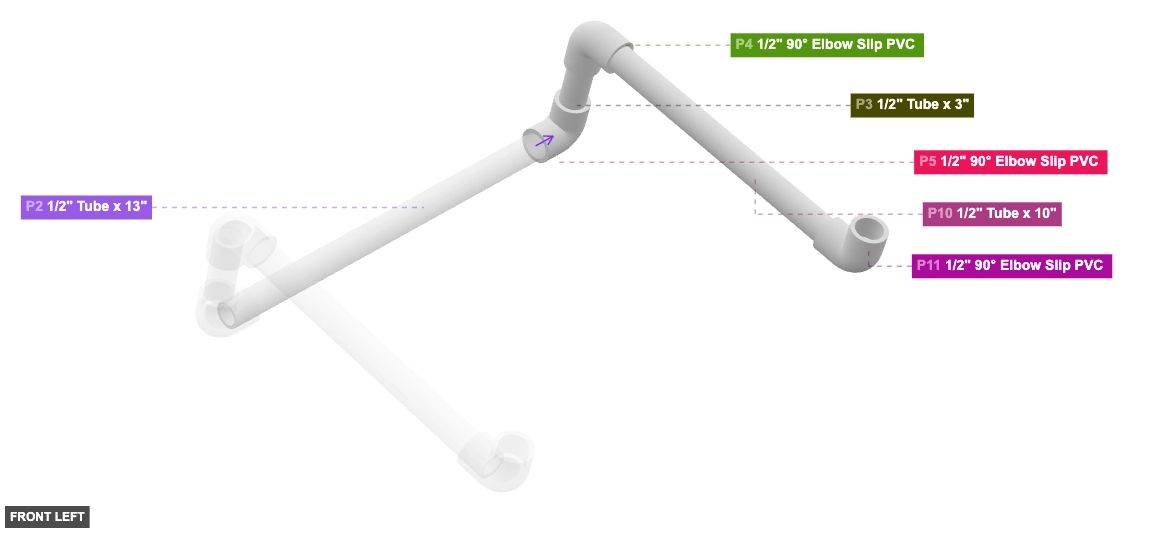
P3 (0.5" Tube 3" length) - attach its 0.5" M SLIP #1 facing bottom to part 4's 0.5" F SLIP #1, plus its 0.5" M SLIP #2, which is top-facing, should connect to part 5's 0.5" F SLIP #2
P4 (0.5" 90° Elbow Slip PVC ) - its 0.5" F SLIP #1, which is bottom-facing, should connect to part 3's 0.5" M SLIP #1, plus attach its 0.5" F SLIP #2 facing front to part 10's 0.5" M SLIP #2
P5 (0.5" 90° Elbow Slip PVC ) - connect its 0.5" F SLIP #1 oriented left links with part 2's 0.5" M SLIP #1. Next, connect its 0.5" F SLIP #2 oriented top links with part 3's 0.5" M SLIP #2
P10 (0.5" Tube 10" length) - connect its 0.5" M SLIP #1 oriented front links with part 11's 0.5" F SLIP #1, also its 0.5" M SLIP #2, which is back-facing, should connect to part 4's 0.5" F SLIP #2
P11 (0.5" 90° Elbow Slip PVC ) - its 0.5" F SLIP #1, which is back-facing, should connect to part 10's 0.5" M SLIP #1, also its 0.5" F SLIP #2 must be oriented top
1/2" Tube x 3"x 1 1/2" 90° Elbow Slip PVC x 3 1/2" Tube x 10"x 1
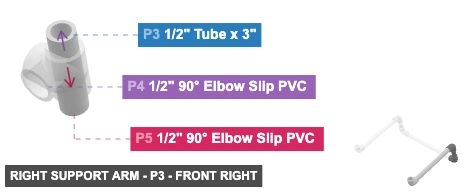
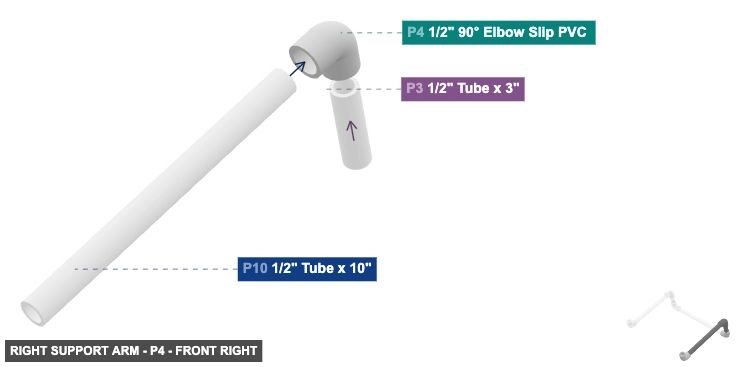
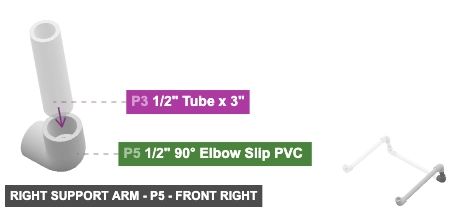
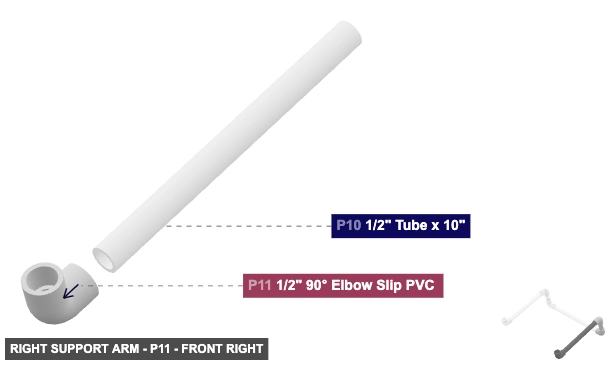
Angle: front right
P3 (0.5" Tube 3" length) - attach its 0.5" M SLIP #1 facing bottom to part 4's 0.5" F SLIP #1, plus its 0.5" M SLIP #2, which is top-facing, should connect to part 5's 0.5" F SLIP #2
P4 (0.5" 90° Elbow Slip PVC ) - its 0.5" F SLIP #1, which is bottom-facing, should connect to part 3's 0.5" M SLIP #1, plus attach its 0.5" F SLIP #2 facing front to part 10's 0.5" M SLIP #2
P5 (0.5" 90° Elbow Slip PVC ) - connect its 0.5" F SLIP #1 oriented left links with part 2's 0.5" M SLIP #1. Next, connect its 0.5" F SLIP #2 oriented top links with part 3's 0.5" M SLIP #2
P10 (0.5" Tube 10" length) - connect its 0.5" M SLIP #1 oriented front links with part 11's 0.5" F SLIP #1, also its 0.5" M SLIP #2, which is back-facing, should connect to part 4's 0.5" F SLIP #2
P11 (0.5" 90° Elbow Slip PVC ) - its 0.5" F SLIP #1, which is back-facing, should connect to part 10's 0.5" M SLIP #1, also its 0.5" F SLIP #2 must be oriented top
1/2" Tube x 3"x 1 1/2" 90° Elbow Slip PVC x 3 1/2" Tube x 10"x 1
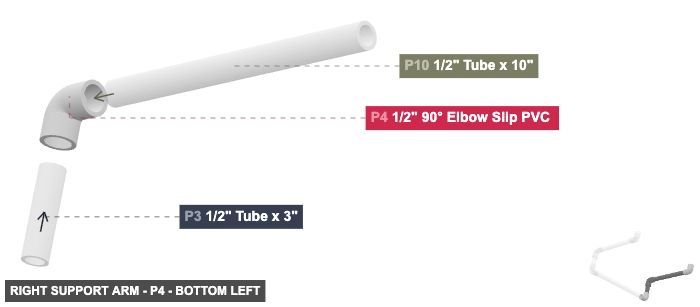
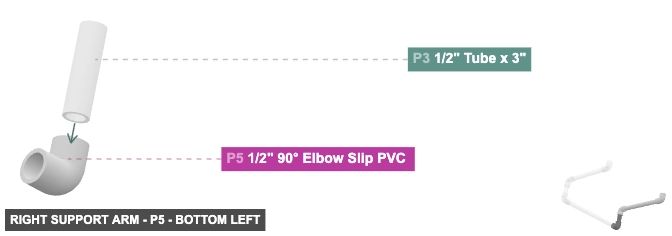
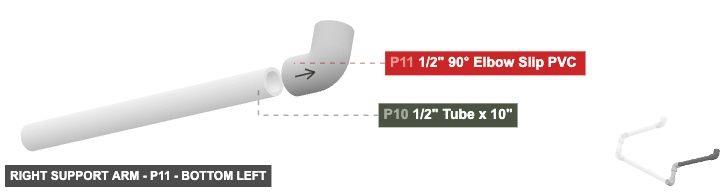
Angle: bottom left

P3 (0.5" Tube 3" length) - attach its 0.5" M SLIP #1 facing bottom to part 4's 0.5" F SLIP #1, plus its 0.5" M SLIP #2, which is top-facing, should connect to part 5's 0.5" F SLIP #2
P4 (0.5" 90° Elbow Slip PVC ) - its 0.5" F SLIP #1, which is bottom-facing, should connect to part 3's 0.5" M SLIP #1, plus attach its 0.5" F SLIP #2 facing front to part 10's 0.5" M SLIP #2
P5 (0.5" 90° Elbow Slip PVC ) - connect its 0.5" F SLIP #1 oriented left links with part 2's 0.5" M SLIP #1. Next, connect its 0.5" F SLIP #2 oriented top links with part 3's 0.5" M SLIP #2
P10 (0.5" Tube 10" length) - connect its 0.5" M SLIP #1 oriented front links with part 11's 0.5" F SLIP #1, also its 0.5" M SLIP #2, which is back-facing, should connect to part 4's 0.5" F SLIP #2
P11 (0.5" 90° Elbow Slip PVC ) - its 0.5" F SLIP #1, which is back-facing, should connect to part 10's 0.5" M SLIP #1, also its 0.5" F SLIP #2 must be oriented top
1/2" Tube x 3"x 1 1/2" 90° Elbow Slip PVC x 3 1/2" Tube x 10"x 1
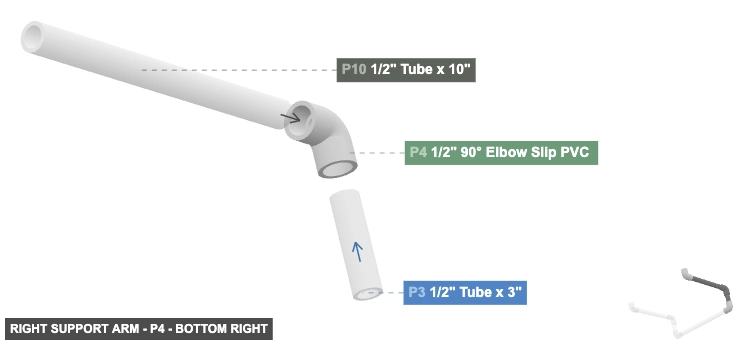
Angle: bottom right
P3 (0.5" Tube 3" length) - attach its 0.5" M SLIP #1 facing bottom to part 4's 0.5" F SLIP #1, plus its 0.5" M SLIP #2, which is top-facing, should connect to part 5's 0.5" F SLIP #2
P4 (0.5" 90° Elbow Slip PVC ) - its 0.5" F SLIP #1, which is bottom-facing, should connect to part 3's 0.5" M SLIP #1, plus attach its 0.5" F SLIP #2 facing front to part 10's 0.5" M SLIP #2
P5 (0.5" 90° Elbow Slip PVC ) - connect its 0.5" F SLIP #1 oriented left links with part 2's 0.5" M SLIP #1. Next, connect its 0.5" F SLIP #2 oriented top links with part 3's 0.5" M SLIP #2
P10 (0.5" Tube 10" length) - connect its 0.5" M SLIP #1 oriented front links with part 11's 0.5" F SLIP #1, also its 0.5" M SLIP #2, which is back-facing, should connect to part 4's 0.5" F SLIP #2
P11 (0.5" 90° Elbow Slip PVC ) - its 0.5" F SLIP #1, which is back-facing, should connect to part 10's 0.5" M SLIP #1, also its 0.5" F SLIP #2 must be oriented top
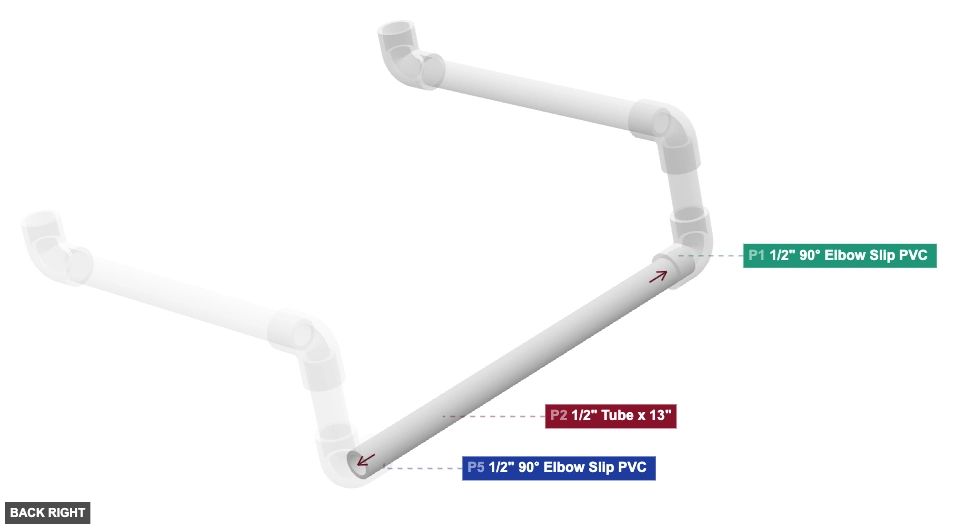
1/2" Tube x 3"x 1 1/2" 90° Elbow Slip PVC x 3 1/2" Tube x 10"x 1 Attaching: Final Assembly
Connects the left and right support arms using the central tube to complete the laptop stand structure.
This step completes the assembly of the laptop stand.
Angle: back left
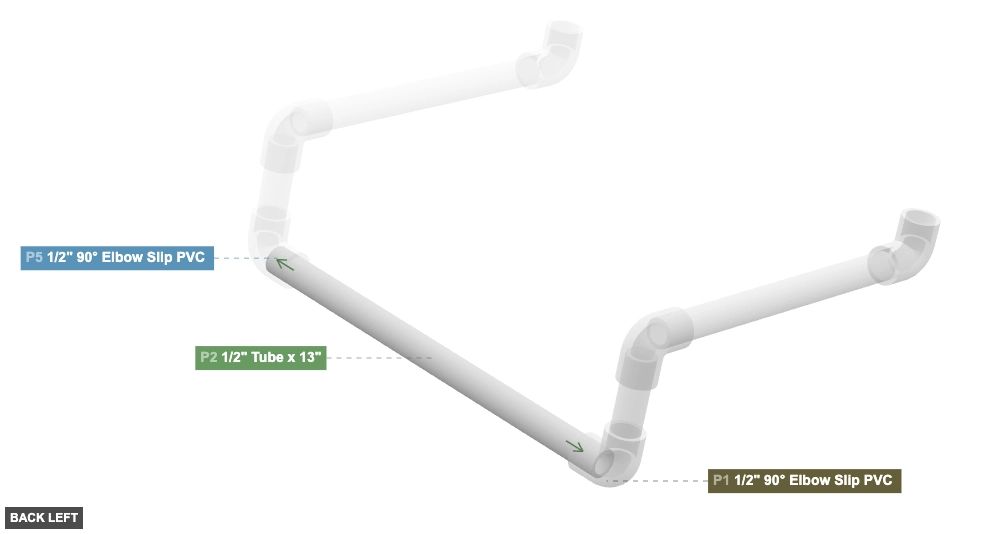
P2 (0.5" Tube 13" length) - attach its 0.5" M SLIP #1 facing right to part 5's 0.5" F SLIP #1. Next, attach its 0.5" M SLIP #2 facing left to part 1's 0.5" F SLIP #2
1/2" Tube x 13"x 1
Angle: back right
P2 (0.5" Tube 13" length) - attach its 0.5" M SLIP #1 facing right to part 5's 0.5" F SLIP #1. Next, attach its 0.5" M SLIP #2 facing left to part 1's 0.5" F SLIP #2
1/2" Tube x 13"x 1
Angle: front left

P2 (0.5" Tube 13" length) - attach its 0.5" M SLIP #1 facing right to part 5's 0.5" F SLIP #1. Next, attach its 0.5" M SLIP #2 facing left to part 1's 0.5" F SLIP #2
1/2" Tube x 13"x 1
Angle: front right
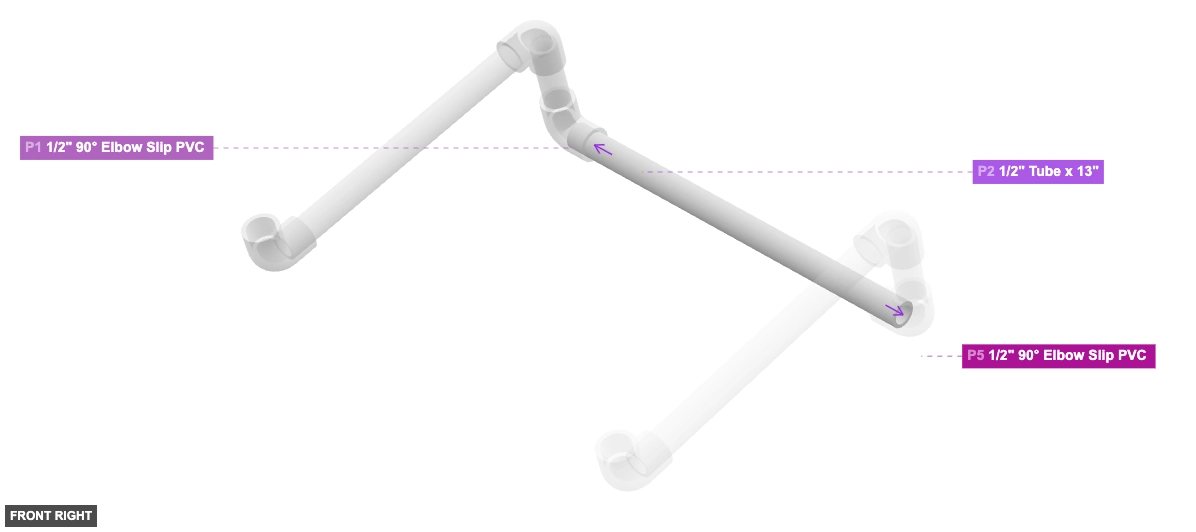
P2 (0.5" Tube 13" length) - attach its 0.5" M SLIP #1 facing right to part 5's 0.5" F SLIP #1. Next, attach its 0.5" M SLIP #2 facing left to part 1's 0.5" F SLIP #2
1/2" Tube x 13"x 1
Angle: bottom left
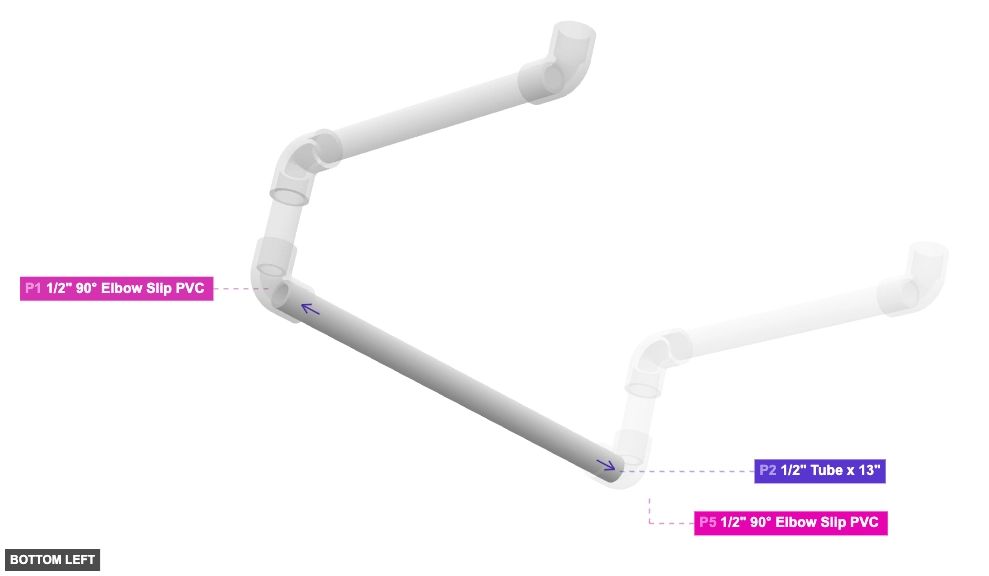
P2 (0.5" Tube 13" length) - attach its 0.5" M SLIP #1 facing right to part 5's 0.5" F SLIP #1. Next, attach its 0.5" M SLIP #2 facing left to part 1's 0.5" F SLIP #2
1/2" Tube x 13"x 1
Angle: bottom right
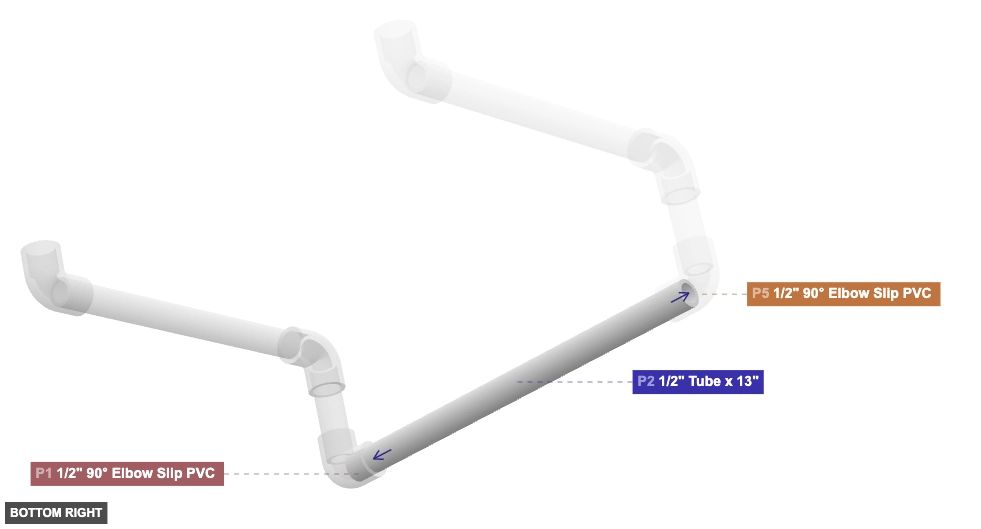
P2 (0.5" Tube 13" length) - attach its 0.5" M SLIP #1 facing right to part 5's 0.5" F SLIP #1. Next, attach its 0.5" M SLIP #2 facing left to part 1's 0.5" F SLIP #2
1/2" Tube x 13"x 1